LNMP架构介绍、MySQL安装、PHP安装 、Nginx源码安装
2018-07-04 01:01
1041 查看
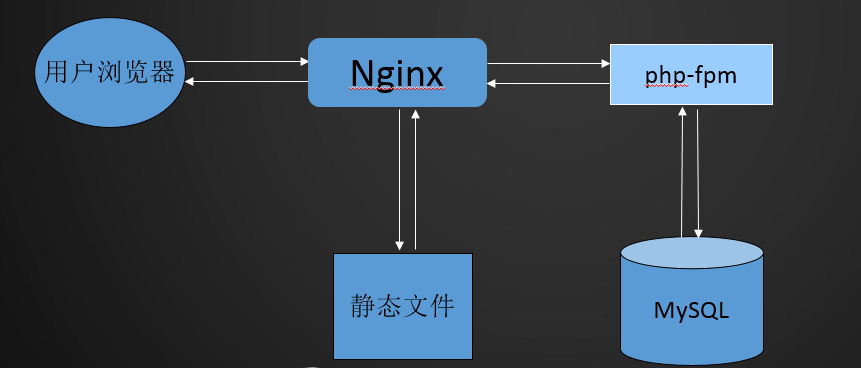
LNMP架构介绍
和LAMP唯一不同的是,LNMP中的N指的是Nginx(类似于Apache的一种web服务软件)。目前这种环境的应用也非常多。Nginx设计的初衷是提供一种快速、高效、多并发的Web服务软件。在静态页面的处理上,Nginx较Apache更胜一筹,但在动态页面的处理上,Nginx并不比Apache有优势。但是目前还是有很多爱好者对Nginx比较热衷。随着Nginx技术的不断成熟,它在Web服务软件领域的地位也会越来越高。并且php是作为一个独立服务存在的,这个服务叫做php-fpm。Nginx直接处理静态请求,动态请求会转发给php-fpm。
MySQL安装
1. 删除之前安装的mysql[root@xuexi-001 ~]# ps aux | grep mysql root 1432 0.0 0.0 112720 972 pts/0 R+ 22:46 0:00 grep --color=automysql [root@xuexi-001 ~]# rm -rf /usr/local/mysql [root@xuexi-001 ~]# rm -rf /etc/init.d/mysqld
2.安装mysql过程
[root@xuexi-001 ~]# cd /usr/local/src/
[root@xuexi-001 ~]# wget http://mirrors.sohu.com/mysql/MySQL-5.6/mysql-5.6.36-linux-glibc2.5-x86_64.tar.gz [root@xuexi-001 ~]# cd /usr/local/src/
[root@xuexi-001 src]# tar zxvf mysql-5.6.36-linux-glibc2.5-x86_64.tar.gz
[root@xuexi-001 src]# mv mysql-5.6.36-linux-glibc2.5-x86_64 /usr/local/mysql
[root@xuexi-001 src]# ls /usr/local/mysql/
bin      data  include  man         README   share      support-files
COPYING  docs  lib      mysql-test  scripts  sql-bench
[root@xuexi-001 src]# ls /data/
mariadb  mysql  wwwroot
// 由于之前创建过,需要将其删除
[root@xuexi-001 src]# rm -rf /data/mysql/*
[root@xuexi-001 src]# useradd mysql
[root@xuexi-001 mysql]#  ./scripts/mysql_install_db --user=mysql --datadir=/data/mysql/
[root@xuexi-001 mysql]# echo $?
0
[root@xuexi-001 mysql]# cp support-files/my-default.cnf /etc/my.cnf
[root@xuexi-001 mysql]# vim /etc/my.cnf
//定义内容如下:
basedir=/usr/local/mysql
datadir=/data/mysql
[root@xuexi-001 mysql]# cp support-files/mysql.server /etc/init.d/mysqld
[root@xuexi-001 mysql]# vi /etc/init.d/mysqld
basedir=/usr/local/mysql
datadir=/data/mysql
[root@xuexi-001 mysql]# chmod 755 /etc/init.d/mysqld
[root@xuexi-001 mysql]# chkconfig --add mysqld
[root@xuexi-001 mysql]# chkconfig --list
[root@xuexi-001 mysql]# /etc/init.d/mysqld start
Starting MySQL.Logging to '/data/mysql/xuexi-001.err'.
SUCCESS!
[root@xuexi-001 mysql]# ps aux |grep mysql
root       2008  0.5  0.0 113308  1640 pts/0    S    23:41   0:00 /bin/sh /usr/local/mysql/bin/mysqld_safe --datadir=/data/mysql --pid-file=/data/mysql/xuexi-001.pid
mysql      2145 15.7 24.0 1300828 449604 pts/0  Sl   23:41   0:00 /usr/local/mysql/bin/mysqld --basedir=/usr/local/mysql --datadir=/data/mysql --plugin-dir=/usr/local/mysql/lib/plugin --user=mysql --log-error=/data/mysql/xuexi-001.err --pid-file=/datamysql/xuexi-001.pid --socket=/tmp/mysql.sock
root       2169  0.0  0.0 112720   972 pts/0    R+   23:41   0:00 grep --color=automysql
PHP安装
Nginx的PHP安装和上一章的PHP安装是有区别的,因为Nginx中的PHP是以fastcgi的方式给合Nginx的,可以理解为Nginx代理了PHP的fastcgi,而httpd是把PHP作为自己的模块来调用的。1. 因为之前安装过php,这次重新安装的话直接在源码包目录下执行命令:make clean,删除之前编译过的文件内容,回到之前的解压的状态。
[root@xuexi-001 ~]# cd /usr/local/src/
[root@xuexi-001 src]# ls
apr-1.6.3
apr-1.6.3.tar.gz
apr-util-1.6.1
apr-util-1.6.1.tar.gz
httpd-2.4.33
httpd-2.4.33.tar.gz
mariadb-10.2.6-linux-glibc_214-x86_64.tar.gz
mysql-5.6.35-linux-glibc2.5-x86_64.tar.gz
mysql-5.6.36-linux-glibc2.5-x86_64.tar.gz
php-5.6.36
php-5.6.36.tar.gz
php-7.1.6
php-7.1.6.tar.bz2
[root@xuexi-001 src]# cd php-5.6.36
[root@xuexi-001 php-5.6.36]# ls
acinclude.m4      main                      README.PARAMETER_PARSING_API
aclocal.m4        makedist                  README.REDIST.BINS
build             Makefile                  README.RELEASE_PROCESS
buildconf         Makefile.frag             README.SELF-CONTAINED-EXTENSIONS
buildconf.bat     Makefile.fragments        README.STREAMS
CODING_STANDARDS  Makefile.gcov             README.SUBMITTING_PATCH
config.guess      Makefile.global           README.TESTING
config.log        Makefile.objects          README.TESTING2
config.nice       makerpm                   README.UNIX-BUILD-SYSTEM
config.status     meta_ccld                 README.WIN32-BUILD-SYSTEM
config.sub        missing                   run-tests.php
configure         mkinstalldirs             sapi
configure.in      modules                   scripts
CREDITS           netware                   server-tests-config.php
ext               NEWS                      server-tests.php
EXTENSIONS        pear                      snapshot
footer            php5.spec                 stamp-h.in
generated_lists   php5.spec.in              stub.c
genfiles          php.gif                   tests
header            php.ini-development       travis
include           php.ini-production        TSRM
INSTALL           README.EXT_SKEL           UPGRADING
install-sh        README.GIT-RULES          UPGRADING.INTERNALS
libphp5.la        README.input_filter       vcsclean
libs              README.MAILINGLIST_RULES  win32
libtool           README.md                 Zend
LICENSE           README.namespaces
ltmain.sh         README.NEW-OUTPUT-API
[root@xuexi-001 php-5.6.36]# make clean
find . -name \*.gcno -o -name \*.gcda | xargs rm -f
find . -name \*.lo -o -name \*.o | xargs rm -f
find . -name \*.la -o -name \*.a | xargs rm -f
find . -name \*.so | xargs rm -f
find . -name .libs -a -type d|xargs rm -rf
rm -f libphp5.la sapi/cli/php sapi/cgi/php-cgi    libphp5.la modules/* libs/*
2.创建账号
该账号用来运行php-fpm服务的,在LNMP环境中,PHP以一个服务php-fpm的形式出现,独立存在于Linux系统中,方便管理。
[root@xuexi-001 php-5.6.36]# useradd -s /sbin/nologin php-fpm
3.安装PHP
[root@xuexi-001 php-5.6.36]# ./configure --prefix=/usr/local/php-fpm --with-config-file-path=/usr/local/php-fpm/etc --enable-fpm --with-fpm-user=php-fpm --with-fpm-group=php-fpm --with-mysql=/usr/local/mysql --with-mysqli=/usr/local/mysql/bin/mysql_config --with-pdo-mysql=/usr/local/mysql --with-mysql-sock=/tmp/mysql.sock --with-libxml-dir --with-gd --with-jpeg-dir --with-png-dir --with-freetype-dir --with-iconv-dir --with-zlib-dir --with-mcrypt --enable-soap --enable-gd-native-ttf --enable-ftp --enable-mbstring --enable-exif --with-pear --with-curl --with-openssl
编译参数和跟之前的文章不同,这里多了一个--enable-fpm,如果不加该参数,则不会有php-fpm执行文件生成,更不能启动php-fpm服务。
报错:
configure: error: Please reinstall the libcurl distribution -
easy.h should be in <curl-dir>/include/curl/
解决:
[root@xuexi-001 php-5.6.36]# yum install -y libcurl-devel
备注:
如果是第一次安装PHP,会有很多依赖包需要安装,这时你看错误提示,缺少什么包就安装什么包。
4.编译安装PHP
[root@xuexi-001 php-5.6.36]# make
[root@xuexi-001 php-5.6.36]# make install
5.修改配置文件:
[root@xuexi-001 php-5.6.36]#  ls /usr/local/php-fpm/etc/
pear.conf  php-fpm.conf.default
[root@xuexi-001 php-5.6.36]# cp php.ini-production /usr/local/php-fpm/etc/php.ini
[root@xuexi-001 php-5.6.36]# ls /usr/local/php-fpm/etc/
pear.conf  php-fpm.conf.default  php.ini
[root@xuexi-001 php-5.6.36]# vim /usr/local/php-fpm/etc/php-fpm.conf
添加如下内容:
[global]    //定义全局参数
pid = /usr/local/php-fpm/var/run/php-fpm.pid
error_log = /usr/local/php-fpm/var/log/php-fpm.log
[www]                      //一个模块的名字
listen = /tmp/php-fcgi.sock   //监听地址
listen.mode = 666     //监听的是sock时这行才生效,用来定义sock文件的权限是666
user = php-fpm    //定义服务的用户
group = php-fpm   //定义服务的用户组
pm = dynamic
pm.max_children = 50
pm.start_servers = 20
pm.min_spare_servers = 5
pm.max_spare_servers = 35
pm.max_requests = 500
rlimit_files = 1024
6.检测配置
[root@xuexi-001 php-5.6.36]# /usr/local/php-fpm/sbin/php-fpm -t
[04-Jul-2018 00:09:44] NOTICE: configuration file /usr/local/php-fpm/etc/php-fpm.conf test is successful
7.拷贝启动脚本
[root@xuexi-001 php-5.6.36]# cp sapi/fpm/init.d.php-fpm /etc/init.d/php-fpm
8.修改启动脚本权限及添加服务到开机启动
[root@xuexi-001 php-5.6.36]# chmod 755 /etc/init.d/php-fpm
//更改权限
[root@xuexi-001 php-5.6.36]# chkconfig --add php-fpm
[root@xuexi-001 php-5.6.36]# chkconfig php-fpm on
//设置开机启动
[root@xuexi-001 php-5.6.36]# service php-fpm start
//启动php命令
Starting php-fpm  done
[root@xuexi-001 php-5.6.36]# ps aux |grep php-fpm
//查看进程
root     118183  0.1  0.2 125744  4948 ?        Ss   00:11   0:00 php-fpm: master process (/usr/local/php-fpm/etc/php-fpm.conf)
php-fpm  118184  0.0  0.2 125744  4720 ?        S    00:11   0:00 php-fpm: pool www
php-fpm  118185  0.0  0.2 125744  4720 ?        S    00:11   0:00 php-fpm: pool www
php-fpm  118186  0.0  0.2 125744  4720 ?        S    00:11   0:00 php-fpm: pool www
php-fpm  118187  0.0  0.2 125744  4720 ?        S    00:11   0:00 php-fpm: pool www
php-fpm  118188  0.0  0.2 125744  4724 ?        S    00:11   0:00 php-fpm: pool www
php-fpm  118189  0.0  0.2 125744  4724 ?        S    00:11   0:00 php-fpm: pool www
php-fpm  118190  0.0  0.2 125744  4724 ?        S    00:11   0:00 php-fpm: pool www
php-fpm  118191  0.0  0.2 125744  4724 ?        S    00:11   0:00 php-fpm: pool www
php-fpm  118192  0.0  0.2 125744  4724 ?        S    00:11   0:00 php-fpm: pool www
php-fpm  118193  0.0  0.2 125744  4728 ?        S    00:11   0:00 php-fpm: pool www
php-fpm  118194  0.0  0.2 125744  4728 ?        S    00:11   0:00 php-fpm: pool www
php-fpm  118195  0.0  0.2 125744  4728 ?        S    00:11   0:00 php-fpm: pool www
php-fpm  118196  0.0  0.2 125744  4728 ?        S    00:11   0:00 php-fpm: pool www
php-fpm  118197  0.0  0.2 125744  4728 ?        S    00:11   0:00 php-fpm: pool www
php-fpm  118198  0.0  0.2 125744  4728 ?        S    00:11   0:00 php-fpm: pool www
php-fpm  118199  0.0  0.2 125744  4728 ?        S    00:11   0:00 php-fpm: pool www
php-fpm  118200  0.0  0.2 125744  4728 ?        S    00:11   0:00 php-fpm: pool www
php-fpm  118201  0.0  0.2 125744  4728 ?        S    00:11   0:00 php-fpm: pool www
php-fpm  118202  0.0  0.2 125744  4728 ?        S    00:11   0:00 php-fpm: pool www
php-fpm  118203  0.0  0.2 125744  4728 ?        S    00:11   0:00 php-fpm: pool www
root     118205  0.0  0.0 112720   972 pts/0    R+   00:11   0:00 grep --color=autophp-fpm
Nginx源码安装
[root@xuexi-001 src]# wget http://nginx.org/download/nginx-1.15.1.tar.gz [root@xuexi-001 src]# tar -zxvf nginx-1.15.1.tar.gz
[root@xuexi-001 src]# cd nginx-1.15.1
[root@xuexi-001 nginx-1.15.1]# ./configure --prefix=/usr/local/nginx
[root@xuexi-001 nginx-1.15.1]# make
[root@xuexi-001 nginx-1.15.1]# make install
[root@xuexi-001 nginx-1.15.1]# vim /etc/init.d/nginx
// 编辑启动脚本
#!/bin/bash
# chkconfig: - 30 21
# description: http service.
# Source Function Library
. /etc/init.d/functions
# Nginx Settings

NGINX_SBIN="/usr/local/nginx/sbin/nginx"
NGINX_CONF="/usr/local/nginx/conf/nginx.conf"
NGINX_PID="/usr/local/nginx/logs/nginx.pid"
RETVAL=0
prog="Nginx"

start()
{
echo -n $"Starting $prog: "
mkdir -p /dev/shm/nginx_temp
daemon $NGINX_SBIN -c $NGINX_CONF
RETVAL=$?
echo
return $RETVAL
}

stop()
{
echo -n $"Stopping $prog: "
killproc -p $NGINX_PID $NGINX_SBIN -TERM
rm -rf /dev/shm/nginx_temp
RETVAL=$?
echo
return $RETVAL
}

reload()
{
echo -n $"Reloading $prog: "
killproc -p $NGINX_PID $NGINX_SBIN -HUP
RETVAL=$?
echo
return $RETVAL
}

restart()
{
stop
start
}

configtest()
{
$NGINX_SBIN -c $NGINX_CONF -t
return 0
}

case "$1" in
start)
start
;;
stop)
stop
;;
reload)
reload
;;
restart)
restart
;;
configtest)
configtest
;;
*)
echo $"Usage: $0 {start|stop|reload|restart|configtest}"
RETVAL=1
esac

exit $RETVAL
[root@xuexi-001 nginx-1.15.1]# chmod 755 /etc/init.d/nginx
// 赋予755权限
[root@xuexi-001 nginx-1.15.1]# chkconfig --add nginx
[root@xuexi-001 nginx-1.15.1]#  chkconfig nginx on
//设置开机启动
[root@xuexi-001 nginx-1.15.1]# ls /usr/local/nginx/
conf  html  logs  sbin
[root@xuexi-001 nginx-1.15.1]# cd /usr/local/nginx/conf/
[root@xuexi-001 nginx-1.15.1]# mv nginx.conf nginx.conf.bak
[root@xuexi-001 nginx-1.15.1]# vim nginx.conf
user nobody nobody;
worker_processes 2;
error_log /usr/local/nginx/logs/nginx_error.log crit;
pid /usr/local/nginx/logs/nginx.pid;
worker_rlimit_nofile 51200;

events
{
use epoll;
worker_connections 6000;
}

http
{
include mime.types;
default_type application/octet-stream;
server_names_hash_bucket_size 3526;
server_names_hash_max_size 4096;
log_format combined_realip '$remote_addr $http_x_forwarded_for [$time_local]'
' $host "$request_uri" $status'
' "$http_referer" "$http_user_agent"';
sendfile on;
tcp_nopush on;
keepalive_timeout 30;
client_header_timeout 3m;
client_body_timeout 3m;
send_timeout 3m;
connection_pool_size 256;
client_header_buffer_size 1k;
large_client_header_buffers 8 4k;
request_pool_size 4k;
output_buffers 4 32k;
postpone_output 1460;
client_max_body_size 10m;
client_body_buffer_size 256k;
client_body_temp_path /usr/local/nginx/client_body_temp;
proxy_temp_path /usr/local/nginx/proxy_temp;
fastcgi_temp_path /usr/local/nginx/fastcgi_temp;
fastcgi_intercept_errors on;
tcp_nodelay on;
gzip on;
gzip_min_length 1k;
gzip_buffers 4 8k;
gzip_comp_level 5;
gzip_http_version 1.1;
gzip_types text/plain application/x-javascript text/css text/htm
application/xml;

server
{
listen 80;
server_name localhost;
index index.html index.htm index.php;
root /usr/local/nginx/html;

location ~ \.php$
{
include fastcgi_params;
fastcgi_pass unix:/tmp/php-fcgi.sock;
fastcgi_index index.php;
fastcgi_param SCRIPT_FILENAME /usr/local/nginx/html$fastcgi_script_name;
}
}
}

[root@xuexi-001 conf]# /usr/local/nginx/sbin/nginx -t
nginx: the configuration file /usr/local/nginx/conf/nginx.conf syntax is ok
nginx: configuration file /usr/local/nginx/conf/nginx.conf test is successful
[root@xuexi-001 conf]# /etc/init.d/nginx  start
Starting nginx (via systemctl):                            [  确定  ]
[root@xuexi-001 conf]# ps aux | grep nginx
root     121077  0.0  0.0  20556   628 ?        Ss   00:55   0:00 nginx: master process /usr/local/nginx/sbin/nginx -c /usr/local/nginx/conf/nginx.conf
nobody   121078  0.0  0.1  23044  3212 ?        S    00:55   0:00 nginx: worker process
nobody   121079  0.0  0.1  23044  3212 ?        S    00:55   0:00 nginx: worker process
root     121116  0.0  0.0 112720   972 pts/0    R+   00:57   0:00 grep --color=autonginx
测试PHP
[root@xuexi-001 conf]# vi /usr/local/nginx/html/1.php
//添加以下内容
<?php
echo "test php scripts.";
?>
[root@xuexi-001 conf]# curl localhost/1.php
test php scripts.

相关文章推荐
- LNMP架构介绍、mysql安装、PHP安装、nginx介绍
- 12.1 LNMP架构介绍 12.2 MySQL安装 12.3/12.4 PHP安装 12.5 Nginx介绍
- LNMP架构介绍、MySQL安装、PHP安装、Nginx介绍
- LNMP架构 (1) 之 架构介绍、MySQL安装、PHP安装、Nginx介绍
- LNMP架构介绍,MySQL安装,PHP安装,Nginx介绍
- LNMP架构介绍、MySQL安装、PHP安装、Nginx介绍
- 12.1 LNMP架构介绍 12.2 MySQL安装 12.3/12.4 PHP安装 12.5 Nginx介绍
- LNMP架构介绍,MySQL、PHP安装,Nginx介绍
- LNMP架构介绍、MySQL安装、PHP安装与Nginx介绍
- LNMP架构介绍,MySQL安装,PHP安装,Nginx介绍
- LNMP架构介绍、MySQL安装、PHP安装、Nginx介绍
- LNMP架构的搭建(linux+nginx+mysql+php源码安装 )+Discuz论坛的搭建
- 12.1-12.5 LNMP架构介绍 , MySQL安装 , PHP安装, Nginx介绍
- LNMP架构(架构介绍,mysql安装,php安装,nginx介绍)
- mysql、php、nginx源码安装及Lnmp架构搭建论坛
- LNMP架构介绍、Mysql安装、php安装、Nginx介绍
- 12.1 LNMP架构介绍;12.2 MySQL安装;12.3 PHP安装(上);12.4 PHP安装(下);12.5 Nginx介绍
- 12.1LNMP架构介绍12.2 MySQL安装12.3/12.4 PHP安装12.5 Nginx介绍
- linux的LNMP架构介绍、MySQL安装、PHP安装
- Linux(6.4)+Nginx(1.4.1)+Mysql(5.6.12)+Php(5.5.0)源码编译安装 环境介绍