springboot整合jsp踩坑
2018-06-27 13:03
423 查看
springboot以其高效的开发效率越来越多的用在中小项目的开发,并且在分布式开发中的使用也很广泛,springboot官方推荐的前端框架却是thymeleaf,并且默认不支持jsp,而大部分java开发人员最熟悉的前端开发工具却是jsp,自己在工作中就遇到这样的情况,因此在网上找一些整合的demo,但是依然踩了很多坑,记录下来以供学习。
代码及配置如下:
1、pom.xml,这个是本人整合中遇到的最大的坑,主要是spring-boot-starter-parent的版本,自己先去官网查,官方文档给的是2.0.3,然而试了下视图解析器根本不起作用,然后又试了1.3.5和1.5.2,这两个版本主要是SpringBootServletInitializer类的包位置变了,重新导一下包之后项目正常运行了,也能访问到页面,最后又试了下2.0.1版本,SpringBootServletInitializer类位置一样,所有配置不变,项目就正常了,个人也不知道最新的springboot版本2.0.3为什么不可以,所以推荐后续整合jsp的同学使用2.0.1版本。
2、SpringbootJspApplication
3、IndexController
4、application.properties
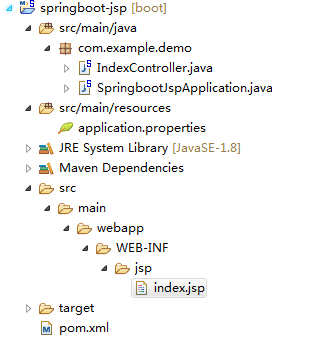
5、在main目录下新建webapp/WEB-INF/jsp目录,添加index.jsp
项目目录结构如下,本人使用的是STS:
在STS中启动项目,访问localhost:8080/index,效果如下:

代码及配置如下:
1、pom.xml,这个是本人整合中遇到的最大的坑,主要是spring-boot-starter-parent的版本,自己先去官网查,官方文档给的是2.0.3,然而试了下视图解析器根本不起作用,然后又试了1.3.5和1.5.2,这两个版本主要是SpringBootServletInitializer类的包位置变了,重新导一下包之后项目正常运行了,也能访问到页面,最后又试了下2.0.1版本,SpringBootServletInitializer类位置一样,所有配置不变,项目就正常了,个人也不知道最新的springboot版本2.0.3为什么不可以,所以推荐后续整合jsp的同学使用2.0.1版本。
<?xml version="1.0" encoding="UTF-8"?>
<project xmlns="http://maven.apache.org/POM/4.0.0" xmlns:xsi="http://www.w3.org/2001/XMLSchema-instance"
xsi:schemaLocation="http://maven.apache.org/POM/4.0.0 http://maven.apache.org/xsd/maven-4.0.0.xsd"> <modelVersion>4.0.0</modelVersion>

<groupId>com.example</groupId>
<artifactId>springboot-jsp</artifactId>
<version>0.0.1-SNAPSHOT</version>
<packaging>war</packaging>

<name>springboot-jsp</name>
<description>Demo project for Spring Boot</description>

<parent>
<groupId>org.springframework.boot</groupId>
<artifactId>spring-boot-starter-parent</artifactId>
<version>2.0.1.RELEASE</version>
<relativePath/> <!-- lookup parent from repository -->
</parent>

<properties>
<project.build.sourceEncoding>UTF-8</project.build.sourceEncoding>
<project.reporting.outputEncoding>UTF-8</project.reporting.outputEncoding>
<java.version>1.8</java.version>
</properties>

<dependencies>
<dependency>
<groupId>org.springframework.boot</groupId>
<artifactId>spring-boot-starter-web</artifactId>
</dependency>

<dependency>
<groupId>org.springframework.boot</groupId>
<artifactId>spring-boot-starter-tomcat</artifactId>
</dependency>
<dependency>
<groupId>org.apache.tomcat.embed</groupId>
<artifactId>tomcat-embed-jasper</artifactId>
</dependency>
<!-- servlet支持 -->
<dependency>
<groupId>javax.servlet</groupId>
<artifactId>javax.servlet-api</artifactId>
</dependency>

<!-- jstl 支持 -->
<dependency>
<groupId>javax.servlet</groupId>
<artifactId>jstl</artifactId>
</dependency>
<dependency>
<groupId>org.springframework.boot</groupId>
<artifactId>spring-boot-starter-test</artifactId>
<scope>test</scope>
</dependency>
</dependencies>

<build>
<plugins>
<plugin>
<groupId>org.springframework.boot</groupId>
<artifactId>spring-boot-maven-plugin</artifactId>
</plugin>
</plugins>
</build>

</project>
2、SpringbootJspApplication
package com.example.demo;

import org.springframework.boot.SpringApplication;
import org.springframework.boot.autoconfigure.SpringBootApplication;
import org.springframework.boot.builder.SpringApplicationBuilder;
import org.springframework.boot.web.servlet.support.SpringBootServletInitializer;

@SpringBootApplication
public class SpringbootJspApplication extends SpringBootServletInitializer{

@Override
protected SpringApplicationBuilder configure(SpringApplicationBuilder application) {
return application.sources(SpringbootJspApplication.class);
}
public static void main(String[] args) {
SpringApplication.run(SpringbootJspApplication.class, args);
}
}
3、IndexController
package com.example.demo;

import org.springframework.stereotype.Controller;
import org.springframework.web.bind.annotation.RequestMapping;
import org.springframework.web.bind.annotation.RequestMethod;

@Controller
public class IndexController {

@RequestMapping(value="/index",method=RequestMethod.GET)
public String index() {
return "index";
}
}
4、application.properties
spring.mvc.view.prefix= /WEB-INF/jsp/
spring.mvc.view.suffix= .jsp
5、在main目录下新建webapp/WEB-INF/jsp目录,添加index.jsp
<!DOCTYPE html>
<%@page contentType="text/html; charset=UTF-8" language="java"%>
<html lang="en">
<head>
<title>title</title>
</head>
<body>
this is index jsp
</body>
</html>
项目目录结构如下,本人使用的是STS:
在STS中启动项目,访问localhost:8080/index,效果如下:

相关文章推荐
- SpringBoot整合Jsp和Thymeleaf (附工程)
- idea整合 spring boot jsp mybatis
- springboot整合jsp
- 为什么整合jsp后必须通过spring-boot:run方式启动?
- 构建一个SpringBoot整合了MyBatis和JSP
- thymeleaf :springboot整合mybatis的web项目中使用html而不是jsp当页面渲染
- SpringBoot整合MyBatis(包含热部署及其JSP配置详解)
- SpringBoot 同时整合thymeleaf html、vue html和jsp-在线助手
- 最新spring boot搭建,整合jsp页面以及打war包配置
- spring boot整合jsp及设置启动页面的方法
- [三]Spring Boot 整合jsp
- springboot-10-前端页面整合, thymeleaf, freemarker, jsp 模板使用
- springboot学习(二)springboot项目整合前端,添加jsp的访问
- springBoot整合jsp
- SpringBoot+mybatis+jsp整合
- 基于springBoot整合传统jsp项目
- spring boot 1.5.4 整合JSP(四)
- spring-boot 整合JSP实现java web动态应用程序
- Spring Boot学习总结(2)——Spring Boot整合Jsp
- SpringBoot(五):SpringBoot整合jsp