Spring Boot 2.0 利用 Spring Security 实现简单的OAuth2.0认证方式2
0.前言
经过前面一小节已经基本配置好了基于SpringBoot+SpringSecurity+OAuth2.0的环境。这一小节主要对一些写固定InMemory的User和Client进行扩展。实现动态查询用户,但为了演示方便,这里没有查询数据库。仅做Demo演示,最最关键的是,作为我个人笔记。其实代码里面有些注释,可能只有我知道为什么,有些是Debug调试时的一些测试代码。还是建议,读者自己跑一遍会比较好,能跟深入的理解OAuth2.0协议。我也是参考网上很多博客,然后慢慢测试和理解的。
参考的每个人的博客,都写得很好很仔细,但是有些关键点,还是要自己写个Demo出来才会更好理解。
结合数据库的,期待下一篇博客
1.目录结构
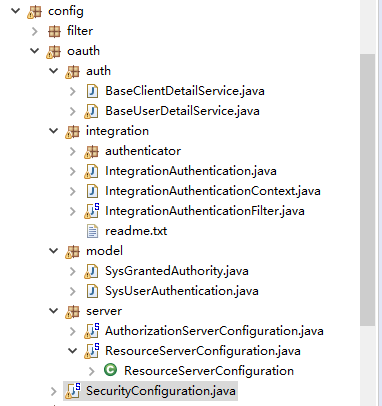
SecurityConfiguration.java Spring-Security 配置
auth/BaseClientDetailService.java 自定义客户端认证
auth/BaseUserDetailService.java 自定义用户认证
integration/* 通过过滤器方式对OAuth2.0集成多种认证方式
model/SysGrantedAuthority.java 授权权限模型
model/SysUserAuthentication.java 认证用户主体模型
server/AuthorizationServerConfiguration.java OAuth 授权服务器配置
server/ResourceServerConfiguration.java OAuth 资源服务器配置
2.代码解析
(1) SecurityConfiguration.java
/**
* Spring-Security 配置<br>
* 具体参考: https://github.com/lexburner/oauth2-demo
* http://blog.didispace.com/spring-security-oauth2-xjf-1/
* https://www.cnblogs.com/cjsblog/p/9152455.html
* https://segmentfault.com/a/1190000014371789 (多种认证方式)
* @author wunaozai
* @date 2018-05-28
*/
@Configuration
@EnableWebSecurity
@EnableGlobalMethodSecurity(prePostEnabled = true) //启用方法级的权限认证
public class SecurityConfiguration extends WebSecurityConfigurerAdapter {

//通过自定义userDetailsService 来实现查询数据库,手机,二维码等多种验证方式
@Bean
@Override
protected UserDetailsService userDetailsService(){
//采用一个自定义的实现UserDetailsService接口的类
return new BaseUserDetailService();
/*
InMemoryUserDetailsManager manager = new InMemoryUserDetailsManager();
BCryptPasswordEncoder bCryptPasswordEncoder = new BCryptPasswordEncoder();
String finalPassword = "{bcrypt}"+bCryptPasswordEncoder.encode("123456");
manager.createUser(User.withUsername("user_1").password(finalPassword).authorities("USER").build());
finalPassword = "{noop}123456";
manager.createUser(User.withUsername("user_2").password(finalPassword).authorities("USER").build());
return manager;
*/
}

@Override
protected void configure(HttpSecurity http) throws Exception {
//        http.authorizeRequests()
//            .antMatchers("/", "/index.html", "/oauth/**").permitAll() //允许访问
//            .anyRequest().authenticated() //其他地址的访问需要验证权限
//            .and()
//            .formLogin()
//            .loginPage("/login.html") //登录页
//            .failureUrl("/login-error.html").permitAll()
//            .and()
//            .logout()
//            .logoutSuccessUrl("/index.html");
http.authorizeRequests().anyRequest().fullyAuthenticated();
http.formLogin().loginPage("/login").failureUrl("/login?code=").permitAll();
http.logout().permitAll();
http.authorizeRequests().antMatchers("/oauth/authorize").permitAll();
}

/**
* 用户验证
*/
@Override
protected void configure(AuthenticationManagerBuilder auth) throws Exception {
super.configure(auth);
}

/**
* Spring Boot 2 配置,这里要bean 注入
*/
@Bean
@Override
public AuthenticationManager authenticationManagerBean() throws Exception {
AuthenticationManager manager = super.authenticationManagerBean();
return manager;
}

@Bean
PasswordEncoder passwordEncoder() {
return PasswordEncoderFactories.createDelegatingPasswordEncoder();
}
}
(2) AuthorizationServerConfiguration.java
/**
* OAuth 授权服务器配置
* https://segmentfault.com/a/1190000014371789
* @author wunaozai
* @date 2018-05-29
*/
@Configuration
@EnableAuthorizationServer
public class AuthorizationServerConfiguration extends AuthorizationServerConfigurerAdapter {

private static final String DEMO_RESOURCE_ID = "order";

@Autowired
AuthenticationManager authenticationManager;
@Autowired
RedisConnectionFactory redisConnectionFactory;

@Override
public void configure(ClientDetailsServiceConfigurer clients) throws Exception {
//String finalSecret = "{bcrypt}"+new BCryptPasswordEncoder().encode("123456");
//clients.setBuilder(builder);
//这里通过实现 ClientDetailsService接口
clients.withClientDetails(new BaseClientDetailService());
/*
//配置客户端,一个用于password认证一个用于client认证
clients.inMemory()
.withClient("client_1")
.resourceIds(DEMO_RESOURCE_ID)
.authorizedGrantTypes("client_credentials", "refresh_token")
.scopes("select")
.authorities("oauth2")
.secret(finalSecret)
.and()
.withClient("client_2")
.resourceIds(DEMO_RESOURCE_ID)
.authorizedGrantTypes("password", "refresh_token")
.scopes("select")
.authorities("oauth2")
.secret(finalSecret)
.and()
.withClient("client_code")
.resourceIds(DEMO_RESOURCE_ID)
.authorizedGrantTypes("authorization_code", "client_credentials", "refresh_token",
"password", "implicit")
.scopes("all")
//.authorities("oauth2")
.redirectUris("http://www.baidu.com")
.accessTokenValiditySeconds(1200)
.refreshTokenValiditySeconds(50000);
*/
}

@Override
public void configure(AuthorizationServerEndpointsConfigurer endpoints) throws Exception {
endpoints
.tokenStore(new RedisTokenStore(redisConnectionFactory))
.authenticationManager(authenticationManager)
.allowedTokenEndpointRequestMethods(HttpMethod.GET, HttpMethod.POST);

//配置TokenService参数
DefaultTokenServices tokenService = new DefaultTokenServices();
tokenService.setTokenStore(endpoints.getTokenStore());
tokenService.setSupportRefreshToken(true);
tokenService.setClientDetailsService(endpoints.getClientDetailsService());
tokenService.setTokenEnhancer(endpoints.getTokenEnhancer());
tokenService.setAccessTokenValiditySeconds((int)TimeUnit.DAYS.toSeconds(30)); //30天
endpoints.tokenServices(tokenService);

}

@Override
public void configure(AuthorizationServerSecurityConfigurer oauthServer) throws Exception {
//允许表单认证
//这里增加拦截器到安全认证链中,实现自定义认证,包括图片验证,短信验证,微信小程序,第三方系统,CAS单点登录
//addTokenEndpointAuthenticationFilter(IntegrationAuthenticationFilter())
//IntegrationAuthenticationFilter 采用 @Component 注入
oauthServer.allowFormAuthenticationForClients()
.tokenKeyAccess("isAuthenticated()")
.checkTokenAccess("permitAll()");
}

}
(3) ResourceServerConfiguration.java
/**
* OAuth 资源服务器配置
* @author wunaozai
* @date 2018-05-29
*/
@Configuration
@EnableResourceServer
public class ResourceServerConfiguration extends ResourceServerConfigurerAdapter {

private static final String DEMO_RESOURCE_ID = "order";

@Override
public void configure(ResourceServerSecurityConfigurer resources) {
resources.resourceId(DEMO_RESOURCE_ID).stateless(true);
}

@Override
public void configure(HttpSecurity http) throws Exception {
// Since we want the protected resources to be accessible in the UI as well we need
// session creation to be allowed (it's disabled by default in 2.0.6)
http.sessionManagement().sessionCreationPolicy(SessionCreationPolicy.IF_REQUIRED)
.and()
.requestMatchers().anyRequest()
.and()
.anonymous()
.and()
//            .authorizeRequests()
//            .antMatchers("/order/**").authenticated();//配置order访问控制,必须认证过后才可以访问
.authorizeRequests()
.antMatchers("/order/**").hasAuthority("admin_role");//配置访问控制,必须具有admin_role权限才可以访问资源
//            .antMatchers("/order/**").hasAnyRole("admin");
}

}
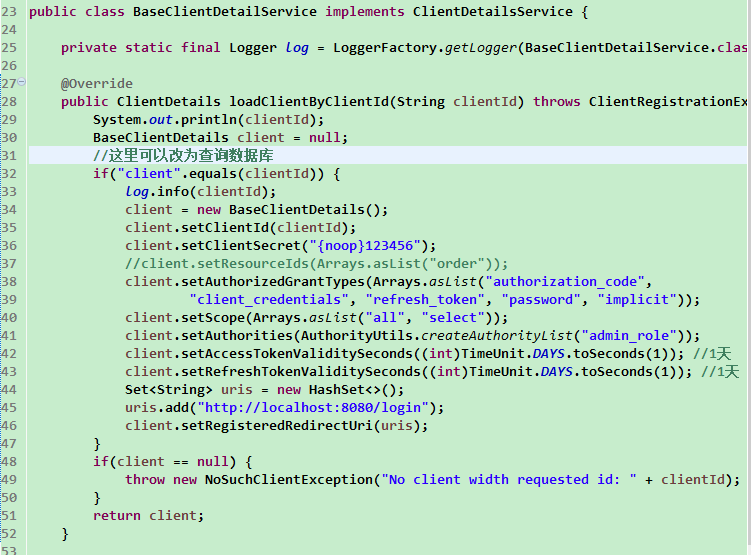
(4) BaseClientDetailService.java
/**
* 自定义客户端认证
* @author wunaozai
* @date 2018-06-20
*/
public class BaseClientDetailService implements ClientDetailsService {

private static final Logger log = LoggerFactory.getLogger(BaseClientDetailService.class);

@Override
public ClientDetails loadClientByClientId(String clientId) throws ClientRegistrationException {
System.out.println(clientId);
BaseClientDetails client = null;
//这里可以改为查询数据库
if("client".equals(clientId)) {
log.info(clientId);
client = new BaseClientDetails();
client.setClientId(clientId);
client.setClientSecret("{noop}123456");
//client.setResourceIds(Arrays.asList("order"));
client.setAuthorizedGrantTypes(Arrays.asList("authorization_code",
"client_credentials", "refresh_token", "password", "implicit"));
//不同的client可以通过 一个scope 对应 权限集
client.setScope(Arrays.asList("all", "select"));
client.setAuthorities(AuthorityUtils.createAuthorityList("admin_role"));
client.setAccessTokenValiditySeconds((int)TimeUnit.DAYS.toSeconds(1)); //1天
client.setRefreshTokenValiditySeconds((int)TimeUnit.DAYS.toSeconds(1)); //1天
Set<String> uris = new HashSet<>();
uris.add("http://localhost:8080/login");
client.setRegisteredRedirectUri(uris);
}
if(client == null) {
throw new NoSuchClientException("No client width requested id: " + clientId);
}
return client;
}

}
(5) BaseUserDetailService.java
/**
* 自定义用户认证Service
* @author wunaozai
* @date 2018-06-19
*/
//@Service
public class BaseUserDetailService implements UserDetailsService {

private static final Logger log = LoggerFactory.getLogger(BaseUserDetailService.class);

@Override
public UserDetails loadUserByUsername(String username) throws UsernameNotFoundException {
log.info(username);
System.out.println(username);
//return new User(username, "{noop}123456", false, false, null);
//User user = null;
SysUserAuthentication user = null;
if("admin".equals(username)) {
IntegrationAuthentication auth = IntegrationAuthenticationContext.get();
//这里可以通过auth 获取 user 值
//然后根据当前登录方式type 然后创建一个sysuserauthentication 重新设置 username 和 password
//比如使用手机验证码登录的, username就是手机号 password就是6位的验证码{noop}000000
System.out.println(auth);
List<GrantedAuthority> list = AuthorityUtils.createAuthorityList("admin_role"); //所谓的角色,只是增加ROLE_前缀
user = new SysUserAuthentication();
user.setUsername(username);
user.setPassword("{noop}123456");
user.setAuthorities(list);
user.setAccountNonExpired(true);
user.setAccountNonLocked(true);
user.setCredentialsNonExpired(true);
user.setEnabled(true);

//user = new User(username, "{noop}123456", list);
log.info("---------------------------------------------");
log.info(user.toJSONString());
log.info("---------------------------------------------");
//这里会根据user属性抛出锁定,禁用等异常
}

return user;//返回UserDetails的实现user不为空,则验证通过
}
}
(6) SysGrantedAuthority.java
/**
* 授权权限模型
* @author wunaozai
* @date 2018-06-20
*/
public class SysGrantedAuthority extends BaseModel implements GrantedAuthority {

private static final long serialVersionUID = 5698641074914331015L;

/**
* 权限
*/
private String authority;

/**
* 权限
* @return authority
*/
public String getAuthority() {
return authority;
}

/**
* 权限
* @param authority 权限
*/
public void setAuthority(String authority) {
this.authority = authority;
}

}
(7) SysUserAuthentication.java
/**
* 认证用户主体模型
* @author wunaozai
* @date 2018-06-19
*/
public class SysUserAuthentication extends BaseModel implements UserDetails {

private static final long serialVersionUID = 2678080792987564753L;

/**
* ID号
*/
private String uuid;
/**
* 用户名
*/
private String username;
/**
* 密码
*/
private String password;
/**
* 账户生效
*/
private boolean accountNonExpired;
/**
* 账户锁定
*/
private boolean accountNonLocked;
/**
* 凭证生效
*/
private boolean credentialsNonExpired;
/**
* 激活状态
*/
private boolean enabled;
/**
* 权限列表
*/
private Collection<GrantedAuthority>  authorities;
/**
* ID号
* @return uuid
*/
public String getUuid() {
return uuid;
}

/**
* ID号
* @param uuid ID号
*/
public void setUuid(String uuid) {
this.uuid = uuid;
}

/**
* 用户名
* @return username
*/
public String getUsername() {
return username;
}

/**
* 用户名
* @param username 用户名
*/
public void setUsername(String username) {
this.username = username;
}

/**
* 密码
* @return password
*/
public String getPassword() {
return password;
}

/**
* 密码
* @param password 密码
*/
public void setPassword(String password) {
this.password = password;
}

/**
* 账户生效
* @return accountNonExpired
*/
public boolean isAccountNonExpired() {
return accountNonExpired;
}

/**
* 账户生效
* @param accountNonExpired 账户生效
*/
public void setAccountNonExpired(boolean accountNonExpired) {
this.accountNonExpired = accountNonExpired;
}

/**
* 账户锁定
* @return accountNonLocked
*/
public boolean isAccountNonLocked() {
return accountNonLocked;
}

/**
* 账户锁定
* @param accountNonLocked 账户锁定
*/
public void setAccountNonLocked(boolean accountNonLocked) {
this.accountNonLocked = accountNonLocked;
}

/**
* 凭证生效
* @return credentialsNonExpired
*/
public boolean isCredentialsNonExpired() {
return credentialsNonExpired;
}

/**
* 凭证生效
* @param credentialsNonExpired 凭证生效
*/
public void setCredentialsNonExpired(boolean credentialsNonExpired) {
this.credentialsNonExpired = credentialsNonExpired;
}

/**
* 激活状态
* @return enabled
*/
public boolean isEnabled() {
return enabled;
}

/**
* 激活状态
* @param enabled 激活状态
*/
public void setEnabled(boolean enabled) {
this.enabled = enabled;
}

/**
* 权限列表
* @return authorities
*/
public Collection<GrantedAuthority> getAuthorities() {
return authorities;
}

/**
* 权限列表
* @param authorities 权限列表
*/
public void setAuthorities(Collection<GrantedAuthority> authorities) {
this.authorities = authorities;
}

}
3.PostMan工具接口测试
(0) /oauth/token 登录
这个如果配置支持allowFormAuthenticationForClients的,且url中有client_id和client_secret的会走ClientCredentialsTokenEndpointFilter来保护
如果没有支持allowFormAuthenticationForClients或者有支持但是url中没有client_id和client_secret的,走basic认证保护
(1) /oauth/token client_credentials模式
如代码所示,增加了一个client/123456 的Client账户,里面有client_credentials授权模式
通过postman请求如下

获取到access_token后,使用该token请求受保护的资源/order/demo

如果是错误的access_token的那么会提示invalid_token

其实像我们这种小公司,小项目,基本上用这个也就可以了,自己的帐号密码,然后接入第三方微信、QQ之类的。哈哈。
(2) /oauth/token password模式
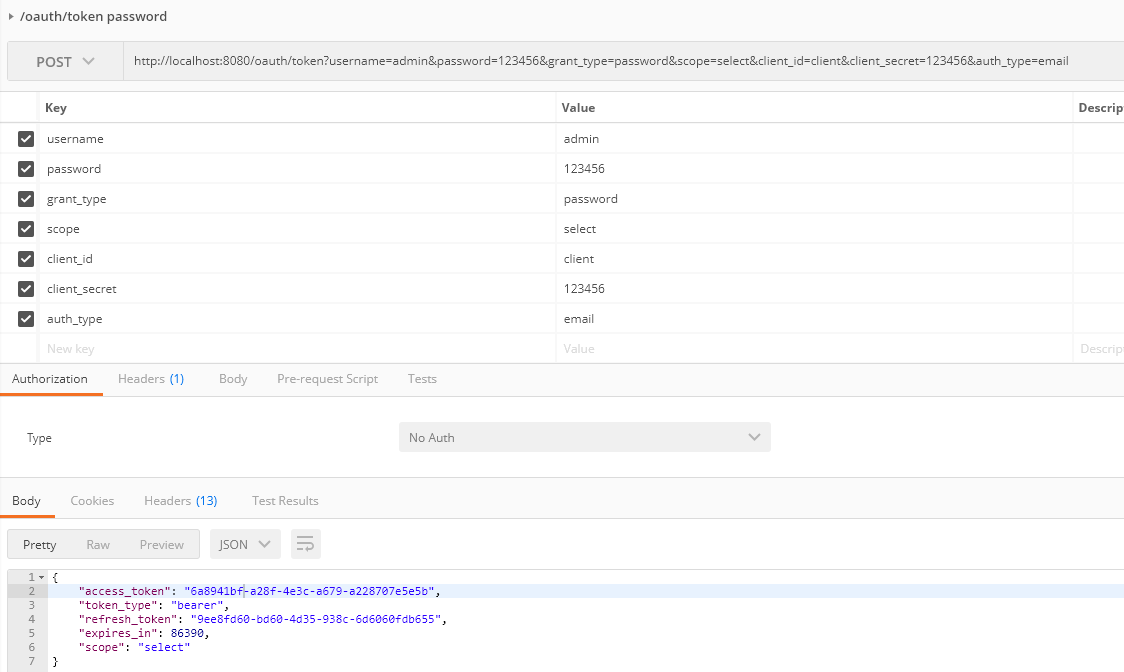
这种方式比上一种方式更适合我们公司使用,因为我们公司对外提供接入方式,基本是提供给我们的代理商,而我们更希望帐号和服务都由我们提供,基本目前几年内不会提供给代理商第三方登录,也没有必要。所以这里的帐号密码都是由我们服务器统一管理。
(3) /oauth/token code 模式
/oauth/authorize
这个比较复杂。我就一步一步的说明。
首先要通过/oauth/token进行登录,可以使用以上(0)(2)方式登录,注意登录是scope的填写。登录成功后,得到access_token.然后请求/oauth/authorize地址,注意参数redirect_uri是要跳转到的第三方地址上。
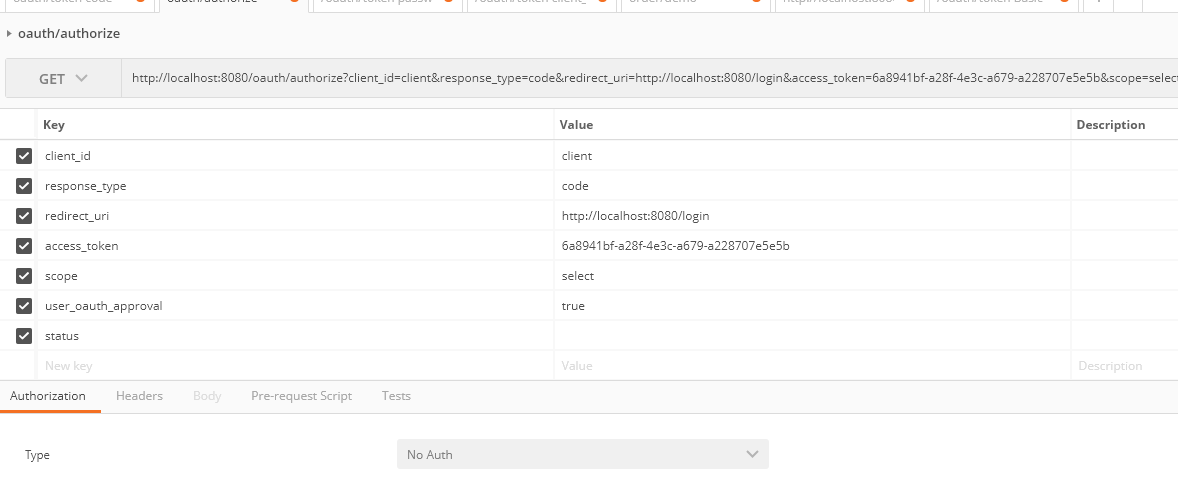
一般通过GET方式访问,如果合法的话(合法,判断access_token和对应的scope)那么浏览器会跳转到redirect_uri指定的地址。

访问成功后,会返回一个code值。第三方厂商就可以根据这个code去获取用户的access_token然后访问受限资源。

一个code只能使用一次,如果多次使用那么会报错
{
"error": "invalid_grant",
"error_description": "Invalid authorization code: 55ffrh"
}
注意这里的redirect_uri根据服务器BaseClientDetailService中配置的uri是一致的,否则不通过。
这种方式是OAuth最好的一种方式,只是基于公司,项目的实际考虑,这种方式,比较繁琐,目前是不会用到的。
刚才想了一下,好像第三方获取到的access_token就是用户登录后的access_token,觉得不对,想了想,应该是用户要通过scope对权限进行限制。而这里的scope会对应到资源权限部分。
(4) implicit模式 略,基本参考标准OAuth2.0就可以啦
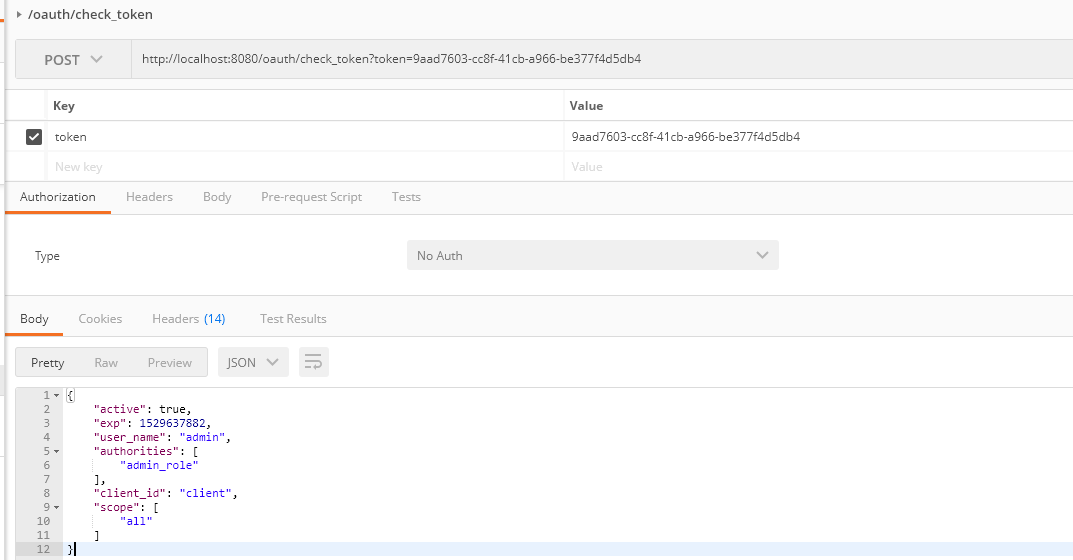
(5) check_token 检查token是否合法
(6) refresh_token 刷新token
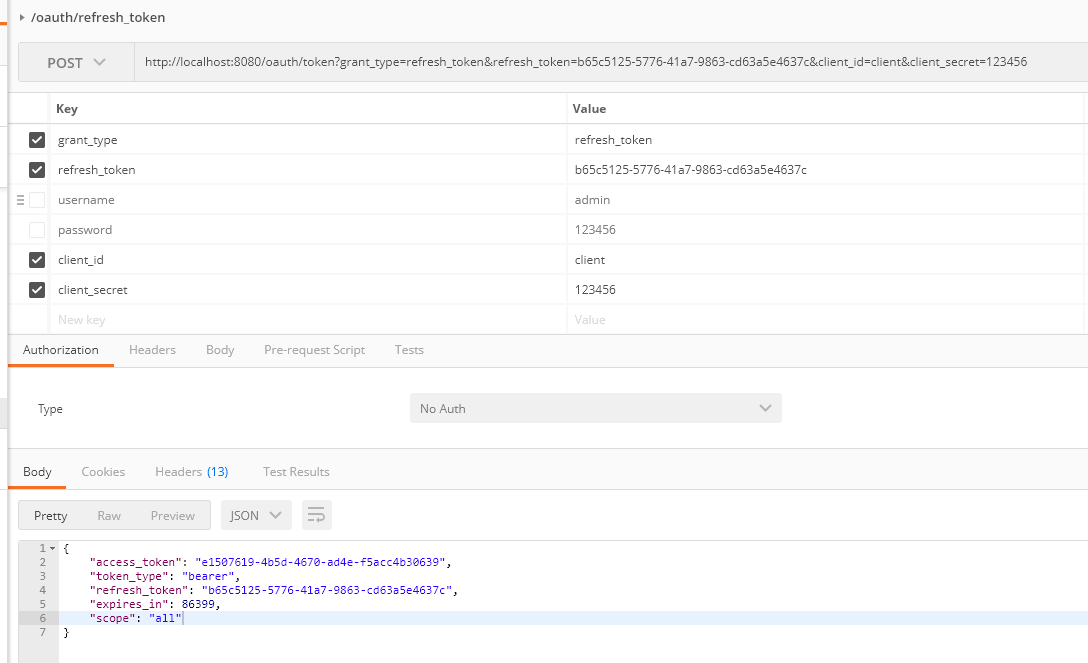
调用时access_token,refresh_token均未过期
access_token会变,而且expires延长,refresh_token根据设定的过期时间,没有失效则不变
{"access_token":"eb45f1d4-54a5-4e23-bf12-31d8d91a902f","token_type":"bearer","refresh_token":"efa96270-18a1-432c-b9e6-77725c0dabea","expires_in":1199,"scope":"all"}

调用时access_token过期,refresh_token未过期
access_token会变,而且expires延长,refresh_token根据设定的过期时间,没有失效则不变
{"access_token":"a78999d6-614a-45fe-be58-d5e0b6451bdb","token_type":"bearer","refresh_token":"bb2a0165-769d-43b0-a9a5-1331012ede1f","expires_in":119,"scope":"all"}

调用时refresh_token过期
{"error":"invalid_token","error_description":"Invalid refresh token (expired): 95844d87-f06e-4a4e-b76c-f16c5329e287"}
关于OAuth里面的知识还有很多细节没有理解透,随着项目的深入,慢慢了解吧。
参考资料:
https://github.com/lexburner/oauth2-demo
http://blog.didispace.com/spring-security-oauth2-xjf-1/
https://www.cnblogs.com/cjsblog/p/9152455.html
https://segmentfault.com/a/1190000014371789 (多种认证方式)

- Spring Boot 2.0 利用 Spring Security 实现简单的OAuth2.0认证方式1
- 利用Spring2.0技术实现RMI的成功简单示例
- C/S中利用域控进行SSO的简单实现方式
- 利用GET方式实现Web登录认证的MIDLET
- 利用servlet 实现JAVAWeb访问微信OAuth2.0认证,获取用户信息的实例
- spring boot 集成quartz 2.0 实现前端动态配置(获取spring上下文)的两种方式,启动数据库中已开启定时任务
- 【远程调用框架】如何实现一个简单的RPC框架(三)优化一:利用动态代理改变用户服务调用方式
- SpringMVC+Spring Security实现登录认证的简单功能
- 利用hadoop命令rcc生成Record 一种简单的方式实现自定义的writable对象
- C/S中利用域控进行SSO的简单实现方式
- C/S中利用域控进行SSO的简单实现方式
- 关于上报错误最简单的实现方式--利用图片
- C/S中利用域控进行SSO的简单实现方式
- 利用servlet 实现JAVAWeb访问微信OAuth2.0认证,获取用户信息的实例
- spring security 多登陆入口实现方式 以及对spring security认证流程的理解
- 基于 Vue.js 2.0 酷炫自适应背景视频登录页面实现方式
- iOS利用Label实现的简单高性能标签TagView
- 利用动态调用方式实现分布式应用(上)
- mongodb全量备份,简单的实现方式
- 利用单片机实现极简单的测温电路(转)