spring的RestTemplate使用指南
前言:现在restful接口越来越广泛,而如今很多接口摒弃了传统的配置复杂的webService开发模式,在java领域只需要很简单的springMvc就可以声明为一个控制器,再加上service层,就可以直接操作数据库成为一个灵活的接口。而我们请求接口的次数也会越来越多(最近我在和一个工具对接的时候,对方公司提供的接口全部由我们主动去调用),一般我们请求接口,都采用Apache Httpclient工具,这个工具稳定,既可以建立长连接,保持不错的性能,而它唯一的不足就是使用起来麻烦多变,并且要很多层判断处理,今天我要谈的就是spring对httpClient的再封装工具类,restTemplate,采用模板模式抽象出来的高效工具。有点类似于jdbcTemplate,今天我们就来一步步揭开它的使用方法
本篇博客的目录
一:restTemplate简介
二:restTemplate配置
三:restTemplat使用方法-restUtil
四:使用示例
五:总结
一:restTemplate简介
1.1:restTemplate的类结构

可以看出它继承自HttpAccessor这个统一的处理器,然后再继承自InterceptingHttpAccessor,这个拦截转换器,最终RestTemplate实现了封装httpClient的模板工具类
1.2:restTemplate的方法
Spring用于同步客户端HTTP访问的中心类。它简化了与HTTP服务器的通信,并执行RESTful原则。它处理HTTP连接,使应用程序代码提供URL,使用可能的模板变量,并提取结果。
注意:默认情况下,RestTemplate依赖于标准的JDK来建立HTTP连接。你可以切换使用不同的HTTP库,如Apache HttpComponents,Netty和OkHttp通过setRequestFactory属性。 内部模板使用HttpMessageConverter实例将HTTP消息转换为POJO和从POJO转换。主要MIME类型的转换器是默认注册的,但您也可以注册其他转换器通过setMessageConverters
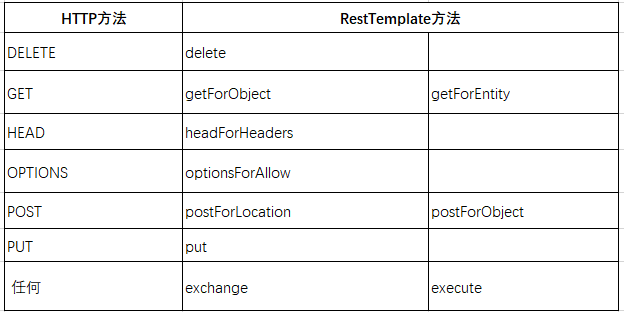
以下是http方法和restTempalte方法的比对映射,可以看出restTemplate提供了操作http的方法,其中exchange方法可以用来做任何的请求,一般我们都是用它来封装不同的请求方式。
二:restTemplate的配置方法
2.1:在springboot中的配置,springboot是一款简化传统xml配置式的开发方式,主要采用注解的方式来代替传统繁琐的xml配置,接下来我们就用springboot提供的注解来配置restTemplate:
@Configuration
public class RestTemplateConfig {

private static final Logger logger= LoggerFactory.getLogger(RestTemplateConfig.class);

@Bean
public RestTemplate restTemplate() {
// 添加内容转换器,使用默认的内容转换器
RestTemplate restTemplate = new RestTemplate(httpRequestFactory());
// 设置编码格式为UTF-8
List<HttpMessageConverter<?>> converterList = restTemplate.getMessageConverters();
HttpMessageConverter<?> converterTarget = null;
for (HttpMessageConverter<?> item : converterList) {
if (item.getClass() == StringHttpMessageConverter.class) {
converterTarget = item;
break;
}
}
if (converterTarget != null) {
converterList.remove(converterTarget);
}
HttpMessageConverter<?> converter = new StringHttpMessageConverter(StandardCharsets.UTF_8);
converterList.add(1,converter);

LOGGER.info("-----restTemplate-----初始化完成");
return restTemplate;
}

@Bean
public ClientHttpRequestFactory httpRequestFactory() {

return new HttpComponentsClientHttpRequestFactory(httpClient());

}

@Bean
public HttpClient httpClient() {
// 长连接保持30秒
PoolingHttpClientConnectionManager connectionManager = new PoolingHttpClientConnectionManager(30, TimeUnit.SECONDS);
//设置整个连接池最大连接数 根据自己的场景决定
connectionManager.setMaxTotal(500);
//同路由的并发数,路由是对maxTotal的细分
connectionManager.setDefaultMaxPerRoute(500);

//requestConfig
RequestConfig requestConfig = RequestConfig.custom()
//服务器返回数据(response)的时间,超过该时间抛出read timeout
.setSocketTimeout(10000)
//连接上服务器(握手成功)的时间,超出该时间抛出connect timeout
.setConnectTimeout(5000)
//从连接池中获取连接的超时时间,超过该时间未拿到可用连接,会抛出org.apache.http.conn.ConnectionPoolTimeoutException: Timeout waiting for connection from pool
.setConnectionRequestTimeout(500)
.build();
//headers
List<Header> headers = new ArrayList<>();
headers.add(new BasicHeader("User-Agent", "Mozilla/5.0 (Windows NT 6.1) AppleWebKit/537.36 (KHTML, like Gecko) Chrome/31.0.1650.16 Safari/537.36"));
headers.add(new BasicHeader("Accept-Encoding", "gzip,deflate"));
headers.add(new BasicHeader("Accept-Language", "zh-CN"));
headers.add(new BasicHeader("Connection", "Keep-Alive"));
headers.add(new BasicHeader("Content-type", "application/json;charset=UTF-8"));

return HttpClientBuilder.create()
.setDefaultRequestConfig(requestConfig)
.setConnectionManager(connectionManager)
.setDefaultHeaders(headers)
// 保持长连接配置,需要在头添加Keep-Alive
.setKeepAliveStrategy(new DefaultConnectionKeepAliveStrategy())
//重试次数,默认是3次,没有开启
.setRetryHandler(new DefaultHttpRequestRetryHandler(2, true))
.build();
}
}
首先解释以下@configuration,它的主要作用就是在spring容器启动的时候,初始化IOC,使用了这个注解,那么该类就会在spring启动的时候,把@Bean注解标识的类进行依赖注入。@Bean理解的话,就好比在配置文件中配置<bean id="xxx">.接下来就是在restTemplate的构造方法中添加httpRequest的工厂,使用连接池来优化http通信,默认使用长连接时间为30秒,再设置路由让http连接定向到指定的IP,然后设置并发数。再就是设置请求配置的超时时间,为了防止请求时间过长而引起资源的过渡浪费。如果在超过设置的timeout还没有数据返回,就直接断开连接。headers是添加默认的请求头,这里设置了传送的格式为json,语言为中-英等等属性。HttpClientBuilder.create设置请求头到HttpClient,然后在设置保持的时间,重试的次数,注入给httpClient进行封装。
在bean中的HttpMessageConverter,就是http信息转换器,它的主要作用就是转换和解析返回来的json数据,restTemplate默认使用jackson来作为底层的解析工具,而其它的比如Gson,fastjson等等第三方开源库放在headers这个list中,如果要使用,可以通过以下代码进行改变:
this.restTemplate.getMessageConverters().clear();

final List<HttpMessageConverter<?>> myHttpMessageConverter = new ArrayList<HttpMessageConverter<?>>();

        //自己实现的messgeConverter
HttpMessageConverter<Object> messageConverter = new MyHttpMessageConverter<Object>();

myHttpMessageConverter.add(messageConverter);

this.restTemplate.setMessageConverters(myHttpMessageConverter);
三:restUtil工具类
restUtil就是通过包装restTemplate暴露出面向外界的方法,通过高度封装,可以隐藏内部细节,简单使用,在使用它的时候,我们只需要传入请求的url和对应的参数,然后就可以取到结果了。参数一般有两种形式,一种是直接传入json,另一种是key、value形式的,key/value形式的,可以直接使用execute方法,传入url和请求的方法类型就可以了。在开头看到了restTemplate基本上是支持所有http请求的,接下来的工具类就介绍一下post和get请求的主要封装方法
@Component
public class RestUtil {

@Autowired
private  RestTemplate restTemplate;

//一些自定义的请求头参数
public static final String supplierID="";
public static final String interfacekey= "";

/**
* DLT专用执行方法
* @param param 请求参数:可以添加一些常量请求值
* @param url 访问的url
* @param method 请求的方法
* @return
*/
public String execute(Map<String,Object> param, String url, HttpMethod method){
HttpHeaders headers = this.getDefaultHeader();
Map<String,Object> requestor = this.getDefaultParam();
param.put("requestor",requestor);
param.put("supplierID",supplierID);
HttpEntity<Map<String,Object>> requestEntity = new HttpEntity<>(param, headers);
ResponseEntity<String> response = restTemplate.exchange(url,method, requestEntity, String.class);
return response.getBody();
}

/**
* 获取默认的头请求信息
* @return
*/
public HttpHeaders getDefaultHeader(){
String timestamp = ""+System.currentTimeMillis();
String signature = EncoderByMd5(supplierID + timestamp + interfacekey);
HttpHeaders headers = new HttpHeaders();
headers.add("signature", signature);
headers.add("timestamp", timestamp);
return headers;
}

/**
* 获取默认的参数
* @return
*/
public Map<String,Object> getDefaultParam(){
Map<String,Object> defParam = new HashMap<>();
defParam.put("invoker","xx");
defParam.put("operatorName","xx");
return defParam;
}

/**
* 通过MD5加密
* @param str
* @return
*/
public static String EncoderByMd5(String str){
if (str == null) {
return null;
}
try {
// 确定计算方法
MessageDigest md5 = MessageDigest.getInstance("MD5");
BASE64Encoder base64en = new BASE64Encoder();
// 加密后的字符串
return base64en.encode(md5.digest(str.getBytes("utf-8"))).toUpperCase();
} catch (NoSuchAlgorithmException | UnsupportedEncodingException e) {
return null;
}
}

/**
* get请求
* @param url 请求的url
* @param jsonData 请求的json
* @return
*/
public String restGet(String url,String jsonData){

return request(url, jsonData,HttpMethod.GET);

}

/**
* @param url 请求的url
* @param jsonData json数据
* @param httpMethod
* @return
*/
private String request(String url, String jsonData,HttpMethod httpMethod) {

ResponseEntity<String> response=null;

try {
if (Check.isEmpty(url)) {

throw new IllegalArgumentException();
}

HttpEntity<String> requestEntity = new HttpEntity<String>(jsonData);

response = restTemplate.exchange(url, httpMethod, requestEntity, String.class);

}catch (Exception ex){

ex.printStackTrace();

return "";
}

return response.getBody().toString();
}

/**
* Get请求获取实体类
* @param url 请求的url
* @param responseType 返回的类型
* @param parms 不限定个数的参数
* @param <T> 泛型
* @return
*/
public <T> T getForEntity(String url,Class<T> responseType,Object... parms){

return (T) restTemplate.getForEntity(url,responseType,parms);

}

/**
* Get请求
* @param url
* @param parm
* @return
*/
public String get(String url,Map<String,Object> parm){

return restTemplate.getForEntity(url,String.class,parm).getBody();
}

}
四:使用示例
4.1:首先我们用springBoot来搭建一个简单的rest请求链接,我们来模拟一个请求,传入年龄和性别、身高,计算出标准体重的接口,这段代码比较简单,我只给出示范代码:
@SpringBootApplication
@RestController
public class HealApplication {
@RequestMapping(value = "weight", method = RequestMethod.GET)
public ResultModel getWeight(@RequestParam(value = "height", required = false) Integer height,   @RequestParam(value = "sex", required = false) Integer sex, @RequestParam(value = "age", required = false) Integer age) {
if (height == null || age == null || sex == null || (!sex.equals(0) && !sex.equals(1))) {

return new ResultModel(400, "缺少请求参数或者参数错误", 0d);
}

double condition = getStandardWeight(sex, age, height);

return new ResultModel(200, "请求成功", condition);

}

/**
* 获取标准体重
*
* @param sex    性别 1:男  2:女
* @param age    年龄
* @param height
* @return 体重(单位:kg)
*/
public double getStandardWeight(int sex, int age, int height) {

double weight = 0.0;

switch (sex) {
//男性
case 1:
if (age < 12 && age > 2) {
weight = age * 2 + 12;
} else if (age > 12) {
weight = (height - 150) * 0.6 + 50;
}
break;
case 0:

if (age < 12 && age > 2) {
weight = age * 2 + 12;
} else if (age > 12) {
weight = (height - 100) * 0.6 + 50;
}
break;
default:
weight = 0;
break;
}

return weight;
}
可以看到我们的控制器有个映射weight请求的方法,通过传入年龄、身高、性别,就可以计算出标准体重,我们来启动springBoot,先试着用浏览器访问一下,可以看出如下结果:


4.2:为了表明接口是通的,我们再用postman来试一下,可以看到返回结果正确:

4.3:在springboot里引入testNg单元测试类,测试一下访问这个链接的结果:
public class TestRestManager  extends OrderProviderApplicationTests {

@Autowired
private RestUtil restUtil;

/**
* 请求方法为GEt
* @return
*/
@Test
private void  requestGet(){

String url="http://localhost:8080/weight?age={age}&sex={sex}&height={height}";
//组装请求参数
Map<String,Object> parmMap =new HashMap<String,Object>();

parmMap.put("age",35);

parmMap.put("sex",1);

parmMap.put("height",178);

String result = restUtil.get(url, parmMap);

System.out.println(result);

}
}
结果返回以下内容:

五:总结
本篇博客讲述了RestTemplate的简介,还有配置方法和使用示例,作为一款非常不错的rest请求工具,屏蔽了复杂的HttpClient的实现细节,向外暴露出简单、易于使用的接口,使得我们的开发工作越来越简单、高效,更多的方法工具可以研究一下restTemplate的具体Api,打开源码,一切都了如指掌。在平时的工作中,应该多发现这种工具类,从而来代替一些传统的工具,对于提升工作效率有着突飞猛进的效果和不可言喻的方便。

- 使用RestTemplate Spring安全认证
- spring boot / cloud (八) 使用RestTemplate来构建远程调用服务
- springboot-24-restTemplate的使用
- 使用HttpClient4来构建Spring RestTemplate
- Spring RestTemplate的使用方式
- Spring RestTemplate的使用(解决put,delete方法无返回值问题)
- 如何使用 Spring RestTemplate
- 4000 Spring Cloud入门教程(番外篇一):RestTemplate使用指南
- 使用spring RestTemplate进行rest接口测试
- Spring-boot RestTemplate 使用 报错问题
- spring组件 RestTemplate + @ResponseBody 使用心得
- 使用HttpClient4来构建Spring RestTemplate
- Spring学习笔记之RestTemplate使用小结
- spring boot RestTemplate 发送 get 请求使用误区
- 在spring boot中使用restTemplate上传大文件Java heap space
- Spring使用RestTemplate模拟form提交示例
- 使用 Spring RestTemplate 调用 rest 服务时自定义请求头(custom HTTP headers)
- spring cloud RestTemplate消费者使用Hystrix进行容错和服务降级
- spring RestTemplate使用
- Spring boot 发送http请求组件RestTemplate使用实例