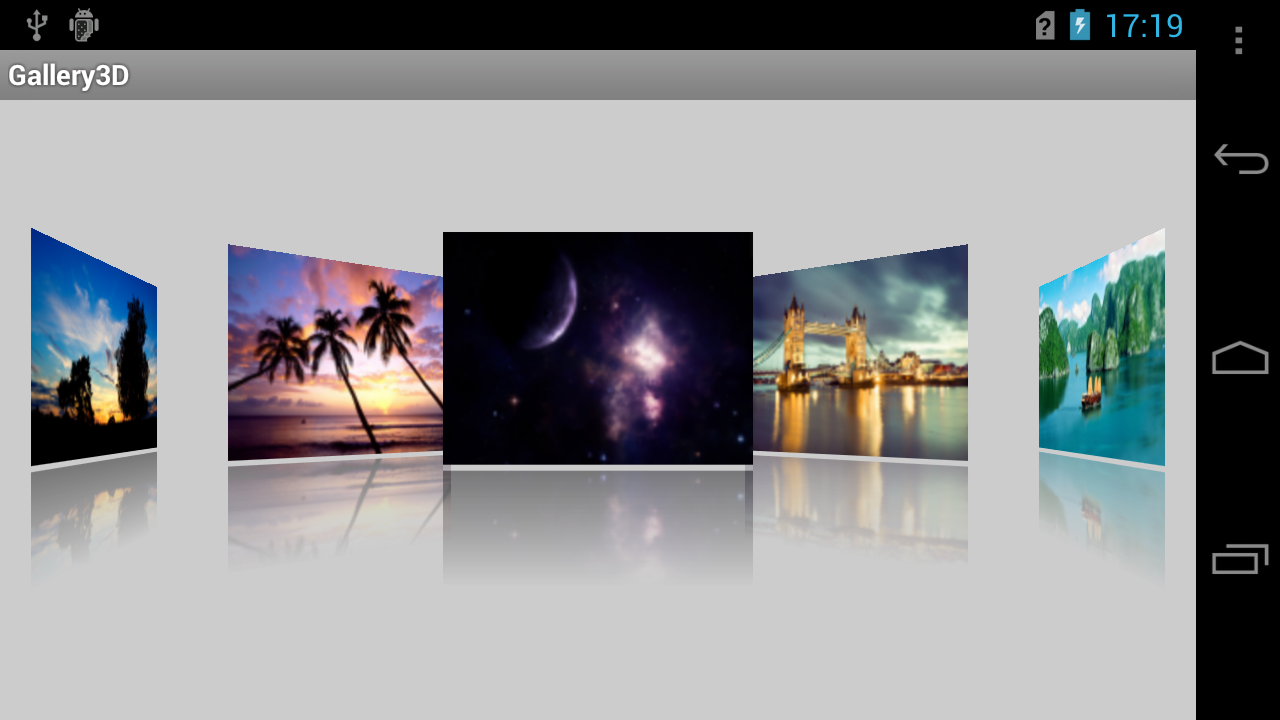
Android实现CoverFlow效果控件的实例代码
2018-05-14 10:15
821 查看
最近研究了一下如何在Android上实现CoverFlow效果的控件,其实早在2010年,就有Neil Davies开发并开源出了这个控件,Neil大神的这篇博客地址。首先是阅读源码,弄明白核心思路后,自己重新写了一遍这个控件,并加入了详尽的注释以便日后查阅;而后在使用过程中,发现了有两点可以改进:
(1)初始图片位于中间,左边空了一半空间,比较难看,可以改为重复滚动地展示;
(2)由于图片一开始就需要加载出来,所以对内存开销较大,很容易OOM,需要对图片的内存空间进行压缩。
这个自定义控件包括4个部分,用于创建及提供图片对象的ImageAdapter,计算图片旋转角度等的自定义控件GalleryFlow,压缩采样率解析Bitmap的工具类BitmapScaleDownUtil,以及承载自定义控件的Gallery3DActivity。
首先是ImageAdapter,代码如下:
package pym.test.gallery3d.widget;
import pym.test.gallery3d.util.BitmapScaleDownUtil;
import android.content.Context;
import android.graphics.Bitmap;
import android.graphics.Bitmap.Config;
import android.graphics.Canvas;
import android.graphics.LinearGradient;
import android.graphics.Matrix;
import android.graphics.Paint;
import android.graphics.PaintFlagsDrawFilter;
import android.graphics.PorterDuff.Mode;
import android.graphics.PorterDuffXfermode;
import android.graphics.Shader.TileMode;
import android.view.View;
import android.view.ViewGroup;
import android.widget.BaseAdapter;
import android.widget.Gallery;
import android.widget.ImageView;
/**
* @author pengyiming
* @date 2013-9-30
* @function GalleryFlow适配器
*/
public class ImageAdapter extends BaseAdapter
{
/* 数据段begin */
private final String TAG = "ImageAdapter";
private Context mContext;
//图片数组
private int[] mImageIds ;
//图片控件数组
private ImageView[] mImages;
//图片控件LayoutParams
private GalleryFlow.LayoutParams mImagesLayoutParams;
/* 数据段end */
/* 函数段begin */
public ImageAdapter(Context context, int[] imageIds)
{
mContext = context;
mImageIds = imageIds;
mImages = new ImageView[mImageIds.length];
mImagesLayoutParams = new GalleryFlow.LayoutParams(Gallery.LayoutParams.WRAP_CONTENT, Gallery.LayoutParams.WRAP_CONTENT);
}
/**
* @function 根据指定宽高创建待绘制的Bitmap,并绘制到ImageView控件上
* @param imageWidth
* @param imageHeight
* @return void
*/
public void createImages(int imageWidth, int imageHeight)
{
// 原图与倒影的间距5px
final int gapHeight = 5;
int index = 0;
for (int imageId : mImageIds)
{
/* step1 采样方式解析原图并生成倒影 */
// 解析原图,生成原图Bitmap对象
// Bitmap originalImage = BitmapFactory.decodeResource(mContext.getResources(), imageId);
Bitmap originalImage = BitmapScaleDownUtil.decodeSampledBitmapFromResource(mContext.getResources(), imageId, imageWidth, imageHeight);
int width = originalImage.getWidth();
int height = originalImage.getHeight();
// Y轴方向反向,实质就是X轴翻转
Matrix matrix = new Matrix();
matrix.setScale(1, -1);
// 且仅取原图下半部分创建倒影Bitmap对象
Bitmap reflectionImage = Bitmap.createBitmap(originalImage, 0, height / 2, width, height / 2, matrix, false);
/* step2 绘制 */
// 创建一个可包含原图+间距+倒影的新图Bitmap对象
Bitmap bitmapWithReflection = Bitmap.createBitmap(width, (height + gapHeight + height / 2), Config.ARGB_8888);
// 在新图Bitmap对象之上创建画布
Canvas canvas = new Canvas(bitmapWithReflection);
// 抗锯齿效果
canvas.setDrawFilter(new PaintFlagsDrawFilter(0, Paint.ANTI_ALIAS_FLAG));
// 绘制原图
canvas.drawBitmap(originalImage, 0, 0, null);
// 绘制间距
Paint gapPaint = new Paint();
gapPaint.setColor(0xFFCCCCCC);
canvas.drawRect(0, height, width, height + gapHeight, gapPaint);
// 绘制倒影
canvas.drawBitmap(reflectionImage, 0, height + gapHeight, null);
/* step3 渲染 */
// 创建一个线性渐变的渲染器用于渲染倒影
Paint paint = new Paint();
LinearGradient shader = new LinearGradient(0, height, 0, (height + gapHeight + height / 2), 0x70ffffff, 0x00ffffff, TileMode.CLAMP);
// 设置画笔渲染器
paint.setShader(shader);
// 设置图片混合模式
paint.setXfermode(new PorterDuffXfermode(Mode.DST_IN));
// 渲染倒影+间距
canvas.drawRect(0, height, width, (height + gapHeight + height / 2), paint);
/* step4 在ImageView控件上绘制 */
ImageView imageView = new ImageView(mContext);
imageView.setImageBitmap(bitmapWithReflection);
imageView.setLayoutParams(mImagesLayoutParams);
// 打log
imageView.setTag(index);
/* step5 释放heap */
originalImage.recycle();
reflectionImage.recycle();
// bitmapWithReflection.recycle();
mImages[index++] = imageView;
}
}
@Override
public int getCount()
{
return Integer.MAX_VALUE;
}
@Override
public Object getItem(int position)
{
return mImages[position];
}
@Override
public long getItemId(int position)
{
return position;
}
@Override
public View getView(int position, View convertView, ViewGroup parent)
{
return mImages[position % mImages.length];
}
/* 函数段end */
}
其次是GalleryFlow,代码如下:
package pym.test.gallery3d.widget;
import android.content.Context;
import android.graphics.Camera;
import android.graphics.Matrix;
import android.util.AttributeSet;
import android.util.Log;
import android.view.View;
import android.view.animation.Transformation;
import android.widget.Gallery;
/**
* @author pengyiming
* @date 2013-9-30
* @function 自定义控件
*/
public class GalleryFlow extends Gallery
{
/* 数据段begin */
private final String TAG = "GalleryFlow";
// 边缘图片最大旋转角度
private final float MAX_ROTATION_ANGLE = 75;
// 中心图片最大前置距离
private final float MAX_TRANSLATE_DISTANCE = -100;
// GalleryFlow中心X坐标
private int mGalleryFlowCenterX;
// 3D变换Camera
private Camera mCamera = new Camera();
/* 数据段end */
/* 函数段begin */
public GalleryFlow(Context context, AttributeSet attrs)
{
super(context, attrs);
// 开启,在滑动过程中,回调getChildStaticTransformation()
this.setStaticTransformationsEnabled(true);
}
/**
* @function 获取GalleryFlow中心X坐标
* @return
*/
private int getCenterXOfCoverflow()
{
return (getWidth() - getPaddingLeft() - getPaddingRight()) / 2 + getPaddingLeft();
}
/**
* @function 获取GalleryFlow子view的中心X坐标
* @param childView
* @return
*/
private int getCenterXOfView(View childView)
{
return childView.getLeft() + childView.getWidth() / 2;
}
/**
* @note step1 系统调用measure()方法时,回调此方法;表明此时系统正在计算view的大小
*/
@Override
protected void onMeasure(int widthMeasureSpec, int heightMeasureSpec)
{
super.onMeasure(widthMeasureSpec, heightMeasureSpec);
mGalleryFlowCenterX = getCenterXOfCoverflow();
Log.d(TAG, "onMeasure, mGalleryFlowCenterX = " + mGalleryFlowCenterX);
}
/**
* @note step2 系统调用layout()方法时,回调此方法;表明此时系统正在给child view分配空间
* @note 必定在onMeasure()之后回调,但与onSizeChanged()先后顺序不一定
*/
@Override
protected void onLayout(boolean changed, int l, int t, int r, int b)
{
super.onLayout(changed, l, t, r, b);
mGalleryFlowCenterX = getCenterXOfCoverflow();
Log.d(TAG, "onLayout, mGalleryFlowCenterX = " + mGalleryFlowCenterX);
}
/**
* @note step2 系统调用measure()方法后,当需要绘制此view时,回调此方法;表明此时系统已计算完view的大小
* @note 必定在onMeasure()之后回调,但与onSizeChanged()先后顺序不一定
*/
@Override
protected void onSizeChanged(int w, int h, int oldw, int oldh)
{
super.onSizeChanged(w, h, oldw, oldh);
mGalleryFlowCenterX = getCenterXOfCoverflow();
Log.d(TAG, "onSizeChanged, mGalleryFlowCenterX = " + mGalleryFlowCenterX);
}
@Override
protected boolean getChildStaticTransformation(View childView, Transformation t)
{
// 计算旋转角度
float rotationAngle = calculateRotationAngle(childView);
// 计算前置距离
float translateDistance = calculateTranslateDistance(childView);
// 开始3D变换
transformChildView(childView, t, rotationAngle, translateDistance);
return true;
}
/**
* @function 计算GalleryFlow子view的旋转角度
* @note1 位于Gallery中心的图片不旋转
* @note2 位于Gallery中心两侧的图片按照离中心点的距离旋转
* @param childView
* @return
*/
private float calculateRotationAngle(View childView)
{
final int childCenterX = getCenterXOfView(childView);
float rotationAngle = 0;
rotationAngle = (mGalleryFlowCenterX - childCenterX) / (float) mGalleryFlowCenterX * MAX_ROTATION_ANGLE;
if (rotationAngle > MAX_ROTATION_ANGLE)
{
rotationAngle = MAX_ROTATION_ANGLE;
}
else if (rotationAngle < -MAX_ROTATION_ANGLE)
{
rotationAngle = -MAX_ROTATION_ANGLE;
}
return rotationAngle;
}
/**
* @function 计算GalleryFlow子view的前置距离
* @note1 位于Gallery中心的图片前置
* @note2 位于Gallery中心两侧的图片不前置
* @param childView
* @return
*/
private float calculateTranslateDistance(View childView)
{
final int childCenterX = getCenterXOfView(childView);
float translateDistance = 0;
if (mGalleryFlowCenterX == childCenterX)
{
translateDistance = MAX_TRANSLATE_DISTANCE;
}
return translateDistance;
}
/**
* @function 开始变换GalleryFlow子view
* @param childView
* @param t
* @param rotationAngle
* @param translateDistance
*/
private void transformChildView(View childView, Transformation t, float rotationAngle, float translateDistance)
{
t.clear();
t.setTransformationType(Transformation.TYPE_MATRIX);
final Matrix imageMatrix = t.getMatrix();
final int imageWidth = childView.getWidth();
final int imageHeight = childView.getHeight();
mCamera.save();
/* rotateY */
// 在Y轴上旋转,位于中心的图片不旋转,中心两侧的图片竖向向里或向外翻转。
mCamera.rotateY(rotationAngle);
/* rotateY */
/* translateZ */
// 在Z轴上前置,位于中心的图片会有放大的效果
mCamera.translate(0, 0, translateDistance);
/* translateZ */
// 开始变换(我的理解是:移动Camera,在2D视图上产生3D效果)
mCamera.getMatrix(imageMatrix);
imageMatrix.preTranslate(-imageWidth / 2, -imageHeight / 2);
imageMatrix.postTranslate(imageWidth / 2, imageHeight / 2);
mCamera.restore();
}
/* 函数段end */
}
Bitmap解析用具BitmapScaleDownUtil,代码如下:
package pym.test.gallery3d.util;
import android.content.res.Resources;
import android.graphics.Bitmap;
import android.graphics.BitmapFactory;
import android.view.Display;
/**
* @author pengyiming
* @date 2013-9-30
* @function Bitmap缩放处理工具类
*/
public class BitmapScaleDownUtil
{
/* 数据段begin */
private final String TAG = "BitmapScaleDownUtil";
/* 数据段end */
/* 函数段begin */
/**
* @function 获取屏幕大小
* @param display
* @return 屏幕宽高
*/
public static int[] getScreenDimension(Display display)
{
int[] dimension = new int[2];
dimension[0] = display.getWidth();
dimension[1] = display.getHeight();
return dimension;
}
/**
* @function 以取样方式加载Bitmap
* @param res
* @param resId
* @param reqWidth
* @param reqHeight
* @return 取样后的Bitmap
*/
public static Bitmap decodeSampledBitmapFromResource(Resources res, int resId, int reqWidth, int reqHeight)
{
// step1,将inJustDecodeBounds置为true,以解析Bitmap真实尺寸
final BitmapFactory.Options options = new BitmapFactory.Options();
options.inJustDecodeBounds = true;
BitmapFactory.decodeResource(res, resId, options);
// step2,计算Bitmap取样比例
options.inSampleSize = calculateInSampleSize(options, reqWidth, reqHeight);
// step3,将inJustDecodeBounds置为false,以取样比列解析Bitmap
options.inJustDecodeBounds = false;
return BitmapFactory.decodeResource(res, resId, options);
}
/**
* @function 计算Bitmap取样比例
* @param options
* @param reqWidth
* @param reqHeight
* @return 取样比例
*/
private static int calculateInSampleSize(BitmapFactory.Options options, int reqWidth, int reqHeight)
{
// 默认取样比例为1:1
int inSampleSize = 1;
// Bitmap原始尺寸
final int width = options.outWidth;
final int height = options.outHeight;
// 取最大取样比例
if (height > reqHeight || width > reqWidth)
{
final int widthRatio = Math.round((float) width / (float) reqWidth);
final int heightRatio = Math.round((float) height / (float) reqHeight);
// 取样比例为X:1,其中X>=1
inSampleSize = Math.max(widthRatio, heightRatio);
}
return inSampleSize;
}
/* 函数段end */
}
测试控件的Gallery3DActivity,代码如下:
package pym.test.gallery3d.main;
import pym.test.gallery3d.R;
import pym.test.gallery3d.util.BitmapScaleDownUtil;
import pym.test.gallery3d.widget.GalleryFlow;
import pym.test.gallery3d.widget.ImageAdapter;
import android.app.Activity;
import android.content.Context;
import android.os.Bundle;
/**
* @author pengyiming
* @date 2013-9-30
*/
public class Gallery3DActivity extends Activity
{
/* 数据段begin */
private final String TAG = "Gallery3DActivity";
private Context mContext;
// 图片缩放倍率(相对屏幕尺寸的缩小倍率)
public static final int SCALE_FACTOR = 8;
// 图片间距(控制各图片之间的距离)
private final int GALLERY_SPACING = -10;
// 控件
private GalleryFlow mGalleryFlow;
/* 数据段end */
/* 函数段begin */
@Override
protected void onCreate(Bundle savedInstanceState)
{
super.onCreate(savedInstanceState);
mContext = getApplicationContext();
setContentView(R.layout.gallery_3d_activity_layout);
initGallery();
}
private void initGallery()
{
// 图片ID
int[] images = {
R.drawable.picture_1,
R.drawable.picture_2,
R.drawable.picture_3,
R.drawable.picture_4,
R.drawable.picture_5,
R.drawable.picture_6,
R.drawable.picture_7 };
ImageAdapter adapter = new ImageAdapter(mContext, images);
// 计算图片的宽高
int[] dimension = BitmapScaleDownUtil.getScreenDimension(getWindowManager().getDefaultDisplay());
int imageWidth = dimension[0] / SCALE_FACTOR;
int imageHeight = dimension[1] / SCALE_FACTOR;
// 初始化图片
adapter.createImages(imageWidth, imageHeight);
// 设置Adapter,显示位置位于控件中间,这样使得左右均可"无限"滑动
mGalleryFlow = (GalleryFlow) findViewById(R.id.gallery_flow);
mGalleryFlow.setSpacing(GALLERY_SPACING);
mGalleryFlow.setAdapter(adapter);
mGalleryFlow.setSelection(Integer.MAX_VALUE / 2);
}
/* 函数段end */
}
see效果图~~~
以上就是这篇文章的全部内容了,希望本文的内容对大家的学习或者工作具有一定的参考学习价值,如果有疑问大家可以留言交流,谢谢大家对脚本之家的支持。
您可能感兴趣的文章:

相关文章推荐
- Android 实现控件悬浮效果实例代码
- Android 实现ViewPager边界回弹效果实例代码
- Android xml实现animation的4种动画效果实例代码
- Android自定义view实现圆环效果实例代码
- Android自定义ScrollView实现放大回弹效果实例代码
- Android实现滑动选择控件实例代码
- Android DrawerLayout实现抽屉效果实例代码
- Android实现水波纹外扩效果的实例代码
- Android实现水波纹扩散效果的实例代码
- Android控件Gallery3D效果实例代码
- Android代码实现控件按下显示底色效果
- Android自定义view系列之99.99%实现QQ侧滑删除效果实例代码详解
- Android 轻松实现图片倒影效果实例代码
- Android 自定义view实现进度条加载效果实例代码
- android ViewPager实现滑动翻页效果实例代码
- Android实现桌面悬浮窗、蒙板效果实例代码
- Android自定义view实现太极效果实例代码
- Android使用ViewDragHelper实现QQ6.X最新版本侧滑界面效果实例代码
- Android使用Rotate3dAnimation实现3D旋转动画效果的实例代码
- Android编程实现3D立体旋转效果的实例代码