CentOS7 Cobbler 自动化部署安装系统
2018-04-21 14:35
423 查看
一、cobbler简介和服务
Cobbler是一款自动化操作系统安装的实现,与PXE安装系统的区别就是可以同时部署多个版本的系统,而PXE只能选择一种系统。而如今的架构动辄就是上千台的服务器。而存在一些操作系统不统一的现象,例如最初的架构采用的是CentOS5系列的系统,而新出现了一些技术后,需要新的操作系统的支持,一方面是需要批量部署装机,而另一方面还需要考虑到如果老版本的服务器出现故障后还需要重新去部署。并且提供Web配置页面,可以只需要一些点击就可以完成一些操作。
二、cobber实战
1.安装cobbler等依赖服务
yum install -y httpd dhcp tftp cobbler cobbler-web pykickstart
2.启动httpd和cobbler服务,并开机自启
systemctl start httpd
systemctl enable httpd
systemctl start cobblerd
systemctl enable cobblerd
3.进行check
cobbler check
The following are potential configuration items that you may want to fix:

1 : The 'server' field in /etc/cobbler/settings must be set to something other than
localhost, or kickstarting features will not work.  This should be a resolvable hostname
or IP for the boot server as reachable by all machines that will use it.
2 : For PXE to be functional, the 'next_server' field in /etc/cobbler/settings must be set
to something other than 127.0.0.1, and should match the IP of the boot server on the PXE
network.
3 : some network boot-loaders are missing from /var/lib/cobbler/loaders, you may run
'cobbler get-loaders' to download them, or, if you only want to handle x86/x86_64
netbooting, you may ensure that you have installed a *recent* version of the syslinux
package installed and can ignore this message entirely.  Files in this directory,
should you want to support all architectures, should include pxelinux.0, menu.c32,
elilo.efi, and yaboot. The 'cobbler get-loaders' command is the easiest way to resolve
these requirements.
4 : change 'disable' to 'no' in /etc/xinetd.d/rsync
5 : reposync is not installed, need for cobbler reposync, install/upgrade yum-utils?
6 : debmirror package is not installed, it will be required to manage debian deployments
and repositories
7 : The default password used by the sample templates for newly installed machines
(default_password_crypted in /etc/cobbler/settings) is still set to 'cobbler' and should
be changed, try: "openssl passwd -1 -salt 'random-phrase-here' 'your-password-here'" to
generate new one
8 : fencing tools were not found, and are required to use the (optional) power management
features. install cman or fence-agents to use them
Restart cobblerd and then run 'cobbler sync' to apply changes.
4.按上面提示步骤进行,要保证firewall和selinux关闭
1 systemctl stop firewalld
2 systemctl disable firewalld
3 sed -i "s#SELINUX=enforcing#SELINUX=disabled#g"/etc/sysconfig/selinux
4 reboot
5.修改/etc/cobbler/settings文件
1 vim /etc/cobbler/settings
2 #将272行改为 next_server: 192.168.134.132(你的ip地址)
3 #将384行改为 server: 192.168.134.132
4 vim /etc/xinetd.d/tftp
5 #将disable改为no
6 systemctl start rsyncd
7 systemctl enable rsyncd
8 cobbler get-loaders
6.使用openssl对密码加密
1 openssl passwd -1 -salt 'cobbler'  'cobbler' #前面的cobbler为掩码,后面的为密码,可随意设置.
2 vim /etc/cobbler/settings #将刚才的密码替换文档中101中的密码,然后修改242行,将manage_dncp改为1

7.修改/etc/cobbler/dhcp.template,执行cobbler sync
vim /etc/cobbler/dhcp.template

1 systemctl restart cobblerd
2 cobbler sync
8.使用vmvare虚拟机的iso镜像挂载到/mnt 路径(如下图),并导入镜像
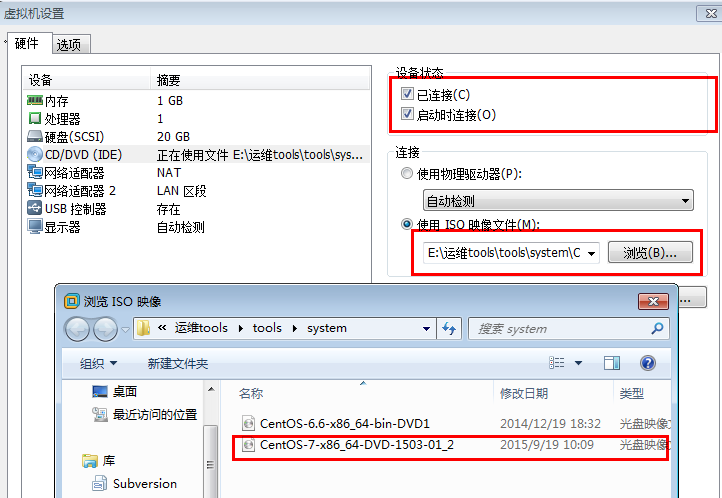
9,挂载镜像
mount /dev/cdrom mnt #挂载镜像,放两个版本的系统,上传完一个后要在虚拟机设置中切换镜像文件

cobbler import --path=/mnt/ --name=CentOS-6-x86_64 --arch=x86_64
10.给kickstart定义ks文件
vim /var/lib/cobbler/kickstarts/CentOS-7-x86_64.cfg#保证和前面的系统名称相同
#Kickstart Configurator by Jason Zhao
#platform=x86, AMD64, or Intel EM64T
#System  language
lang en_US
#System keyboard
keyboard us
#Sytem timezone
timezone Asia/Shanghai
#Root password
rootpw --iscrypted $default_password_crypted
#rootpw --iscrypted $1$ops-node$7hqdpgEmIE7Z0RbtQkxW20
#Use text mode install
text
#Install OS instead of upgrade
install
#Use NFS installation Media
url --url=$tree
#url --url=http://192.168.56.11/CentOS-7.1-x86_64
#System bootloader configuration
bootloader --location=mbr
#Clear the Master Boot Record
zerombr
#Partition clearing information
clearpart --all --initlabel
#Disk partitioning information
part /boot --fstype xfs --size 1024 --ondisk sda
part swap --size 16384 --ondisk sda
part / --fstype xfs --size 1 --grow --ondisk sda
#System authorization infomation
auth  --useshadow  --enablemd5
#Network information
$SNIPPET('network_config')
#network --bootproto=dhcp --device=eth0 --onboot=on
# Reboot after installation
reboot
#Firewall configuration
firewall --disabled
#SELinux configuration
selinux --disabled
#Do not configure XWindows
skipx
%pre
$SNIPPET('log_ks_pre')
$SNIPPET('kickstart_start')
$SNIPPET('pre_install_network_config')
# Enable installation monitoring
$SNIPPET('pre_anamon')
%end
#Package install information
%packages
@ base
@ core
sysstat
iptraf
ntp
lrzsz
ncurses-devel
openssl-devel
zlib-devel
OpenIPMI-tools
mysql
nmap
screen
%end
%post
systemctl disable postfix.service
%end
vim /var/lib/cobbler/kickstarts/CentOS-6-x86_64.cfg
install
text
url --url=$tree
lang en_US.UTF-8
keyboard us
zerombr
bootloader --location=mbr --driveorder=sda --append="crashkernel=auto rhgb quiet"
$SNIPPET('network_config')
timezone --utc Asia/Shanghai
authconfig --enableshadow --passalgo=sha512
rootpw  Redhat
clearpart --all --initlabel
part /boot --fstype=ext4 --asprimary --size=10000
part swap --size=10000
part / --fstype=ext4 --grow --asprimary --size=80000
firstboot --disable
selinux --disabled
firewall --disabled
logging --level=info
reboot
%pre
$SNIPPET('log_ks_pre')
$SNIPPET('kickstart_start')
$SNIPPET('pre_install_network_config')
# Enable installation monitoring
$SNIPPET('pre_anamon')
%end

%packages
@base
@compat-libraries
@debugging
@development
tree
nmap
sysstat
lrzsz
dos2unix
telnet
%end
%post --nochroot
$SNIPPET('log_ks_post_nochroot')
%end
%post
$SNIPPET('log_ks_post')
# Start yum configuration
$yum_config_stanza
# End yum configuration
$SNIPPET('post_install_kernel_options')
$SNIPPET('post_install_network_config')
$SNIPPET('func_register_if_enabled')
$SNIPPET('download_config_files')
$SNIPPET('koan_environment')
$SNIPPET('redhat_register')
$SNIPPET('cobbler_register')
# Enable post-install boot notification
$SNIPPET('post_anamon')
# Start final steps
$SNIPPET('kickstart_done')
# End final steps
%end
11.执行以下代码
1 cobbler profile edit --name=CentOS-7-x86_64 --kickstart=/var/lib/cobbler/kickstarts/CentOS-7-x86_64.cfg
2 cobbler profile edit --name=CentOS-6-x86_64 --kickstart=/var/lib/cobbler/kickstarts/CentOS-6-x86_64.cfg
3 cobbler profile edit --name=CentOS-7-x86_64 --kopts='net.ifnames=0 biosdevname=0'
4 cobbler sync
5 yum install -y xinetd
6 systemctl start xinetd
7 systemctl enable xinetd
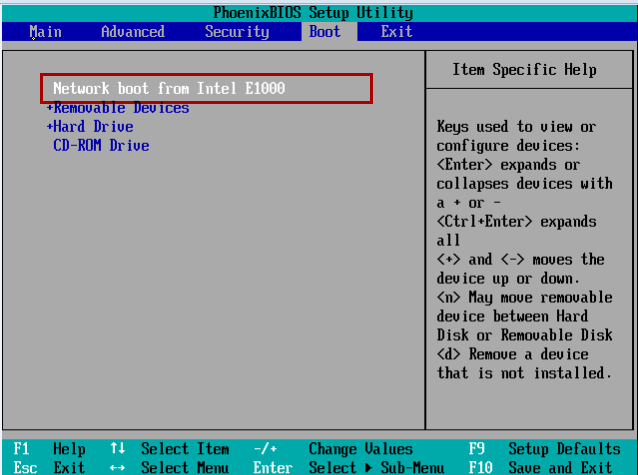
10.创建虚拟机
注意:客户端机器装系统时,要先使用修改bios启动然后修改为网卡启动,如图,把network boot from Intel E1000调整为最上,F10保存
出现下图所示,代表开始从dhcp服务安装系统开始


相关文章推荐
- Cobbler自动化安装部署系统
- Cobbler自动化批量部署CentOS6.5系统
- 部署cobbler自动化安装系统
- ubuntu 下cobbler 安装调试与系统自动化部署
- 使用cobbler工具实现centos 6,7系统的自动化安装
- 基于pxe+cobbler的全自动化安装centos系统
- Kickstart自动化安装部署Centos系统平台的搭建
- Cobbler 2.9+EFI自动化部署CentOS系统
- 使用centos6.6部署Cobbler--自动安装centos系统
- 系统自动化安装部署工具——cobbler
- CentOS7 利用Cobbler安装部署centos系统
- CentOS 6.5自动化运维之基于cobbler服务的自动化安装操作系统详解
- Cobbler实现自动化无人值守网络批量安装部署Linux系统
- 为cobbler自动化安装系统工具添加epel源
- 使用 Cobbler 自动化和管理系统安装
- 夕阳桥断 Linux(centos6.5)下安装jenkins Jenkins 的前身是 Hudson 是一个可扩展的持续集成引擎。 通俗的来讲,jenkins就是一个可以实现自动化部署的一个插
- Linux系统批量化安装部署之Cobbler
- Cobbler+preseed自动化安装Ubuntu系统
- Cobbler实现自动化批量安装Linux系统系列二:修改Cobbler Check时发现的问题