Python——破解极验滑动验证码
2018-04-19 12:05
471 查看
极验滑动验证码
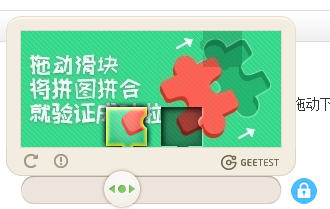
以上图片是最典型的要属于极验滑动认证了,极验官网:http://www.geetest.com/。
现在极验验证码已经更新到了 3.0 版本,截至 2017 年 7 月全球已有十六万家企业正在使用极验,每天服务响应超过四亿次,广泛应用于直播视频、金融服务、电子商务、游戏娱乐、政府企业等各大类型网站
对于这类验证,如果我们直接模拟表单请求,繁琐的认证参数与认证流程会让你蛋碎一地,我们可以用selenium驱动浏览器来解决这个问题,大致分为以下几个步骤
1、输入用户名,密码
2、点击按钮验证,弹出没有缺口的图
3、获得没有缺口的图片
4、点击滑动按钮,弹出有缺口的图
5、获得有缺口的图片
6、对比两张图片,找出缺口,即滑动的位移
7、按照人的行为行为习惯,把总位移切成一段段小的位移
8、按照位移移动
9、完成登录
实现
位移移动需要的基础知识
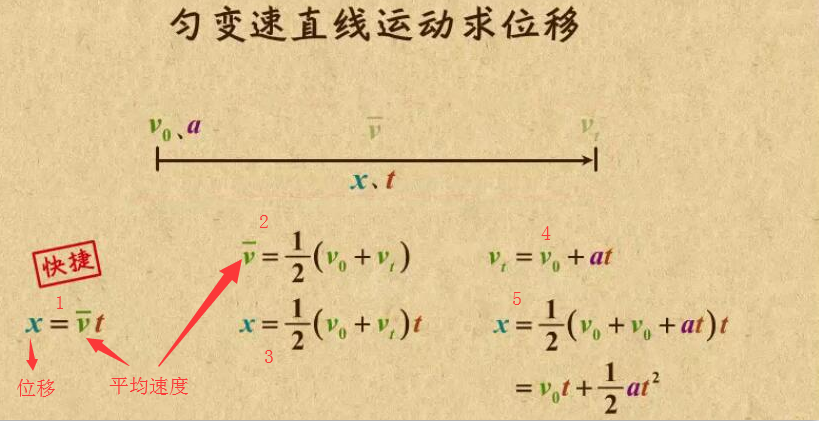
位移移动相当于匀变速直线运动,类似于小汽车从起点开始运行到终点的过程(首先为匀加速,然后再匀减速)。

其中a为加速度,且为恒量(即单位时间内的加速度是不变的),t为时间
位移移动的代码实现
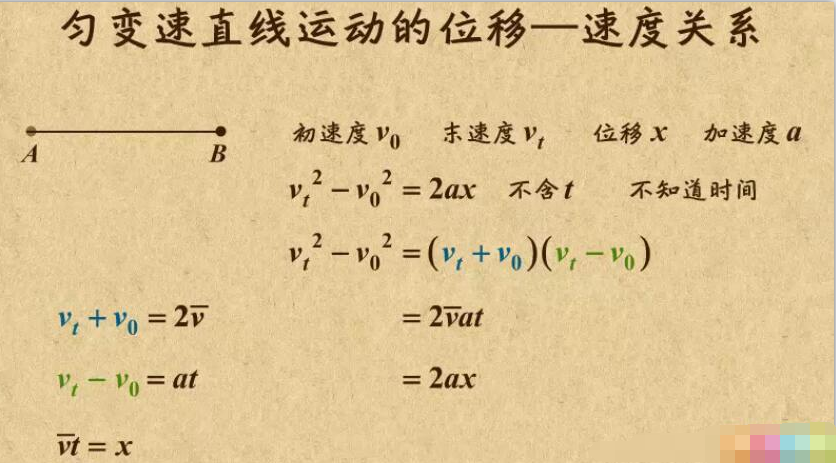
def get_track(distance):
'''
拿到移动轨迹,模仿人的滑动行为,先匀加速后匀减速
匀变速运动基本公式:
①v=v0+at
②s=v0t+(1/2)at²
③v²-v0²=2as

:param distance: 需要移动的距离
:return: 存放每0.2秒移动的距离
'''
# 初速度
v=0
# 单位时间为0.2s来统计轨迹,轨迹即0.2内的位移
t=0.1
# 位移/轨迹列表,列表内的一个元素代表0.2s的位移
tracks=[]
# 当前的位移
current=0
# 到达mid值开始减速
mid=distance * 4/5

distance += 10  # 先滑过一点,最后再反着滑动回来

while current < distance:
if current < mid:
# 加速度越小,单位时间的位移越小,模拟的轨迹就越多越详细
a = 2  # 加速运动
else:
a = -3 # 减速运动

# 初速度
v0 = v
# 0.2秒时间内的位移
s = v0*t+0.5*a*(t**2)
# 当前的位置
current += s
# 添加到轨迹列表
tracks.append(round(s))

# 速度已经达到v,该速度作为下次的初速度
v= v0+a*t

# 反着滑动到大概准确位置
for i in range(3):
tracks.append(-2)
for i in range(4):
tracks.append(-1)
return tracks
对比两张图片,找出缺口
def get_distance(image1,image2):
'''
拿到滑动验证码需要移动的距离
:param image1:没有缺口的图片对象
:param image2:带缺口的图片对象
:return:需要移动的距离
'''
# print('size', image1.size)

threshold = 50
for i in range(0,image1.size[0]):  # 260
for j in range(0,image1.size[1]):  # 160
pixel1 = image1.getpixel((i,j))
pixel2 = image2.getpixel((i,j))
res_R = abs(pixel1[0]-pixel2[0]) # 计算RGB差
res_G = abs(pixel1[1] - pixel2[1])  # 计算RGB差
res_B = abs(pixel1[2] - pixel2[2])  # 计算RGB差
if res_R > threshold and res_G > threshold and res_B > threshold:
return i  # 需要移动的距离
获得图片
def merge_image(image_file,location_list):
"""
拼接图片
:param image_file:
:param location_list:
:return:
"""
im = Image.open(image_file)
im.save('code.jpg')
new_im = Image.new('RGB',(260,116))
# 把无序的图片 切成52张小图片
im_list_upper = []
im_list_down = []
# print(location_list)
for location in location_list:
# print(location['y'])
if location['y'] == -58: # 上半边
im_list_upper.append(im.crop((abs(location['x']),58,abs(location['x'])+10,116)))
if location['y'] == 0:  # 下半边
im_list_down.append(im.crop((abs(location['x']),0,abs(location['x'])+10,58)))

x_offset = 0
for im in im_list_upper:
new_im.paste(im,(x_offset,0))  # 把小图片放到 新的空白图片上
x_offset += im.size[0]

x_offset = 0
for im in im_list_down:
new_im.paste(im,(x_offset,58))
x_offset += im.size[0]
new_im.show()
return new_im

def get_image(driver,div_path):
'''
下载无序的图片  然后进行拼接 获得完整的图片
:param driver:
:param div_path:
:return:
'''
time.sleep(2)
background_images = driver.find_elements_by_xpath(div_path)
location_list = []
for background_image in background_images:
location = {}
result = re.findall('background-image: url\("(.*?)"\); background-position: (.*?)px (.*?)px;',background_image.get_attribute('style'))
# print(result)
location['x'] = int(result[0][1])
location['y'] = int(result[0][2])

image_url = result[0][0]
location_list.append(location)

print('==================================')
image_url = image_url.replace('webp','jpg')
# '替换url http://static.geetest.com/pictures/gt/579066de6/579066de6.webp'
image_result = requests.get(image_url).content
# with open('1.jpg','wb') as f:
#     f.write(image_result)
image_file = BytesIO(image_result) # 是一张无序的图片
image = merge_image(image_file,location_list)

return image
按照位移移动
print('第一步,点击滑动按钮')
ActionChains(driver).click_and_hold(on_element=element).perform()  # 点击鼠标左键,按住不放
time.sleep(1)
print('第二步,拖动元素')
for track in track_list:
ActionChains(driver).move_by_offset(xoffset=track, yoffset=0).perform() # 鼠标移动到距离当前位置(x,y)
if l<100:
ActionChains(driver).move_by_offset(xoffset=-2, yoffset=0).perform()
else:
ActionChains(driver).move_by_offset(xoffset=-5, yoffset=0).perform()
time.sleep(1)
print('第三步,释放鼠标')
ActionChains(driver).release(on_element=element).perform()
详细代码
from selenium import webdriver
from selenium.webdriver.support.ui import WebDriverWait # 等待元素加载的
from selenium.webdriver.common.action_chains import ActionChains  #拖拽
from selenium.webdriver.support import expected_conditions as EC
from selenium.common.exceptions import TimeoutException, NoSuchElementException
from selenium.webdriver.common.by import By
from PIL import Image
import requests
import time
import re
import random
from io import BytesIO

def merge_image(image_file,location_list):
"""
拼接图片
:param image_file:
:param location_list:
:return:
"""
im = Image.open(image_file)
im.save('code.jpg')
new_im = Image.new('RGB',(260,116))
# 把无序的图片 切成52张小图片
im_list_upper = []
im_list_down = []
# print(location_list)
for location in location_list:
# print(location['y'])
if location['y'] == -58: # 上半边
im_list_upper.append(im.crop((abs(location['x']),58,abs(location['x'])+10,116)))
if location['y'] == 0:  # 下半边
im_list_down.append(im.crop((abs(location['x']),0,abs(location['x'])+10,58)))

x_offset = 0
for im in im_list_upper:
new_im.paste(im,(x_offset,0))  # 把小图片放到 新的空白图片上
x_offset += im.size[0]

x_offset = 0
for im in im_list_down:
new_im.paste(im,(x_offset,58))
x_offset += im.size[0]
new_im.show()
return new_im

def get_image(driver,div_path):
'''
下载无序的图片  然后进行拼接 获得完整的图片
:param driver:
:param div_path:
:return:
'''
time.sleep(2)
background_images = driver.find_elements_by_xpath(div_path)
location_list = []
for background_image in background_images:
location = {}
result = re.findall('background-image: url\("(.*?)"\); background-position: (.*?)px (.*?)px;',background_image.get_attribute('style'))
# print(result)
location['x'] = int(result[0][1])
location['y'] = int(result[0][2])

image_url = result[0][0]
location_list.append(location)

print('==================================')
image_url = image_url.replace('webp','jpg')
# '替换url http://static.geetest.com/pictures/gt/579066de6/579066de6.webp'
image_result = requests.get(image_url).content
# with open('1.jpg','wb') as f:
#     f.write(image_result)
image_file = BytesIO(image_result) # 是一张无序的图片
image = merge_image(image_file,location_list)

return image

def get_track(distance):
'''
拿到移动轨迹,模仿人的滑动行为,先匀加速后匀减速
匀变速运动基本公式:
①v=v0+at
②s=v0t+(1/2)at²
③v²-v0²=2as

:param distance: 需要移动的距离
:return: 存放每0.2秒移动的距离
'''
# 初速度
v=0
# 单位时间为0.2s来统计轨迹,轨迹即0.2内的位移
t=0.2
# 位移/轨迹列表,列表内的一个元素代表0.2s的位移
tracks=[]
# 当前的位移
current=0
# 到达mid值开始减速
mid=distance * 7/8

distance += 10  # 先滑过一点,最后再反着滑动回来
# a = random.randint(1,3)
while current < distance:
if current < mid:
# 加速度越小,单位时间的位移越小,模拟的轨迹就越多越详细
a = random.randint(2,4)  # 加速运动
else:
a = -random.randint(3,5) # 减速运动

# 初速度
v0 = v
# 0.2秒时间内的位移
s = v0*t+0.5*a*(t**2)
# 当前的位置
current += s
# 添加到轨迹列表
tracks.append(round(s))

# 速度已经达到v,该速度作为下次的初速度
v= v0+a*t

# 反着滑动到大概准确位置
for i in range(4):
tracks.append(-random.randint(2,3))
for i in range(4):
tracks.append(-random.randint(1,3))
return tracks

def get_distance(image1,image2):
'''
拿到滑动验证码需要移动的距离
:param image1:没有缺口的图片对象
:param image2:带缺口的图片对象
:return:需要移动的距离
'''
# print('size', image1.size)

threshold = 50
for i in range(0,image1.size[0]):  # 260
for j in range(0,image1.size[1]):  # 160
pixel1 = image1.getpixel((i,j))
pixel2 = image2.getpixel((i,j))
res_R = abs(pixel1[0]-pixel2[0]) # 计算RGB差
res_G = abs(pixel1[1] - pixel2[1])  # 计算RGB差
res_B = abs(pixel1[2] - pixel2[2])  # 计算RGB差
if res_R > threshold and res_G > threshold and res_B > threshold:
return i  # 需要移动的距离

def main_check_code(driver, element):
"""
拖动识别验证码
:param driver:
:param element:
:return:
"""
image1 = get_image(driver, '//div[@class="gt_cut_bg gt_show"]/div')
image2 = get_image(driver, '//div[@class="gt_cut_fullbg gt_show"]/div')
# 图片上 缺口的位置的x坐标

# 2 对比两张图片的所有RBG像素点,得到不一样像素点的x值,即要移动的距离
l = get_distance(image1, image2)
print('l=',l)
# 3 获得移动轨迹
track_list = get_track(l)
print('第一步,点击滑动按钮')
ActionChains(driver).click_and_hold(on_element=element).perform()  # 点击鼠标左键,按住不放
time.sleep(1)
print('第二步,拖动元素')
for track in track_list:
ActionChains(driver).move_by_offset(xoffset=track, yoffset=0).perform()  # 鼠标移动到距离当前位置(x,y)
     time.sleep(0.002)
# if l>100:
ActionChains(driver).move_by_offset(xoffset=-random.randint(2,5), yoffset=0).perform()
time.sleep(1)
print('第三步,释放鼠标')
ActionChains(driver).release(on_element=element).perform()
time.sleep(5)
def main_check_slider(driver):
"""
检查滑动按钮是否加载
:param driver:
:return:
"""
while True:
try :
driver.get('http://www.cnbaowen.net/api/geetest/')
element = WebDriverWait(driver, 30, 0.5).until(EC.element_to_be_clickable((By.CLASS_NAME, 'gt_slider_knob')))
if element:
return element
except TimeoutException as e:
print('超时错误,继续')
time.sleep(5)
if __name__ == '__main__':
try:
count = 6 # 最多识别6次
driver = webdriver.Chrome()
# 等待滑动按钮加载完成
element = main_check_slider(driver)
while count > 0:
main_check_code(driver,element)
time.sleep(2)
try:
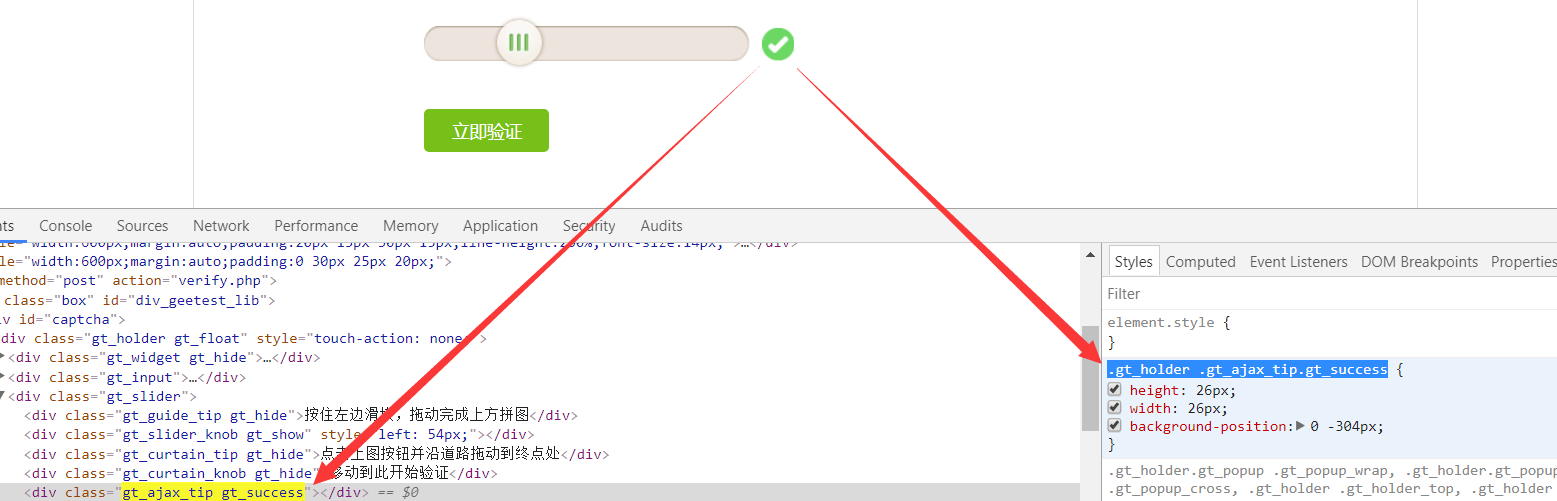
success_element = (By.CSS_SELECTOR, '.gt_holder .gt_ajax_tip.gt_success')
# 得到成功标志
print('suc=',driver.find_element_by_css_selector('.gt_holder .gt_ajax_tip.gt_success'))
success_images = WebDriverWait(driver, 20).until(EC.presence_of_element_located(success_element))
if success_images:
print('成功识别!!!!!!')
count = 0
break
except NoSuchElementException as e:
print('识别错误,继续')
count -= 1
time.sleep(2)
else:
print('too many attempt check code ')
exit('退出程序')
finally:
driver.close()
成功识别标志css

相关文章推荐
- python B站 滑动验证码破解(极验)
- 爬虫之破解滑动验证码
- python验证码识别教程之滑动验证码
- 破解滑动验证码
- selenium+java破解极验滑动验证码
- Python入门:PIL之验证码破解
- 解读滑块验证码(滑动验证码)与图形验证码的破解难度
- selenium+java破解极验滑动验证码
- Python 破解验证码
- 《Diss验证码》——Python验证码破解:图像字符验证码识别(1-入门)
- 极验滑动验证码geetest.6.0.1破解
- Python破解验证码
- Python + selenium + requests实现12306全自动抢票及验证码破解加自动点击功能
- 爬虫项目:破解极验滑动验证码
- Python 爬虫入门(四)—— 验证码下篇(破解简单的验证码)
- Python 破解验证码
- BiliBili等网站极验滑动验证码的详细破解过程
- selenium+java破解极验滑动验证码
- 破解极验滑动验证码
- 极验验证的滑动验证码破解