微信小程序开发2-点击列表中的某一行跳转到新的页面显示该列的详细信息
2018-04-06 10:41
1081 查看
此案例的介绍是在上一个案例的基础上进行的,如果没有看过上一个案例的请参考完上一个案例后在进行这个部分的参考
上次我们介绍了页面间传值的方法,那么接着上次的说在跳转页面传值过后要根据传的值也就是u_id(这里不明白的请看上一篇文章),来上数据库中查询该id对应下的详细信息(这里我用的是多表的联合查询,具体的sql语句就不详讲了),闲话少说先上代码:
xxx_x.js
Page({ data: { array:[], index: 0, index1: 0, //部门 dept:0, //岗位 post:0, //点击修改的时候要传进去的对象 uId:0
}, //点击所属部门的时候触发的事件 bindPickerChange: function (e) { console.log('picker发送选择改变,携带值为', e.detail.value) // console.log(e.detail.value),
console.log(this.data.uId) this.setData({ index: e.detail.value, //同时设置更改后的部门的id dept: e.detail.value }) // console.log("收到部门信息") }, //点击所属岗位的时候出发的事件 bindPickerChange1: function (e) { console.log('picker发送选择改变,携带值为', e.detail.value)
this.setData({ index1: e.detail.value, //同时设置更改后的岗位的id post: e.detail.value }) }, //点击修改按钮的时候出发的事件 modify: function (e) { //将数据库中user对应的字段的部门id和岗位id进行修改 console.log("返回数据库"+this.data.uId+" ,"+this.data.dept+" ,"+this.data.post) //将要修改的参数定义好 var that = this var u_id = that.data.uId var group_id = that.data.dept var u_type = that.data.post console.log("请求的参数"+u_id+","+group_id+","+u_type) //发送ajax请求到服务器修改u_id所对应的部门id和岗位id wx:wx.request({ url: 'http://localhost:8080/Weixinapp/user/updateByUid.do', data: { u_id:u_id, group_id:group_id, u_type:u_type }, header: { 'content-type': 'application/x-www-form-urlencoded' // 默认值 }, method: 'POST', dataType: 'json', responseType: 'text', success: function(res) { console.log("成功") wx:wx.redirectTo({ url: '../user', }) }, fail: function(res) { wx.showToast({
title: '服务器网络错误,请稍后重试',
icon: 'loading',
duration: 1500
}) }, complete: function(res) {
}, }) }, //点击取消的时候触发的事件 cancel: function () { // console.log("取消") //点击取消时返回上一级目录 wx.navigateBack({ delta:1 }) }, //页面也加载的时候就接收到上一级传过来的参数并发送请求到数据库中查询对应的信息渲染到页面上 onLoad: function (options) { var that = this //收到u_id // console.log(options) var u_id = options.u_id this.uId = options.u_id // console.log("收到了详细信息"+u_id) //发送ajax请求查询u_id对应的用户的信息 wx:wx.request({ url: 'http://localhost:8080/Weixinapp/user/findUserByUid.do', data: { u_id:u_id }, header: { 'content-type': 'application/x-www-form-urlencoded' // 默认值 }, method: 'POST', dataType: 'json', responseType: 'text', success: function(res) { console.log(res.data) console.log(res.data.users) console.log(res.data.groups) // console.log(res.data.users[8]) that.setData({ title: res.data.users, array: res.data.groups, array1: res.data.posts, index: res.data.users.group_id, index1: res.data.users.u_type, // 设置修改的时候传过去的uId uId: res.data.users.u_id }) }, fail: function(res) { wx.showToast({
title: '服务器网络错误,请稍后重试',
icon: 'loading',
duration: 1500
}) }, complete: function(res) {
}, }) },xxx_x.wxml
<view class="container"> <view class="userinfo" data-text="{{title}}"> <image class='userpic' src='../../../images/2.png' ></image> <text class="username"> {{title.name}}:先生 </text> </view>
<view class="zan-panel" data-text="{{title}}" > <view class="zan-cell"> <view class="zan-cell__bd"><text>实名:</text></view> <view class="zan-cell__ft"><text>{{title.real_name}}</text></view> </view> </view>
<view class="zan-panel" > <view class="zan-cell"> <view class="zan-cell__bd"><text>所属部门:</text></view>
<view class="zan-cell__ft"> <picker bindchange="bindPickerChange" range-key='group_name' range="{{array}}" data-text="{{index}}" > <input class="picker" type="text" placeholder="{{array[index].group_name}}" bindinput="teaminput" /> </picker></view> </view> <view class="zan-cell"> <view class="zan-cell__bd"><text>所属岗位:</text></view>
<view class="zan-cell__ft"> <picker bindchange="bindPickerChange1" range-key='u_name' range="{{array1}}" data-text="{{index1}}" > <input class="picker" type="text" placeholder="{{array1[index1].u_name}}" bindinput="teaminput" /> </picker></view> </view> <view class="zan-cell" data-text="{{title}}" > <view class="zan-cell__bd"><text>注册手机:</text></view> <view class="zan-cell__ft"><text>{{title.mobile}}</text></view> </view> <view class="zan-cell" data-text="{{title}}"> <view class="zan-cell__bd"><text>注册时间:</text></view> <view class="zan-cell__ft"><text>{{title.reg_date}}</text></view> </view> </view> <view class="modify" bindtap="modify" ><text>修改</text></view> <view class="cancel" bindtap="cancel"><text>取消</text></view></view>
运行效果截图

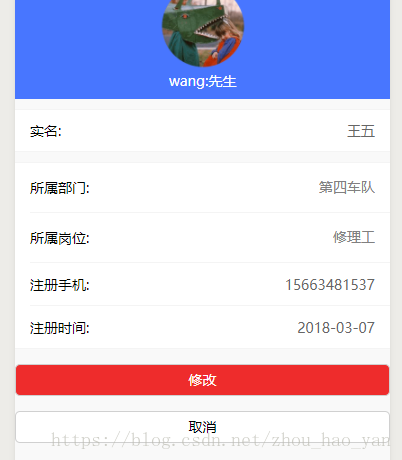

首先是将u_id对应的信息显示出来具体代码也已经给出,当然还有修改的操作
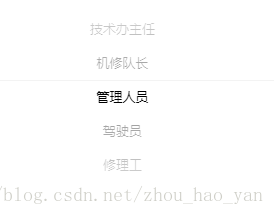
这里注意的是picker中弹出的数据是从数据库中获得的数据,因此在onload事件中请求成功后返回的参数中还得将picker
中所需要的信息都从数据库中查出来并赋给响应的变量上,这里我已经用不同颜色的背景标记出来了,当点击修改按钮的时候要将
3个参数返回给后台-u_id,group_id,u_type的值传过去,后台数据库根据传过来的参数进行修改。具体代码上面都有标注,希望
可以给大家带来帮助,我们一起学习共同进步。
至于后台的范围在以后会有讲解
上次我们介绍了页面间传值的方法,那么接着上次的说在跳转页面传值过后要根据传的值也就是u_id(这里不明白的请看上一篇文章),来上数据库中查询该id对应下的详细信息(这里我用的是多表的联合查询,具体的sql语句就不详讲了),闲话少说先上代码:
xxx_x.js
Page({ data: { array:[], index: 0, index1: 0, //部门 dept:0, //岗位 post:0, //点击修改的时候要传进去的对象 uId:0
}, //点击所属部门的时候触发的事件 bindPickerChange: function (e) { console.log('picker发送选择改变,携带值为', e.detail.value) // console.log(e.detail.value),
console.log(this.data.uId) this.setData({ index: e.detail.value, //同时设置更改后的部门的id dept: e.detail.value }) // console.log("收到部门信息") }, //点击所属岗位的时候出发的事件 bindPickerChange1: function (e) { console.log('picker发送选择改变,携带值为', e.detail.value)
this.setData({ index1: e.detail.value, //同时设置更改后的岗位的id post: e.detail.value }) }, //点击修改按钮的时候出发的事件 modify: function (e) { //将数据库中user对应的字段的部门id和岗位id进行修改 console.log("返回数据库"+this.data.uId+" ,"+this.data.dept+" ,"+this.data.post) //将要修改的参数定义好 var that = this var u_id = that.data.uId var group_id = that.data.dept var u_type = that.data.post console.log("请求的参数"+u_id+","+group_id+","+u_type) //发送ajax请求到服务器修改u_id所对应的部门id和岗位id wx:wx.request({ url: 'http://localhost:8080/Weixinapp/user/updateByUid.do', data: { u_id:u_id, group_id:group_id, u_type:u_type }, header: { 'content-type': 'application/x-www-form-urlencoded' // 默认值 }, method: 'POST', dataType: 'json', responseType: 'text', success: function(res) { console.log("成功") wx:wx.redirectTo({ url: '../user', }) }, fail: function(res) { wx.showToast({
title: '服务器网络错误,请稍后重试',
icon: 'loading',
duration: 1500
}) }, complete: function(res) {
}, }) }, //点击取消的时候触发的事件 cancel: function () { // console.log("取消") //点击取消时返回上一级目录 wx.navigateBack({ delta:1 }) }, //页面也加载的时候就接收到上一级传过来的参数并发送请求到数据库中查询对应的信息渲染到页面上 onLoad: function (options) { var that = this //收到u_id // console.log(options) var u_id = options.u_id this.uId = options.u_id // console.log("收到了详细信息"+u_id) //发送ajax请求查询u_id对应的用户的信息 wx:wx.request({ url: 'http://localhost:8080/Weixinapp/user/findUserByUid.do', data: { u_id:u_id }, header: { 'content-type': 'application/x-www-form-urlencoded' // 默认值 }, method: 'POST', dataType: 'json', responseType: 'text', success: function(res) { console.log(res.data) console.log(res.data.users) console.log(res.data.groups) // console.log(res.data.users[8]) that.setData({ title: res.data.users, array: res.data.groups, array1: res.data.posts, index: res.data.users.group_id, index1: res.data.users.u_type, // 设置修改的时候传过去的uId uId: res.data.users.u_id }) }, fail: function(res) { wx.showToast({
title: '服务器网络错误,请稍后重试',
icon: 'loading',
duration: 1500
}) }, complete: function(res) {
}, }) },xxx_x.wxml
<view class="container"> <view class="userinfo" data-text="{{title}}"> <image class='userpic' src='../../../images/2.png' ></image> <text class="username"> {{title.name}}:先生 </text> </view>
<view class="zan-panel" data-text="{{title}}" > <view class="zan-cell"> <view class="zan-cell__bd"><text>实名:</text></view> <view class="zan-cell__ft"><text>{{title.real_name}}</text></view> </view> </view>
<view class="zan-panel" > <view class="zan-cell"> <view class="zan-cell__bd"><text>所属部门:</text></view>
<view class="zan-cell__ft"> <picker bindchange="bindPickerChange" range-key='group_name' range="{{array}}" data-text="{{index}}" > <input class="picker" type="text" placeholder="{{array[index].group_name}}" bindinput="teaminput" /> </picker></view> </view> <view class="zan-cell"> <view class="zan-cell__bd"><text>所属岗位:</text></view>
<view class="zan-cell__ft"> <picker bindchange="bindPickerChange1" range-key='u_name' range="{{array1}}" data-text="{{index1}}" > <input class="picker" type="text" placeholder="{{array1[index1].u_name}}" bindinput="teaminput" /> </picker></view> </view> <view class="zan-cell" data-text="{{title}}" > <view class="zan-cell__bd"><text>注册手机:</text></view> <view class="zan-cell__ft"><text>{{title.mobile}}</text></view> </view> <view class="zan-cell" data-text="{{title}}"> <view class="zan-cell__bd"><text>注册时间:</text></view> <view class="zan-cell__ft"><text>{{title.reg_date}}</text></view> </view> </view> <view class="modify" bindtap="modify" ><text>修改</text></view> <view class="cancel" bindtap="cancel"><text>取消</text></view></view>
运行效果截图
首先是将u_id对应的信息显示出来具体代码也已经给出,当然还有修改的操作
这里注意的是picker中弹出的数据是从数据库中获得的数据,因此在onload事件中请求成功后返回的参数中还得将picker
中所需要的信息都从数据库中查出来并赋给响应的变量上,这里我已经用不同颜色的背景标记出来了,当点击修改按钮的时候要将
3个参数返回给后台-u_id,group_id,u_type的值传过去,后台数据库根据传过来的参数进行修改。具体代码上面都有标注,希望
可以给大家带来帮助,我们一起学习共同进步。
至于后台的范围在以后会有讲解

相关文章推荐
- 问题五-实现详细信息页面(点击列表,预览窗口显示具体信息)
- 微信小程序--(5-1)点击列表item,把item上面显示的所有数据,传递到另外一个页面
- 将参数放在URL中(点击列表中的某条记录携带信息进行页面跳转)
- 微信小程序开发过程中tabbar页面显示的相关问题及解决办法
- (转)C#开发微信门户及应用(4)--关注用户列表及详细信息管理
- 微信小程序开发-页面跳转方式
- 微信小程序点击 navigator ,页面不跳转
- 微信小程序开发过程中tabbar页面显示的相关问题及解决办法
- 微信小程序开发之好友列表字母列表跳转对应位置
- 微信小程序快速点击两个按钮会跳转两个页面
- JavaEE体验笔记二 -- 如何在一个显示了一堆投票(或新闻之类的)的页面中,点击其中一个就会显示其详细信息
- 微信小程序(2) 按钮点击跳转页面
- 微信小程序开发-点击事件,获取元素id,页面传值 & 获取js里的数据
- 开发微信小程序 页面突然不跳转的原因及解决办法
- 微信小程序笔记(一)——点击显示或隐藏某一行数据
- 微信小程序开发实战&电影小程序——阅读页面轮播图-新闻列表页面构建-数据绑定
- 微信小程序(5)--页面跳转传值(点击item传值)
- android 点击按钮实现页面跳转并显示以选择信息
- .Net有关问题。在GridView中添加了一个HyperLinkField,用来显示显示详细信息,请教跳转后的详细信息页面该怎样写代码
- 微信小程序实现点击文字页面跳转功能【附源码下载】