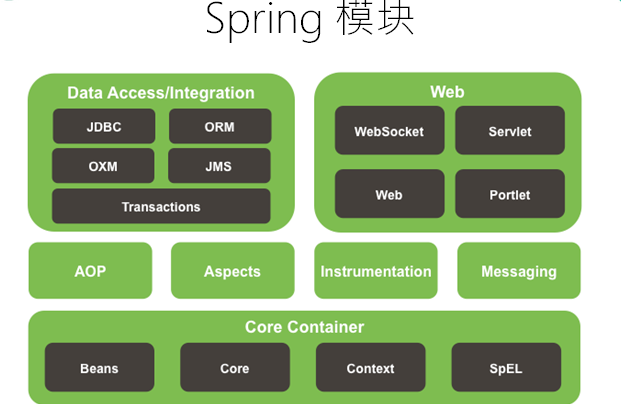
Spring知识整理(二)Spring之Bean的基本配置
2018-04-01 11:41
645 查看
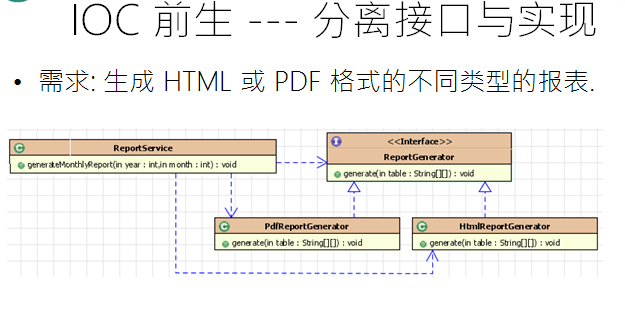
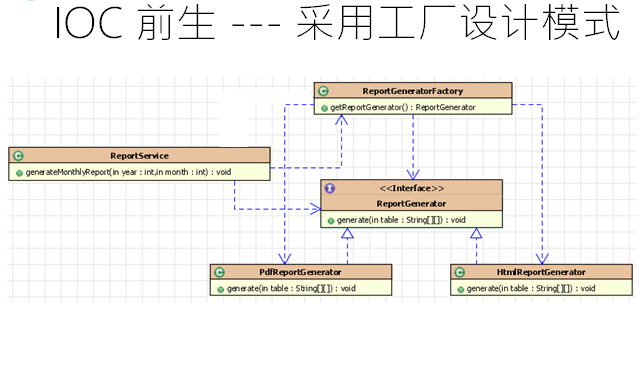
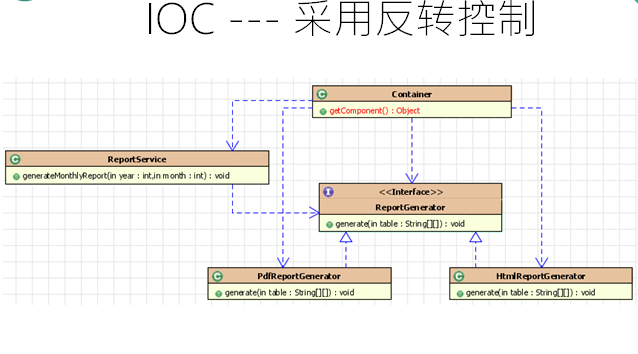
1.(OC & DI概述)
•IOC(Inversion of Control):其思想是反转资源获取的方向. 传统的资源查找方式要求组件向容器发起请求查找资源. 作为回应, 容器适时的返回资源. 而应用了 IOC 之后, 则是容器主动地将资源推送给它所管理的组件, 组件所要做的仅是选择一种合适的方式来接受资源. 这种行为也被称为查找的被动形式•DI(Dependency Injection)—IOC 的另一种表述方式:即组件以一些预先定义好的方式(例如: setter 方法)接受来自如容器的资源注入. 相对于 IOC 而言,这种表述更直接
2.(Bean)
Bean是Spring的控制反转,利用反射为我们创建实例的基础配置好Bean尤其重要
(•在Spring的配置文件 xml 文件中通过 bean 节点来配置 bean)
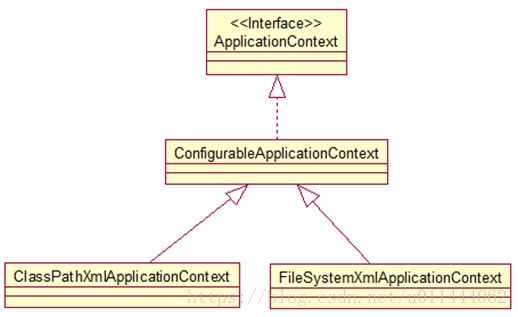
<!-- 配置一个 bean -->
<!--class:bean的全类名,通过反射的方式在IOC容器中创建bean,所以要求bean中必须有无参构造函数-->
<!--id:创建完成bean之后,通过id来获取bean,id唯一-->
<bean id="helloWorld" class="HelloWorld">
<!-- 为属性赋值 -->
<!--property中的name所对应的属性需要在Class所指定的类中具有set方法-->
<property name="name" value="Spring"></property>
</bean>
•在 Spring IOC 容器读取 Bean 配置创建 Bean 实例之前, 必须对它进行实例化. 只有在容器实例化后, 才可以从 IOC 容器里获取 Bean 实例并使用.•Spring 提供了两种类型的 IOC 容器实现. –BeanFactory: IOC 容器的基本实现.–ApplicationContext: 提供了更多的高级特性. 是 BeanFactory的子接口.–BeanFactory是 Spring 框架的基础设施,面向 Spring 本身;ApplicationContext面向使用 Spring 框架的开发者,几乎所有的应用场合都直接使用 ApplicationContext而非底层的 BeanFactory–无论使用何种方式, 配置文件时相同的.•ApplicationContext的主要实现类:–ClassPathXmlApplicationContext:从 类路径下加载配置文件–FileSystemXmlApplicationContext: 从文件系统中加载配置文件•ConfigurableApplicationContext扩展于 ApplicationContext,新增加两个主要方法:refresh() 和 close(), 让 ApplicationContext具有启动、刷新和关闭上下文的能力•ApplicationContext在初始化上下文时就实例化所有单例的 Bean。•WebApplicationContext是专门为 WEB 应用而准备的,它允许从相对于WEB 根目录的路径中完成初始化工作
//        原始方法
//        HelloWorld helloWorld =new HelloWorld();
// helloWorld.setName("spring");(使用Spring之后,对象的创建交给Spring的IOC容器创建)// 1.创建Spring的IOC容器对象
ApplicationContext applicationContext =new ClassPathXmlApplicationContext("classpath:spring/applicationContex.xml");
// 2.从IOC容器中获取Bean实例
HelloWorld helloWorld = (HelloWorld) applicationContext.getBean("helloWorld");
// 3.调用方法
helloWorld.hello();2.1(依赖注入的方式)
•Spring 支持 3 种依赖注入的方式–属性注入(•属性注入即通过 setter 方法注入Bean 的属性值或依赖的对象•属性注入使用 <property> 元素, 使用 name 属性指定 Bean 的属性名称,value 属性或 <value> 子节点指定属性值 •属性注入是实际应用中最常用的注入方式)
<!-- 配置一个 bean -->
<!--class:bean的全类名,通过反射的方式在IOC容器中创建bean,所以要求bean中必须有无参构造函数-->
<!--id:创建完成bean之后,通过id来获取bean,id唯一-->
<bean id="helloWorld" class="HelloWorld">
<!-- 为属性赋值 -->
<!--property中的name所对应的属性需要在Class所指定的类中具有set方法-->
<property name="name" value="Spring"></property>
</bean>
–构造器注入(•通过构造方法注入Bean 的属性值或依赖的对象,它保证了 Bean 实例在实例化后就可以使用。•构造器注入在 <constructor-arg> 元素里声明属性, <constructor-arg> 中没有 name 属性)
package com.spring.beans;

/**
* Created by Administrator on 2018/3/31.
*/
public class CarBean {
private  String name;
private  int price;

public CarBean(String name, int price) {
this.name = name;
this.price = price;
}
public  CarBean(){

}

@Override
public String toString() {
return "CarBean{" +
"name='" + name + '\'' +
", price='" + price + '\'' +
'}';
}

public String getName() {
return name;
}

public void setName(String name) {
this.name = name;
}

public int getPrice() {
return price;
}

public void setPrice(int price) {
this.price = price;
}
}
•按索引匹配入参:(可以单独使用value子标签,也可以使用value属性来赋值)
<bean id="car" class="com.spring.beans.CarBean">
<constructor-arg value="宝马" index="0"></constructor-arg>
<constructor-arg index="1">
<value>300000</value>
</constructor-arg>
</bean>
•按类型匹配入参:
<bean id="car" class="com.spring.beans.CarBean">
<constructor-arg value="宝马" type="java.lang.String"></constructor-arg>
<constructor-arg type="int">
<value>300000</value>
</constructor-arg>
</bean>
•字面值:可用字符串表示的值,可以通过<value> 元素标签或 value 属性进行注入。•基本数据类型及其封装类、String 等类型都可以采取字面值注入的方式•若字面值中包含特殊字符,可以使用 <![CDATA[]]> 把字面值包裹起来。
<!--通过构造方法来配置bean的属性-->
<!--index:标识构造方法中第几个参数-->
<!--type:构造器中参数的类型-->
<!--index与type可以混合使用,也可以单独使用一个,type是为了解决重载的构造函数-->
<!--属性值可以使用<value>标签,也可以使用value属性-->
<!--如果字面值包含特殊的字符例如<北京宝马!>可以使用<![CDATA[<北京宝马!>]]>将其包裹起来-->
–工厂方法注入(很少使用,不推荐)
2.2(引用其它 Bean)
<bean id="person" class="com.spring.beans.PersonBean">
<property name="name" value="小贤"></property>
<property name="car" ref="car"></property>
<!--=====================================也可以使用内部bean,不能被外部引用只能在内部使用============================-->
<!--<property name="car" >-->
<!--<bean class="com.spring.beans.CarBean">-->
<!--<constructor-arg value="宝马" index="0" type="java.lang.String"></constructor-arg>-->
<!--<constructor-arg index="1" type="int">-->
<!--<value>500000</value>-->
<!--</constructor-arg>-->
<!--</bean>-->
<!--</property>-->
</bean>2.3(集合属性)
•在 Spring中可以通过一组内置的 xml 标签(例如: <list>, <set> 或 <map>) 来配置集合属性.•配置 java.util.List类型的属性, 需要指定 <list> 标签, 在标签里包含一些元素. 这些标签可以通过 <value>指定简单的常量值, 通过 <ref>指定对其他 Bean 的引用. 通过<bean>指定内置 Bean 定义. 通过 <null/> 指定空元素. 甚至可以内嵌其他集合.•数组的定义和 List 一样, 都使用 <list>•配置 java.util.Set需要使用 <set>标签, 定义元素的方法与 List 一样.
package com.spring.beans;

import java.util.List;

/**
* Created by Administrator on 2018/3/31.
*/
public class CollectionBean {
//集合
private List<CarBean> cars;

public List<CarBean> getCars() {
return cars;
}

public void setCars(List<CarBean> cars) {
this.cars = cars;
}

@Override
public String toString() {
return "CollectionBean{" +
"cars=" + cars +
'}';
}
}
<!--=====================================配置List集合属性============================--> <bean id="collection" class="com.spring.beans.CollectionBean"> <property name="cars" ref="carlist"> <!--使用list标签来配置--> <!--<list>--> <!--<ref bean="car"></ref>--> <!--<ref bean="car"></ref>--> <!--<ref bean="car"></ref>--> <!--<ref bean="car"></ref>--> <!--</list>--> </property> </bean>
<!--=====================================可以将list,map,properties等单独定义,方便复用============================-->
<util:list id="carlist">
<ref bean="car"></ref>
<ref bean="car"></ref>
<ref bean="car"></ref>
</util:list>
•Java.util.Map通过 <map>标签定义,<map> 标签里可以使用多个 <entry>作为子标签. 每个条目包含一个键和一个值. •必须在 <key>标签里定义键•因为键和值的类型没有限制, 所以可以自由地为它们指定 <value>, <ref>, <bean> 或 <null>元素. •可以将 Map 的键和值作为 <entry>的属性定义: 简单常量使用 key 和 value 来定义; Bean 引用通过 key-ref 和 value-ref属性定义•使用 <props>定义 java.util.Properties, 该标签使用多个 <prop>作为子标签. 每个 <prop>标签必须定义 key属性.
package com.spring.beans;

import java.util.Map;

/**
* Created by Administrator on 2018/3/31.
*/
public class MapBean {
Map<String,CarBean> map;

public Map<String, CarBean> getMap() {
return map;
}

public void setMap(Map<String, CarBean> map) {
this.map = map;
}

@Override
public String toString() {
return "MapBean{" +
"map=" + map +
'}';
}
}
<!--=====================================配置Map属性值============================--> <bean id="map" class="com.spring.beans.MapBean"> <property name="map"> <map> <entry key="A" value-ref="car"></entry> <entry key="B" value-ref="car"></entry> <entry key="C" value-ref="car"></entry> </map> </property> </bean>•使用 <props>定义 java.util.Properties, 该标签使用多个 <prop>作为子标签. 每个 <prop>标签必须定义 key属性.
package com.spring.beans;

import java.util.Properties;

/**
* Created by Administrator on 2018/3/31.
*/
public class PropertiesBean {
private Properties properties;

public Properties getProperties() {
return properties;
}

public void setProperties(Properties properties) {
this.properties = properties;
}

@Override
public String toString() {
return "PropertiesBean{" +
"properties=" + properties +
'}';
}
}
<!--=====================================配置properties属性============================--> <bean id="properties" class="com.spring.beans.PropertiesBean"> <property name="properties"> <props> <prop key="user">root</prop> <prop key="password">root</prop> <prop key="driver">root</prop> <prop key="url">root</prop> </props> </property> </bean>2.4(使用 p 命名空间)
<!--使用p命名空间-->
<bean id="p-helloWorld" class="HelloWorld" p:name="p-spring">
</bean>•为了简化 XML 文件的配置,越来越多的 XML 文件采用属性而非子元素配置信息。•Spring 从 2.5 版本开始引入了一个新的 p 命名空间,可以通过 <bean> 元素属性的方式配置 Bean 的属性。•使用 p 命名空间后,基于 XML 的配置方式将进一步简化
2.5(XML 配置里的 Bean 自动装配)
•Spring IOC 容器可以自动装配 Bean. 需要做的仅仅是在 <bean> 的 autowire属性里指定自动装配的模式•byType(根据类型自动装配): 若 IOC 容器中有多个与目标 Bean 类型一致的 Bean. 在这种情况下, Spring 将无法判定哪个 Bean 最合适该属性, 所以不能执行自动装配.•byName(根据名称自动装配): 必须将目标 Bean 的名称和属性名设置的完全相同.•constructor(通过构造器自动装配): 当 Bean 中存在多个构造器时, 此种自动装配方式将会很复杂. 不推荐使用
package com.spring.beans;

/**
* Created by Administrator on 2018/3/31.
*/
public class AutowireBean {
//自动装配
private String name;
private  CarBean car;

public String getName() {
return name;
}

public void setName(String name) {
this.name = name;
}

public CarBean getCar() {
return car;
}

public void setCar(CarBean car) {
this.car = car;
}

@Override
public String toString() {
return "AutowireBean{" +
"name='" + name + '\'' +
", car=" + car +
'}';
}
}
<?xml version="1.0" encoding="UTF-8"?> <beans xmlns="http://www.springframework.org/schema/beans" xmlns:xsi="http://www.w3.org/2001/XMLSchema-instance" xmlns:util="http://www.springframework.org/schema/util" xmlns:p="http://www.springframework.org/schema/p" xsi:schemaLocation="http://www.springframework.org/schema/beans http://www.springframework.org/schema/beans/spring-beans.xsd http://www.springframework.org/schema/util http://www.springframework.org/schema/util/spring-util-4.0.xsd"> <!--//自动装配的bean--> <bean id="car" class="com.spring.beans.CarBean"> <property name="name" value="保时捷"></property> <property name="price" value="100000000"></property> </bean> <!--自动装配--> <!--byName根据bean的id和当前bean的set方法属性进行自动匹配,若有匹配的则匹配,否则不匹配--> <!--byType:根据bean的类型和bean的属性的类型进行自动装配(名字对不上,类型对的上也可以,但是,如果IOC容器有两个以上类型一样的,byType就无法装配了)--> <bean id="autowire" class="com.spring.beans.AutowireBean" p:name="小贤" autowire="byName"></bean> </beans>•在 Bean 配置文件里设置 autowire属性进行自动装配将会装配 Bean 的所有属性. 然而, 若只希望装配个别属性时, autowire属性就不够灵活了. •autowire属性要么根据类型自动装配, 要么根据名称自动装配, 不能两者兼而有之.•一般情况下,在实际的项目中很少使用自动装配功能,因为和自动装配功能所带来的好处比起来,明确清晰的配置文档更有说服力一些

相关文章推荐
- Spring基础知识及bean的配置
- 重拾Spring之配置bean详解以及AppliactionContext基本功能
- 注解的力量 -----Spring 2.5 JPA hibernate 使用方法的点滴整理(五):使用@Component 来简化bean的配置
- spring 2 bean配置--基本配置
- Spring4 的知识应用总结(一)——基本配置jar包和设置
- 一个spring 基本知识的微博(怎么加载多个xml、多个property文件、aop配置、监视器)
- spring基本配置详解(属性bean的基本配置)
- Spring中bean的基本xml配置
- Spring中bean的基本xml配置
- [注解的力量]Spring 2.5 JPA hibernate 使用方法的点滴整理(五):使用@Component 来简化bean的配置
- spring知识三-----SpEL&生命周期&bean配置方式
- 注解的力量 -----Spring 2.5 JPA hibernate 使用方法的点滴整理(五):使用@Component 来简化bean的配置
- Spring 基础教程之四:JavaBean基本配置详解
- spring Bean基本配置及注解
- Spring笔记(4)-----<bean>的基本配置
- Spring整理系列 - @Configuration注解、@Bean注解以及配置自动扫描、bean作用域
- spring学习笔记整理--04(配置Spring管理的bean的作用域、生命周期)
- Spring4的知识应用总结(四)——Bean的生命周期和注解方式配置
- Spring.NET环境搭建和基本API及XML配置笔记整理
- ssh项目搭建时,Spring的bean的基本配置