利用NGINX搭建FastDFS图片服务器
2018-03-22 10:30
639 查看
个人博客:打开链接

组名:文件上传后所在的storage组名称,在文件上传成功后有storage服务器返回,需要客户端自行保存。
虚拟磁盘路径:storage配置的虚拟路径,与磁盘选项store_path*对应。如果配置了store_path0则是M00,如果配置了store_path1则是M01,以此类推。
数据两级目录:storage服务器在每个虚拟磁盘路径下创建的两级目录,用于存储数据文件。
文件名:与文件上传时不同。是由存储服务器根据特定信息生成,文件名包含:源存储服务器IP地址、文件创建时间戳、文件大小、随机数和文件拓展名等信息。
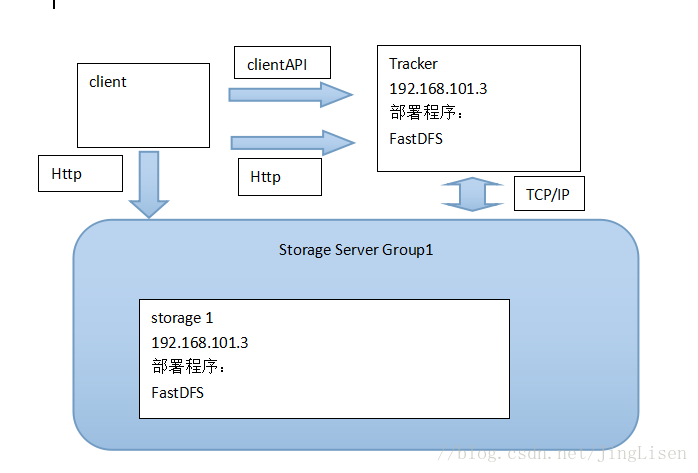
可以使用一台虚拟机来模拟,只有一个Tracker、一个Storage服务。
配置nginx访问图片。
第二步:安装FastDFS之前,先安装libevent工具包。
yum -y install libevent
第三步:安装libfastcommonV1.0.7工具包。
(1)、解压缩
(2)、./make.sh
(3)、./ma
4000
ke.sh install
(4)、把/usr/lib64/libfastcommon.so文件向/usr/lib/下复制一份
第四步:安装Tracker服务。
(1)、解压缩
(2)、./make.sh
(3)、./make.sh install
安装后在/usr/bin/目录下有以fdfs开头的文件都是编译出来的。
配置文件都放到/etc/fdfs文件夹
(4)、把/root/FastDFS/conf目录下的所有的配置文件都复制到/etc/fdfs下。
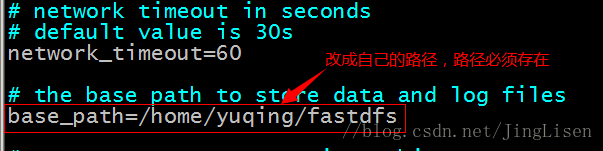
(5)、配置tracker服务。修改/etc/fdfs/tracker.conf文件。
(6)、启动tracker。/usr/bin/fdfs_trackerd /etc/fdfs/tracker.conf
重启使用命令:/usr/bin/fdfs_trackerd /etc/fdfs/tracker.conf restart
第五步:安装storage服务。
(1)、如果是在不同的服务器安装,第四步的1~4需要重新执行。
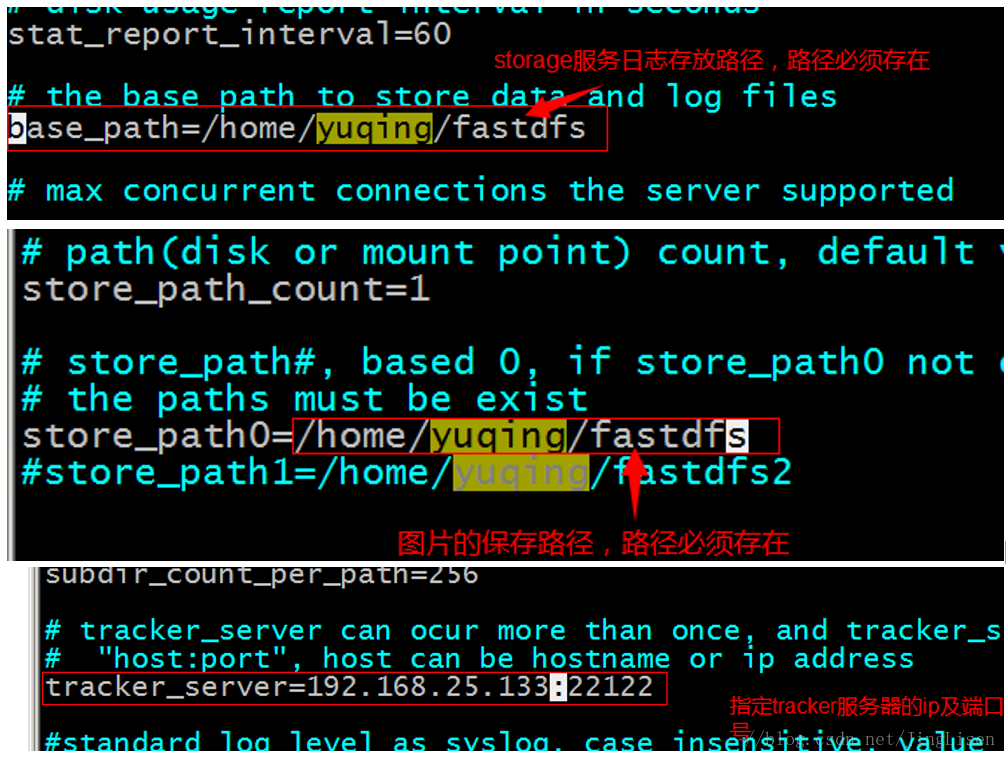
(2)、配置storage服务。修改/etc/fdfs/storage.conf文件
(3)、启动storage服务。
/usr/bin/fdfs_storaged /etc/fdfs/storage.conf restart
第六步:测试服务。
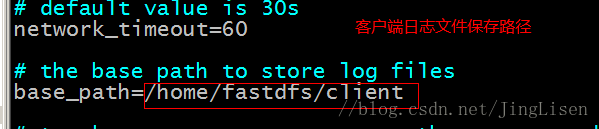
(1)、修改配置文件/etc/fdfs/client.conf

(2)、测试
/usr/bin/fdfs_test /etc/fdfs/client.conf upload anti-steal.jpg
第七步:搭建nginx提供http服务。
可以使用官方提供的nginx插件。要使用nginx插件需要重新编译。
fastdfs-nginx-module_v1.16.tar.gz
(1)、解压插件压缩包
(2)、修改/root/fastdfs-nginx-module/src/config文件,把其中的local去掉。

(3)、对nginx重新config
./configure \
–prefix=/usr/local/nginx \
–pid-path=/var/run/nginx/nginx.pid \
–lock-path=/var/lock/nginx.lock \
–error-log-path=/var/log/nginx/error.log \
–http-log-path=/var/log/nginx/access.log \
–with-http_gzip_static_module \
–http-client-body-temp-path=/var/temp/nginx/client \
–http-proxy-temp-path=/var/temp/nginx/proxy \
–http-fastcgi-temp-path=/var/temp/nginx/fastcgi \
–http-uwsgi-temp-path=/var/temp/nginx/uwsgi \
–http-scgi-temp-path=/var/temp/nginx/scgi \
–add-module=/usr/software/fastdfs-nginx-module/src
(4)、make
(5)、make install
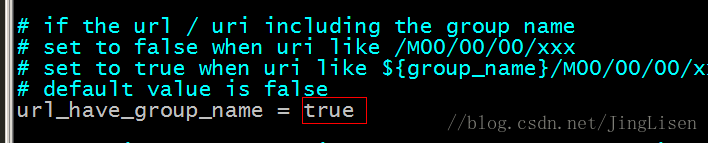
(6)、把/root/fastdfs-nginx-module/src/mod_fastdfs.conf文件复制到/etc/fdfs目录下。编辑:


(7)、nginx的配置
在nginx的配置文件中添加一个Server:
server {
listen 80;
server_name 192.168.101.3;
}
(8)、将libfdfsclient.so拷贝至/usr/lib下
cp /usr/lib64/libfdfsclient.so /usr/lib/
(9)、启动nginx
使用方法:
(1)、把FastDFS提供的jar包添加到工程中
(2)、初始化全局配置。加载一个配置文件。
(3)、创建一个TrackerClient对象。
(4)、创建一个TrackerServer对象。
(5)、声明一个StorageServer对象,null。
(6)、获得StorageClient对象。
(7)、直接调用StorageClient对象方法上传文件即可。
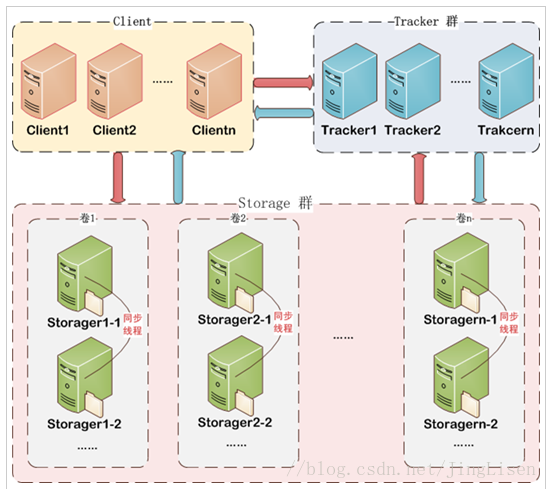
1 什么是FastDFS
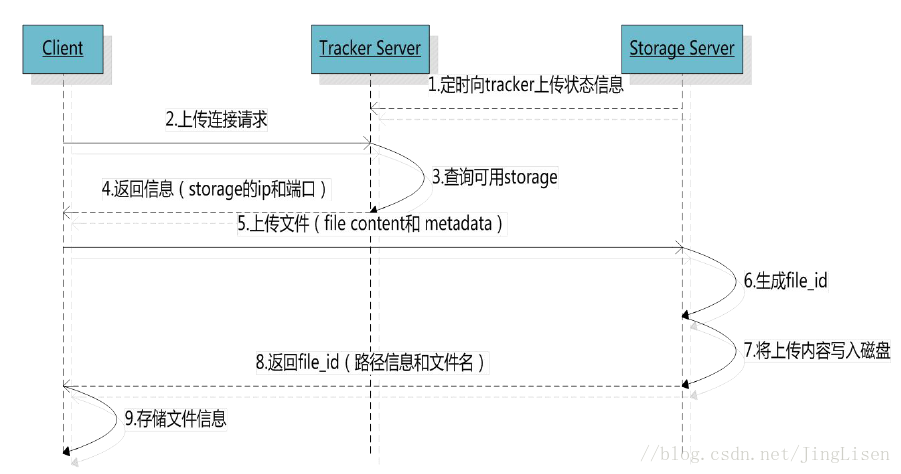
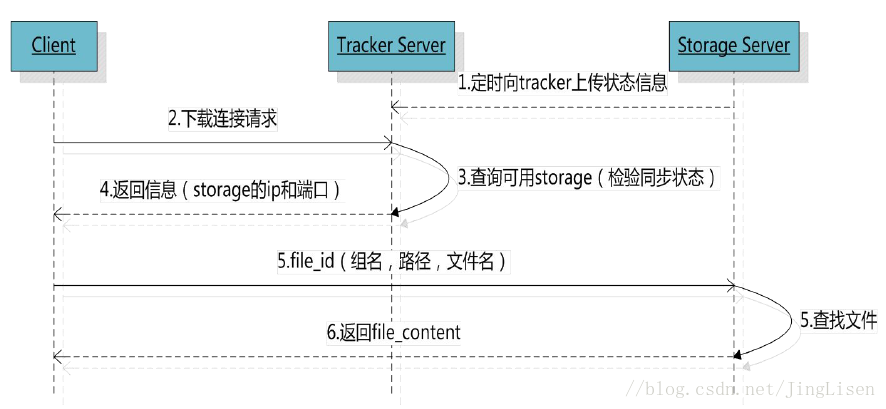
FastDFS是用c语言编写的一款开源的分布式文件系统。FastDFS为互联网量身定制,充分考虑了冗余备份、负载均衡、线性扩容等机制,并注重高可用、高性能等指标,使用FastDFS很容易搭建一套高性能的文件服务器集群提供文件上传、下载等服务。2 文件上传流程
3 文件下载流程
4 上传文件的文件名
客户端上传文件后存储服务器将文件ID返回给客户端,此文件ID用于以后访问该文件的索引信息。文件索引信息包括:组名,虚拟磁盘路径,数据两级目录,文件名。 组名:文件上传后所在的storage组名称,在文件上传成功后有storage服务器返回,需要客户端自行保存。
虚拟磁盘路径:storage配置的虚拟路径,与磁盘选项store_path*对应。如果配置了store_path0则是M00,如果配置了store_path1则是M01,以此类推。
数据两级目录:storage服务器在每个虚拟磁盘路径下创建的两级目录,用于存储数据文件。
文件名:与文件上传时不同。是由存储服务器根据特定信息生成,文件名包含:源存储服务器IP地址、文件创建时间戳、文件大小、随机数和文件拓展名等信息。
5 FastDFS搭建
可以使用一台虚拟机来模拟,只有一个Tracker、一个Storage服务。
配置nginx访问图片。
6 搭建步骤
第一步:把fastDFS都上传到linux系统。第二步:安装FastDFS之前,先安装libevent工具包。
yum -y install libevent
第三步:安装libfastcommonV1.0.7工具包。
(1)、解压缩
(2)、./make.sh
(3)、./ma
4000
ke.sh install
(4)、把/usr/lib64/libfastcommon.so文件向/usr/lib/下复制一份
第四步:安装Tracker服务。
(1)、解压缩
(2)、./make.sh
(3)、./make.sh install
安装后在/usr/bin/目录下有以fdfs开头的文件都是编译出来的。
配置文件都放到/etc/fdfs文件夹
(4)、把/root/FastDFS/conf目录下的所有的配置文件都复制到/etc/fdfs下。
(5)、配置tracker服务。修改/etc/fdfs/tracker.conf文件。
(6)、启动tracker。/usr/bin/fdfs_trackerd /etc/fdfs/tracker.conf
重启使用命令:/usr/bin/fdfs_trackerd /etc/fdfs/tracker.conf restart
第五步:安装storage服务。
(1)、如果是在不同的服务器安装,第四步的1~4需要重新执行。
(2)、配置storage服务。修改/etc/fdfs/storage.conf文件
(3)、启动storage服务。
/usr/bin/fdfs_storaged /etc/fdfs/storage.conf restart
第六步:测试服务。
(1)、修改配置文件/etc/fdfs/client.conf
(2)、测试
/usr/bin/fdfs_test /etc/fdfs/client.conf upload anti-steal.jpg
第七步:搭建nginx提供http服务。
可以使用官方提供的nginx插件。要使用nginx插件需要重新编译。
fastdfs-nginx-module_v1.16.tar.gz
(1)、解压插件压缩包
(2)、修改/root/fastdfs-nginx-module/src/config文件,把其中的local去掉。
(3)、对nginx重新config
./configure \
–prefix=/usr/local/nginx \
–pid-path=/var/run/nginx/nginx.pid \
–lock-path=/var/lock/nginx.lock \
–error-log-path=/var/log/nginx/error.log \
–http-log-path=/var/log/nginx/access.log \
–with-http_gzip_static_module \
–http-client-body-temp-path=/var/temp/nginx/client \
–http-proxy-temp-path=/var/temp/nginx/proxy \
–http-fastcgi-temp-path=/var/temp/nginx/fastcgi \
–http-uwsgi-temp-path=/var/temp/nginx/uwsgi \
–http-scgi-temp-path=/var/temp/nginx/scgi \
–add-module=/usr/software/fastdfs-nginx-module/src
(4)、make
(5)、make install
(6)、把/root/fastdfs-nginx-module/src/mod_fastdfs.conf文件复制到/etc/fdfs目录下。编辑:
(7)、nginx的配置
在nginx的配置文件中添加一个Server:
server {
listen 80;
server_name 192.168.101.3;
location /group1/M00/{
#root /home/FastDFS/fdfs_storage/data;
ngx_fastdfs_module;
}
}
(8)、将libfdfsclient.so拷贝至/usr/lib下
cp /usr/lib64/libfdfsclient.so /usr/lib/
(9)、启动nginx
7 图片服务的使用
官方提供一个jar包使用方法:
(1)、把FastDFS提供的jar包添加到工程中
(2)、初始化全局配置。加载一个配置文件。
(3)、创建一个TrackerClient对象。
(4)、创建一个TrackerServer对象。
(5)、声明一个StorageServer对象,null。
(6)、获得StorageClient对象。
(7)、直接调用StorageClient对象方法上传文件即可。
@Test
public void testUpload() throws Exception {
// 1、把FastDFS提供的jar包添加到工程中
// 2、初始化全局配置。加载一个配置文件。
ClientGlobal.init("D:\\workspaces-itcast\\JaveEE18\\taotao-manager\\taotao-manager-web\\src\\main\\resources\\properties\\client.conf");
// 3、创建一个TrackerClient对象。
TrackerClient trackerClient = new TrackerClient();
// 4、创建一个TrackerServer对象。
TrackerServer trackerServer = trackerClient.getConnection();
// 5、声明一个StorageServer对象,null。
StorageServer storageServer = null;
// 6、获得StorageClient对象。
StorageClient storageClient = new StorageClient(trackerServer, storageServer);
// 7、直接调用StorageClient对象方法上传文件即可。
String[] strings = storageClient.upload_file("D:\\Documents\\Pictures\\images\\2f2eb938943d.jpg", "jpg", null);
for (String string : strings) {
System.out.println(string);
}
}

相关文章推荐
- 搭建FastDFS,Nginx,fastdfs-nginx-module图片资源服务器
- fastdfs+nginx+tracker搭建互联网电商分布式图片服务器过程
- ubuntu16.04搭建FASTDFS图片服务器并配置nginx
- 利用nginx搭建简单图片服务器实现负载均衡
- Nginx 教程二:利用nginx搭建静态文件服务、正向代理服务器、反向代理服务器
- 利用nginx搭建RTMP视频点播、直播、HLS服务器
- nginx 搭建图片服务器出现 403 forbidden的解决方法
- [置顶] 【FastDFS】搭建一台结构简单的FastDFS图片服务器
- nginx和ftp搭建图片服务器
- Linux下FastDFS图片服务器的搭建
- 利用nginx搭建http和rtmp协议的流媒体服务器
- FastDFS组合nginx的http_image_filter_module建立的图片服务器-分布式文件系统(FastDFS)-ChinaUnix.net
- 利用Nginx搭建http和rtmp协议的流媒体服务器[转]
- Centos7单台服务器搭建FastDFS+Nginx
- Nginx+Nodejs搭建图片服务器
- nginx + FastDFS分布式文件服务器搭建
- 使用FastDFS搭建图片服务器(单实例)
- 利用nginx搭建http和rtmp协议的流媒体服务器
- Nginx+vsftpd搭建图片服务器
- nginx搭建图片服务器