Spring Mvc第一个web程序
2018-03-21 21:35
429 查看
Spring Mvc第一个web程序
介绍
Spring Mvc是一种轻量级的web开发框架,有了
Spring Mvc我们只需要关注在我们的逻辑代码和业务代码上就可以了,比传统的重量级web开发,节省了大量的时间。
比较正规的介绍
Spring Web MVC是一种基于Java的实现了Web MVC设计模式的请求驱动类型的轻量级Web框架,即使用了MVC架构模式的思想,将web层进行职责解耦,基于请求驱动指的就是使用请求-响应模型,框架的目的就是帮助我们简化开发,Spring Web MVC也是要简化我们日常Web开发的。SpringMVC处理流程
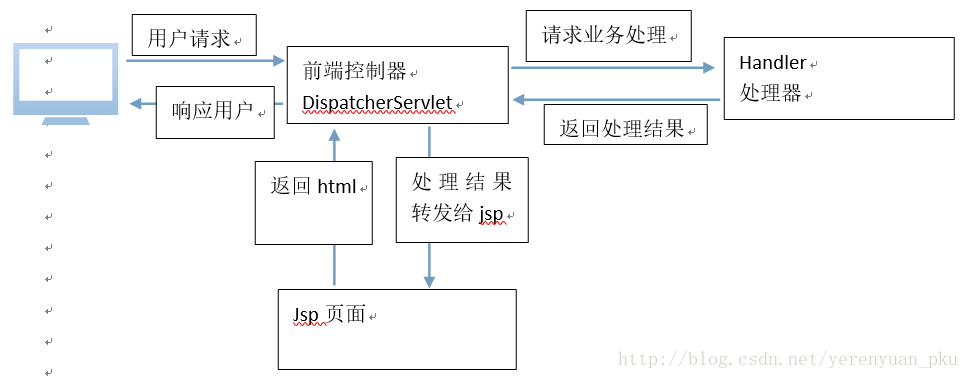
图片来自互联网
入门程序
第一步:创建Maven Web项目
这里就不演示了,不会的可以去看这篇文章:https://www.cnblogs.com/wen1027/p/6709810.html
第二步:引入Spring MVC包
在pom.xml文件中,添加一下代码,引入Spring mvc依赖包
<!-- Spring -->
<dependency>
<groupId>org.springframework</groupId>
<artifactId>spring-context</artifactId>
<version>3.1.1.RELEASE</version>
<exclusions>
<!-- Exclude Commons Logging in favor of SLF4j -->
<exclusion>
<groupId>commons-logging</groupId>
<artifactId>commons-logging</artifactId>
</exclusion>
</exclusions>
</dependency>
<dependency>
<groupId>org.springframework</groupId>
<artifactId>spring-webmvc</artifactId>
<version>3.1.1.RELEASE</version>
</dependency>
第三步:配置web.xml
添加自定义的Servlet和控制器中的xml文件:
<context-param>
<param-name>contextConfigLocation</param-name>
<param-value>/WEB-INF/spring/root-context.xml</param-value>
</context-param>
添加
Spring中的监听器:
<listener>
<listener-class>org.springframework.web.context.ContextLoaderListener</listener-class>
</listener>
添加
Spring中的路由
Servlet:
<servlet>
<servlet-name>appServlet</servlet-name>
<servlet-class>org.springframework.web.servlet.DispatcherServlet</servlet-class>
<init-param>
<param-name>contextConfigLocation</param-name>
<param-value>/WEB-INF/spring/appServlet/servlet-context.xml</param-value>
</init-param>
<load-on-startup>1</load-on-startup>
</servlet>

<servlet-mapping>
<servlet-name>appServlet</servlet-name>
<url-pattern>/</url-pattern>
</servlet-mapping>
整个web.xml的内容
<?xml version="1.0" encoding="UTF-8"?>
<web-app version="2.5" xmlns="http://java.sun.com/xml/ns/javaee"
xmlns:xsi="http://www.w3.org/2001/XMLSchema-instance"
xsi:schemaLocation="http://java.sun.com/xml/ns/javaee http://java.sun.com/xml/ns/javaee/web-app_2_5.xsd">
<context-param>
<param-name>contextConfigLocation</param-name>
<param-value>/WEB-INF/spring/root-context.xml</param-value>
</context-param>
<listener>
<listener-class>org.springframework.web.context.ContextLoaderListener</listener-class>
</listener>
<servlet>
<servlet-name>appServlet</servlet-name>
<servlet-class>org.springframework.web.servlet.DispatcherServlet</servlet-class>
<init-param>
<param-name>contextConfigLocation</param-name>
<param-value>/WEB-INF/spring/appServlet/servlet-context.xml</param-value>
</init-param>
<load-on-startup>1</load-on-startup>
</servlet>

<servlet-mapping>
<servlet-name>appServlet</servlet-name>
<url-pattern>/</url-pattern>
</servlet-mapping>
</web-app>
第四步:
在第三步,你声明Spring中的
servlet传入的参数有个文件路径,当然你也可以指定其他路径,但是必须确保该路径可以被找到
上面的文件路径:
<param-value>/WEB-INF/spring/appServlet/servlet-context.xml</param-value>
在声明的路径下创建该文件
servlet-context.xml,将下面模板拷贝下去:
<?xml version="1.0" encoding="UTF-8"?>
<beans:beans xmlns="http://www.springframework.org/schema/mvc"
xmlns:xsi="http://www.w3.org/2001/XMLSchema-instance"
xmlns:beans="http://www.springframework.org/schema/beans"
xmlns:context="http://www.springframework.org/schema/context"
xsi:schemaLocation="http://www.springframework.org/schema/mvc http://www.springframework.org/schema/mvc/spring-mvc.xsd http://www.springframework.org/schema/beans http://www.springframework.org/schema/beans/spring-beans.xsd http://www.springframework.org/schema/context http://www.springframework.org/schema/context/spring-context.xsd">
</beans:beans>
先添加资源引用转换声明:
<resources mapping="/resources/**" location="/resources/" />
启动注解驱动:
<annotation-driven />
声明
View试图的文件及路径
<beans:bean class="org.springframework.web.servlet.view.InternalResourceViewResolver">
<beans:property name="prefix" value="/WEB-INF/views/" />
<beans:property name="suffix" value=".jsp" />
</beans:bean>
然后创建
/WEB-INF/views/路径
声明扫描的注解包:
<context:component-scan base-package="cn.wenhaha.huoju" />
第三步还指定了一个/WEB-INF/spring/root-context.xml文件路径, 在该路径下创建该文件。里面的内容暂时为空
<?xml version="1.0" encoding="UTF-8"?>
<beans xmlns="http://www.springframework.org/schema/beans"
xmlns:xsi="http://www.w3.org/2001/XMLSchema-instance"
xsi:schemaLocation="http://www.springframework.org/schema/beans http://www.springframework.org/schema/beans/spring-beans.xsd">
</beans>
第四步:创建控制层
新建一个HomeController类:public class HomeController {
public String home(Locale locale, Model model) {
Date date = new Date();
DateFormat dateFormat = DateFormat.getDateTimeInstance(DateFormat.LONG, DateFormat.LONG, locale);
String formattedDate = dateFormat.format(date);
model.addAttribute("serverTime", formattedDate );
return "home";
}
}然后用
@Controller注解声明这是一个
Controller层,然后用
@RequestMapping注解声明
home方法为路由。
@Controller
public class HomeController {
@RequestMapping("/hi")
public String home(Locale locale, Model model) {

Date date = new Date();
DateFormat dateFormat = DateFormat.getDateTimeInstance(DateFormat.LONG, DateFormat.LONG, locale);

String formattedDate = dateFormat.format(date);

model.addAttribute("serverTime", formattedDate );

return "home";
}
}最后在/WEB-INF/views/路径下,创建
home.jsp文件
<%@ taglib uri="http://java.sun.com/jsp/jstl/core" prefix="c" %>
<%@ page session="false"  contentType="text/html; charset=utf-8"%>
<html>
<head>
<title>Home</title>
</head>
<body>
<h1>
Hello world!
</h1>

<P>  The time on the server is ${serverTime}. </P>
</body>
</html>
启动服务器看效果


相关文章推荐
- Spring入门17 - 第一个Spring MVC Web程序
- 干净win7要做几步才能运行第一个Spring MVC 写的动态web程序
- 最简单的Spring MVC Web程序记录
- swift之第一个IOS程序(浏览web页面)
- Django第一个web程序
- React+webpack构建你的第一个程序
- 【JavaWeb开发(二)】第一个jsp程序以及web.xml分析
- 第一个Spring Boot Web程序
- 用Eclipse MyEclipse WebLogic8.1开发第一个Web程序
- 整合Eclipse与Tomcat开发第一个WEB程序
- .NET Core初体验 - 在Mac下运行第一个Web示例程序
- 第一个Python Web程序——简单的Web服务器
- 第一个自己写的MVC小程序,重点是web.xml的配置问题
- 使用Seam Framework + JBoss 5.0 开发第一个Web应用 - 简单投票程序
- 第一个web程序(web.xml , ServletConfig , ServletContext)
- Servlet入门(第一个Servlet的Web程序)
- Spring研究 (1) 第一个Spring MVC程序
- 第一个Spring MVC程序
- 搭建java web开发环境、使用eclipse编写第一个java web程序
- Windows Azure入门教学系列 (二): 部署第一个Web Role程序