Spring-Session实现Session共享Redis集群方式配置教程
2018-03-07 14:46
836 查看
循序渐进,由易到难,这样才更有乐趣!
对Redis-Cluster和Redis-Sentinel不太懂,或者不知道在Windows下面如何搭建的伙伴,请先移步到,
Redis高可用集群-哨兵模式(Redis-Sentinel)搭建配置教程【Windows环境】
Redis创建高可用集群教程【Windows环境】
进行简单的学习和配置好本次需要的环境!
spring-session-data-redis
而这个jar包会自动下载Spring-session和Jedis的依赖
spring-session
jedis
本次开始就直接上代码和配置,并进行简单的说明!
本次集群配置教程结束!
spring-session实现分布式集群session的共享
【第二篇】Spring-Session实现Session共享Redis集群方式配置教程
【第三篇】Spring-Session实现Session共享实现原理以及源码解析
本系列的源码下载地址:learn-spring-session-core
如果您觉得这篇博文对你有帮助,请点个赞,让更多的人看到,谢谢!
如果帅气(美丽)、睿智(聪颖),和我一样简单善良的你看到本篇博文中存在问题,请指出,我虚心接受你让我成长的批评,谢谢阅读!
祝你今天开心愉快!
欢迎访问我的csdn博客,我们一同成长!
“不管做什么,只要坚持下去就会看到不一样!在路上,不卑不亢!”
博客首页:http://blog.csdn.net/u010648555
概述
本篇开始继续上一篇的内容基础上进行,本篇主要介绍Spring-Session实现配置使用Redis集群,会有两种配置方式,一种是Redis-Cluster,一种是Redis-Sentinel,并通过一个简单的demo进行实例演示!对Redis-Cluster和Redis-Sentinel不太懂,或者不知道在Windows下面如何搭建的伙伴,请先移步到,
Redis高可用集群-哨兵模式(Redis-Sentinel)搭建配置教程【Windows环境】
Redis创建高可用集群教程【Windows环境】
进行简单的学习和配置好本次需要的环境!
Spring-Session 集成Redis集群
由于有了上一篇的介绍,上一篇中添加依赖:spring-session-data-redis
而这个jar包会自动下载Spring-session和Jedis的依赖
spring-session
jedis
本次开始就直接上代码和配置,并进行简单的说明!
redis.properties
#jedisPoolConfig
redis.maxTotal=10
redis.maxIdle=8
redis.minIdle=0
redis.testOnBorrow=true
redis.testOnReturn=true
redis.maxWaitMillis=-1
redis.blockWhenExhausted=true
redis.evictionPolicyClassName=org.apache.commons.pool2.impl.DefaultEvictionPolicy
#redis-sentinel

redis.sentinel1.host=127.0.0.1
redis.sentinel1.port=26379

redis.sentinel2.host=127.0.0.1
redis.sentinel2.port=26380

redis.sentinel3.host=127.0.0.1
redis.sentinel3.port=26381

#redis-cluster
#重试次数,在执行失败后,进行的重试次数,默认是5
#此值设置过大时,容易报:Too many Cluster redirections
redis.cluster.maxRedirects=3

redis.cluster0.host=127.0.0.1
redis.cluster0.port=20000

redis.cluster1.host=127.0.0.1
redis.cluster1.port=20001

redis.cluster2.host=127.0.0.1
redis.cluster2.port=20002

redis.cluster3.host=127.0.0.1
redis.cluster3.port=20003

redis.cluster4.host=127.0.0.1
redis.cluster4.port=20004

redis.cluster5.host=127.0.0.1
redis.cluster5.port=20005
Spring-Session 集成Redis-Sentinel
Redis-Sentinel配置
<?xml version="1.0" encoding="UTF-8"?>
<beans xmlns="http://www.springframework.org/schema/beans"
xmlns:xsi="http://www.w3.org/2001/XMLSchema-instance"
xmlns:context="http://www.springframework.org/schema/context"
xsi:schemaLocation="http://www.springframework.org/schema/beans http://www.springframework.org/schema/beans/spring-beans-4.3.xsd http://www.springframework.org/schema/context http://www.springframework.org/schema/context/spring-context-4.3.xsd">
<!-- 打开注解方式 -->
<context:annotation-config/>

<!--可以將redis配置写入配置文件中-->
<context:property-placeholder location="classpath:redis.properties"/>

<!--创建一个Spring Bean的名称springSessionRepositoryFilter实现过滤器。
筛选器负责将HttpSession实现替换为Spring会话支持。在这个实例中,Spring会话得到了Redis的支持。-->
<bean class="org.springframework.session.data.redis.config.annotation.web.http.RedisHttpSessionConfiguration"/>

<!--创建了一个RedisConnectionFactory,它将Spring会话连接到Redis服务器。我们配置连接到默认端口(6379)上的本地主机!-->

<!-- //单机Redis
<bean class="org.springframework.data.redis.connection.jedis.JedisConnectionFactory">
<constructor-arg ref="jedisPoolConfig"/>
<property name="port" value="6379"/>
<property name="hostName" value="localhost"/>
</bean>
-->
<!--集群Redis-->
<bean id="jedisConnectionFactory" class="org.springframework.data.redis.connection.jedis.JedisConnectionFactory">
<!--Redis-Sentinel-->
<constructor-arg index="0" ref="redisSentinelConfig"/>

<!--配置Redis连接池 ,测试使用可以不配置,使用默认就行!-->
<constructor-arg index="1" ref="jedisPoolConfig"/>

</bean>

<bean id="jedisPoolConfig" class="redis.clients.jedis.JedisPoolConfig">

<!--最大连接数, 默认8个-->
<property name="maxTotal" value="${redis.maxTotal}"/>

<!--最大空闲连接数, 默认8-->
<property name="maxIdle" value="${redis.maxIdle}"/>

<!--最小空闲连接数, 默认0-->
<property name="minIdle" value="${redis.minIdle}"/>

<!--在获取连接的时候检查有效性, 默认false-->
<property name="testOnBorrow" value="${redis.testOnBorrow}"/>

<!--在空闲时检查有效性, 默认false, 新版jedis 不支持这个参数了-->
<property name="testOnReturn" value="${redis.testOnReturn}"/>

<!--获取连接时的最大等待毫秒数(如果设置为阻塞时BlockWhenExhausted),如果超时就抛异常, 小于零:阻塞不确定的时间,  默认-1-->
<property name="maxWaitMillis" value="${redis.maxWaitMillis}"/>

<!--连接耗尽时是否阻塞, false报异常,ture阻塞直到超时, 默认true-->
<property name="blockWhenExhausted" value="${redis.blockWhenExhausted}"/>

<!--设置的逐出策略类名, 默认DefaultEvictionPolicy(当连接超过最大空闲时间,或连接数超过最大空闲连接数)-->
<property name="evictionPolicyClassName" value="${redis.evictionPolicyClassName}"/>

<!--还有很多配置参数,参数的调优还没接触过,后面有机会结合项目整理整理-->
</bean>

<!--哨兵模式配置-->
<bean id="redisSentinelConfig" class="org.springframework.data.redis.connection.RedisSentinelConfiguration">

<property name="master">
<bean class="org.springframework.data.redis.connection.RedisNode">
<property name="name" value="mymaster"></property>
</bean>
</property>

<property name="sentinels">
<set>
<bean  id="sentinel1" class="org.springframework.data.redis.connection.RedisNode">
<constructor-arg name="host" value="${redis.sentinel1.host}"/>
<constructor-arg name="port" value="${redis.sentinel1.port}"/>
</bean>
<bean  id="sentinel2" class="org.springframework.data.redis.connection.RedisNode" >
<constructor-arg name="host" value="${redis.sentinel2.host}"/>
<constructor-arg name="port" value="${redis.sentinel2.port}"/>
</bean>
<bean  id="sentinel3" class="org.springframework.data.redis.connection.RedisNode">
<constructor-arg name="host" value="${redis.sentinel3.host}"/>
<constructor-arg name="port" value="${redis.sentinel3.port}"/>
</bean>
</set>
</property>
</bean>

</beans>
Spring-Session 集成Redis-Cluster
Redis-Cluster配置
<?xml version="1.0" encoding="UTF-8"?>
<beans xmlns="http://www.springframework.org/schema/beans"
xmlns:xsi="http://www.w3.org/2001/XMLSchema-instance"
xmlns:context="http://www.springframework.org/schema/context"
xsi:schemaLocation="http://www.springframework.org/schema/beans http://www.springframework.org/schema/beans/spring-beans-4.3.xsd http://www.springframework.org/schema/context http://www.springframework.org/schema/context/spring-context-4.3.xsd">
<!-- 打开注解方式 -->
<context:annotation-config/>

<!--可以將redis配置写入配置文件中-->
<context:property-placeholder location="classpath:redis.properties"/>

<!--创建一个Spring Bean的名称springSessionRepositoryFilter实现过滤器。
筛选器负责将HttpSession实现替换为Spring会话支持。在这个实例中,Spring会话得到了Redis的支持。-->
<bean class="org.springframework.session.data.redis.config.annotation.web.http.RedisHttpSessionConfiguration"/>

<!--创建了一个RedisConnectionFactory,它将Spring会话连接到Redis服务器。我们配置连接到默认端口(6379)上的本地主机!-->
<!--集群Redis-->
<bean id="jedisConnectionFactory" class="org.springframework.data.redis.connection.jedis.JedisConnectionFactory">
<!--Redis-CLuster-->
<constructor-arg index="0" ref="redisClusterConfig"/>

<!--配置Redis连接池 ,可以不配置,使用默认就行!-->
<constructor-arg index="1" ref="jedisPoolConfig"/>
</bean>

<bean id="jedisPoolConfig" class="redis.clients.jedis.JedisPoolConfig">

<!--最大连接数, 默认8个-->
<property name="maxTotal" value="${redis.maxTotal}"/>

<!--最大空闲连接数, 默认8-->
<property name="maxIdle" value="${redis.maxIdle}"/>

<!--最小空闲连接数, 默认0-->
<property name="minIdle" value="${redis.minIdle}"/>

<!--在获取连接的时候检查有效性, 默认false-->
<property name="testOnBorrow" value="${redis.testOnBorrow}"/>

<!--在空闲时检查有效性, 默认false, 新版jedis 不支持这个参数了-->
<property name="testOnReturn" value="${redis.testOnReturn}"/>

<!--获取连接时的最大等待毫秒数(如果设置为阻塞时BlockWhenExhausted),如果超时就抛异常, 小于零:阻塞不确定的时间,  默认-1-->
<property name="maxWaitMillis" value="${redis.maxWaitMillis}"/>

<!--连接耗尽时是否阻塞, false报异常,ture阻塞直到超时, 默认true-->
<property name="blockWhenExhausted" value="${redis.blockWhenExhausted}"/>

<!--设置的逐出策略类名, 默认DefaultEvictionPolicy(当连接超过最大空闲时间,或连接数超过最大空闲连接数)-->
<property name="evictionPolicyClassName" value="${redis.evictionPolicyClassName}"/>

<!--还有很多配置参数,参数的调优还没接触过,后面有机会结合项目整理整理-->
</bean>

<!--集群模式配置-->
<bean id="redisClusterConfig" class="org.springframework.data.redis.connection.RedisClusterConfiguration">
<property name="maxRedirects" value="${redis.cluster.maxRedirects}"/>
<property name="clusterNodes">
<set>
<bean id="cluster0" class="org.springframework.data.redis.connection.RedisNode">
<constructor-arg name="host" value="${redis.cluster0.host}"/>
<constructor-arg name="port" value="${redis.cluster0.port}"/>
</bean>
<bean id="cluster1" class="org.springframework.data.redis.connection.RedisNode">
<constructor-arg name="host" value="${redis.cluster1.host}"/>
<constructor-arg name="port" value="${redis.cluster1.port}"/>
</bean>
<bean id="cluster2" class="org.springframework.data.redis.connection.RedisNode">
<constructor-arg name="host" value="${redis.cluster2.host}"/>
<constructor-arg name="port" value="${redis.cluster2.port}"/>
</bean>
<bean id="cluster3" class="org.springframework.data.redis.connection.RedisNode">
<constructor-arg name="host" value="${redis.cluster3.host}"/>
<constructor-arg name="port" value="${redis.cluster3.port}"/>
</bean>
<bean id="cluster4" class="org.springframework.data.redis.connection.RedisNode">
<constructor-arg name="host" value="${redis.cluster4.host}"/>
<constructor-arg name="port" value="${redis.cluster4.port}"/>
</bean>
<bean id="cluster5" class="org.springframework.data.redis.connection.RedisNode">
<constructor-arg name="host" value="${redis.cluster5.host}"/>
<constructor-arg name="port" value="${redis.cluster5.port}"/>
</bean>
</set>
</property>
</bean>

</beans>
演示验证
只演示Redis-Cluster,Redis-Cluster和Redis-Cluster就配置稍有不同,其他一样!启动Redis
启动Nginx
启动两台Tomcat
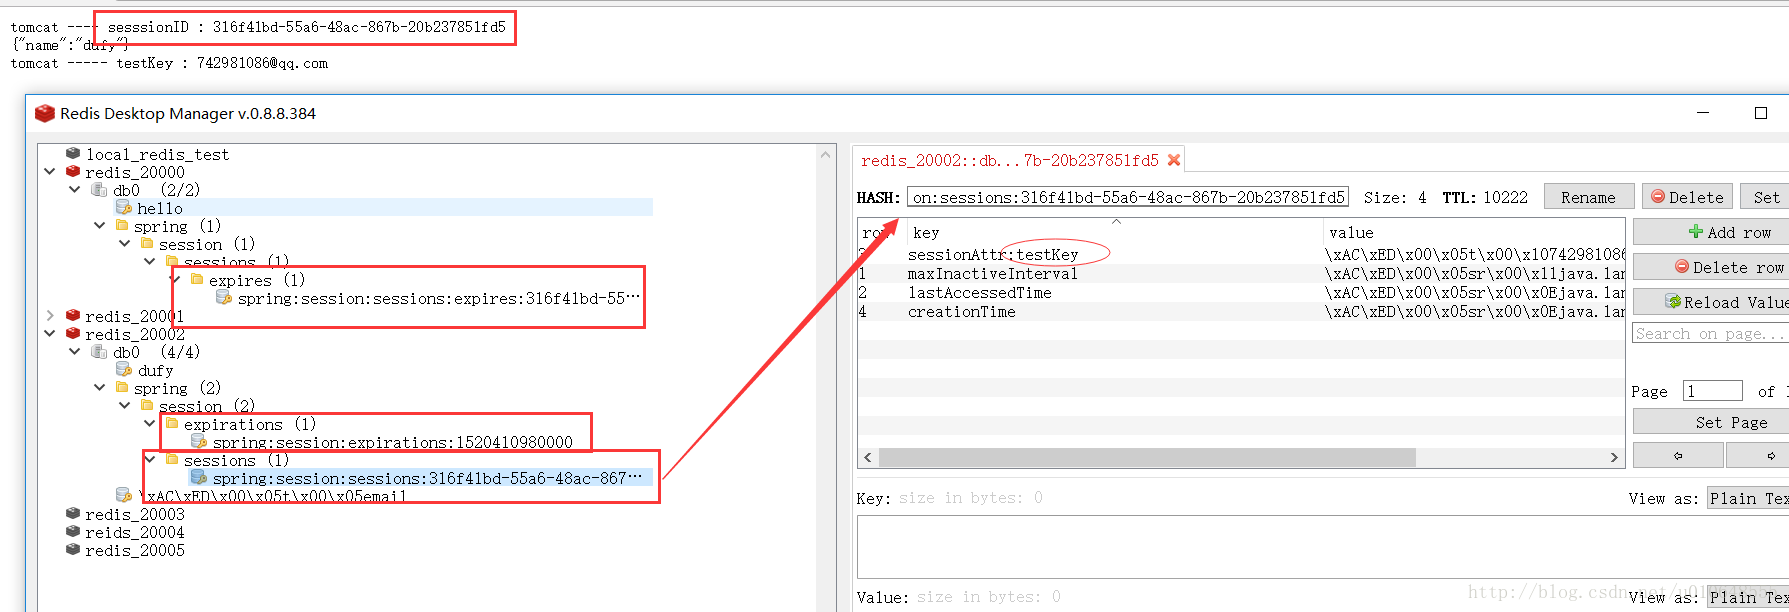
上述三步和上一篇一样,这里就不在介绍!查看Session保存效果
使用RedisDesktopManager,具体看下面截图,保存成功!本次集群配置教程结束!
参考文章
架构设计之Spring-Session分布式集群会话管理spring-session实现分布式集群session的共享
本系列教程
【第一篇】Spring-Session实现Session共享入门教程【第二篇】Spring-Session实现Session共享Redis集群方式配置教程
【第三篇】Spring-Session实现Session共享实现原理以及源码解析
本系列的源码下载地址:learn-spring-session-core
如果您觉得这篇博文对你有帮助,请点个赞,让更多的人看到,谢谢!
如果帅气(美丽)、睿智(聪颖),和我一样简单善良的你看到本篇博文中存在问题,请指出,我虚心接受你让我成长的批评,谢谢阅读!
祝你今天开心愉快!
欢迎访问我的csdn博客,我们一同成长!
“不管做什么,只要坚持下去就会看到不一样!在路上,不卑不亢!”
博客首页:http://blog.csdn.net/u010648555

相关文章推荐
- Spring-Session实现Session共享Redis集群方式配置教程
- SpringSession+Redis实现集群会话共享的方法
- mybatis+spring+springmvc+springsession + redis实现session共享配置
- Nginx+Tomcat搭建集群,Spring Session+Redis实现Session共享
- spring Session + Redis集群 + 哨兵部署下实现Session共享
- spring session redis 实现集群session共享,SessionListener监听生效
- ehcache集群缓存同步配置(rmi方式)实现session共享
- spring-session + redis 实现集群 session 共享
- SpringBoot+redis 实现shiro集群,共享session。亲测可用
- Nginx+Tomcat搭建集群,Spring Session+Redis实现Session共享
- Nginx+Tomcat搭建集群,Spring Session+Redis实现Session共享
- Nginx+Tomcat搭建集群,Spring Session+Redis实现Session共享
- Spring Boot高级教程之使用Redis实现session共享
- WebLogic 通过数据库的方式实现Session共享的配置
- Windows环境下Nginx+Tomcat+Redis实现应用服务器集群负载均衡和Session共享
- spring boot + redis 实现session共享
- spring boot + redis 实现session共享
- tomcat 集群(1)总结tomcat的server.ml配置cluster的方式,以及Tomcat集群session共享失败的解决方法
- tomcat集群使用redis实现session共享
- Linux高可用(HA)之Nginx+Redis+Tomcat集群实现session保持和共享