SpringBoot基于易邮邮件服务器实现本地邮件收发
2018-03-06 23:00
459 查看
SpringBoot快速实现本地邮件收发
一:环境准备
1:邮件服务器:易邮邮件服务器.
开发框架:SpringBoot(1.5.7,版本不限),Mysql,JPA(持久层),Thymeleaf(视图层),IDEA开发工具,FoxMail邮件客户端方便查看.
对于使用过SpringBoot的伙伴来说,搭建一个SpringBoot是非常容易的事情啦,这里就直接开始哈.
2:准备好相应的pom文件的配置
<properties>
<project.build.sourceEncoding>UTF-8</project.build.sourceEncoding>
<project.reporting.outputEncoding>UTF-8</project.reporting.outputEncoding>
<java.version>1.8</java.version>
<!-- 使用Thymeleaf3.0 可以避免单标签不结束的问题-->
<thymeleaf.version>3.0.0.RELEASE</thymeleaf.version>
<thymeleaf-layout-dialect.version>2.0.0</thymeleaf-layout-dialect.version>
</properties>
那个server的账户用户发送邮件的,注意那个域名就可以的.
4:下面来设定字段(主要字段)
username:用户名称.
password:用户密码.
nickname:用户昵称.
email:邮箱地址.
code:邮件激活码
state:用户的激活身份(0:未激活,1:表示已经激活了的)
由于我们使用的JPA,可以不用创建数据表的,运行项目自动生成(数据库创建就自己准备吧)
application.properties中的文件配置
#关闭Thymeleaf的缓存
spring.thymeleaf.cache=false
#热部署生效配置
spring.devtools.restart.enabled=true
#配置JDBC
spring.datasource.driver-class-name=com.mysql.jdbc.Driver
spring.datasource.username=root
spring.datasource.password=自己的数据库密码
spring.datasource.url=jdbc:mysql://localhost:3306/testssm?useUnicode=true&characterEncoding=utf-8#配置JPA访问MySql
spring.jpa.database=mysql
spring.jpa.show-sql=true
#这个create属性就是每次都会新建数据表,但是是空的表.
spring.jpa.hibernate.ddl-auto=update
#使用freemarker来做视图层,关闭缓存
spring.freemarker.cache=false
spring.freemarker.charset=UTF-85:下面就是entity了
@Entity
public class People {
@Id
@GeneratedValue
private Integer uid;
private String username;
private String password;
private String nickname;
private String code;
private String email;
private Integer state;相应的set和get方法就自己加吧.
dao层:
@Repository
public interface PeopleReposity extends JpaRepository<People,Integer> {
/**
* 根据用户的激活码来查询用户
* @param code
* @return
*/
People findByCode(String code);
}UID生成的工具方法
public class UidUtil {
public static String getUUID(){
return UUID.randomUUID().toString().replace("-","");
}
}
Service层
@Service
public class PeopleService {
@Autowired
private PeopleReposity peopleReposity;
/**
* 邮箱注册
*/
public People register(People people) throws Exception {
// 数据插入库
// 发送一份邮件
People people1 = peopleReposity.save(people);
sendMail(people.getEmail(), people.getCode());
return people;
}
/**
* 发送邮件
*/
public static void sendMail(String to, String code) throws Exception {
@Override
protected PasswordAuthentication getPasswordAuthentication() {
return new PasswordAuthentication("server@store.com", "自己的密码哟");
}
}); // 创建邮件对象
Message message = new MimeMessage(session);
// 设置发件人
message.setFrom(new InternetAddress("server@store.com"));
// 设置收件人
message.setRecipient(Message.RecipientType.TO, new InternetAddress(to));
// 设置邮件的主题
message.setSubject("一封来自SpringBoot学习网站的用户注册的激活邮件");
// 设置邮件的正文
message.setContent("<h1>来自SpringBoot的激活邮件,请点击链接激活:</h1><h3><a href='http://localhost:9090/active?code=" + code + "'>http://localhost:9090/active?code=" + code + "</a></h3>", "text/html;charset=UTF-8");
// 发送邮件
Transport.send(message); } /** * 根据激活码来查询用户信息 */ public People findByCode(String code) { return peopleReposity.findByCode(code); } /** * 更新用户的信息 * @param people * @return */ public void save(People people){ peopleReposity.save(people); }}Controller:注册的控制器
@Controller
public class RegisterController {
@Autowired
private PeopleService peopleService;
@RequestMapping(value = "/registerpeople")
public String register(HttpServletRequest request, HttpServletResponse response) throws Exception {
// 获取前台提交的表单参数
response.setCharacterEncoding("UTF-8");
String username=request.getParameter("username");
String password=request.getParameter("password");
String nickname=request.getParameter("nickname");
String email=request.getParameter("email");
// 封装数据
People people=new People();
people.setUsername(username);
people.setPassword(password);
people.setNickname(nickname);
people.setEmail(email);
// 0表示未激活的
people.setState(0);
// uid的设置
String code= UidUtil.getUUID()+UidUtil.getUUID();
people.setCode(code);
// 注册发送邮件的业务
People ps=peopleService.register(people);
// 跳转页面
request.setAttribute("msg","恭喜,您已注册成功,请去邮箱激活!");
return "msg";
}
}视图层:注册的页面
<!DOCTYPE html>
<html xmlns="http://www.w3.org/1999/xhtml"
xmlns:th="http://www.thymeleaf.org">
<head>
<meta charset="UTF-8">
<title>注册页面</title>
<style type="text/css">
*{
margin:0;
padding:0;
}
#register{
width:400px;
height:270px;
position:absolute;
left:400px;
top:100px;
border:4px solid chocolate;
margin:20px;
fce0
padding:20px;
border-radius: 15px;
}
</style>
</head>
<body>
<div id="register" align="center">
<h2>用户注册页面</h2>
<br/>
<form action="/registerpeople" method="post">
用户名: <input type="text" name="username" /><br/><br/>
密码: <input type="password" name="password" /><br/><br/>
昵称: <input type="text" name="nickname" /><br/><br/>
邮箱: <input type="text" name="email" /><br/><br/>
<input type="submit" th:value="注册"/>
<input type="reset" th:value="取消">
</form>
</div>
</body>
</html>提示信息页面:
<!DOCTYPE html>
<html xmlns="http://www.w3.org/1999/xhtml"
xmlns:th="http://www.thymeleaf.org">
<html lang="en">
<head>
<meta charset="UTF-8">
<title>提示信息页面</title>
</head>
<body>
<div align="center">
<h2 th:text="${msg}">提示信息</h2>
</div>
</body>
</html>页面跳转控制器:PageController
@Controller
public class PageController {
@RequestMapping("/register")
public String register(){
return "register";
}
}
激活邮件的控制器ActiveController
@Controller
public class ActiveController {
@Autowired
private PeopleService peopleService;
@RequestMapping(value="/active")
public String active(HttpServletRequest request, HttpServletResponse response){
// 获取激活码
String code=request.getParameter("code");
// 查询用户
People people=peopleService.findByCode(code);
// 修改状态
if(people!=null){
people.setState(1);
people.setCode(null);
peopleService.save(people);
request.setAttribute("msg","您已激活成功,请去登录!");
}else{
request.setAttribute("msg","您的激活码有误,请重新激活!");
}
return "msg";
}
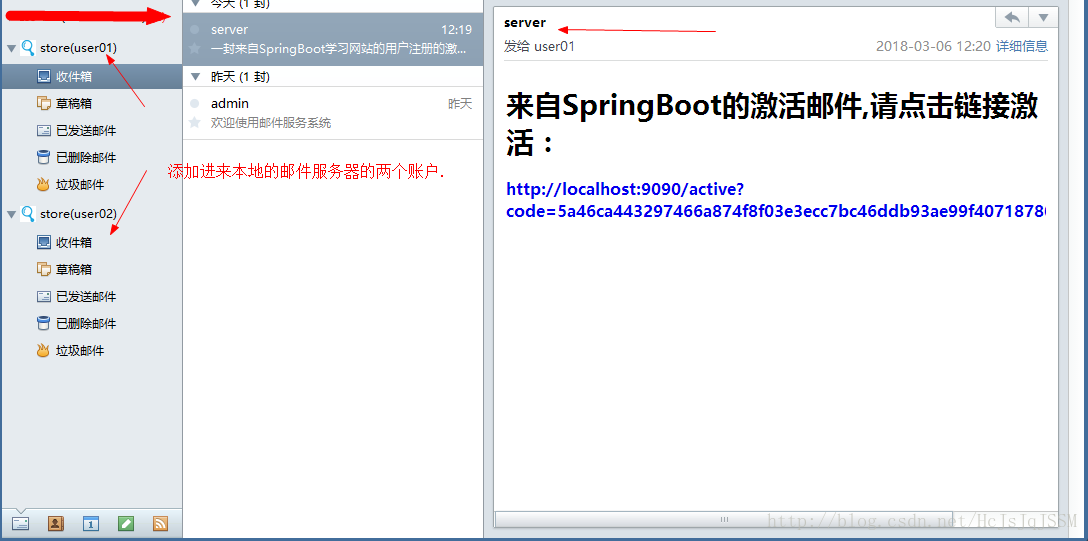
}发送成功的邮件:
数据库信息查看:

邮件激活的操作原理就是:根据邮箱中的激活码查找到该用户后,将用户状态修改为1,然后将code设置为null,只使用一次,然后更新数据表即可.
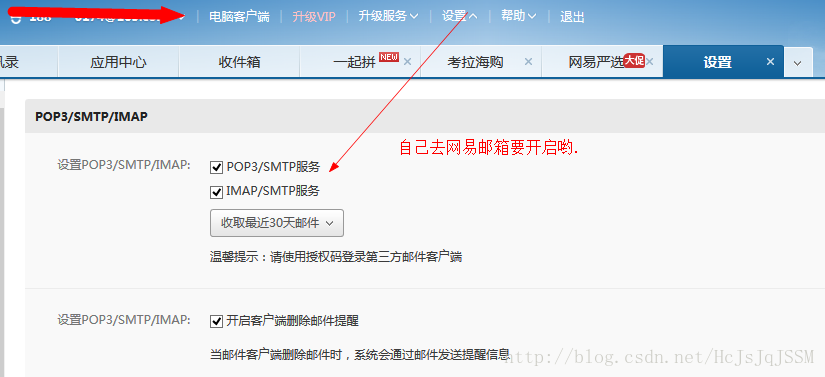
以上就是快速实现本地邮件的收发的(只能本地发送的哟),当然如果要使用自己的网易邮箱的,修改一下,这样就可在在项目中注册邮箱的时候就有自己的网易邮箱来发送邮件了的,一定要开启
/**
* 发送邮件
*/
public static void sendMail(String to, String code) throws Exception {
Properties props = new Properties();
props.put("username", "自己的网易邮箱账号");
props.put("password", "自己的网易邮箱的授权码");
props.put("mail.transport.protocol", "smtp" );
props.put("mail.smtp.host", "smtp.163.com");
props.put("mail.smtp.port", "25" );
Session session = Session.getInstance(props);
// 创建邮件对象
Message message = new MimeMessage(session);
// 设置发件人
message.setFrom(new InternetAddress("自己的网易邮箱账号"));
// 设置收件人
message.setRecipient(Message.RecipientType.TO, new InternetAddress(to));
// 设置邮件的主题
message.setSubject("一封来自SpringBoot学习网站的用户注册的激活邮件");
// 设置邮件的正文
message.setContent("<h1>来自SpringBoot的激活邮件,请点击链接激活:</h1><h3><a href='http://localhost:9090/active?code=" + code + "'>http://localhost:9090/active?code=" + code + "</a></h3>", "text/html;charset=UTF-8");
// 发送邮件
Transport transport = session.getTransport("smtp");
transport.connect(props.getProperty("mail.smtp.host"), props
.getProperty("username"), props.getProperty("password"));
transport.sendMessage(message,message.getAllRecipients());
transport.close();
}至此SpringBoot打造本的邮件发送邮件就介绍完了.
一:环境准备
1:邮件服务器:易邮邮件服务器.
开发框架:SpringBoot(1.5.7,版本不限),Mysql,JPA(持久层),Thymeleaf(视图层),IDEA开发工具,FoxMail邮件客户端方便查看.
对于使用过SpringBoot的伙伴来说,搭建一个SpringBoot是非常容易的事情啦,这里就直接开始哈.
2:准备好相应的pom文件的配置
<properties>
<project.build.sourceEncoding>UTF-8</project.build.sourceEncoding>
<project.reporting.outputEncoding>UTF-8</project.reporting.outputEncoding>
<java.version>1.8</java.version>
<!-- 使用Thymeleaf3.0 可以避免单标签不结束的问题-->
<thymeleaf.version>3.0.0.RELEASE</thymeleaf.version>
<thymeleaf-layout-dialect.version>2.0.0</thymeleaf-layout-dialect.version>
</properties>
<!-- 添加Mysql的依赖 -->
<dependency>
<groupId>mysql</groupId>
<artifactId>mysql-connector-java</artifactId>
<version>5.0.8</version>
</dependency>
<!-- 添加thymeleaf的依赖-->
<dependency>
<groupId>org.springframework.boot</groupId>
<artifactId>spring-boot-starter-thymeleaf</artifactId>
</dependency>
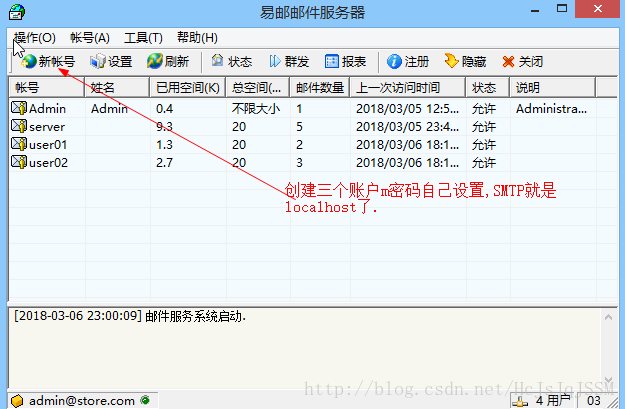
<!-- 添加JPA的依赖-->
<dependency>
<groupId>org.springframework.boot</groupId>
<artifactId>spring-boot-starter-data-jpa</artifactId>
</dependency>
<!-- 发送邮件的依赖-->
<dependency>
<groupId>org.springframework.boot</groupId>
<artifactId>spring-boot-starter-mail</artifactId>
</dependency>
3:易邮邮件服务器上创建三个账户
那个server的账户用户发送邮件的,注意那个域名就可以的.
4:下面来设定字段(主要字段)
username:用户名称.
password:用户密码.
nickname:用户昵称.
email:邮箱地址.
code:邮件激活码
state:用户的激活身份(0:未激活,1:表示已经激活了的)
由于我们使用的JPA,可以不用创建数据表的,运行项目自动生成(数据库创建就自己准备吧)
application.properties中的文件配置
#关闭Thymeleaf的缓存
spring.thymeleaf.cache=false
#热部署生效配置
spring.devtools.restart.enabled=true
#配置JDBC
spring.datasource.driver-class-name=com.mysql.jdbc.Driver
spring.datasource.username=root
spring.datasource.password=自己的数据库密码
spring.datasource.url=jdbc:mysql://localhost:3306/testssm?useUnicode=true&characterEncoding=utf-8#配置JPA访问MySql
spring.jpa.database=mysql
spring.jpa.show-sql=true
#这个create属性就是每次都会新建数据表,但是是空的表.
spring.jpa.hibernate.ddl-auto=update
#使用freemarker来做视图层,关闭缓存
spring.freemarker.cache=false
spring.freemarker.charset=UTF-85:下面就是entity了
@Entity
public class People {
@Id
@GeneratedValue
private Integer uid;
private String username;
private String password;
private String nickname;
private String code;
private String email;
private Integer state;相应的set和get方法就自己加吧.
dao层:
@Repository
public interface PeopleReposity extends JpaRepository<People,Integer> {
/**
* 根据用户的激活码来查询用户
* @param code
* @return
*/
People findByCode(String code);
}UID生成的工具方法
public class UidUtil {
public static String getUUID(){
return UUID.randomUUID().toString().replace("-","");
}
}
Service层
@Service
public class PeopleService {
@Autowired
private PeopleReposity peopleReposity;
/**
* 邮箱注册
*/
public People register(People people) throws Exception {
// 数据插入库
// 发送一份邮件
People people1 = peopleReposity.save(people);
sendMail(people.getEmail(), people.getCode());
return people;
}
/**
* 发送邮件
*/
public static void sendMail(String to, String code) throws Exception {
Properties properties = new Properties();Session session = Session.getInstance(properties, new Authenticator() {
@Override
protected PasswordAuthentication getPasswordAuthentication() {
return new PasswordAuthentication("server@store.com", "自己的密码哟");
}
}); // 创建邮件对象
Message message = new MimeMessage(session);
// 设置发件人
message.setFrom(new InternetAddress("server@store.com"));
// 设置收件人
message.setRecipient(Message.RecipientType.TO, new InternetAddress(to));
// 设置邮件的主题
message.setSubject("一封来自SpringBoot学习网站的用户注册的激活邮件");
// 设置邮件的正文
message.setContent("<h1>来自SpringBoot的激活邮件,请点击链接激活:</h1><h3><a href='http://localhost:9090/active?code=" + code + "'>http://localhost:9090/active?code=" + code + "</a></h3>", "text/html;charset=UTF-8");
// 发送邮件
Transport.send(message); } /** * 根据激活码来查询用户信息 */ public People findByCode(String code) { return peopleReposity.findByCode(code); } /** * 更新用户的信息 * @param people * @return */ public void save(People people){ peopleReposity.save(people); }}Controller:注册的控制器
@Controller
public class RegisterController {
@Autowired
private PeopleService peopleService;
@RequestMapping(value = "/registerpeople")
public String register(HttpServletRequest request, HttpServletResponse response) throws Exception {
// 获取前台提交的表单参数
response.setCharacterEncoding("UTF-8");
String username=request.getParameter("username");
String password=request.getParameter("password");
String nickname=request.getParameter("nickname");
String email=request.getParameter("email");
// 封装数据
People people=new People();
people.setUsername(username);
people.setPassword(password);
people.setNickname(nickname);
people.setEmail(email);
// 0表示未激活的
people.setState(0);
// uid的设置
String code= UidUtil.getUUID()+UidUtil.getUUID();
people.setCode(code);
// 注册发送邮件的业务
People ps=peopleService.register(people);
// 跳转页面
request.setAttribute("msg","恭喜,您已注册成功,请去邮箱激活!");
return "msg";
}
}视图层:注册的页面
<!DOCTYPE html>
<html xmlns="http://www.w3.org/1999/xhtml"
xmlns:th="http://www.thymeleaf.org">
<head>
<meta charset="UTF-8">
<title>注册页面</title>
<style type="text/css">
*{
margin:0;
padding:0;
}
#register{
width:400px;
height:270px;
position:absolute;
left:400px;
top:100px;
border:4px solid chocolate;
margin:20px;
fce0
padding:20px;
border-radius: 15px;
}
</style>
</head>
<body>
<div id="register" align="center">
<h2>用户注册页面</h2>
<br/>
<form action="/registerpeople" method="post">
用户名: <input type="text" name="username" /><br/><br/>
密码: <input type="password" name="password" /><br/><br/>
昵称: <input type="text" name="nickname" /><br/><br/>
邮箱: <input type="text" name="email" /><br/><br/>
<input type="submit" th:value="注册"/>
<input type="reset" th:value="取消">
</form>
</div>
</body>
</html>提示信息页面:
<!DOCTYPE html>
<html xmlns="http://www.w3.org/1999/xhtml"
xmlns:th="http://www.thymeleaf.org">
<html lang="en">
<head>
<meta charset="UTF-8">
<title>提示信息页面</title>
</head>
<body>
<div align="center">
<h2 th:text="${msg}">提示信息</h2>
</div>
</body>
</html>页面跳转控制器:PageController
@Controller
public class PageController {
@RequestMapping("/register")
public String register(){
return "register";
}
}
激活邮件的控制器ActiveController
@Controller
public class ActiveController {
@Autowired
private PeopleService peopleService;
@RequestMapping(value="/active")
public String active(HttpServletRequest request, HttpServletResponse response){
// 获取激活码
String code=request.getParameter("code");
// 查询用户
People people=peopleService.findByCode(code);
// 修改状态
if(people!=null){
people.setState(1);
people.setCode(null);
peopleService.save(people);
request.setAttribute("msg","您已激活成功,请去登录!");
}else{
request.setAttribute("msg","您的激活码有误,请重新激活!");
}
return "msg";
}
}发送成功的邮件:
数据库信息查看:
邮件激活的操作原理就是:根据邮箱中的激活码查找到该用户后,将用户状态修改为1,然后将code设置为null,只使用一次,然后更新数据表即可.
以上就是快速实现本地邮件的收发的(只能本地发送的哟),当然如果要使用自己的网易邮箱的,修改一下,这样就可在在项目中注册邮箱的时候就有自己的网易邮箱来发送邮件了的,一定要开启
/**
* 发送邮件
*/
public static void sendMail(String to, String code) throws Exception {
Properties props = new Properties();
props.put("username", "自己的网易邮箱账号");
props.put("password", "自己的网易邮箱的授权码");
props.put("mail.transport.protocol", "smtp" );
props.put("mail.smtp.host", "smtp.163.com");
props.put("mail.smtp.port", "25" );
Session session = Session.getInstance(props);
// 创建邮件对象
Message message = new MimeMessage(session);
// 设置发件人
message.setFrom(new InternetAddress("自己的网易邮箱账号"));
// 设置收件人
message.setRecipient(Message.RecipientType.TO, new InternetAddress(to));
// 设置邮件的主题
message.setSubject("一封来自SpringBoot学习网站的用户注册的激活邮件");
// 设置邮件的正文
message.setContent("<h1>来自SpringBoot的激活邮件,请点击链接激活:</h1><h3><a href='http://localhost:9090/active?code=" + code + "'>http://localhost:9090/active?code=" + code + "</a></h3>", "text/html;charset=UTF-8");
// 发送邮件
Transport transport = session.getTransport("smtp");
transport.connect(props.getProperty("mail.smtp.host"), props
.getProperty("username"), props.getProperty("password"));
transport.sendMessage(message,message.getAllRecipients());
transport.close();
}至此SpringBoot打造本的邮件发送邮件就介绍完了.

相关文章推荐
- 通过MailServer和Foxmail搭建本地邮件服务器及实现本地邮箱账号收发邮件
- 构建postfix邮件服务器(二)postfix和dovecot的安装,实现简单的收发邮件
- postfix+dovecot+squirrelmail 实现本地邮件的收发&并与sendmail邮件(双域邮件
- JavaMail实现收发邮件——(四)各大主流邮件服务器地址
- Linux 邮件服务器原理介绍,编译安装Postfix实现本地的邮件服务。
- 利用postfix实现两台邮件服务器间的邮件收发实验
- Exchange邮件服务器实现外部邮件的收发 推荐
- Exchange邮件服务器实现外部邮件的收发
- 实现邮件外部收发(2)
- 用java实现的邮件系统三(收取邮件服务器)
- exchange实现外部邮件收发的两种方法
- 邮件系列(一)- 搭建本地邮件服务器
- EXCH-POP3互通邮件测试笔记04——EXCH2010邮件服务器搭建及内部邮件收发
- 实现邮件的外部收发
- 菜鸟学exchange之四:实现外部邮件的收发部署
- Exchange2003中实现两个邮件系统收发邮件配置实例
- 用Delphi中的Indy控件实现收发邮件
- 借助javaMail来实现邮件的收发功能之知识篇
- 关于用Windows自带的邮件服务组件实现在局域网内部的邮件收发(转)
- JavaMail实现收发邮件(五)使用SSL实现加密传输