Apache(httpd)配置--用户认证,域名跳转和访问日志配置
2018-03-02 19:22
816 查看
一、用户认证
用户认证功能就是在用户访问网站的时候,需要输入用户名密码才能进行访问。一些比较好总要的站点和网站后台都会加上用户认证,以保证安全。实例:下面对
zlinux.com站点来做一个全站的用户认证:
步骤1:编辑虚拟主机配置文件
[root@zlinux ~]# vim /usr/local/apache2/conf/extra/httpd-vhosts.conf    //在linuxtest.com虚拟主机下编辑添加以下内容

<VirtualHost *:80>
DocumentRoot "/data/wwwroot/123test"
ServerName linuxtest.com
<Directory /data/wwwroot/123test>   //指定认证的目录
AllowOverride AuthConfig             //这个相当于打开认证的开关
AuthName "linuxtest.com user auth"       //自定义认证的名字,作用不大
AuthType Basic                            //认证的类型,一般为Basic
AuthUserFile /data/.htpasswd      //指定密码文件所在位置
require valid-user                        //指定需要认证的用户为全部可用用户
</Directory>
ErrorLog "logs/dummy-host2.example.com-error_log"
CustomLog "logs/dummy-host2.example.com-access_log" common
步骤2:创建密码
在创建密码文件先要了解htpasswd命令:htpasswd命令是Apache的Web服务器内置工具,用于创建和更新储存用户名、域和用户基本认证的密码文件。
语法:
htpasswd [选项] [参数]
选项:
-c:=create,创建一个加密文件
-n:不更新加密文件,只将更新后的用户名密码显示在屏幕上
-m:使用MD5算法对密码进行加密(默认)
-d:使用CRYPT算法对密码进行加密
-p:不对密码进行加密,即明文密码
-s:使用SHA算法对密码进行加密
-b:在命令行一并输入用户名和密码,而不是根据提示输入密码
-D:删除指定用户
下面创建密码文件:
[root@zlinux ~]# vim /usr/local/apache2/conf/extra/httpd-vhosts.conf
[root@zlinux ~]# /usr/local/apache2/bin/htpasswd -cm /data/.htpasswd zlinux   // -c 表示创建  -m 指定MD5加密 指定所在位置  如果再次增加用户可以不用-c选项,-c是首次创建文件使用的,,否则/data/.htpasswd会被重置,之前用户被清空
New password:
Re-type new password:
Adding password for user zlinux
[root@zlinux ~]# /usr/local/apache2/bin/apachectl -t
Syntax OK
[root@zlinux ~]# /usr/local/apache2/bin/apachectl graceful
步骤3:测试用户认证是否启用
在浏览器中测试,需要修改下windows下hosts文件,把linuxtest.com域名指向Linux机器:
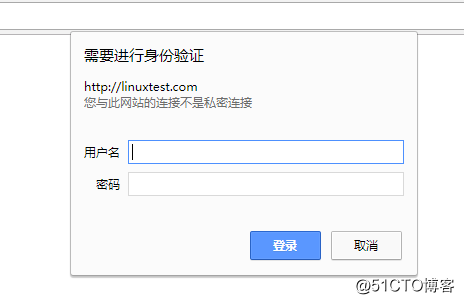
使用
curl进行测试:
[root@zlinux ~]# curl -x 192.168.204.128:80 linuxtest.com -I
HTTP/1.1 401 Unauthorized          //说明:因为生成了密码,所以在不指定用户名和密码的情况下会报401错误
Date: Fri, 02 Mar 2018 09:59:05 GMT
Server: Apache/2.4.29 (Unix) PHP/5.6.30
WWW-Authenticate: Basic realm="linuxtest.com user auth"
Content-Type: text/html; charset=iso-8859-1

[root@zlinux ~]# curl -x 192.168.204.128:80 -uzlinux:passwd linuxtest.com -I        //使用-u指定用户名和密码
HTTP/1.1 200 OK                                                 //状态码“200”,即访问成功
Date: Fri, 02 Mar 2018 10:00:34 GMT
Server: Apache/2.4.29 (Unix) PHP/5.6.30
X-Powered-By: PHP/5.6.30
Content-Type: text/html; charset=UTF-8
步骤4:单个文件进行认证
在配置文件中添加以下类似内容(根据自己的目录修改):[root@zlinux ~]# vim /usr/local/apache2/conf/extra/httpd-vhosts.conf <VirtualHost *:80> DocumentRoot "/data/wwwroot/123test" ServerName linuxtest.com <FilesMatch admin.php> //针对文件,这里针对admin.php AllowOverride AuthConfig AuthName "123.com user auth" AuthType Basic AuthUserFile /data/.htpasswd require valid-user </FilesMatch> </VirtualHost>
二、配置域名跳转
域名跳转类似于将网页重新指向另一个网站,但区别是域名跳转会将域名本身重新指向网站,而不使用HTML或脚本来进行重新指向。当域名被设置为跳转至另一网站,域名的地址将不会保留在浏览器的URL栏中,该栏显示的会是新页面的URL。如果您希望保留该栏中的URL,则需要使用隐形跳转。下面做个实例,把
www.linuxtestbak.com域名跳转到
linuxtest.com:
步骤1:修改虚拟主机配置文件
<VirtualHost *:80>
DocumentRoot "/data/wwwroot/123test"
ServerName linuxtest.com
ServerAlias www.linuxtestbak.com
<IfModule mod_rewrite.c>          //需要mod_rewrite模块支持
RewriteEngine on                   //打开rewrite功能
RewriteCond %{HTTP_HOST} !^linuxtest.com$     //定义rewrite的条件,主机名(域名)不是linuxtest.com满足条件
RewriteRule ^/(.*)$ http://linuxtest.com/$1 [R=301,L]     //定义rewrite规则:当满足上面条件时才执行当前规则,即跳转到linuxtest.com。301表示永久跳转;302表示临时跳转。
</IfModule>
#    <Directory /data/wwwroot/123test>
#        AllowOverride AuthConfig
#        AuthName "linuxtest.com user auth"
#        AuthType Basic
#        AuthUserFile /data/.htpasswd
#        require valid-user
#    </Directory>
ErrorLog "logs/dummy-host2.example.com-error_log"
CustomLog "logs/dummy-host2.example.com-access_log" common
</VirtualHost>
步骤2:修改httpd.conf文件
[root@zlinux ~]# vim /usr/local/apache2/conf/httpd.conf

LoadModule rewrite_module modules/mod_rewrite.so     //去掉#,以启用这个模块
步骤3:测试
[root@zlinux ~]# curl -x 192.168.204.128:80 www.linuxtestbak.com -I
HTTP/1.1 301 Moved Permanently
Date: Fri, 02 Mar 2018 10:53:51 GMT
Server: Apache/2.4.29 (Unix) PHP/5.6.30
Location: http://linuxtest.com/ Content-Type: text/html; charset=iso-8859-1

[root@zlinux ~]# /usr/local/apache2/bin/apachectl -t
Syntax OK
[root@zlinux ~]# /usr/local/apache2/bin/apachectl graceful
使用浏览器(hosts需要修改),访问
www.linuxtestbak.com会直接跳转到
linuxtest.com
三、配置访问日志
1、Apache访问日志所在位置:
[root@zlinux ~]# ls /usr/local/apache2/logs/
123test-access_log  abstest-error_log                   dummy-host2.example.com-error_log  error_log
123test-error_log   access_log                          dummy-host.example.com-access_log  httpd.pid
abctest-access_log  dummy-host2.example.com-access_log  dummy-host.example.com-error_log
[root@zlinux ~]# cat  /usr/local/apache2/logs/123test-access_log     //common格式日志
192.168.204.128 - - [02/Mar/2018:19:06:28 +0800] "HEAD HTTP://linuxtestbak.com/ HTTP/1.1" 301 -
192.168.204.128 - - [02/Mar/2018:19:07:51 +0800] "GET HTTP://linuxtest.com/ HTTP/1.1" 200 28
192.168.204.128 - - [02/Mar/2018:19:09:05 +0800] "HEAD HTTP://www.linuxtestbak.com/ HTTP/1.1" 301 -
192.168.204.1 - - [02/Mar/2018:19:10:55 +0800] "GET / HTTP/1.1" 200 28
192.168.204.1 - - [02/Mar/2018:19:11:08 +0800] "GET / HTTP/1.1" 200 28
2、查看日志格式
[root@zlinux ~]# vim /usr/local/apache2/conf/httpd.conf      //搜索LogFormat

<IfModule log_config_module>
#
# The following directives define some format nicknames for use with
# a CustomLog directive (see below).
#
LogFormat "%h %l %u %t \"%r\" %>s %b \"%{Referer}i\" \"%{User-Agent}i\"" combined
LogFormat "%h %l %u %t \"%r\" %>s %b" common
说明:combined和common两种格式,默认使用common格式。
3、更改日志的格式为combined
[root@zlinux ~]# vim /usr/local/apache2/conf/extra/httpd-vhosts.conf

ErrorLog "logs/123test-error_log"
CustomLog "logs/123test-access_log" combined

[root@zlinux ~]# /usr/local/apache2/bin/apachectl -t
Syntax OK
[root@zlinux ~]# /usr/local/apache2/bin/apachectl graceful
4,做一些访问操作之后,再查看日志。
[root@zlinux ~]# cat  /usr/local/apache2/logs/123test-access_log
192.168.204.128 - - [02/Mar/2018:19:06:28 +0800] "HEAD HTTP://linuxtestbak.com/ HTTP/1.1" 301 -
192.168.204.128 - - [02/Mar/2018:19:07:51 +0800] "GET HTTP://linuxtest.com/ HTTP/1.1" 200 28
192.168.204.128 - - [02/Mar/2018:19:09:05 +0800] "HEAD HTTP://www.linuxtestbak.com/ HTTP/1.1" 301 -
192.168.204.1 - - [02/Mar/2018:19:10:55 +0800] "GET / HTTP/1.1" 200 28
192.168.204.1 - - [02/Mar/2018:19:11:08 +0800] "GET / HTTP/1.1" 200 28
192.168.204.1 - - [02/Mar/2018:19:20:16 +0800] "GET / HTTP/1.1" 200 28 "-" "Mozilla/5.0 (Windows NT 10.0; WOW64) AppleWebKit/537.36 (KHTML, like Gecko) Chrome/64.0.3282.186 Safari/537.36"
192.168.204.1 - - [02/Mar/2018:19:20:19 +0800] "GET / HTTP/1.1" 200 28 "-" "Mozilla/5.0 (Windows NT 10.0; WOW64) AppleWebKit/537.36 (KHTML, like Gecko) Chrome/64.0.3282.186 Safari/537.36"
192.168.204.1 - - [02/Mar/2018:19:20:27 +0800] "GET / HTTP/1.1" 200 28 "-" "Mozilla/5.0 (Windows NT 10.0; WOW64) AppleWebKit/537.36 (KHTML, like Gecko) Chrome/64.0.3282.186 Safari/537.36"
192.168.204.128 - - [02/Mar/2018:19:20:39 +0800] "HEAD HTTP://www.linuxtestbak.com/ HTTP/1.1" 301 - "-" "curl/7.29.0"
192.168.204.128 - - [02/Mar/2018:19:20:45 +0800] "HEAD HTTP://www.linuxtestbak.com/ HTTP/1.1" 301 - "-" "curl/7.29.0"
192.168.204.128 - - [02/Mar/2018:19:20:54 +0800] "GET HTTP://linuxtest.com/ HTTP/1.1" 200 28 "-" "curl/7.29.0"
192.168.204.128 - - [02/Mar/2018:19:20:57 +0800] "GET HTTP://linuxtest.com/ HTTP/1.1" 200 28 "-" "curl/7.29.0"
192.168.204.128 - - [02/Mar/2018:19:20:58 +0800] "GET HTTP://linuxtest.com/ HTTP/1.1" 200 28 "-" "curl/7.29.0"
日志格式变化很明显。

相关文章推荐
- apache 配置用户认证 域名跳转 日志 静态缓存文件 防盗链接
- 171220---LAMP Apache用户认证, 域名跳转 ,Apache访问日志
- Apache的用户认证、域名跳转、Apache的访问日志
- Apache用户认证;域名跳转;Apache访问日志
- linux学习第三十九篇:Apache用户认证,域名跳转,Apache访问日志
- 11.18 Apache用户认证 - 11.19/11.20 域名跳转 - 11.21 Apache访问日志
- Linux-LAMP配置二(用户认证,域名跳转,访问日志)
- Apache配置用户认证、域名跳转、日志轮询、静态文件缓存、防盗链
- 默认虚拟主机,用户认证,域名跳转,访问日志,缓存时间,防盗链,访问控制
- Apache配置域名跳转、日志切割、静态缓存、防盗链、访问控制
- CentOS7 Nginx配置--虚拟主机、用户认证、域名重定向、访问日志
- apache虚拟主机基础配置(用户认证,域名跳转)
- Apache用户认证、域名跳转、配置访问日志
- nginx配置用户认证、域名跳转、日志记录、静态文件缓存、防盗链
- 配置默认主机,Apache用户认证,域名跳转,Apache访问日志,访问日志
- apache配置虚拟主机、日志切割、域名跳转、缓存
- Apache用户认证、域名跳转、Apache访问日志
- Apache用户认证、域名跳转、Apache访问日志
- apache用户认证 域名跳转 Apache访问日志