Spring入门(注解方式)
2018-02-28 18:44
344 查看
一概述
二代码
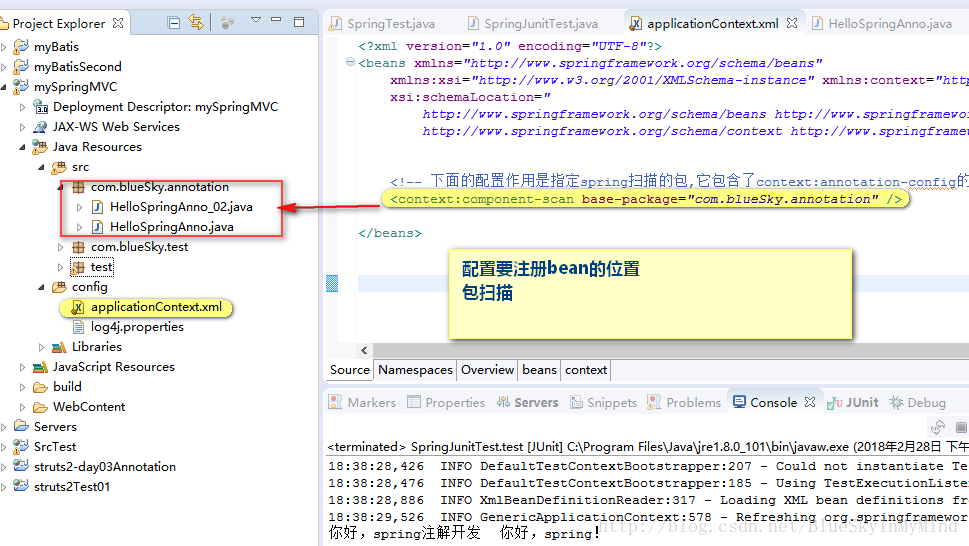
1.导入jar包2.类路径下创建applicationContext.xml配置文件
<?xml version="1.0" encoding="UTF-8"?>
<beans xmlns="http://www.springframework.org/schema/beans"
xmlns:xsi="http://www.w3.org/2001/XMLSchema-instance" xmlns:context="http://www.springframework.org/schema/context"
xsi:schemaLocation=" http://www.springframework.org/schema/beans http://www.springframework.org/schema/beans/spring-beans.xsd http://www.springframework.org/schema/context http://www.springframework.org/schema/context/spring-context.xsd">

<!-- <context:annotation-config /> -->

<!-- 下面的配置作用是指定spring扫描的包,它包含了context:annotation-config的功能,所以在开发中一般就不需要在配置上面的 -->
<context:component-scan base-package="cn.itheima" />

</beans>
3.编写类,类上加注解
package com.blueSky.annotation;

import org.springframework.beans.factory.annotation.Autowired;
import org.springframework.beans.factory.annotation.Value;
import org.springframework.context.annotation.Scope;
import org.springframework.stereotype.Component;

@Component
@Scope(value="prototype")  //设置为多例
public class HelloSpringAnno {
@Value("你好,spring注解开发")
private String content;

@Autowired
private HelloSpringAnno_02 helloSpringAnno_02;

public String getContent() {
return content;
}
public void setContent(String content) {
this.content = content;
}
public HelloSpringAnno_02 getHelloSpringAnno_02() {
return helloSpringAnno_02;
}
public void setHelloSpringAnno_02(HelloSpringAnno_02 helloSpringAnno_02) {
this.helloSpringAnno_02 = helloSpringAnno_02;
}

public void printContent(){
System.out.println(content+"      "+helloSpringAnno_02.getContent());
}
}
package com.blueSky.annotation;
import org.springframework.beans.factory.annotation.Value;
import org.springframework.stereotype.Component;
@Component
public class HelloSpringAnno_02 {
@Value("你好,spring!")
private String content;
public String getContent() {
return content;
}
public void setContent(String content) {
this.content = content;
}
}4.applicationContext.xml文件中配置包扫描(扫描注解),扫描的是bean
<?xml version="1.0" encoding="UTF-8"?>
<beans xmlns="http://www.springframework.org/schema/beans"
xmlns:xsi="http://www.w3.org/2001/XMLSchema-instance" xmlns:context="http://www.springframework.org/schema/context"
xsi:schemaLocation=" http://www.springframework.org/schema/beans http://www.springframework.org/schema/beans/spring-beans.xsd http://www.springframework.org/schema/context http://www.springframework.org/schema/context/spring-context.xsd">

<!-- 下面的配置作用是指定spring扫描的包,它包含了context:annotation-config的功能,所以在开发中一般就不需要在配置上面的 -->
<context:component-scan base-package="com.blueSky.annotation" />

</beans>
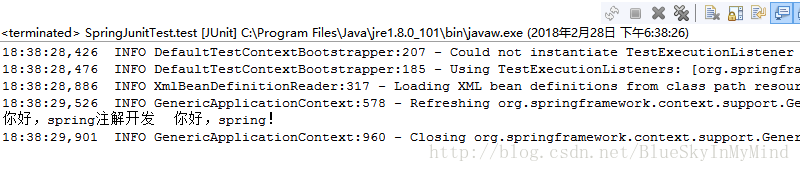
5.测试
package test;

import org.junit.Test;
import org.junit.runner.RunWith;
import org.springframework.beans.factory.annotation.Autowired;
import org.springframework.test.context.ContextConfiguration;
import org.springframework.test.context.junit4.SpringJUnit4ClassRunner;

import com.blueSky.annotation.HelloSpringAnno;

@RunWith(SpringJUnit4ClassRunner.class)
@ContextConfiguration(locations = "classpath:applicationContext.xml")
public class SpringJunitTest {

@Autowired
private HelloSpringAnno helloSpringAnno;

@Test
public void test(){
helloSpringAnno.printContent();
}

}

相关文章推荐
- (9) 使用Spring的注解方式实现AOP入门 以及 细节
- Spring基础:快速入门spring(11):bean scope注解方式
- Spring配置入门案例(注解方式 )
- Spring入门案例 注解方式配置(一)
- 使用Spring的注解方式实现AOP入门
- AOP之Spring使用注解方式实现AOP(入门)
- JAVAWEB开发之Spring详解之——Spring的入门以及IOC容器装配Bean(xml和注解的方式)、Spring整合web开发、整合Junit4测试
- Spring入门之事务管理【二】注解方式
- Spring学习历程---使用注解方式入门AOP
- ITCAST视频-Spring学习笔记(使用Spring的注解方式实现AOP入门)
- Spring中bean注入初始化方式—通过注解@Configuration @bean
- 注解方式使用hibernate与spring
- Spring 使用注解方式进行事物管理
- Spring bean 注解方式注入
- Spring教程--IOC(注解方式)和整合junit
- Spring-使用注解方式装配对象
- Spring AOP之AspectJ的注解方式使用
- Spring通过@Value注解注入属性的几种方式
- Spring注解入门
- SpringAOP拦截Controller,Service实现日志管理(自定义注解的方式)