SpringMVC 开发接口实例+json参数传递
2018-02-07 15:05
465 查看
第一步,搭建springmvc项目
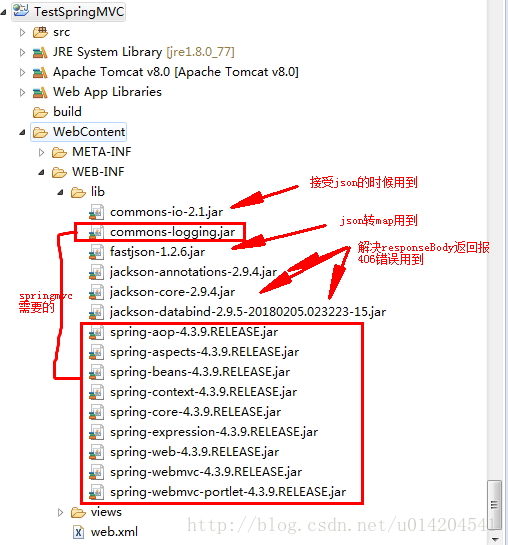
这里就不教怎么搭建web项目了,搭建好后导入所需要的jar包,
spring jar包官网下载链接
进去找到自己想下载的版本下载,下面是我用的版本,算是比较新的
第二步
在web.xml中添加下面代码
第三步
在src下添加spring.xml文件,下面是整个文件的内容
第四步
开始测试是否可行
新建一个bean,下面是代码
新建一个开发接口的类,下面是代码:
下面是用工具模拟请求,需要用到的工具的postman,可以在百度搜索下载
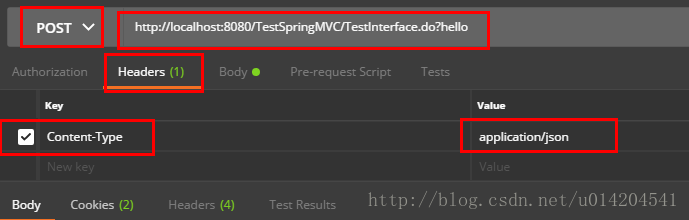
下面是postman发送post请求的设置,请求链接是 http://localhost:8080/TestSpringMVC/TestInterface.do?hello
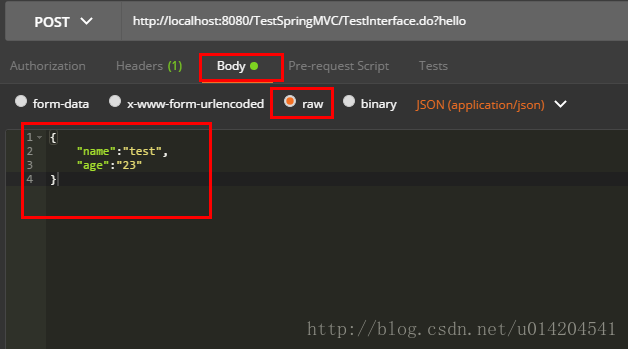
body设置
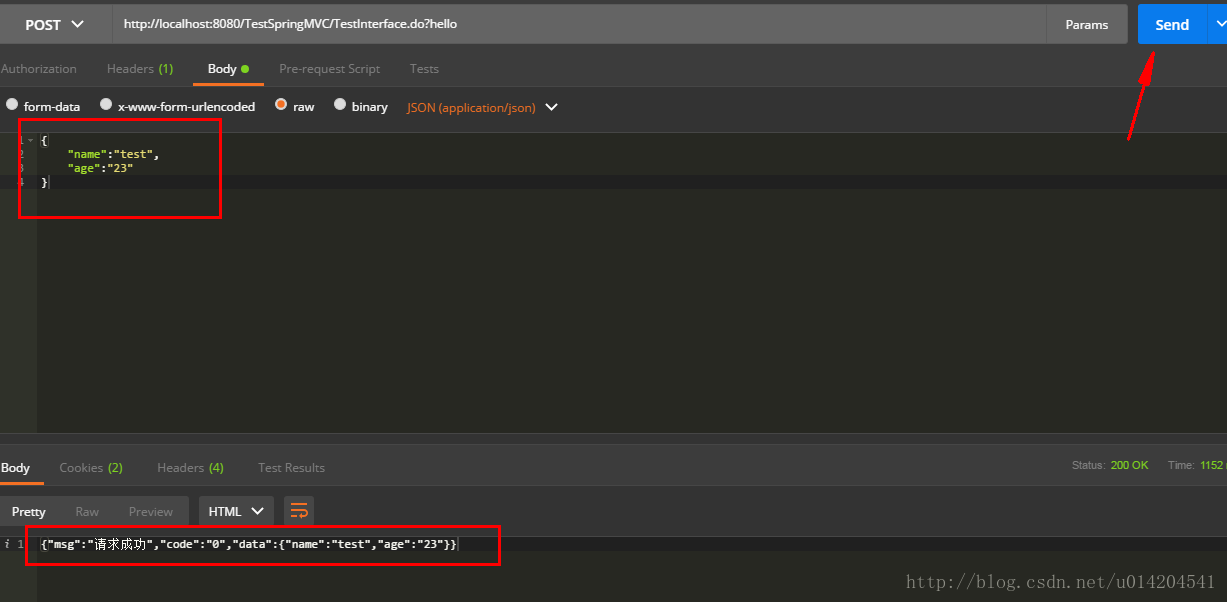
然后就是开始测试了,点击send即可:
后台打印信息:
说明已经成功访问到了
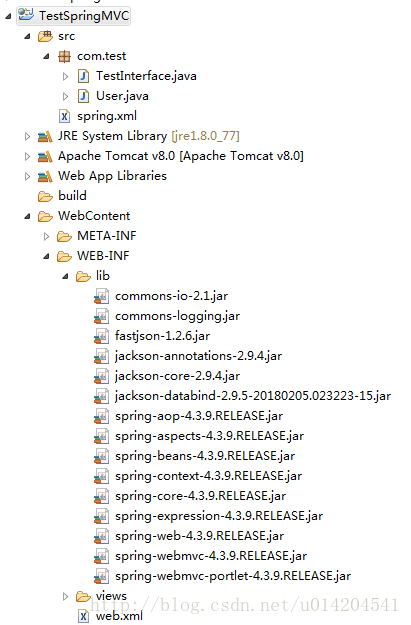
最后贴上整个项目的结构,和源码链接
源码下载
这里就不教怎么搭建web项目了,搭建好后导入所需要的jar包,
spring jar包官网下载链接
进去找到自己想下载的版本下载,下面是我用的版本,算是比较新的
第二步
在web.xml中添加下面代码
<servlet>
<servlet-name>DispatcherServlet</servlet-name>
<servlet-class>org.springframework.web.servlet.DispatcherServlet</servlet-class>
<init-param>
<param-name>contextConfigLocation</param-name>
<param-value>classpath:spring.xml</param-value>
</init-param>
</servlet>
<servlet-mapping>
<servlet-name>DispatcherServlet</servlet-name>
<url-pattern>*.do</url-pattern>
</servlet-mapping>
第三步
在src下添加spring.xml文件,下面是整个文件的内容
<?xml version="1.0" encoding="UTF-8"?>
<beans xmlns="http://www.springframework.org/schema/beans"
xmlns:mvc="http://www.springframework.org/schema/mvc"
xmlns:xsi="http://www.w3.org/2001/XMLSchema-instance"
xmlns:context="http://www.springframework.org/schema/context"
xmlns:aop="http://www.springframework.org/schema/aop"
xmlns:tx="http://www.springframework.org/schema/tx"
xmlns:p="http://www.springframework.org/schema/p"
xsi:schemaLocation="http://www.springframework.org/schema/beans http://www.springframework.org/schema/beans/spring-beans-4.0.xsd http://www.springframework.org/schema/context http://www.springframework.org/schema/context/spring-context-4.0.xsd http://www.springframework.org/schema/aop http://www.springframework.org/schema/aop/spring-aop-4.0.xsd http://www.springframework.org/schema/tx http://www.springframework.org/schema/tx/spring-tx-4.0.xsd">
<!-- Action控制器 -->
<context:component-scan base-package="com.test"/>

<!-- 例如@resquestmapping这类的 -->
<!--    <mvc:annotation-driven /> -->

<!-- 基于注解的映射器(可选) -->
<bean class="org.springframework.web.servlet.mvc.annotation.DefaultAnnotationHandlerMapping"/>
<!--解决 ResponseBody 返回json报 406错误需要添加的内容 -->
<bean id="mappingJacksonHttpMessageConverter"
class="org.springframework.http.converter.json.MappingJackson2HttpMessageConverter">
<property name="supportedMediaTypes">
<list>
<value>text/html;charset=UTF-8</value>
</list>
</property>
</bean>

<!-- 启动Spring MVC的注解功能,完成请求和注解POJO的映射 -->
<bean
class="org.springframework.web.servlet.mvc.annotation.AnnotationMethodHandlerAdapter">
<property name="messageConverters">
<list>
<ref bean="mappingJacksonHttpMessageConverter" /><!-- json转换器 -->
</list>
</property>
</bean>
<!-- 解决 ResponseBody 返回json报 406错误需要添加的内容结束 -->

<!-- 基于注解的适配器(可选) -->
<!-- <bean class="org.springframework.web.servlet.mvc.annotation.AnnotationMethodHandlerAdapter"/> -->

<!-- 视图解析器(可选) -->
<!--配置视图解析器:如何把handler 方法返回值解析为实际的物理视图  -->
<bean class="org.springframework.web.servlet.view.InternalResourceViewResolver">
<!--前缀 -->
<property name="prefix" value="/WEB-INF/views/"></property>
<!--后缀 -->
<!--        <property name="suffix" value=".jsp"></property>   -->
<property name="suffix" value=""></property>
</bean>
</beans>
第四步
开始测试是否可行
新建一个bean,下面是代码
package com.test;

import org.springframework.stereotype.Component;

/**
* bean
* @author tlimted
*
*/
@Component
public class User {

private String name;
private String age;

public String getName() {
return name;
}
public void setName(String name) {
this.name = name;
}
public String getAge() {
return age;
}
public void setAge(String age) {
this.age = age;
}
@Override
public String toString() {
return "User [name=" + name + ", age=" + age + "]";
}
}
新建一个开发接口的类,下面是代码:
package com.test;
import java.util.HashMap;
import java.util.Map;
import javax.servlet.http.HttpServletRequest;
import javax.servlet.http.HttpServletResponse;
import org.apache.commons.io.IOUtils;
import org.springframework.stereotype.Controller;
import org.springframework.web.bind.annotation.RequestMapping;
import org.springframework.web.bind.annotation.RequestMethod;
import org.springframework.web.bind.annotation.ResponseBody;
import com.alibaba.fastjson.JSON;
/**
* springmvc开发接口实例代码
* @author Administrator
*
*/
@Controller
@RequestMapping("/TestInterface")
public class TestInterface {
/**
* consumes 用于指定处理何种请求的提交内容类型context-type,如果不是指定的类型,则不处理
* method 用于指定请求的方法,可以设置单个或多个,如果请求方法不满足条件则会请求失败。设置post,就只支持post请求,不设置这个属性就两种请求都支持
* @param request
* @param response
* @return
* @throws Exception
*/
@RequestMapping(params = "hello", consumes="application/json", method = RequestMethod.POST)
@ResponseBody//这个注解是把返回的map自动封装成json数据的,但是需要在spring.xml里配置,不然会报406错误
public Map<String,Object> testModel(HttpServletRequest request, HttpServletResponse response) throws Exception{
Map<String,Object> responseMap = new HashMap<String, Object>();//用来存接口返回信息
try{
String data= IOUtils.toString(request.getInputStream());//获取传入的json
Map<String, Object> requsetMap = new HashMap<String, Object>();//用来保存接口请求信息
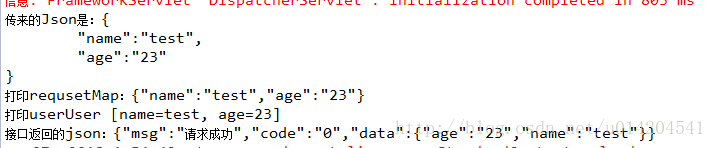
System.out.println("传来的Json是:" + data);
requsetMap = JSON.parseObject(data);//把json转成map
System.out.println("打印requsetMap:"+requsetMap.toString());
/*********业务逻辑开始**********/
//下面只是模拟,所以我简单处理一下
User user = new User();
String username = requsetMap.get("name").toString();
String age = requsetMap.get("age").toString();
user.setAge(age);
user.setName(username);
System.out.println("打印user" + user.toString());
//我把这个user对象直接存入返回的map中去了
responseMap.put("data", user);
//一般做接口开发,都会用到下面两个,一个是code代表你的接口状态,第二是msg,代表接口的情况
responseMap.put("code", "0");//状态码
responseMap.put("msg", "请求成功");//信息描述
/*********业务逻辑结束**********/
}catch(Exception e){
responseMap.put("data", "");
responseMap.put("code", "1");//状态码
responseMap.put("msg", "请求失败,系统异常");//信息描述
e.printStackTrace();
}
System.out.println("接口返回的json:" + JSON.toJSONString(responseMap));
return responseMap;
}
}下面是用工具模拟请求,需要用到的工具的postman,可以在百度搜索下载
下面是postman发送post请求的设置,请求链接是 http://localhost:8080/TestSpringMVC/TestInterface.do?hello
body设置
然后就是开始测试了,点击send即可:
后台打印信息:
说明已经成功访问到了
最后贴上整个项目的结构,和源码链接
源码下载

相关文章推荐
- SpringMVC系列(三)JQuery和JSON方式参数传递并处理JAVAWEB中文乱码问题
- SpringMVC开发移动端接口(返回Json数据)
- C#微信公众号接口开发实例-高级接口-申请带参数的二维码
- JAVAWEB开发之SpringMVC详解(二)——高级开发、数据回显、参数绑定集合、图片上传、json交互、validation校验、异常处理、RESTful支持、拦截器
- SpringMVC之前台post方式传递的json格式参数无法到后台
- IOS接口请求传递JSON参数
- SpringMVC和JSon结合实现jsp和服务端对象的相互传递(写的很好,有实例)
- Android开发:使用序列化接口Parcelable、Serializable实现Activity间传递复杂数据类型参数
- SpringMVC+tomcat json接口开发,IDE IntelliJ idea遇到的问题汇总
- ajax 以json 的形式来传递返回参数的实例
- springmvc 传递和接收数组参数的实例
- SpringMVC 后台接口,使用axios 传递参数接收不到
- IOS接口请求传递JSON参数
- SpringMVC(5)传递JSON数据实例
- SpringMVC系列(三)JQuery和JSON方式参数传递并处理JAVAWEB中文乱码问题
- Android-调用本地方法传递数组参数/NDK-JNI开发实例(五)
- Android开发:使用序列化接口Parcelable、Serializable实现Activity间传递复杂数据类型参数
- springmvc接口接收json类型参数设置
- 怎么生成内部hide接口实例并通过反射作为参数进行传递
- SpringMVC中使用Ajax POST请求以json格式传递参数服务端通过request.getParameter("name")无法获取参数值问题分析