selenium2+python_自动化测试实例_登录&下拉框
2018-02-06 11:15
579 查看
本篇博客主要是想记录一下自己在学习过程中编写的代码,将selenium与单元测试结合实现了百度网盘的登录测试、排序下拉框的测试,并使用测试套件组织测试模块执行,将结果生成html文件。代码中使用包、模块、unitest、TestSuite、HTMLTestRunner、输出文件名带上时间戳。
代码中包含一个以百度网盘为基础的两个测试用例,还有两个是在学习中单纯为了测试一些概念的毫无意义的测试用例。废话不多说,直接看代码吧,一些注意点会在代码中注释。
首先看一下项目中的目录结构:
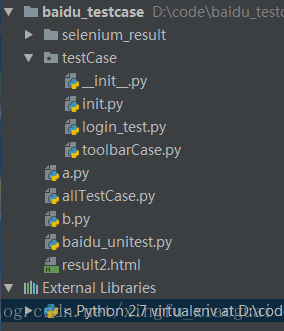
selenium_result:存放HTMLTestRunner的输出结果
testCase:是百度网盘测试用例中用到的方法
—— __init__.py :作用是定义此文件夹是个包:【备注1】
—— 其他就省略了,看代码就知道是什么用处了
——login_test.py:与本篇文章中的整体无关
allTestCase.py :使用TestSuite与HTMLTestRunner
baidu_unitest.py:百度网盘的单元测试用例
testCase\__init__.py
testCase\init.py
testCase\toolbarCase
baidu_unitest.py
a.py
b.py
allTestCase.py
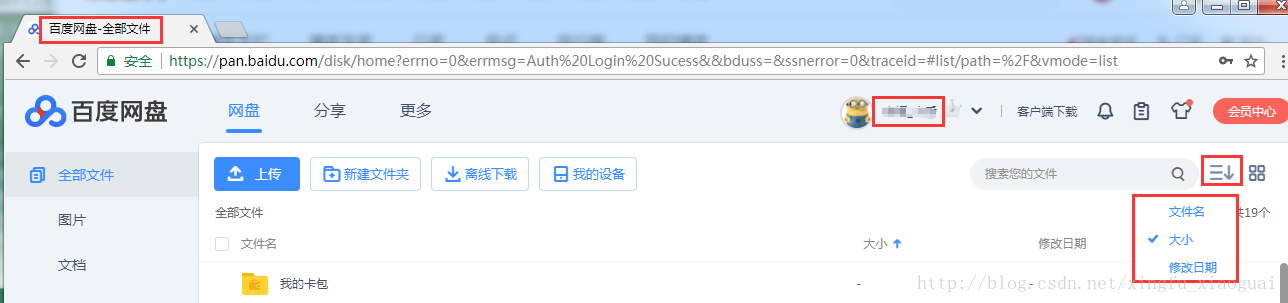
测试位置:
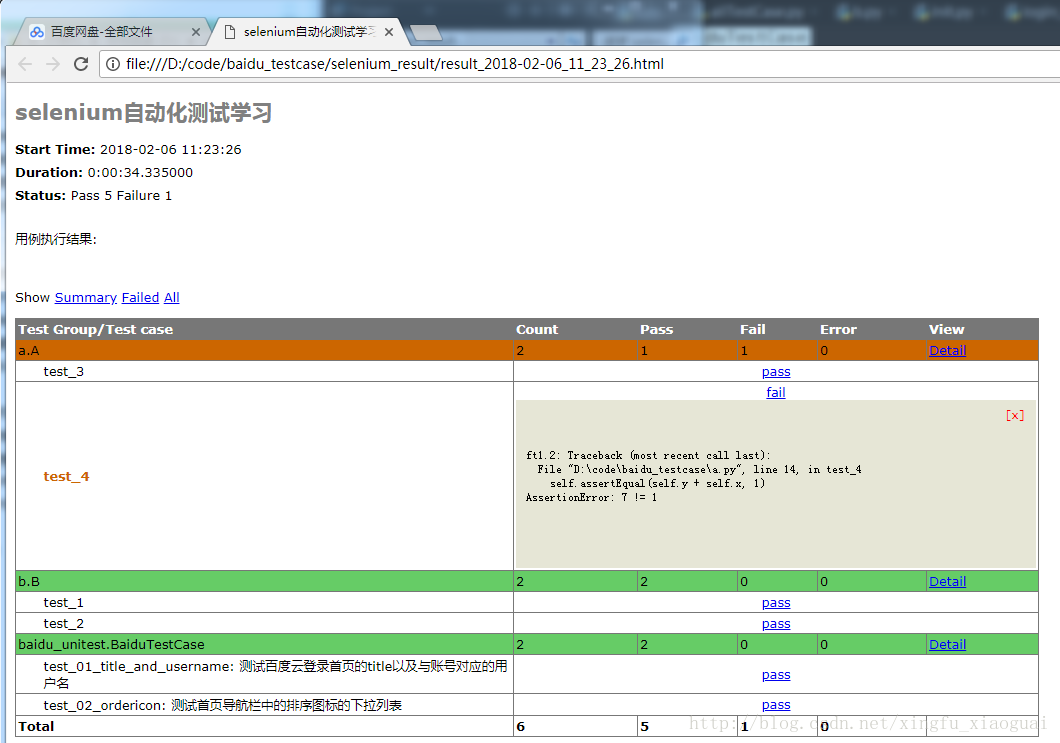
测试结果:
备注1:当导入一个包时,实际上是导入它的__init__.py文件,在__init__.py文件中添加导入语句,可以在添加新的测试方法时,直接修改__init__.py文件就可以了,对于引用它的文件不必做任何修改。
备注2:http://blog.csdn.net/xingfu_xiaoguai/article/details/79230588
备注3:测试类中的每个测试方法的执行顺序是按照方法名称排序的,并不是编写测试方法的先后顺序!
备注4:HTMLTestRunner 需要下载,是一个.py文件,需要放到程序的Interpreter的Lib目录下(windows)
代码中包含一个以百度网盘为基础的两个测试用例,还有两个是在学习中单纯为了测试一些概念的毫无意义的测试用例。废话不多说,直接看代码吧,一些注意点会在代码中注释。
首先看一下项目中的目录结构:
selenium_result:存放HTMLTestRunner的输出结果
testCase:是百度网盘测试用例中用到的方法
—— __init__.py :作用是定义此文件夹是个包:【备注1】
—— 其他就省略了,看代码就知道是什么用处了
——login_test.py:与本篇文章中的整体无关
allTestCase.py :使用TestSuite与HTMLTestRunner
baidu_unitest.py:百度网盘的单元测试用例
testCase\__init__.py
#coding:utf-8
import login_test
import toolbarCase
import init
testCase\init.py
# coding:utf-8
import time
from selenium import webdriver
home_title = u'百度网盘-全部文件'
username = u'幸福_小乖'
toobar_order_list = [u"文件名", u"大小", u"修改日期"]
toobar_order_list_len = len(toobar_order_list)
cookieslist = []  #这个需要自己获得,参考【备注2】
def init(driver): # 初始化浏览器
driver.get("https://pan.baidu.com/")
driver.set_window_size(1280, 960)
driver.implicitly_wait(30)
for cookie in cookieslist:
driver.add_cookie(cookie)

def get_title_and_username(driver, url):  # 获取登录后的title和用户名
driver.get(url)
time.sleep(5)
title = driver.title
user = driver.find_element_by_class_name("user-name").get_attribute("innerHTML")
return [title, user]
testCase\toolbarCase
#coding:utf-8
from selenium.webdriver import ActionChains

def get_orderlist(driver):
url = "https://pan.baidu.com/disk/home"
driver.get(url)
toobar = driver.find_element_by_css_selector("#layoutMain").find_element_by_class_name("DxdbeCb")
order = toobar.find_element_by_class_name("EzLavy")
#showtype = toobar.find_element_by_class_name("ryvhP50g")
orderlistshow = order.find_element_by_class_name("efdtEWV0")
ActionChains(driver).move_to_element(orderlistshow).perform()
orderlist = order.find_element_by_class_name("sDwvAgb").find_elements_by_css_selector("span")

listpro = []
for orderem in orderlist:
emtext = orderem.get_attribute("innerText")
listpro.append(emtext)

return [orderlist, listpro]

def order(driver):
# ====================文件列表================================
filelists = driver.find_element_by_css_selector("#layoutMain").find_element_by_class_name(
"vdAfKMb").find_elements_by_css_selector("dd")
print len(filelists)
for file in filelists:
filehref = file.find_element_by_css_selector("div.file-name>div>a")
filetitle = filehref.get_attribute("title")
print filetitle
baidu_unitest.py
# coding:utf-8
import unittest
from selenium import webdriver
from testCase import * #由于在testCase包中的__init__.py中使用了导入语句,所以才可以这样写

class BaiduTestCase(unittest.TestCase):
# 使用修饰器,定义一个测试类的方法,这样可以不用每次执行一个测试用例就重新启动一个浏览器
@classmethod
def setUpClass(self):
self.driver = webdriver.Chrome()
init.init(self.driver)

# 测试百度云登录首页的title以及与账号对应的用户名
def test_01_title_and_username(self):
u"""测试百度云登录首页的title以及与账号对应的用户名"""
url = "https://pan.baidu.com/disk/home"
title = init.get_title_and_username(self.driver, url)[0]
username = init.get_title_and_username(self.driver, url)[1]
print title + "----" + username
self.assertEqual(title, init.home_title, "Title错误")
self.assertEqual(username, init.username, "用户名错误")

# 测试首页导航栏中的排序图标的下拉列表
def test_02_ordericon(self):
u"""测试首页导航栏中的排序图标的下拉列表"""
orderlist = toolbarCase.get_orderlist(self.driver)[0]
orderlisttext = toolbarCase.get_orderlist(self.driver)[1]
print len(orderlist)
self.assertEqual(len(orderlist), init.toobar_order_list_len, "排序列表中的选项不为3")
self.assertListEqual(orderlisttext, init.toobar_order_list, "排序下拉列表不正确")

# 原理同setUpClass()
@classmethod
def tearDownClass(self):
self.driver.close()

if __name__ == "__main__":
unittest.main()
a.py
import unittest

class A(unittest.TestCase):
def setUp(self):
self.x = 3
self.y = 4

def test_3(self):
self.assertEqual(self.x+self.y, 7)
print "\nA.test_3"

def test_4(self):
self.assertEqual(self.y + self.x, 1)  # 这个断言是错误的,为了查看测试报告中的错误显示情况
print "\nA.test_4"

def tearDown(self):
pass

if __name__ == "__main":
unittest.main()
b.py
import unittest
class B(unittest.TestCase):
def setUp(self):
self.x = 3
self.y = 4

def test_1(self):
self.assertEqual(self.x+self.y, 7)
print "\nB.test_1"

def test_2(self):
self.assertEqual(self.y - self.x, 1)
print "\nB.test_2"

def tearDown(self):
pass

if __name__ == "__main":
unittest.main()
allTestCase.py
# coding:utf-8
import unittest
import HTMLTestRunner
import a, b, baidu_unitest
import time, os
def testcasesuite():
# 用测试套件加载测试类,按加载的顺序执行各个测试类,但是测试类中的测试方法还是根据名称来排序的。
testunit = unittest.TestSuite()
testunit.addTest(unittest.makeSuite(a.A))
testunit.addTest(unittest.makeSuite(b.B))
testunit.addTest(unittest.makeSuite(baidu_unitest.BaiduTestCase))
timestring = time.strftime("%Y-%m-%d_%H_%M_%S", time.localtime())
# 这块是获取项目路径,后面在生成report时会放到改目录下
current_path = os.getcwd()
# 要先建立下面的文件夹selenium_result,否则会报错[Errno 22] invalid mode ('wb') or filename
result_path = current_path + r'\selenium_result'
filename = result_path +r'\result_'+ timestring + '.html'
print filename
fp = file(filename, 'wb')
runner = HTMLTestRunner.HTMLTestRunner(
stream=fp,
title=u'selenium自动化测试学习',
description=u'用例执行结果:'
)
runner.run(testunit)
file.close(fp)
if __name__ == '__main__':
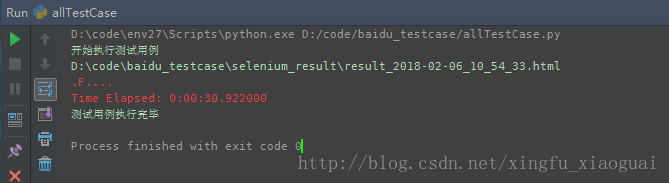
print '开始执行测试用例'
testcasesuite()
print '测试用例执行完毕'测试位置:
测试结果:
备注1:当导入一个包时,实际上是导入它的__init__.py文件,在__init__.py文件中添加导入语句,可以在添加新的测试方法时,直接修改__init__.py文件就可以了,对于引用它的文件不必做任何修改。
备注2:http://blog.csdn.net/xingfu_xiaoguai/article/details/79230588
备注3:测试类中的每个测试方法的执行顺序是按照方法名称排序的,并不是编写测试方法的先后顺序!
备注4:HTMLTestRunner 需要下载,是一个.py文件,需要放到程序的Interpreter的Lib目录下(windows)

相关文章推荐
- 构建Python+Selenium2自动化测试环境<二>:IE、Chrome和Firefox运行
- 一次简单完整的自动化登录测试-基于python+selenium进行cnblog的自动化登录测试
- 构建Python+Selenium2自动化测试环境<二>:IE、Chrome和Firefox运行
- 一次完整的自动化登录测试-基于python+selenium进行cnblog的自动化登录测试 推荐
- 一次完整的自动化登录测试-基于python+selenium进行cnblog的自动化登录测试
- python selenium3 &移动自动化appium测试
- Selenium2 Python 自动化测试实战学习笔记(二)
- Selenium + Python 搭建自动化测试环境(二)
- Selenium2 Python 自动化测试实战学习笔记(八)
- Junit+Selenium+Maven+SVN+Eclipse+AutoFrame全自动化测试实践实例(三)
- Junit+Selenium+Maven+SVN+Eclipse+AutoFrame全自动化测试实践实例(二)
- Selenium2 Python 自动化测试实战学习笔记
- WIN7- selenium-python 自动化测试工具配置环境
- Selenium+Python 测试对象(控件)的登录操作
- 【selenium】- 自动化测试必备工具FireBug&FirePath
- 部署Python+Selenium2自动化测试环境
- Python+Selenium中级篇之0-设计自动化测试框架的前提技能介绍
- selenium+python针对登录功能的用户名,密码和断言组合进行的测试
- Python自动化测试工具Splinter简介和使用实例