微信小程序开发 之 『顶部导航』特效
2018-01-25 12:47
513 查看
很好用的实例就转载了: 原文链接:http://blog.csdn.net/qq_26420489/article/details/62044526
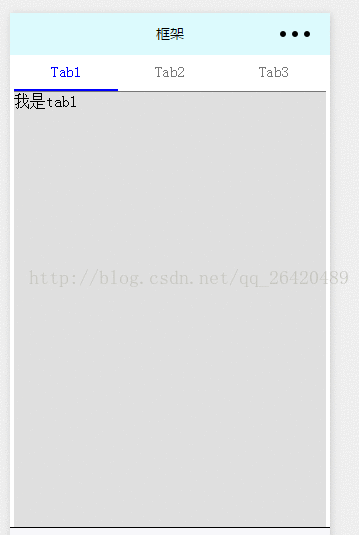
之前Android开发时,顶部导航用到viewPage,微信小程序里想要达到同样的效果,可用swiper来实现;先看效果图
上代码:
1.swiperTab.js
[html] view
plain copy
Page({
data: {
// tab切换
currentTab: 0,
},
swichNav: function (e) {
console.log(e);
var that = this;
if (this.data.currentTab === e.target.dataset.current) {
return false;
} else {
that.setData({
currentTab: e.target.dataset.current,
})
}
},
swiperChange: function (e) {
console.log(e);
this.setData({
currentTab: e.detail.current,
})
},
onLoad: function (options) {
// 生命周期函数--监听页面加载
},
onReady: function () {
// 生命周期函数--监听页面初次渲染完成
},
onShow: function () {
// 生命周期函数--监听页面显示
},
onHide: function () {
// 生命周期函数--监听页面隐藏
},
onUnload: function () {
// 生命周期函数--监听页面卸载
},
onPullDownRefresh: function () {
// 页面相关事件处理函数--监听用户下拉动作
},
onReachBottom: function () {
// 页面上拉触底事件的处理函数
},
onShareAppMessage: function () {
// 用户点击右上角分享
return {
title: 'title', // 分享标题
desc: 'desc', // 分享描述
path: 'path' // 分享路径
}
}
})
2.swiperTab.wxml
[html] view
plain copy
<view class="page">
<!--顶部导航栏-->
<view class="swiper-tab">
<view class="tab-item {{currentTab==0 ? 'on' : ''}}" data-current="0" bindtap="swichNav">Tab1</view>
<view class="tab-item {{currentTab==1 ? 'on' : ''}}" data-current="1" bindtap="swichNav">Tab2</view>
<view class="tab-item {{currentTab==2 ? 'on' : ''}}" data-current="2" bindtap="swichNav">Tab3</view>
</view>
<!--内容主体-->
<swiper class="swiper" current="{{currentTab}}" duration="200" bindchange="swiperChange">
<swiper-item>
<view>我是tab1</view>
</swiper-item>
<swiper-item>
<view>我是tab2</view>
</swiper-item>
<swiper-item>
<view>我是tab3</view>
</swiper-item>
</swiper>
</view>
3.swiperTab.wxss
[html] view
plain copy
.page {
margin-left: 10rpx;
margin-right: 10rpx;
}
.swiper-tab {
display: flex;
flex-direction: row;
line-height: 80rpx;
border-bottom: 2rpx solid #777;
}
.tab-item {
width: 33.3%;
text-align: center;
font-size: 15px;
color: #777;
}
.swiper {
height: 1100px;
background: #dfdfdf;
}
.on {
color: blue;
border-bottom: 5rpx solid blue;
}

相关文章推荐
- 微信小程序开发之『顶部导航』特效
- 微信小程序开发之顶部滑动导航菜单
- 011 - 微信小程序开发之『侧边栏滑动』特效
- 微信小程序开发之『侧边栏滑动』特效
- 微信小程序开发之『弹出菜单』特效
- 微信小程序开发之『弹出菜单』特效
- 微信小程序 底部导航栏目开发资料
- 014 - 微信小程序开发之选项卡(窗口顶部TabBar)页面切换
- 小程序自学系列(零基础学小程序)---实现底部导航栏和顶部导航栏及微信开发工具常用快捷键
- 微信小程序 开发之顶部导航栏实例代码
- 微信小程序配置顶部导航条标题颜色
- 微信小程序开发--『侧边栏滑动』特效
- 【微信小程序开发】快速开发一个动态横向导航模板并使用
- 微信小程序开发之实现选项卡(窗口顶部TabBar)页面切换
- 微信小程序开发之『侧边栏滑动』特效
- 微信小程序开发之选项卡(窗口顶部TabBar)页面切换
- 微信小程序开发:各种页面特效集合(持续更新)
- 微信小程序顶部可滚动导航效果
- 微信小程序开发之选项卡(窗口顶部TabBar)页面切换
- 微信小程序开发之『侧边栏滑动』特效