Redis主从集群的Sentinel配置
2018-01-22 13:26
691 查看
转载自: https://www.cnblogs.com/LiZhiW/p/4851631.html
使用4台CentOS Linux服务器搭建环境,其IP地址如下:
2.Redis服务部署环境
回到顶部
主节点的redis配置文件使用默认的配置文件就可以了,
从节点的redis配置文件在主节点配置的基础上增加如下配置:
#
注意:两台从节点都要改。
2.启动Redis主从集群
先启动192.168.110.101主节点,使用默认配置,脚本:
再启动192.168.110.102和192.168.110.103从节点,使用刚才的配置,脚本:
3.查看集群
192.168.110.101主节点Replication信息
192.168.110.102从节点Replication信息
192.168.110.103从节点Replication信息
此时,存储到192.168.110.101主节点的数据,在从节点中都可以查询到。从节点会备份主节点的数据。
回到顶部
dir /tmp
配置文件说明:
1. port:当前Sentinel服务运行的端口
2. dir: Sentinel服务运行时使用的临时文件夹
3.sentinel monitor master001192.168.110.10163792:Sentinel去监视一个名为master001的主redis实例,这个主实例的IP地址为本机地址192.168.110.101,端口号为6379,而将这个主实例判断为失效至少需要2个
Sentinel进程的同意,只要同意Sentinel的数量不达标,自动failover就不会执行
4.sentinel down-after-milliseconds
master001 30000:指定了Sentinel认为Redis实例已经失效所需的毫秒数。当实例超过该时间没有返回PING,或者直接返回错误,那么Sentinel将这个实例标记为主观下线。只有一个
Sentinel进程将实例标记为主观下线并不一定会引起实例的自动故障迁移:只有在足够数量的Sentinel都将一个实例标记为主观下线之后,实例才会被标记为客观下线,这时自动故障迁移才会执行
5.sentinel parallel-syncs
master001 1:指定了在执行故障转移时,最多可以有多少个从Redis实例在同步新的主实例,在从Redis实例较多的情况下这个数字越小,同步的时间越长,完成故障转移所需的时间就越长
6.sentinel failover-timeout
master001 180000:如果在该时间(ms)内未能完成failover操作,则认为该failover失败
7.sentinel notification-script <master-name> <script-path>:指定sentinel检测到该监控的redis实例指向的实例异常时,调用的报警脚本。该配置项可选,但是很常用
2.启动sentinel集群
创建3个sentinel.conf配置文件:sentinel001.conf、sentinel002.conf、sentinel003.conf并修改端口号分别为:26379、36379、46379,并启动服务:
启动三个sentinel服务后会在其控制台看到如下信息:
./redis-sentinel
sentinel001.conf,端口:26379
./redis-sentinel
sentinel002.conf,端口:36379
./redis-sentinel
sentinel003.conf,端口:46379
每个sentinel服务能知道其他所有的服务!
回到顶部
停止192.168.110.101Redis主节点后,在查看Replication信息如下:
发现192.168.110.101Redis主节点已经不能连接,192.168.110.103成了主节点!
2.再启动192.168.110.101主节点
再启动192.168.110.101Redis主节点后,在查看Replication信息如下:
发现192.168.110.101节点启动后还再集群中,只不过成了从节点,192.168.110.103仍然是主节点,但是现在又有两个从节点了!
3.只留下一个sentinel服务,再停止192.168.110.103主节点,查看Redis集群是否出现新的主节点
停止sentinel服务,只留下一个sentinel服务,再停止Redis主节点,查看Replication信息如下:
发现192.168.110.103主节点已经不能连接了,也不存在Redis主节点,集群中无主节点了!!!分析原因是:sentinel.conf配置的sentinel
monitor master001 192.168.110.10163792最后一个参数是2导致,若是但节点此配置的最后一个参数要使用是1。(此原因我已证实)
注意:在生产环境下建议sentinel节点的数量能在3个以上,并且最好不要在同一台机器上(使用同一网卡)。
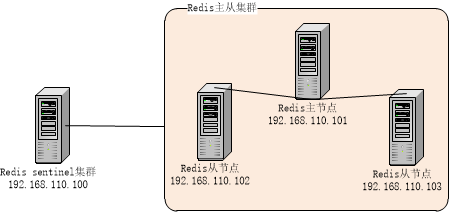
1.集群环境
1.Linux服务器列表使用4台CentOS Linux服务器搭建环境,其IP地址如下:
192.168.110.100
192.168.110.101
192.168.110.102
192.168.110.103
2.Redis服务部署环境
192.168.110.100
启动多个Redis sentinel服务,构成Redis sentinel集群
192.168.110.101
启动Redis服务,设置成主节点
192.168.110.102
启动Redis服务,设置成192.168.110.101的从节点
192.168.110.103
启动Redis服务,设置成192.168.110.101的从节点
回到顶部
2.配置并启动Redis主从集群
1.修改redis.conf配置文件主节点的redis配置文件使用默认的配置文件就可以了,
###设置主节点绑定ip地址
bind 192.168.110.101
###关闭保护模式
protected-mode no
##设置端口号
port 6379
###设置以后台方式启动
daemonize yes
###指定pid文件保存位置
pidfile /home/zh/redis/redis.pid
##指定日志文件位置
logfile /home/zh/redis/redis.log
##指定redis数据文件dump.rdb文件保存位置
dir /home/zh/redis
##指定redis服务密码
masterauth redis
从节点的redis配置文件在主节点配置的基础上增加如下配置:
##修改为从节点ip
bind 192.168.110.102
##修改为从节点端口号
prot 6379
###设置从节点访问主节点密码
requirepass redis
#
# 主从同步。通过 slaveof 配置来实现Redis实例的备份。
# 注意,这里是本地从远端复制数据。也就是说,本地可以有不同的数据库文件、绑定不同的IP、监听不同的端口。
#
# slaveof <masterip> <masterport>
slaveof 192.168.110.101 6379
注意:两台从节点都要改。
2.启动Redis主从集群
先启动192.168.110.101主节点,使用默认配置,脚本:
[wch@localhost bin]$ ./redis-server
再启动192.168.110.102和192.168.110.103从节点,使用刚才的配置,脚本:
./redis-server redis.conf
3.查看集群
192.168.110.101主节点Replication信息
[wch@localhost bin]$ ./redis-cli -h 192.168.110.101 info Replication
# Replication
role:master
connected_slaves:2
slave0:ip=192.168.110.102,port=6379,state=online,offset=659,lag=1
slave1:ip=192.168.110.103,port=6379,state=online,offset=659,lag=0
master_repl_offset:659
repl_backlog_active:1
repl_backlog_size:1048576
repl_backlog_first_byte_offset:2
repl_backlog_histlen:658
192.168.110.102从节点Replication信息
[wch@localhost bin]$ ./redis-cli -h 192.168.110.102 info Replication
# Replication
role:slave
master_host:192.168.110.101
master_port:6379
master_link_status:up
master_last_io_seconds_ago:3
master_sync_in_progress:0
slave_repl_offset:701
slave_priority:100
slave_read_only:1
connected_slaves:0
master_repl_offset:0
repl_backlog_active:0
repl_backlog_size:1048576
repl_backlog_first_byte_offset:0
repl_backlog_histlen:0
192.168.110.103从节点Replication信息
[wch@localhost bin]$ ./redis-cli -h 192.168.110.103 info Replication
# Replication
role:slave
master_host:192.168.110.101
master_port:6379
master_link_status:up
master_last_io_seconds_ago:9
master_sync_in_progress:0
slave_repl_offset:715
slave_priority:100
slave_read_only:1
connected_slaves:0
master_repl_offset:0
repl_backlog_active:0
repl_backlog_size:1048576
repl_backlog_first_byte_offset:0
repl_backlog_histlen:0
此时,存储到192.168.110.101主节点的数据,在从节点中都可以查询到。从节点会备份主节点的数据。
回到顶部
3.配置sentinel集群并启动
1.创建sentinel.conf配置文件###改为sentinel服务ip地址
bind 192.168.110.100
port 26379
protected-mode no
dir /tmp
################################# master001 #################################
##设置redis服务主节点地址
sentinel monitor master001 192.168.110.101 6379 2
###设置redis服务密码
sentinel auth-pass master001 redis
sentinel down-after-milliseconds master001 30000
sentinel parallel-syncs master001 1
sentinel failover-timeout master001 180000
# sentinel notification-script <master-name> <script-path>
# sentinel client-reconfig-script <master-name> <script-path>
# 可以配置多个master节点
################################# master002 #################################
配置文件说明:
1. port:当前Sentinel服务运行的端口
2. dir: Sentinel服务运行时使用的临时文件夹
3.sentinel monitor master001192.168.110.10163792:Sentinel去监视一个名为master001的主redis实例,这个主实例的IP地址为本机地址192.168.110.101,端口号为6379,而将这个主实例判断为失效至少需要2个
Sentinel进程的同意,只要同意Sentinel的数量不达标,自动failover就不会执行
4.sentinel down-after-milliseconds
master001 30000:指定了Sentinel认为Redis实例已经失效所需的毫秒数。当实例超过该时间没有返回PING,或者直接返回错误,那么Sentinel将这个实例标记为主观下线。只有一个
Sentinel进程将实例标记为主观下线并不一定会引起实例的自动故障迁移:只有在足够数量的Sentinel都将一个实例标记为主观下线之后,实例才会被标记为客观下线,这时自动故障迁移才会执行
5.sentinel parallel-syncs
master001 1:指定了在执行故障转移时,最多可以有多少个从Redis实例在同步新的主实例,在从Redis实例较多的情况下这个数字越小,同步的时间越长,完成故障转移所需的时间就越长
6.sentinel failover-timeout
master001 180000:如果在该时间(ms)内未能完成failover操作,则认为该failover失败
7.sentinel notification-script <master-name> <script-path>:指定sentinel检测到该监控的redis实例指向的实例异常时,调用的报警脚本。该配置项可选,但是很常用
2.启动sentinel集群
创建3个sentinel.conf配置文件:sentinel001.conf、sentinel002.conf、sentinel003.conf并修改端口号分别为:26379、36379、46379,并启动服务:
./redis-sentinel sentinel001.conf
./redis-sentinel sentinel002.conf
./redis-sentinel sentinel003.conf
启动三个sentinel服务后会在其控制台看到如下信息:
./redis-sentinel
sentinel001.conf,端口:26379
[7743]01Oct06:20:38.162#
Sentinel runid is ba6c42e1accc31290e11d5876275e1562564295d
[7743]01Oct06:20:38.162#
+monitor master master001 192.168.110.101 6379 quorum 2
[7743]01Oct06:20:39.110*+slave
slave 192.168.110.102:6379192.168.110.1026379@ master001 192.168.110.1016379
[7743]01Oct06:20:39.111*+slave
slave 192.168.110.103:6379192.168.110.1036379@ master001 192.168.110.1016379
[7743]01Oct06:25:07.595*+sentinel
sentinel 192.168.110.100:36379192.168.110.10036379@ master001 192.168.110.1016379
[7743]01Oct06:26:11.170*+sentinel
sentinel 192.168.110.100:46379192.168.110.10046379@ master001 192.168.110.1016379
./redis-sentinel
sentinel002.conf,端口:36379
[7795]01Oct06:25:05.538#
Sentinel runid is 52c14768b15837fb601b26328acf150c6bd30682
[7795]01Oct06:25:05.538#
+monitor master master001 192.168.110.101 6379 quorum 2
[7795]01Oct06:25:06.505*+slave
slave 192.168.110.102:6379192.168.110.1026379@ master001 192.168.110.1016379
[7795]01Oct06:25:06.515*+slave
slave 192.168.110.103:6379192.168.110.1036379@ master001 192.168.110.1016379
[7795]01Oct06:25:07.557*+sentinel
sentinel 192.168.110.100:26379192.168.110.10026379@ master001 192.168.110.1016379
[7795]01Oct06:26:11.168*+sentinel
sentinel 192.168.110.100:46379192.168.110.10046379@ master001 192.168.110.1016379
./redis-sentinel
sentinel003.conf,端口:46379
[7828]01Oct06:26:09.076#
Sentinel runid is c8509594be4a36660b2122b3b81f4f74060c9b04
[7828]01Oct06:26:09.076#
+monitor master master001 192.168.110.101 6379 quorum 2
[7828]01Oct06:26:10.063*+slave
slave 192.168.110.102:6379192.168.110.1026379@ master001 192.168.110.1016379
[7828]01Oct06:26:10.071*+slave
slave 192.168.110.103:6379192.168.110.1036379@ master001 192.168.110.1016379
[7828]01Oct06:26:11.516*+sentinel
sentinel 192.168.110.100:26379192.168.110.10026379@ master001 192.168.110.1016379
[7828]01Oct06:26:11.674*+sentinel
sentinel 192.168.110.100:36379192.168.110.10036379@ master001 192.168.110.1016379
每个sentinel服务能知道其他所有的服务!
回到顶部
4.测试sentinel集群
1.停止192.168.110.101主节点停止192.168.110.101Redis主节点后,在查看Replication信息如下:
[wch@localhost bin]$ ./redis-cli -h 192.168.110.101 info Replication
Could not connect to Redis at 192.168.110.101:6379:Connection refused
[wch@localhost bin]$ ./redis-cli -h 192.168.110.102 info Replication
# Replication
role:slave
master_host:192.168.110.103
master_port:6379
master_link_status:up
master_last_io_seconds_ago:1
master_sync_in_progress:0
slave_repl_offset:29128
slave_priority:100
slave_read_only:1
connected_slaves:0
master_repl_offset:0
repl_backlog_active:0
repl_backlog_size:1048576
repl_backlog_first_byte_offset:0
repl_backlog_histlen:0
[wch@localhost bin]$ ./redis-cli -h 192.168.110.103 info Replication
# Replication
role:master
connected_slaves:1
slave0:ip=192.168.110.102,port=6379,state=online,offset=30456,lag=1
master_repl_offset:30456
repl_backlog_active:1
repl_backlog_size:1048576
repl_backlog_first_byte_offset:2
repl_backlog_histlen:30455
[wch@localhost bin]$
发现192.168.110.101Redis主节点已经不能连接,192.168.110.103成了主节点!
2.再启动192.168.110.101主节点
再启动192.168.110.101Redis主节点后,在查看Replication信息如下:
### 启动脚本,仍然使用默认配置
[wch@localhost bin]$ ./redis-server
[wch@localhost bin]$ ./redis-cli -h 192.168.110.101 info Replication
# Replication
role:slave
master_host:192.168.110.103
master_port:6379
master_link_status:up
master_last_io_seconds_ago:1
master_sync_in_progress:0
slave_repl_offset:57657
slave_priority:100
slave_read_only:1
connected_slaves:0
master_repl_offset:0
repl_backlog_active:0
repl_backlog_size:1048576
repl_backlog_first_byte_offset:0
repl_backlog_histlen:0
[wch@localhost bin]$ ./redis-cli -h 192.168.110.102 info Replication
# Replication
role:slave
master_host:192.168.110.103
master_port:6379
master_link_status:up
master_last_io_seconds_ago:0
master_sync_in_progress:0
slave_repl_offset:60751
slave_priority:100
slave_read_only:1
connected_slaves:0
master_repl_offset:0
repl_backlog_active:0
repl_backlog_size:1048576
repl_backlog_first_byte_offset:0
repl_backlog_histlen:0
[wch@localhost bin]$ ./redis-cli -h 192.168.110.103 info Replication
# Replication
role:master
connected_slaves:2
slave0:ip=192.168.110.102,port=6379,state=online,offset=63247,lag=1
slave1:ip=192.168.110.101,port=6379,state=online,offset=63247,lag=1
master_repl_offset:63393
repl_backlog_active:1
repl_backlog_size:1048576
repl_backlog_first_byte_offset:2
repl_backlog_histlen:63392
[wch@localhost bin]$
发现192.168.110.101节点启动后还再集群中,只不过成了从节点,192.168.110.103仍然是主节点,但是现在又有两个从节点了!
3.只留下一个sentinel服务,再停止192.168.110.103主节点,查看Redis集群是否出现新的主节点
停止sentinel服务,只留下一个sentinel服务,再停止Redis主节点,查看Replication信息如下:
[wch@localhost bin]$ ./redis-cli -h 192.168.110.101 info Replication
# Replication
role:slave
master_host:192.168.110.103
master_port:6379
master_link_status:down
master_last_io_seconds_ago:-1
master_sync_in_progress:0
slave_repl_offset:184231
master_link_down_since_seconds:43
slave_priority:100
slave_read_only:1
connected_slaves:0
master_repl_offset:0
repl_backlog_active:0
repl_backlog_size:1048576
repl_backlog_first_byte_offset:0
repl_backlog_histlen:0
[wch@localhost bin]$ ./redis-cli -h 192.168.110.102 info Replication
# Replication
role:slave
master_host:192.168.110.103
master_port:6379
master_link_status:down
master_last_io_seconds_ago:-1
master_sync_in_progress:0
slave_repl_offset:184231
master_link_down_since_seconds:52
slave_priority:100
slave_read_only:1
connected_slaves:0
master_repl_offset:0
repl_backlog_active:0
repl_backlog_size:1048576
repl_backlog_first_byte_offset:0
repl_backlog_histlen:0
[wch@localhost bin]$ ./redis-cli -h 192.168.110.103 info Replication
Could not connect to Redis at 192.168.110.103:6379:Connection refused
发现192.168.110.103主节点已经不能连接了,也不存在Redis主节点,集群中无主节点了!!!分析原因是:sentinel.conf配置的sentinel
monitor master001 192.168.110.10163792最后一个参数是2导致,若是但节点此配置的最后一个参数要使用是1。(此原因我已证实)
注意:在生产环境下建议sentinel节点的数量能在3个以上,并且最好不要在同一台机器上(使用同一网卡)。

相关文章推荐
- redis sentinel 集群配置-主从切换
- redis单例、主从模式、sentinel以及集群的配置方式及优缺点对比
- Redis单例、主从模式、sentinel以及集群的配置方式及优缺点对比
- Redis主从集群的Sentinel配置
- (转)Redis主从集群的Sentinel配置
- Redis主从集群的Sentinel配置
- redis单例、主从模式、sentinel以及集群的配置方式及优缺点对比
- 搭建Redis主从集群搭建、redis-sentinel的配置以及Jedis对Sentinel的使用[ by 嗡汤圆 ]
- redis-cluster集群配置和主从
- redis sentinel 主从切换(failover)解决方案,详细配置
- redis配置读写分离以及利用哨兵sentinel进行自动主从切换
- redis集群(主从配置)
- Redis集群:redis主从自动切换Sentinel操作实例
- Redis集群(四):主从配置二
- Redis主从复制和集群配置
- redis 集群热备自动切换sentinel配置实战
- redis主从复制和集群配置
- redis集群(主从配置)
- Redis的主从复制与集群配置实践
- redis sentinel(哨兵) 配置详解-redis集群管理