Cocos2d-x 3.6(Lua):Cocos如何绑定Lua自定义C++
2018-01-21 22:21
489 查看
看到了一篇文章,讲cocos 3.X lua高版本如何绑定义C++类。文章写的非常好。可惜照他写的做却绑定失败,因为里面一些必然出现的坑作者没有提,可能是时过境迁环境变了,但是必然是绑定失败。这里我援引一下原文章,再把会出现的坑填好。
原文地址
笔者的环境 Quick-Cocos2dx-Community 3.6
Cocos2d-x 2.x 与 Cocos2d-x 3.x 差异(tolua++)
Cocos2d-x在2.x版本里就是用toLua++和.pkg文件这么把自己注册进Lua环境里的,然而从Cocos2d-x 3.x开始,用bindings-generator脚本代替了toLua++。
bindings-generator脚本的工作机制是:
1、不用编写.pkg和.h文件了,直接定义一个ini文件,注册到Lua环境里的模块名是什么,就行了。
2、摸清了toLua++工具的生成方法,改由Python脚本动态分析C++类,自动生成桥接的.h和.cpp代码,不调用tolua++命令了
3、虽然不再调用tolua++命令了,但是底层仍然使用toLua++的库函数,比如tolua_function,bindings-generator脚本生成的代码就跟使用toLua++工具生成的几乎一样
bindings-generator脚本掌握了生成toLua++桥接代码的主动权,不仅可以省下大量的.pkg和.h文件,而且可以更好地插入自定义代码,达到Cocos2d-x环境下的一些特殊目的,比如内存回收之类的,所以Cocos2d-x从3.x开始放弃了toLua++和.pkg而改用了自己写的bindings-generator脚本是非常值得赞赏的聪明做法。
接下来说怎么用bindings-generator脚本:
1、写自己的C++类,按照Cocos2d-x的规矩,继承cocos2d::Ref类,以便使用Cocos2d-x的内存回收机制。
2、编写一个.ini文件,让bindings-generator可以根据这个配置文件知道C++类该怎么暴露出来
3、修改bindings-generator脚本,让它去读取这个.ini文件
4、执行bindings-generator脚本,生成桥接C++类方法
5、用VS2012将自定义的C++类和生成的桥接文件加入工程,不然编译不到
6、修改AppDelegate.cpp,执行桥接方法,自定义的C++类就注册进Lua环境里了。
安装必要的库和工具包,以及配置相关环境变量,请按照Quick-Cocos2dx-Community\tools\tolua\README.mdown说得去做,
* Make sure that you have installed `android-ndk-r9b`. 必须是android-ndk-r9b
* Download python2.7.3 (32bit) from (http://www.python.org/ftp/python/2.7.3/python-2.7.3.msi).
* Add the installed path of python (e.g. C:\Python27) to windows environment variable named 'PATH'.
* Download pyyaml from http://pyyaml.org/download/pyyaml/PyYAML-3.10.win32-py2.7.exe and install it.
* Download pyCheetah from https://raw.github.com/dumganhar/my_old_cocos2d-x_backup/download/downloads/Cheetah.zip, unzip it to "C:\Python27\Lib\site-packages"
* Set environment variables (`NDK_ROOT`)
首先是自定义的C++类。我习惯将文件保存在自己工程的frameworks/runtime-src/Classes/目录下:
frameworks/runtime-src/Classes/MyClass.h
#include "cocos2d.h"
using namespace cocos2d;
class MyClass : public Ref
{
public:
MyClass() {};
~MyClass() {};
bool init() { return true; };
CREATE_FUNC(MyClass);
int foo(int i);
};frameworks/runtime-src/Classes/MyClass.cpp
这里写出要改的部分:
[myclass] #文件标识
prefix = myclass
target_namespace =
headers = E:/cocosProj/myluaGame/frameworks/runtime-src/Classes/MyClass.h #头文件路径
classes = MyClass
skip =
abstract_classes =
我因为没改第一个[myclass] 出错了好久
修改 Quick-Cocos2dx-Community\tools\tolua 下的 genbindings.py,此文件导出的cocos类太多很费时间,最好复制一个,只导自己的类,命名为genbindings_myclass.py
把生成目录制定到咱工程里去,打开genbindings_myclass.py把
?
改成
?
修改命令参数,把
?
改成
?
注意,这时你如果 python genbindings_myclass.py,
必定报错!报libclang找不到的错误。可能是早期版本不兼容所至,需要下载最新的bindings-generator 地址 https://github.com/guojian822/bindings-generator
下载后文件名为 bindings-generator-develop 改名为bindings-generator,
把Quick-Cocos2dx-Community\tools下的bindings-generator替换,最好先备份一下
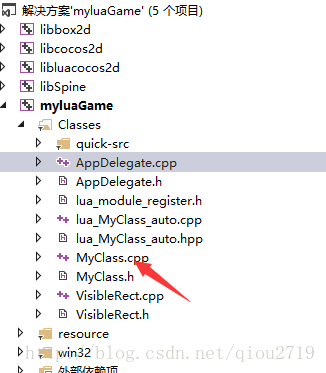
然后就可以执行 python genbindings_myclass.py,就能生成绑定的桥接类了 lua_MyClass_auto.cpp和lua_MyClass_auto.hpp,把它拷到自己的工程目录下,加入,就像下图那样
编译运行
打开Classes/lua_module_register.h文件,添加头文件
在static int lua_module_register(lua_State* L)添加注册函数
若vs2012编译错误,估计都是没把源文件及生成的文件加入工程; 若有特殊处理,比如更换genbindings.py脚本生成文件路径,注意在vs2012环境->属性->c/c++->附加包含目录,添加路径。
lua代码:
编译运行:
原文地址
笔者的环境 Quick-Cocos2dx-Community 3.6
Cocos2d-x 2.x 与 Cocos2d-x 3.x 差异(tolua++)
Cocos2d-x在2.x版本里就是用toLua++和.pkg文件这么把自己注册进Lua环境里的,然而从Cocos2d-x 3.x开始,用bindings-generator脚本代替了toLua++。
bindings-generator脚本的工作机制是:
1、不用编写.pkg和.h文件了,直接定义一个ini文件,注册到Lua环境里的模块名是什么,就行了。
2、摸清了toLua++工具的生成方法,改由Python脚本动态分析C++类,自动生成桥接的.h和.cpp代码,不调用tolua++命令了
3、虽然不再调用tolua++命令了,但是底层仍然使用toLua++的库函数,比如tolua_function,bindings-generator脚本生成的代码就跟使用toLua++工具生成的几乎一样
bindings-generator脚本掌握了生成toLua++桥接代码的主动权,不仅可以省下大量的.pkg和.h文件,而且可以更好地插入自定义代码,达到Cocos2d-x环境下的一些特殊目的,比如内存回收之类的,所以Cocos2d-x从3.x开始放弃了toLua++和.pkg而改用了自己写的bindings-generator脚本是非常值得赞赏的聪明做法。
接下来说怎么用bindings-generator脚本:
1、写自己的C++类,按照Cocos2d-x的规矩,继承cocos2d::Ref类,以便使用Cocos2d-x的内存回收机制。
2、编写一个.ini文件,让bindings-generator可以根据这个配置文件知道C++类该怎么暴露出来
3、修改bindings-generator脚本,让它去读取这个.ini文件
4、执行bindings-generator脚本,生成桥接C++类方法
5、用VS2012将自定义的C++类和生成的桥接文件加入工程,不然编译不到
6、修改AppDelegate.cpp,执行桥接方法,自定义的C++类就注册进Lua环境里了。
安装必要的库和工具包,以及配置相关环境变量,请按照Quick-Cocos2dx-Community\tools\tolua\README.mdown说得去做,
* Make sure that you have installed `android-ndk-r9b`. 必须是android-ndk-r9b
* Download python2.7.3 (32bit) from (http://www.python.org/ftp/python/2.7.3/python-2.7.3.msi).
* Add the installed path of python (e.g. C:\Python27) to windows environment variable named 'PATH'.
* Download pyyaml from http://pyyaml.org/download/pyyaml/PyYAML-3.10.win32-py2.7.exe and install it.
* Download pyCheetah from https://raw.github.com/dumganhar/my_old_cocos2d-x_backup/download/downloads/Cheetah.zip, unzip it to "C:\Python27\Lib\site-packages"
* Set environment variables (`NDK_ROOT`)
首先是自定义的C++类。我习惯将文件保存在自己工程的frameworks/runtime-src/Classes/目录下:
frameworks/runtime-src/Classes/MyClass.h
#include "cocos2d.h"
using namespace cocos2d;
class MyClass : public Ref
{
public:
MyClass() {};
~MyClass() {};
bool init() { return true; };
CREATE_FUNC(MyClass);
int foo(int i);
};frameworks/runtime-src/Classes/MyClass.cpp
#include "MyClass.h"
int MyClass::foo(int i)
{
return i + 100;
}然后编写.ini文件。在Quick-Cocos2dx-Community\tools\tolua目录下能看到genbindings.py脚本和一大堆.ini文件,这些就是bindings-generator的实际执行环境了。随便找一个内容比较少的.ini文件,如:cocos2dx_spine.ini,复制一份,重新命名为MyClass.ini,我写的如下:[myclass]
# the prefix to be added to the generated functions. You might or might not use this in your own
# templates
prefix = MineClass
# create a target namespace (in javascript, this would create some code like the equiv. to `ns = ns || {}`)
# all classes will be embedded in that namespace
target_namespace = my
macro_judgement = #if (CC_TARGET_PLATFORM == CC_PLATFORM_ANDROID || CC_TARGET_PLATFORM == CC_PLATFORM_IOS)
android_headers = -I%(androidndkdir)s/platforms/android-14/arch-arm/usr/include -I%(androidndkdir)s/sources/cxx-stl/gnu-libstdc++/4.7/libs/armeabi-v7a/include -I%(androidndkdir)s/sources/cxx-stl/gnu-libstdc++/4.7/include -I%(androidndkdir)s/sources/cxx-stl/gnu-libstdc++/4.8/libs/armeabi-v7a/include -I%(androidndkdir)s/sources/cxx-stl/gnu-libstdc++/4.8/include
android_flags = -D_SIZE_T_DEFINED_
clang_headers = -I%(clangllvmdir)s/lib/clang/3.3/include
clang_flags = -nostdinc -x c++ -std=c++11 -U __SSE__
cocos_headers = -I%(cocosdir)s/cocos -I%(cocosdir)s/cocos/base -I%(cocosdir)s/cocos/platform/android
cocos_flags = -DANDROID
cxxgenerator_headers =
# extra arguments for clang
extra_arguments = %(android_headers)s %(clang_headers)s %(cxxgenerator_headers)s %(cocos_headers)s %(android_flags)s %(clang_flags)s %(cocos_flags)s %(extra_flags)s
# what headers to parse
headers = E:/cocosProj/myluaGame/frameworks/runtime-src/Classes/MyClass.h
# what classes to produce code for. You can use regular expressions here. When testing the regular
# expression, it will be enclosed in "^$", like this: "^Menu*$".
classes = MyClass
# what should we skip? in the format ClassName::[function function]
# ClassName is a regular expression, but will be used like this: "^ClassName$" functions are also
# regular expressions, they will not be surrounded by "^$". If you want to skip a whole class, just
# add a single "*" as functions. See bellow for several examples. A special class name is "*", which
# will apply to all class names. This is a convenience wildcard to be able to skip similar named
# functions from all classes.
skip =
rename_functions =
rename_classes =
# for all class names, should we remove something when registering in the target VM?
remove_prefix =
# classes for which there will be no "parent" lookup
classes_have_no_parents =
# base classes which will be skipped when their sub-classes found them.
base_classes_to_skip =
# classes that create no constructor
# Set is special and we will use a hand-written constructor
abstract_classes =
# Determining whether to use script object(js object) to control the lifecycle of native(cpp) object or the other way around. Supported values are 'yes' or 'no'.
script_control_cpp = no这里写出要改的部分:
[myclass] #文件标识
prefix = myclass
target_namespace =
headers = E:/cocosProj/myluaGame/frameworks/runtime-src/Classes/MyClass.h #头文件路径
classes = MyClass
skip =
abstract_classes =
我因为没改第一个[myclass] 出错了好久
修改 Quick-Cocos2dx-Community\tools\tolua 下的 genbindings.py,此文件导出的cocos类太多很费时间,最好复制一个,只导自己的类,命名为genbindings_myclass.py
把生成目录制定到咱工程里去,打开genbindings_myclass.py把
?
?
?
?
必定报错!报libclang找不到的错误。可能是早期版本不兼容所至,需要下载最新的bindings-generator 地址 https://github.com/guojian822/bindings-generator
下载后文件名为 bindings-generator-develop 改名为bindings-generator,
把Quick-Cocos2dx-Community\tools下的bindings-generator替换,最好先备份一下
然后就可以执行 python genbindings_myclass.py,就能生成绑定的桥接类了 lua_MyClass_auto.cpp和lua_MyClass_auto.hpp,把它拷到自己的工程目录下,加入,就像下图那样
编译运行
打开Classes/lua_module_register.h文件,添加头文件
lua代码:

相关文章推荐
- (转载)我所理解Cocos2d-x 3.6(Lua):Cocos如何绑定Lua自定义类
- 我所理解cocos2d-x 3.6 lua -- Cocos如何绑定Lua自定义类
- 我所理解cocos2d-x 3.6 lua -- Cocos如何绑定Lua自定义类
- 【Quick-COCOS2D-X 3.3 如何绑定自定义类至Lua之四】使用绑定C++至Lua的自定义类
- Cocos2d-x Tutorial 之 如何绑定 C++ 类到 Lua
- 如何使用cocos的自动绑定工具实现lua调用c++的类
- 【Quick-COCOS2D-X 3.3 如何绑定自定义类至Lua之三】动手绑定自定义类至Lua
- Quick-Cocos2d-x 3.3绑定自定义类至Lua(四)使用绑定C++至Lua的自定义类
- cocos2d-Lua与c++交互,lua如何绑定C++类。
- 【Quick-COCOS2D-X 3.3 如何绑定自定义类至Lua之一】环境搭建
- cocos2d-x Lua绑定C++ 自定义类到Runtime(Lua-binding)
- 【Quick-COCOS2D-X 3.3 如何绑定自定义类至Lua之二】新建项目中配制环境
- 【Cocos2d-x】绑定C++自定义类到Lua
- 在cocos2d-x中绑定和调用c++自定义的类
- cocos2d-x 2.2.0 如何在lua中注册回调函数给C++
- Quick-Cocos2d-x 创建自定义Lua绑定C++类
- Cocos如何绑定lua自定义类
- Cocos2d C++和Lua绑定
- cocos2d-x-lua如何导出自定义类到lua脚本环境
- 我所理解cocos2d-x 3.6 lua --使用Cocos Studio