docker存储驱动模式之direct-lvm配置
2018-01-17 13:55
921 查看
最近在虚拟机上玩docker,但是发现默认安装使用的是loop-lvm的模式做后端存储,这个肯对对后面的实验会造成影响,而且docker官方也不建议在生产环境下使用loop-lvm,下图为docker官方给出的存储方案优劣对比:
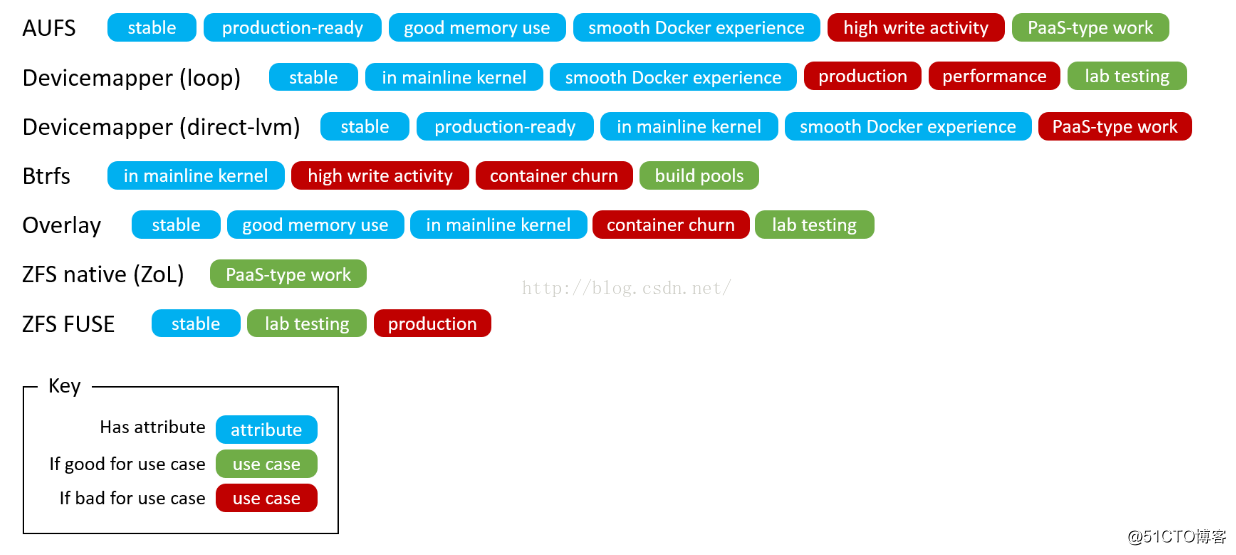
所以今天开题分享一下如何更改docker的devicemapper存储方式为direct-lvm。docker 最先是跑在ubuntu和debian上的,使用aufs存储器. 由于docker越来越流行,许多公司希望在RHEL上使用,但是上游内核中没有包括aufs,所以rhel不能使用aufs. 最终开发者们开发了一个新的后端存储引擎devicemapper,基于已有的Device Mapper技术,并且使docker支持可插拔,现在全世界有很多真实案例在生产环境使用devicemapper。Device Mapper是Linux系统中基于内核的高级卷管理技术框架。Docker的devicemapper存储驱动就是基于该框架的精简置备和快照功能来实现镜像和容器的管理。devicemapper是Red Hat Enterprise Linux下Docker Engine的默认存储驱动,它有两种配置模式:loop-lvm和direct-lvm,loop-lvm是默认的模式,但如果是在生产环境的部署Docker,官方不推荐使用该模式。我们使用docker info命令可以看到以下警告:
direct-lvm是Docker推荐的生产环境的推荐模式,他使用块设备来构建精简池来存放镜像和容器的数据。本文的操作系统是CentOS7.2,使用docker版本为1.12,devicemapper版本为device-mapper-1.02.140-8.el7.x86_64。
0.安装docker
1.停止Docker服务
首先运行docker info 查看当前系统的docker配置:
发现Storage Driver是Devicemapper,Data File和Metadata File都是loop设备,下面我们将docker停掉:
2. 添加磁盘并创建thin-pool lv
查看新添加的磁盘
创建pv
创建vg
创建data lv
创建metadata lv
数据LV大小为VG的95%,元数据LV大小为VG的1%,剩余的空间用来自动扩展。
注意:作为meta的pool大小不能超过16GB!!!
将pool 转换为thin-pool
将 thinpool lv 的 chunksize 改为 512KB,并且将前 4KB 字节清零。
创建一个thinpool的profile
应用配置
3. 查看lv状态
4. 查看磁盘状态
5. 配置docker
方式一: 调整 docker.service 的配置参数
添加如下参数到docker服务的启动项里:
完整的配置文件内容如下:
或者:
方式二: 在 daemon.json 中配置参数
6. 清除Graphdriver
在启动docker之前,需要将之前残留的docker文件删除掉,要不然会有以下报错:
7. 启动docker,并查看docker详情
查看 devicemapper 的资源,发现 docker-thinpool 与 docker info 显示的 Pool Name 一致,代表启用direct-lvm 成功。
8.查看对应的对应的设备
9.docker info 中其它的警告取消
默认禁用网桥上的netfilter,所以出现以下警告
10.再次查看docker信息
查看对应的对应的设备
所以今天开题分享一下如何更改docker的devicemapper存储方式为direct-lvm。docker 最先是跑在ubuntu和debian上的,使用aufs存储器. 由于docker越来越流行,许多公司希望在RHEL上使用,但是上游内核中没有包括aufs,所以rhel不能使用aufs. 最终开发者们开发了一个新的后端存储引擎devicemapper,基于已有的Device Mapper技术,并且使docker支持可插拔,现在全世界有很多真实案例在生产环境使用devicemapper。Device Mapper是Linux系统中基于内核的高级卷管理技术框架。Docker的devicemapper存储驱动就是基于该框架的精简置备和快照功能来实现镜像和容器的管理。devicemapper是Red Hat Enterprise Linux下Docker Engine的默认存储驱动,它有两种配置模式:loop-lvm和direct-lvm,loop-lvm是默认的模式,但如果是在生产环境的部署Docker,官方不推荐使用该模式。我们使用docker info命令可以看到以下警告:
WARNING: Usage of loopback devices is strongly discouraged for production use. Use `--storage-opt dm.thinpooldev` to specify a custom block storage device.
direct-lvm是Docker推荐的生产环境的推荐模式,他使用块设备来构建精简池来存放镜像和容器的数据。本文的操作系统是CentOS7.2,使用docker版本为1.12,devicemapper版本为device-mapper-1.02.140-8.el7.x86_64。
0.安装docker
[root@localhost ~]# yum install docker -y;systemctl enable docker;systemctl start docker
[root@localhost ~]# ls -lsh /var/lib/docker/devicemapper/devicemapper/
total 12M
11M -rw------- 1 root root 100G Jan 17 15:54 data
596K -rw------- 1 root root 2.0G Jan 17 15:55 metadata

data [存放数据] 和 metadata [存放元数据] 的大小从输出可以看出初始化默认为 100G 和 2G 大小,都是稀疏文件,使用多少占用多少。

Docker 在初始化的过程中,创建 data 和 metadata 这两个稀疏文件,并分别附加到回环设备/dev/loop0 和 /dev/loop1 上,然后基于回环设备创建 thin pool。 默认一个 container 最大存放数据不超过 10G[注:docker 1.8 之后默认的大小已经为 100G,建议生产环境针对 container pool 大小监控。],如果需要调整则需要修改 /etc/sysconfig/docker 配置文件添加相关选项 --storage-opt 调整即可(详细参考 man docker 查看 STORAGE DRIVER OPTIONS 具体参数说明)。
1.停止Docker服务
首先运行docker info 查看当前系统的docker配置:
[root@localhost ~]# docker info
Containers: 0
Running: 0
Paused: 0
Stopped: 0
Images: 0
Server Version: 1.12.6
Storage Driver: devicemapper
Pool Name: docker-8:3-135618250-pool
Pool Blocksize: 65.54 kB
Base Device Size: 10.74 GB
Backing Filesystem: xfs
Data file: /dev/loop0
Metadata file: /dev/loop1
Data Space Used: 11.8 MB
Data Space Total: 107.4 GB
Data Space Available: 51.43 GB
Metadata Space Used: 581.6 kB
Metadata Space Total: 2.147 GB
Metadata Space Available: 2.147 GB
Thin Pool Minimum Free Space: 10.74 GB
Udev Sync Supported: true
Deferred Removal Enabled: true
Deferred Deletion Enabled: true
Deferred Deleted Device Count: 0
Data loop file: /var/lib/docker/devicemapper/devicemapper/data
WARNING: Usage of loopback devices is strongly discouraged for production use. Use `--storage-opt dm.thinpooldev` to specify a custom block storage device.
Metadata loop file: /var/lib/docker/devicemapper/devicemapper/metadata
Library Version: 1.02.140-RHEL7 (2017-05-03)
Logging Driver: journald
Cgroup Driver: systemd
Plugins:
Volume: local
Network: host bridge null overlay
Swarm: inactive
Runtimes: docker-runc runc
Default Runtime: docker-runc
Security Options: seccomp selinux
Kernel Version: 3.10.0-327.el7.x86_64
Operating System: CentOS Linux 7 (Core)
OSType: linux
Architecture: x86_64
Number of Docker Hooks: 3
CPUs: 2
Total Memory: 1.954 GiB
Name: localhost.localdomain
ID: 5PPL:6TWG:X2JA:VSVV:YYFD:X7BG:EBP5:GYWB:S3FJ:QET6:T3ED:5HTM
Docker Root Dir: /var/lib/docker
Debug Mode (client): false
Debug Mode (server): false
Registry: https://index.docker.io/v1/ WARNING: bridge-nf-call-iptables is disabled
WARNING: bridge-nf-call-ip6tables is disabled
Insecure Registries:
127.0.0.0/8
Registries: docker.io (secure)
[root@localhost ~]#
发现Storage Driver是Devicemapper,Data File和Metadata File都是loop设备,下面我们将docker停掉:
# systemctl stop docker
2. 添加磁盘并创建thin-pool lv
查看新添加的磁盘
[root@localhost ~]# fdisk -l /dev/sdb

Disk /dev/sdb: 21.5 GB, 21474836480 bytes, 41943040 sectors
Units = sectors of 1 * 512 = 512 bytes
Sector size (logical/physical): 512 bytes / 512 bytes
I/O size (minimum/optimal): 512 bytes / 512 bytes

[root@localhost ~]#
创建pv
[root@localhost ~]# pvcreate /dev/sdb
Physical volume "/dev/sdb" successfully created.
[root@localhost ~]#
创建vg
[root@localhost ~]# vgcreate docker /dev/sdb
Volume group "docker" successfully created
[root@localhost ~]#
创建data lv
[root@localhost ~]# lvcreate --wipesignatures y -n thinpool docker -l 95%VG
Logical volume "thinpool" created.
[root@localhost ~]#
创建metadata lv
[root@localhost ~]# lvcreate --wipesignatures y -n thinpoolmeta docker -l 1%VG
Logical volume "thinpoolmeta" created.
[root@localhost ~]#
[root@docker ~]#
数据LV大小为VG的95%,元数据LV大小为VG的1%,剩余的空间用来自动扩展。
注意:作为meta的pool大小不能超过16GB!!!
[root@localhost ~]# lvs
LV           VG     Attr       LSize   Pool Origin Data%  Meta%  Move Log Cpy%Sync Convert
thinpool     docker -wi-a----- <19.00g
thinpoolmeta docker -wi-a----- 204.00m
[root@localhost ~]#
将pool 转换为thin-pool
将 thinpool lv 的 chunksize 改为 512KB,并且将前 4KB 字节清零。
[root@localhost ~]# lvconvert -y --zero n -c 512k --thinpool docker/thinpool --poolmetadata docker/thinpoolmeta
Thin pool volume with chunk size 512.00 KiB can address at most 126.50 TiB of data.
WARNING: Converting logical volume docker/thinpool and docker/thinpoolmeta to thin pool's data and metadata volumes with metadata wiping.
THIS WILL DESTROY CONTENT OF LOGICAL VOLUME (filesystem etc.)
Converted docker/thinpool_tdata to thin pool.
[root@localhost ~]#
创建一个thinpool的profile
[root@localhost ~]# vim /etc/lvm/profile/docker-thinpool.profile
[root@localhost ~]# cat /etc/lvm/profile/docker-thinpool.profile
activation {
thin_pool_autoextend_threshold=80
thin_pool_autoextend_percent=20
}
[root@localhost ~]#

定义一个百分比的阈值,表明触发 lvm 自动扩容前,已用空间占比。
thin_pool_autoextend_threshold = 80
每次扩容 thin pool 空间的比例
thin_pool_autoextend_percent = 20
应用配置
[root@localhost ~]# lvchange --metadataprofile docker-thinpool docker/thinpool
Logical volume docker/thinpool changed.
[root@localhost ~]#
注意: docker-thinpool 即刚才创建的 profile 文件名的前缀,不需要加.profile,而且要在etc/lvm/profile 目录下运行此命令。 执行完毕后不要mount,不要格式化 lv。
3. 查看lv状态
[root@localhost ~]# lvs -o+seg_monitor
LV       VG     Attr       LSize   Pool Origin Data%  Meta%  Move Log Cpy%Sync Convert Monitor
thinpool docker twi-a-t--- <19.00g             0.00   0.03                             monitored
[root@localhost ~]#
看到有Meta 和Data下面都有数字,代表刚才创建的thinpool创建成功。
4. 查看磁盘状态
[root@localhost ~]# fdisk -l

Disk /dev/sda: 53.7 GB, 53687091200 bytes, 104857600 sectors
Units = sectors of 1 * 512 = 512 bytes
Sector size (logical/physical): 512 bytes / 512 bytes
I/O size (minimum/optimal): 512 bytes / 512 bytes
Disk label type: dos
Disk identifier: 0x00075587

Device Boot      Start         End      Blocks   Id  System
/dev/sda1   *        2048      411647      204800   83  Linux
/dev/sda2          411648     1460223      524288   82  Linux swap / Solaris
/dev/sda3         1460224   104857599    51698688   83  Linux

Disk /dev/sdb: 21.5 GB, 21474836480 bytes, 41943040 sectors
Units = sectors of 1 * 512 = 512 bytes
Sector size (logical/physical): 512 bytes / 512 bytes
I/O size (minimum/optimal): 512 bytes / 512 bytes

Disk /dev/mapper/docker-thinpool_tmeta: 213 MB, 213909504 bytes, 417792 sectors
Units = sectors of 1 * 512 = 512 bytes
Sector size (logical/physical): 512 bytes / 512 bytes
I/O size (minimum/optimal): 512 bytes / 512 bytes

Disk /dev/mapper/docker-thinpool_tdata: 20.4 GB, 20396900352 bytes, 39837696 sectors
Units = sectors of 1 * 512 = 512 bytes
Sector size (logical/physical): 512 bytes / 512 bytes
I/O size (minimum/optimal): 512 bytes / 512 bytes

Disk /dev/mapper/docker-thinpool: 20.4 GB, 20396900352 bytes, 39837696 sectors
Units = sectors of 1 * 512 = 512 bytes
Sector size (logical/physical): 512 bytes / 512 bytes
I/O size (minimum/optimal): 524288 bytes / 524288 bytes

[root@localhost ~]#
5. 配置docker
方式一: 调整 docker.service 的配置参数
添加如下参数到docker服务的启动项里:
--storage-driver=devicemapper --storage-opt dm.thinpooldev=/dev/mapper/docker-thinpool --storage-opt dm.use_deferred_removal=true --storage-opt dm.use_deferred_del
etion=true
或者:
--storage-driver=devicemapper --storage-opt=dm.thinpooldev=/dev/mapper/docker-thinpool --storage-opt=dm.use_deferred_removal=true --storage-opt=dm.use_deferred_del
etion=true
完整的配置文件内容如下:
[root@localhost ~]# cat  /usr/lib/systemd/system/docker.service
[Unit]
Description=Docker Application Container Engine
Documentation=http://docs.docker.com
After=network.target
Wants=docker-storage-setup.service
Requires=docker-cleanup.timer

[Service]
Type=notify
NotifyAccess=all
EnvironmentFile=-/run/containers/registries.conf
EnvironmentFile=-/etc/sysconfig/docker
EnvironmentFile=-/etc/sysconfig/docker-storage
EnvironmentFile=-/etc/sysconfig/docker-network
Environment=GOTRACEBACK=crash
Environment=DOCKER_HTTP_HOST_COMPAT=1
Environment=PATH=/usr/libexec/docker:/usr/bin:/usr/sbin
ExecStart=/usr/bin/dockerd-current \
--add-runtime docker-runc=/usr/libexec/docker/docker-runc-current \
--default-runtime=docker-runc \
--exec-opt native.cgroupdriver=systemd \
--userland-proxy-path=/usr/libexec/docker/docker-proxy-current \
--storage-driver=devicemapper --storage-opt=dm.thinpooldev=/dev/mapper/docker-thinpool --storage-opt=dm.use_deferred_removal=true --storage-opt=dm.use_deferred_deletion=true \
$OPTIONS \
$DOCKER_STORAGE_OPTIONS \
$DOCKER_NETWORK_OPTIONS \
$ADD_REGISTRY \
$BLOCK_REGISTRY \
$INSECURE_REGISTRY\
$REGISTRIES
ExecReload=/bin/kill -s HUP $MAINPID
LimitNOFILE=1048576
LimitNPROC=1048576
LimitCORE=infinity
TimeoutStartSec=0
Restart=on-abnormal
MountFlags=slave
KillMode=process

[Install]
WantedBy=multi-user.target
[root@localhost ~]#
或者:
[root@docker ~]# sed -i '/^ExecStart=/c\ExecStart=/usr/bin/dockerd --storage-driver=devicemapper --storage-opt=dm.thinpooldev=/dev/mapper/docker-thinpool --storage-opt=dm.use_deferred_removal=true --storage-opt=dm.use_deferred_deletion=true \\' /lib/systemd/system/docker.service完整的配置文件内容如下:
[root@docker ~]# cat /usr/lib/systemd/system/docker.service
[Unit]
Description=Docker Application Container Engine
Documentation=http://docs.docker.com
After=network.target
Wants=docker-storage-setup.service
Requires=docker-cleanup.timer

[Service]
Type=notify
NotifyAccess=all
EnvironmentFile=-/run/containers/registries.conf
EnvironmentFile=-/etc/sysconfig/docker
EnvironmentFile=-/etc/sysconfig/docker-storage
EnvironmentFile=-/etc/sysconfig/docker-network
Environment=GOTRACEBACK=crash
Environment=DOCKER_HTTP_HOST_COMPAT=1
Environment=PATH=/usr/libexec/docker:/usr/bin:/usr/sbin
ExecStart=/usr/bin/dockerd --storage-driver=devicemapper --storage-opt=dm.thinpooldev=/dev/mapper/docker-thinpool --storage-opt=dm.use_deferred_removal=true --storage-opt=dm.use_deferred_deletion=true \
--add-runtime docker-runc=/usr/libexec/docker/docker-runc-current \
--default-runtime=docker-runc \
--exec-opt native.cgroupdriver=systemd \
--userland-proxy-path=/usr/libexec/docker/docker-proxy-current \
$OPTIONS \
$DOCKER_STORAGE_OPTIONS \
$DOCKER_NETWORK_OPTIONS \
$ADD_REGISTRY \
$BLOCK_REGISTRY \
$INSECURE_REGISTRY\
$REGISTRIES
ExecReload=/bin/kill -s HUP $MAINPID
LimitNOFILE=1048576
LimitNPROC=1048576
LimitCORE=infinity
TimeoutStartSec=0
Restart=on-abnormal
MountFlags=slave
KillMode=process

[Install]
WantedBy=multi-user.target
[root@docker ~]#
方式二: 在 daemon.json 中配置参数
[root@localhost ~]# cat /etc/docker/daemon.json
{
"storage-driver": "devicemapper",
"storage-opts": [
"dm.thinpooldev=/dev/mapper/docker-thinpool",
"dm.use_deferred_removal=true",
"dm.use_deferred_deletion=true"
]
}
[root@localhost ~]# systemctl daemon-reload
[root@localhost ~]# systemctl restart docker
6. 清除Graphdriver
在启动docker之前,需要将之前残留的docker文件删除掉,要不然会有以下报错:
Error starting daemon: error initializing graphdriver: devmapper: Base Device UUID and Filesystem
verification failed: devicemapper: Error running deviceCreate (ActivateDevice) dm_task_run failed

rm -rf /var/lib/docker/*
7. 启动docker,并查看docker详情
[root@localhost ~]# systemctl daemon-reload
[root@localhost ~]# systemctl start docker
[root@localhost ~]# docker info
Containers: 0
Running: 0
Paused: 0
Stopped: 0
Images: 0
Server Version: 1.12.6
Storage Driver: devicemapper
Pool Name: docker-thinpool
Pool Blocksize: 524.3 kB
Base Device Size: 10.74 GB
Backing Filesystem: xfs
Data file:
Metadata file:
Data Space Used: 20.45 MB
Data Space Total: 20.4 GB
Data Space Available: 20.38 GB
Metadata Space Used: 61.44 kB
Metadata Space Total: 213.9 MB
Metadata Space Available: 213.8 MB
Thin Pool Minimum Free Space: 2.039 GB
Udev Sync Supported: true
Deferred Removal Enabled: true
Deferred Deletion Enabled: true
Deferred Deleted Device Count: 0
Library Version: 1.02.140-RHEL7 (2017-05-03)
Logging Driver: journald
Cgroup Driver: systemd
Plugins:
Volume: local
Network: host bridge overlay null
Swarm: inactive
Runtimes: docker-runc runc
Default Runtime: docker-runc
Security Options: seccomp selinux
Kernel Version: 3.10.0-327.el7.x86_64
Operating System: CentOS Linux 7 (Core)
OSType: linux
Architecture: x86_64
Number of Docker Hooks: 3
CPUs: 2
Total Memory: 1.954 GiB
Name: localhost.localdomain
ID: 5PPL:6TWG:X2JA:VSVV:YYFD:X7BG:EBP5:GYWB:S3FJ:QET6:T3ED:5HTM
Docker Root Dir: /var/lib/docker
Debug Mode (client): false
Debug Mode (server): false
Registry: https://index.docker.io/v1/ WARNING: bridge-nf-call-iptables is disabled
WARNING: bridge-nf-call-ip6tables is disabled
Insecure Registries:
127.0.0.0/8
Registries: docker.io (secure)
[root@localhost ~]#
查看 devicemapper 的资源,发现 docker-thinpool 与 docker info 显示的 Pool Name 一致,代表启用direct-lvm 成功。
[root@localhost ~]# dmsetup ls
docker-thinpool_tdata   (253:1)
docker-thinpool_tmeta   (253:0)
docker-thinpool (253:2)
[root@localhost ~]#
8.查看对应的对应的设备
[root@localhost ~]# lsblk /dev/sdb
NAME                    MAJ:MIN RM  SIZE RO TYPE MOUNTPOINT
sdb                       8:16   0   20G  0 disk
├─docker-thinpool_tmeta 253:0    0  204M  0 lvm
│ └─docker-thinpool     253:2    0   19G  0 lvm
└─docker-thinpool_tdata 253:1    0   19G  0 lvm
└─docker-thinpool     253:2    0   19G  0 lvm
[root@localhost ~]#
9.docker info 中其它的警告取消
默认禁用网桥上的netfilter,所以出现以下警告
WARNING: bridge-nf-call-iptables is disabled
WARNING: bridge-nf-call-ip6tables is disabled
修改配置文件 /usr/lib/sysctl.d/00-system.conf,将net.bridge.bridge参数值设定为1,然后重启系统;
net.bridge.bridge-nf-call-ip6tables = 1
net.bridge.bridge-nf-call-iptables = 1
net.bridge.bridge-nf-call-arptables = 1
10.再次查看docker信息
[root@localhost ~]# docker info
Containers: 0
Running: 0
Paused: 0
Stopped: 0
Images: 0
Server Version: 1.12.6
Storage Driver: devicemapper
Pool Name: docker-thinpool
Pool Blocksize: 524.3 kB
Base Device Size: 10.74 GB
Backing Filesystem: xfs
Data file:
Metadata file:
Data Space Used: 20.45 MB
Data Space Total: 20.4 GB
Data Space Available: 20.38 GB
Metadata Space Used: 61.44 kB
Metadata Space Total: 213.9 MB
Metadata Space Available: 213.8 MB
Thin Pool Minimum Free Space: 2.039 GB
Udev Sync Supported: true
Deferred Removal Enabled: true
Deferred Deletion Enabled: true
Deferred Deleted Device Count: 0
Library Version: 1.02.140-RHEL7 (2017-05-03)
Logging Driver: journald
Cgroup Driver: systemd
Plugins:
Volume: local
Network: overlay null bridge host
Swarm: inactive
Runtimes: docker-runc runc
Default Runtime: docker-runc
Security Options: seccomp selinux
Kernel Version: 3.10.0-327.el7.x86_64
Operating System: CentOS Linux 7 (Core)
OSType: linux
Architecture: x86_64
Number of Docker Hooks: 3
CPUs: 2
Total Memory: 1.954 GiB
Name: localhost.localdomain
ID: 5PPL:6TWG:X2JA:VSVV:YYFD:X7BG:EBP5:GYWB:S3FJ:QET6:T3ED:5HTM
Docker Root Dir: /var/lib/docker
Debug Mode (client): false
Debug Mode (server): false
Registry: https://index.docker.io/v1/ Insecure Registries:
127.0.0.0/8
Registries: docker.io (secure)
[root@localhost ~]#
查看对应的对应的设备

相关文章推荐
- docker深入2-存储驱动之使用devicemapper(direct-lvm)模式
- Docker配置direct-lvm模式
- Docker存储配置切换loop-lvm到direct-lvm
- Centos-7 + Docker-1.12 中 devicemapper + direct_lvm 的 Docker 存储配置
- centos7+ docker1.12 实践部署docker及配置direct_lvm
- Docker存储驱动devicemapper介绍和配置
- 为Docker配置direct-lvm
- Docker存储驱动devicemapper介绍和配置
- docker配置overlay存储模式
- Bluemix虚拟机Docker使用direct-lvm存储方式运行容器
- Docker存储驱动 devicemapper 的配置方法
- Docker存储驱动devicemapper介绍和配置
- docker 配置Btrfs和Device mapper存储驱动设置
- Docker存储驱动之OverlayFS简介
- Docker五种存储驱动原理及应用场景和性能测试对比
- Docker存储驱动之ZFS简介
- Docker存储驱动之ZFS简介
- Docker存储驱动之OverlayFS简介
- Docker aufs存储驱动layer、diff、mnt目录的区别介绍
- Docker配置本地镜像与容器的存储位置