git仓库的简单使用
2018-01-12 16:11
435 查看
笔记内容:git仓库的简单使用
笔记日期:2018-01-12
22.5/22.6 单机上使用git
22.7 建立远程仓库
22.8 克隆远程仓库
安装命令:
yum install -y git
创建git仓库:
创建一个新的文件,然后随便写些东西:
把刚刚创建的文件添加到git仓库里,然后进行上传:
接着再次修改文件中的内容,然后进行提交:
git status命令可以查看当前仓库中的状态,比如是否有改动的文件等:
git diff命令可以对比某个文件本次修改了什么内容,相比较仓库里面的版本:
我们都知道,代码管理仓库最重要的一个功能就是版本控制,通过版本控制,可以进行版本的回退操作:
如果回退版本后,发现不合适,想要回退到新版本或者其他历史版本上,可以使用git reflog命令查看所有历史版本:
通过git可以恢复删除的文件,前提是你已经将文件提交到了仓库中。如果不小心把某个文件删除了,而这个文件已经存储在仓库中的话,就可以从仓库恢复这个文件:
如果某个文件进行了修改,add后但没有commit,再想回退到上一次提交的状态,可以使用git reset HEAD filename,再执行git checkout -- filename:
删除仓库中的文件:
即便删除了仓库中的文件,也是可以通过版本id来恢复的:
1.首先到 https://github.com 注册一个账号,我这里已经有账户了,所以直接登录:
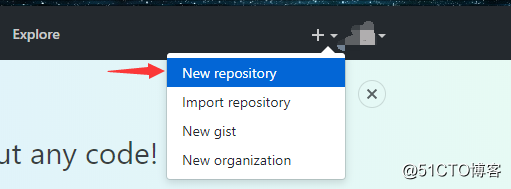
2.登录之后,点击右上角,头像旁边的 + 图标,创建一个自己的repository(仓库):
3.填写仓库的相关信息:

4.创建完成,如下,远程仓库就创建好了:

可以把GitHub上创建的仓库,作为我们的远程服务端。
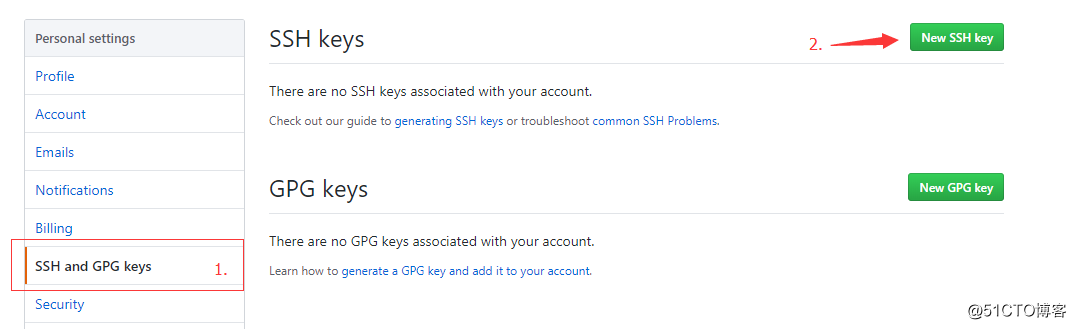
5.在本地机器上创建密钥对:
6.然后给远程的仓库添加密钥认证,保证访问的安全性:
添加完成:
1.创建一个目录,用于存放和上传仓库文件,也相当于是一个本地仓库:
2.根据GitHub的操作示例进行仓库的初始化:
然后再创建一个文件,再次进行推送:
接着到GitHub的仓库上,可以发现多了两个文件,README.md 和 example.txt:
1.复制远程仓库的URL链接:
2.然后到本地机器上执行命令进行克隆:
注:公开的仓库是任何人都可以进行克隆的,但是只能克隆不可以对仓库进行写操作。
3.对克隆的文件进行更改,然后再推送到远程的仓库,因为我们是该仓库的所有者,可以进行写操作:
3.然后到GitHub上看看是否有更改的内容:
4.我现在在GitHub上更改这个文件的内容,更改之后同样可以在本地把新内容拉下来:
拉到页面下方,点击Commit changes提交更改:

接着到本地机器上,执行git pull命令,把远程仓库的更改内容拉下来:
笔记日期:2018-01-12
22.5/22.6 单机上使用git
22.7 建立远程仓库
22.8 克隆远程仓库
22.5/22.6 单机上使用git
git是分布式的仓库,我们不需要把代码上传或更新到某个特定的服务器上,所以它不需要依赖网络,我们可以在本地创建一个git仓库。安装命令:
yum install -y git
创建git仓库:
[root@localhost ~]# mkdir /data/gitroot
[root@localhost ~]# cd /data/gitroot
[root@localhost /data/gitroot]# git init
初始化空的 Git 版本库于 /data/gitroot/.git/
[root@localhost /data/gitroot]# ll -a
总用量 0
drwxr-xr-x  3 root root  17 1月  12 18:38 .
drwxr-xr-x 11 root root 144 1月  12 18:38 ..
drwxr-xr-x  7 root root 111 1月  12 18:38 .git  # 会生成一个.git目录
[root@localhost /data/gitroot]#
创建一个新的文件,然后随便写些东西:
[root@localhost /data/gitroot]# vim Hello.java
class Hello{

public static void main(String[] s){

System.out.println("Hello World!");

}

}
把刚刚创建的文件添加到git仓库里,然后进行上传:
[root@localhost /data/gitroot]# git add Hello.java
[root@localhost /data/gitroot]# git commit -m "add new file Hello.java"
[master(根提交) 1387815] add new file Hello.java
Committer: root <root@localhost.localdomain>
您的姓名和邮件地址基于登录名和主机名进行了自动设置。请检查它们正确  # 如果你没有设置姓名和邮件地址就会有这段提示
与否。您可以通过下面的命令对其进行明确地设置以免再出现本提示信息:

git config --global user.name "Your Name"
git config --global user.email you@example.com

设置完毕后,您可以用下面的命令来修正本次提交所使用的用户身份:

git commit --amend --reset-author

1 file changed, 9 insertions(+)
create mode 100644 Hello.java

# 为了避免老是打印提示信息,可以随便设置一下这两项信息
[root@localhost /data/gitroot]# git config --global user.name "zero"
[root@localhost /data/gitroot]# git config --global user.email none@none.com
接着再次修改文件中的内容,然后进行提交:
[root@localhost /data/gitroot]# echo "class hello{}" >> Hello.java
[root@localhost /data/gitroot]# git add Hello.java
[root@localhost /data/gitroot]# git commit -m "add Hello.java agin"
[master 8d77f14] add Hello.java agin
1 file changed, 1 insertion(+), 1 deletion(-)
[root@localhost /data/gitroot]#
git status命令可以查看当前仓库中的状态,比如是否有改动的文件等:
[root@localhost /data/gitroot]# git status
# 位于分支 master
无文件要提交,干净的工作区
[root@localhost /data/gitroot]#
git diff命令可以对比某个文件本次修改了什么内容,相比较仓库里面的版本:
[root@localhost /data/gitroot]# echo "class emm{}" >> Hello.java
[root@localhost /data/gitroot]# git diff Hello.java
diff --git a/Hello.java b/Hello.java
index 2935899..2bac836 100644
--- a/Hello.java
+++ b/Hello.java
@@ -8,3 +8,4 @@ class Hello{

}
class hello{}
+class emm{}  # 该文件相比较仓库里面的版本多了这行代码
[root@localhost /data/gitroot]#
我们都知道,代码管理仓库最重要的一个功能就是版本控制,通过版本控制,可以进行版本的回退操作:
# 多更改几次Hello.java,然后add,commit
[root@localhost /data/gitroot]# git add Hello.java
[root@localhost /data/gitroot]# git commit -m "ch Hello.java agin"
[master d1cf481] ch Hello.java agin
1 file changed, 1 insertion(+)
[root@localhost /data/gitroot]# echo "class Hi{}" >> Hello.java
[root@localhost /data/gitroot]# git add Hello.java; git commit -m "ch Hello.java agin"
[master 5341f93] ch Hello.java agin
1 file changed, 1 insertion(+)
[root@localhost /data/gitroot]# git log   # 查看所有的提交记录
commit 5341f93bef4f6d216b48d9cf6acb3a1f7dac7f0c  # 这个是该版本的id,进行回退操作时需要使用
Author: zero <none@none.com>
Date:   Fri Jan 12 18:59:51 2018 +0800

ch Hello.java agin

commit d1cf48198534e3bd1a7764ce27667f756f4974b5
Author: zero <none@none.com>
Date:   Fri Jan 12 18:59:12 2018 +0800

ch Hello.java agin

commit 8d77f141ba84dae557ab42cd9a110c2542e06643
Author: zero <none@none.com>
Date:   Fri Jan 12 18:50:07 2018 +0800

add Hello.java agin

commit b576e395c1197a5dc0aa72e584bb54ef9ab66458
Author: root <root@localhost.localdomain>
Date:   Fri Jan 12 18:47:52 2018 +0800

add Hello.java agin

commit 1387815eb4f0eeb58966d89d7756a0ac45c3dde8
Author: root <root@localhost.localdomain>
Date:   Fri Jan 12 18:44:06 2018 +0800

:
[root@localhost /data/gitroot]# git log --pretty=oneline  # 一行显示
5341f93bef4f6d216b48d9cf6acb3a1f7dac7f0c ch Hello.java agin
d1cf48198534e3bd1a7764ce27667f756f4974b5 ch Hello.java agin
8d77f141ba84dae557ab42cd9a110c2542e06643 add Hello.java agin
b576e395c1197a5dc0aa72e584bb54ef9ab66458 add Hello.java agin
1387815eb4f0eeb58966d89d7756a0ac45c3dde8 add new file Hello.java
[root@localhost /data/gitroot]# git reset --hard b576e395c1197a5dc0aa72e584bb54ef9ab66458 # 回退版本
HEAD 现在位于 b576e39 add Hello.java agin
[root@localhost /data/gitroot]# git log --pretty=oneline  # 可以看到已经回退到第二个版本了
b576e395c1197a5dc0aa72e584bb54ef9ab66458 add Hello.java agin
1387815eb4f0eeb58966d89d7756a0ac45c3dde8 add new file Hello.java
[root@localhost /data/gitroot]# git reset --hard 1387815eb  # 这个版本ID是可以简写的,取前面的几个字符即可
HEAD 现在位于 1387815 add new file Hello.java
[root@localhost /data/gitroot]# git log --pretty=oneline
1387815eb4f0eeb58966d89d7756a0ac45c3dde8 add new file Hello.java
[root@localhost /data/gitroot]#
如果回退版本后,发现不合适,想要回退到新版本或者其他历史版本上,可以使用git reflog命令查看所有历史版本:
[root@localhost /data/gitroot]# git reflog  # 查看所有历史版本
1387815 HEAD@{0}: reset: moving to 1387815eb
b576e39 HEAD@{1}: reset: moving to b576e395c1197a5dc0aa72e584bb54ef9ab66458
5341f93 HEAD@{2}: commit: ch Hello.java agin
d1cf481 HEAD@{3}: commit: ch Hello.java agin
8d77f14 HEAD@{4}: commit: add Hello.java agin
b576e39 HEAD@{5}: commit: add Hello.java agin
1387815 HEAD@{6}: commit (initial): add new file Hello.java
[root@localhost /data/gitroot]# git reset --hard 5341f93  # 通过id进行回退
HEAD 现在位于 5341f93 ch Hello.java agin
[root@localhost /data/gitroot]# git log --pretty=oneline  # 回退到最新版本了
5341f93bef4f6d216b48d9cf6acb3a1f7dac7f0c ch Hello.java agin
d1cf48198534e3bd1a7764ce27667f756f4974b5 ch Hello.java agin
8d77f141ba84dae557ab42cd9a110c2542e06643 add Hello.java agin
b576e395c1197a5dc0aa72e584bb54ef9ab66458 add Hello.java agin
1387815eb4f0eeb58966d89d7756a0ac45c3dde8 add new file Hello.java
[root@localhost /data/gitroot]#
通过git可以恢复删除的文件,前提是你已经将文件提交到了仓库中。如果不小心把某个文件删除了,而这个文件已经存储在仓库中的话,就可以从仓库恢复这个文件:
[root@localhost /data/gitroot]# rm -f Hello.java
[root@localhost /data/gitroot]# ls
[root@localhost /data/gitroot]# git checkout -- Hello.java  # 因为文件已经存储到仓库里了,所以可以从仓库恢复
[root@localhost /data/gitroot]# ls
Hello.java
[root@localhost /data/gitroot]#
如果某个文件进行了修改,add后但没有commit,再想回退到上一次提交的状态,可以使用git reset HEAD filename,再执行git checkout -- filename:
[root@localhost /data/gitroot]# echo "class Car{}" >> Hello.java
[root@localhost /data/gitroot]# git add Hello.java
[root@localhost /data/gitroot]# git reset HEAD Hello.java  # 这个命令可以把add标记去掉
重置后撤出暂存区的变更:
M   Hello.java
[root@localhost /data/gitroot]# git checkout -- Hello.java
[root@localhost /data/gitroot]# cat !$
cat Hello.java
class Hello{

public static void main(String[] s){

System.out.println("Hello World!");

}

}
class hello{ }
class emm{}
class Hi{}
[root@localhost /data/gitroot]#
删除仓库中的文件:
[root@localhost /data/gitroot]# git rm Hello.java   # 删除仓库中的文件
rm 'Hello.java'
[root@localhost /data/gitroot]# ls
[root@localhost /data/gitroot]# git commit -m "delete Hello.java"  # 提交删除操作
[master 86da43d] delete Hello.java
1 file changed, 12 deletions(-)
delete mode 100644 Hello.java
[root@localhost /data/gitroot]# git checkout -- Hello.java  # 这时候就无法从仓库中检出该文件了
error: pathspec 'Hello.java' did not match any file(s) known to git.
[root@localhost /data/gitroot]#
即便删除了仓库中的文件,也是可以通过版本id来恢复的:
[root@localhost /data/gitroot]# git log --pretty=oneline
86da43d5b2f68985d376f297fc670d16fd473884 delete Hello.java
5341f93bef4f6d216b48d9cf6acb3a1f7dac7f0c ch Hello.java agin
d1cf48198534e3bd1a7764ce27667f756f4974b5 ch Hello.java agin
8d77f141ba84dae557ab42cd9a110c2542e06643 add Hello.java agin
b576e395c1197a5dc0aa72e584bb54ef9ab66458 add Hello.java agin
1387815eb4f0eeb58966d89d7756a0ac45c3dde8 add new file Hello.java
[root@localhost /data/gitroot]# git reset --hard 5341f93
HEAD 现在位于 5341f93 ch Hello.java agin
[root@localhost /data/gitroot]# ls
Hello.java
[root@localhost /data/gitroot]# cat Hello.java
class Hello{

public static void main(String[] s){

System.out.println("Hello World!");

}

}
class hello{ }
class emm{}
class Hi{}
[root@localhost /data/gitroot]#
22.7 建立远程仓库
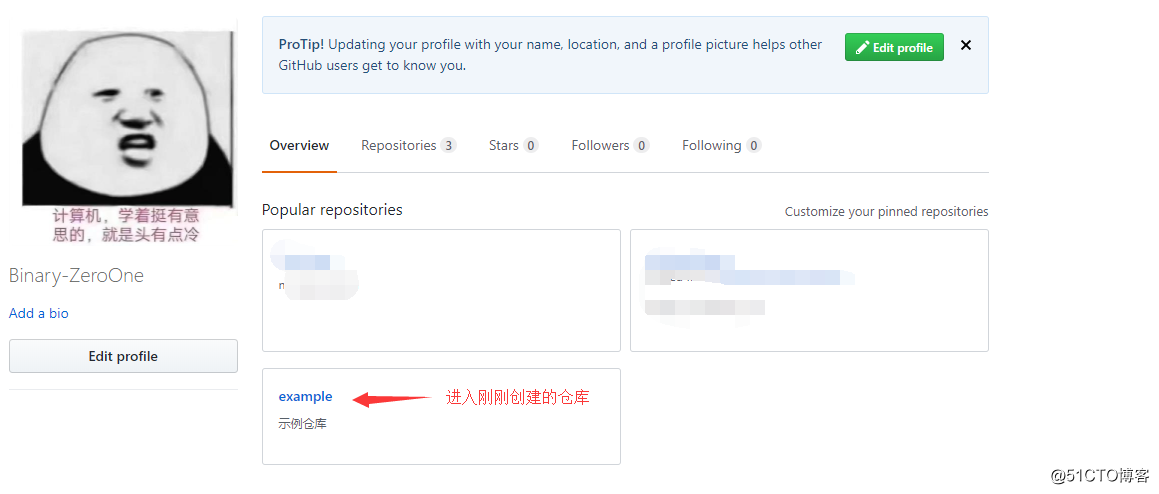
以上的示例都是在本地使用git仓库,没有涉及到远程仓库的使用。下面演示一下如何连接远程的GitHub仓库:1.首先到 https://github.com 注册一个账号,我这里已经有账户了,所以直接登录:
2.登录之后,点击右上角,头像旁边的 + 图标,创建一个自己的repository(仓库):
3.填写仓库的相关信息:
4.创建完成,如下,远程仓库就创建好了:
可以把GitHub上创建的仓库,作为我们的远程服务端。
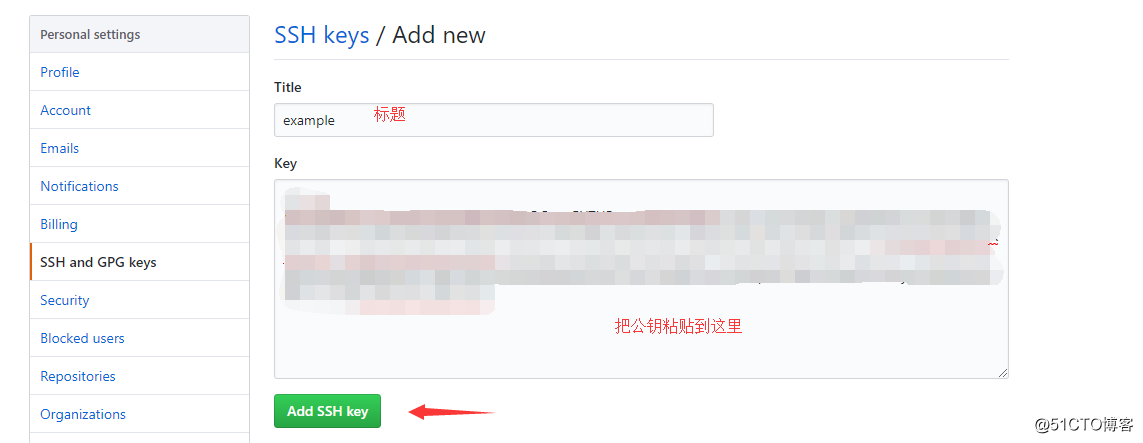
5.在本地机器上创建密钥对:
[root@localhost ~]# ssh-keygen
Generating public/private rsa key pair.
Enter file in which to save the key (/root/.ssh/id_rsa):
Enter passphrase (empty for no passphrase):   # 密码
Enter same passphrase again:   # 确认密码
Your identification has been saved in /root/.ssh/id_rsa.
Your public key has been saved in /root/.ssh/id_rsa.pub.
The key fingerprint is:
0e:17:93:c8:8c:9a:d9:b4:21:6e:72:68:41:fa:79:0a root@localhost.localdomain
The key's randomart image is:
+--[ RSA 2048]----+
| .               |
|o    + . .       |
|... + + +        |
| +.O o   o       |
|E.X + . S        |
|.= o   +         |
|  .     .        |
|                 |
|                 |
+-----------------+
[root@localhost ~]# cat .ssh/id_rsa.pub  # 复制你的公钥
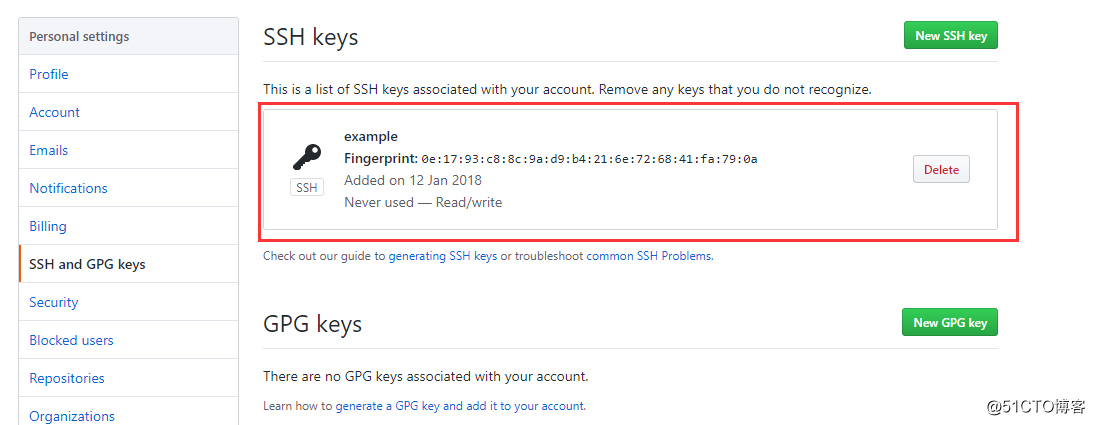
6.然后给远程的仓库添加密钥认证,保证访问的安全性:
添加完成:
连接远程仓库
以上已经在GitHub上创建好了一个远程仓库,并且也添加了密钥认证,现在我们就可以在本地上连接这个仓库了。1.创建一个目录,用于存放和上传仓库文件,也相当于是一个本地仓库:
[root@localhost ~]# mkdir /tmp/example
[root@localhost ~]# cd !$
cd /tmp/example
[root@localhost /tmp/example]#
2.根据GitHub的操作示例进行仓库的初始化:
[root@localhost /tmp/example]# echo "# example" >> README.md  # 生成README.md文件
[root@localhost /tmp/example]# git init  # 初始化
初始化空的 Git 版本库于 /tmp/example/.git/
[root@localhost /tmp/example]# ll -a
总用量 8
drwxr-xr-x  3 root root   33 1月  12 23:17 .
drwxrwxrwt. 9 root root 4096 1月  12 23:12 ..
drwxr-xr-x  7 root root  111 1月  12 23:17 .git
-rw-r--r--  1 root root   10 1月  12 23:16 README.md
[root@localhost /tmp/example]# git add README.md
[root@localhost /tmp/example]# git commit -m "first commit"
[master(根提交) 4b710bc] first commit
1 file changed, 1 insertion(+)
create mode 100644 README.md

## 将本地文件推送到远程仓库上
[root@localhost /tmp/example]# git remote add origin https://github.com/Binary-ZeroOne/example.git [root@localhost /tmp/example]# git push -u origin master
Username for 'https://github.com': Binary-ZeroOne  # 你的github用户名
Password for 'https://Binary-ZeroOne@github.com':   # 以及密码
Counting objects: 3, done.
Writing objects: 100% (3/3), 213 bytes | 0 bytes/s, done.
Total 3 (delta 0), reused 0 (delta 0)
To https://github.com/Binary-ZeroOne/example.git * [new branch]      master -> master
分支 master 设置为跟踪来自 origin 的远程分支 master。
[root@localhost /tmp/example]#
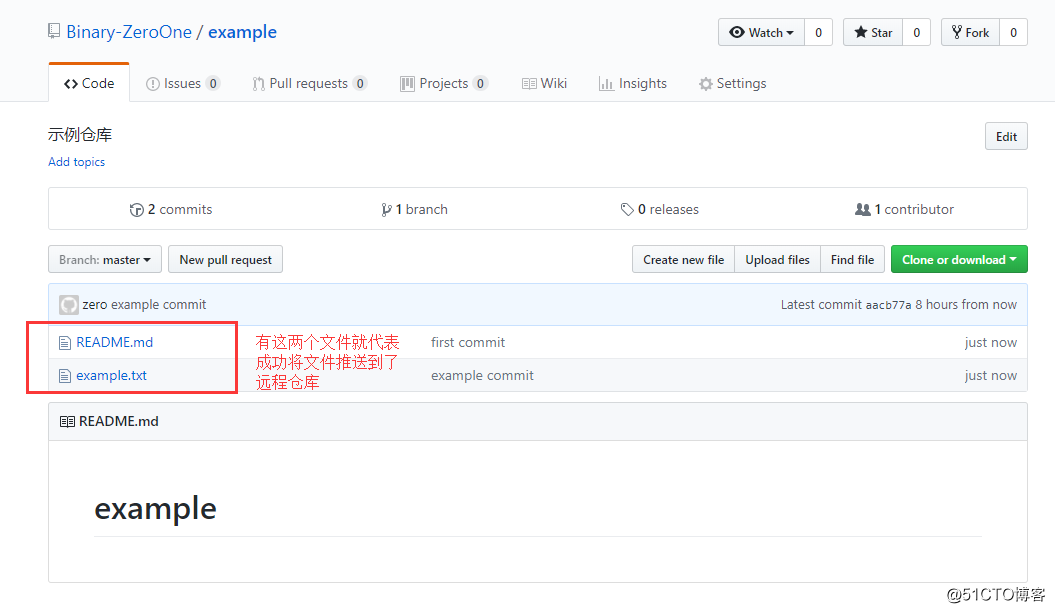
然后再创建一个文件,再次进行推送:
[root@localhost /tmp/example]# vim example.txt
This is a example
[root@localhost /tmp/example]# git add example.txt
[root@localhost /tmp/example]# git commit -m "example commit"
[master aacb77a] example commit
1 file changed, 1 insertion(+)
create mode 100644 example.txt
[root@localhost /tmp/example]# git push
warning: push.default 未设置,它的默认值将会在 Git 2.0 由 'matching'  # 以下是新版本的一些提示信息
修改为 'simple'。若要不再显示本信息并在其默认值改变后维持当前使用习惯,
进行如下设置:

git config --global push.default matching

若要不再显示本信息并从现在开始采用新的使用习惯,设置:

git config --global push.default simple

参见 'git help config' 并查找 'push.default' 以获取更多信息。
('simple' 模式由 Git 1.7.11 版本引入。如果您有时要使用老版本的 Git,
为保持兼容,请用 'current' 代替 'simple' 模式)

Username for 'https://github.com': Binary-ZeroOne
Password for 'https://Binary-ZeroOne@github.com':
Counting objects: 4, done.
Delta compression using up to 4 threads.
Compressing objects: 100% (2/2), done.
Writing objects: 100% (3/3), 287 bytes | 0 bytes/s, done.
Total 3 (delta 0), reused 0 (delta 0)
To https://github.com/Binary-ZeroOne/example.git 4b710bc..aacb77a  master -> master
[root@localhost /tmp/example]#
接着到GitHub的仓库上,可以发现多了两个文件,README.md 和 example.txt:
22.8 克隆远程仓库
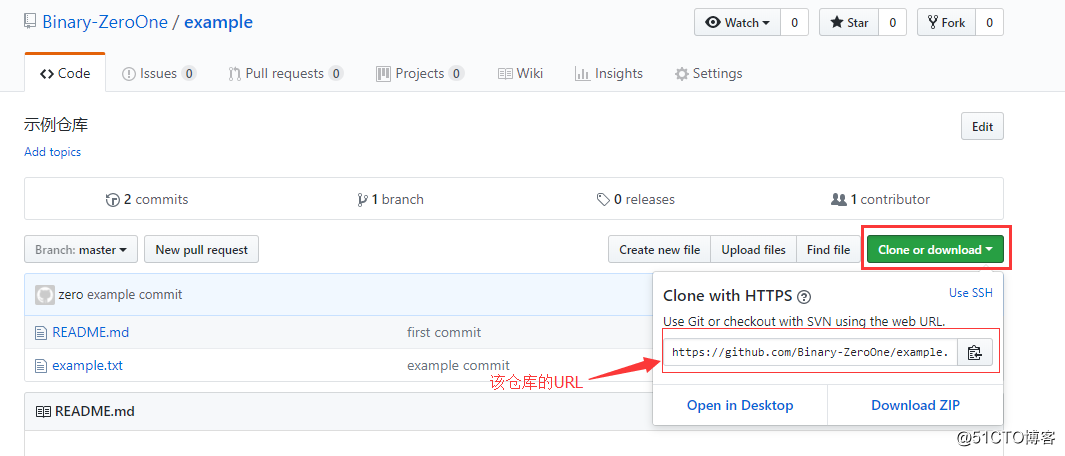
以上演示了将本地文件推送到远程仓库,我们也可以将远程仓库给克隆到本地机器上。1.复制远程仓库的URL链接:
2.然后到本地机器上执行命令进行克隆:
[root@localhost ~]# cd /home/
[root@localhost /home]# git clone https://github.com/Binary-ZeroOne/example.git  # 克隆的命令
正克隆到 'example'...
remote: Counting objects: 6, done.
remote: Compressing objects: 100% (3/3), done.
remote: Total 6 (delta 0), reused 6 (delta 0), pack-reused 0
Unpacking objects: 100% (6/6), done.
[root@localhost /home]# ls
example
[root@localhost /home]# ll -a example/
总用量 8
drwxr-xr-x  3 root root  51 1月  12 23:37 .
drwxr-xr-x. 8 root root  88 1月  12 23:37 ..
-rw-r--r--  1 root root  18 1月  12 23:37 example.txt
drwxr-xr-x  8 root root 152 1月  12 23:37 .git
-rw-r--r--  1 root root  10 1月  12 23:37 README.md
[root@localhost /home]#
注:公开的仓库是任何人都可以进行克隆的,但是只能克隆不可以对仓库进行写操作。
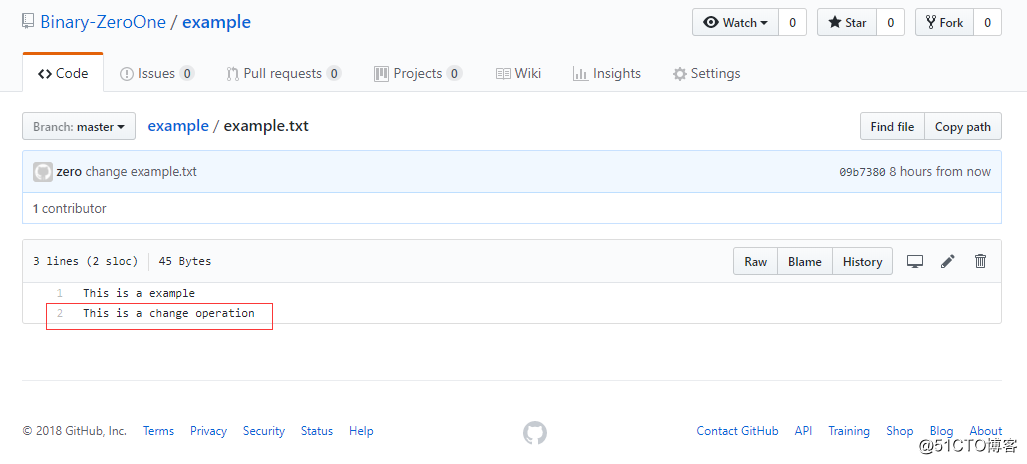
3.对克隆的文件进行更改,然后再推送到远程的仓库,因为我们是该仓库的所有者,可以进行写操作:
[root@localhost /home]# cd example/
[root@localhost /home/example]# echo "This is a change operation" >> example.txt
[root@localhost /home/example]# git add example.txt
[root@localhost /home/example]# git commit -m "change example.txt"
[master 09b7380] change example.txt
1 file changed, 1 insertion(+)
[root@localhost /home/example]# git config --global push.default simple
[root@localhost /home/example]# git push
Username for 'https://github.com': Binary-ZeroOne
Password for 'https://Binary-ZeroOne@github.com':
Counting objects: 5, done.
Delta compression using up to 4 threads.
Compressing objects: 100% (2/2), done.
Writing objects: 100% (3/3), 310 bytes | 0 bytes/s, done.
Total 3 (delta 0), reused 0 (delta 0)
To https://github.com/Binary-ZeroOne/example.git aacb77a..09b7380  master -> master
[root@localhost /home/example]#
3.然后到GitHub上看看是否有更改的内容:
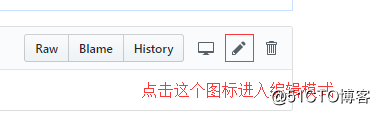
4.我现在在GitHub上更改这个文件的内容,更改之后同样可以在本地把新内容拉下来:
拉到页面下方,点击Commit changes提交更改:
接着到本地机器上,执行git pull命令,把远程仓库的更改内容拉下来:
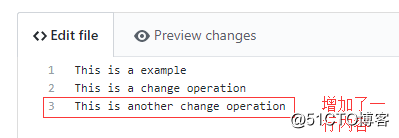
[root@localhost /home/example]# git pull
remote: Counting objects: 3, done.
remote: Compressing objects: 100% (3/3), done.
remote: Total 3 (delta 0), reused 0 (delta 0), pack-reused 0
Unpacking objects: 100% (3/3), done.
来自 https://github.com/Binary-ZeroOne/example 09b7380..b71be6b  master     -> origin/master
更新 09b7380..b71be6b
Fast-forward
example.txt | 1 +
1 file changed, 1 insertion(+)
[root@localhost /home/example]# cat example.txt
This is a example
This is a change operation
This is another change operation  # 可以看到文件内容成功更新了
[root@localhost /home/example]#

相关文章推荐
- [置顶] Git的简单使用及远程仓库的推送
- Git简单使用教程(四)-远程仓库
- 使用gitbash上传代码到github远程仓库简单教程
- GitHub入门教程:(1)简单的git使用,同步仓库
- 构建简单原型展示系统,使用git钩子(hooks)自动同步仓库
- Git命令快速参考以及git远程仓库的使用
- git 简单使用方法
- Git简单的安装与使用
- GIT入门之一:初始化,简单使用,分支
- Linux环境下Maven仓库的搭建(nexus)及Mavan的简单使用
- Eclipse上GIT插件EGIT使用手册之六_远程GIT仓库
- git的简单使用
- 最简单的 Git 使用流程
- git的简单使用
- Eclipse上GIT插件EGIT使用手册之十_Rebase和Merge如何选择的简单解析
- 最简单的 Git 使用流程
- git 使用详解(7)-- 远程仓库的使用
- git 简单命令使用
- GIT 简单使用
- Eclipse上GIT插件EGIT使用手册之七_推送远程仓库