Ubuntu 16.04安装CUDA9+Docker CE+NVIDIA-Docker+TensorFlow/XGBoost
2018-01-10 16:22
811 查看
以Ubuntu16.04系统为例(x86架构,64bit),安装Docker社区版和NVIDIA-Docker并下载启动TensorFlow镜像,跑起hello_tensorflow的ipynb。
安装CUDA9.0
安装Docker
安装NVIDIA-Docker
下载使用TensorFlow镜像
CPU版本
GPU版本
如何使用
下载使用Kaggle镜像
sudo apt-get update
sudo apt-get install -y build-essential git
以上安装完成后,再次确认显卡是否支持cuda,打开NVIDIA官方查看显卡是否支持CUDA的连接:https://developer.nvidia.com/cuda-gpus
里面列举了不同系列下支持CUDA的显卡列表,因为需要翻墙,这里只列出GeForce系列的部分显卡(左边是卡的名字,右边是CUDA计算力,数值越大越好):
虽然只是部分列表,但如果GPU不在以上GTX系列卡的名单里,还是建议装CPU版本(跳过安装CUDA的部分),只看安装Docker(不是NVIDIA-Docker)和安装TensorFlow的CPU镜像。
https://developer.nvidia.com/cuda-downloads?target_os=Linux&target_arch=x86_64&target_distro=Ubuntu&target_version=1604&target_type=runfilelocal
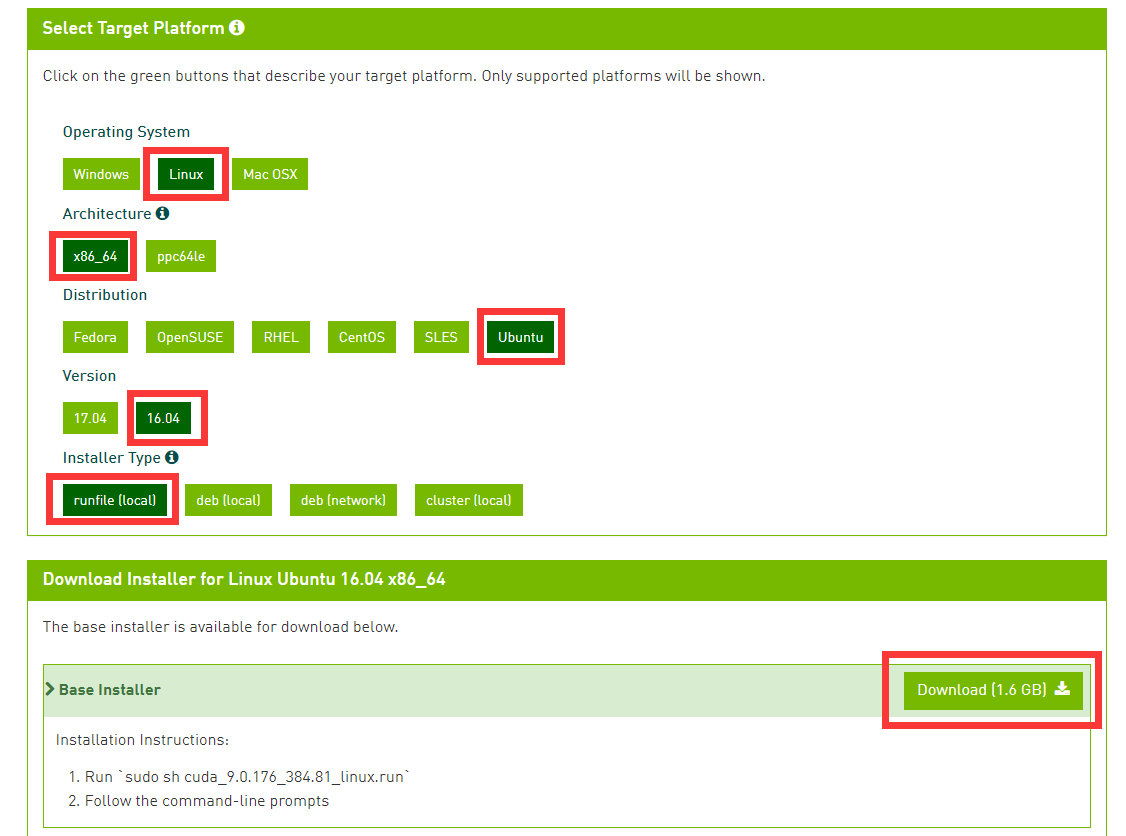
点击进入链接看到如下图,根据咱们的系统版本(Linux的Ubuntu发行版的16.04,x86架构),选择对应的选项,Installer Type建议选择第一个。
下载完成后,根据官网给出的命令提示,对下载好的文件执行如下命令安装cuda:
sudo sh cuda_9.0.176_384.81_linux.run
以下问题在安装的时候会出现(我没有输入的,就是直接回车,选默认值):
Do you accept the previously read EULA?
accept/decline/quit: accept
Install NVIDIA Accelerated Graphics Driver for Linux-x86_64 384.81?
(y)es/(n)o/(q)uit: y
Do you want to install the OpenGL libraries?
(y)es/(n)o/(q)uit [ default is yes ]: y
Do you want to run nvidia-xconfig?
This will update the system X configuration file so that the NVIDIA X driver
is used. The pre-existing X configuration file will be backed up.
This option should not be used on systems that require a custom
X configuration, such as systems with multiple GPU vendors.
(y)es/(n)o/(q)uit [ default is no ]:
Install the CUDA 9.0 Toolkit?
(y)es/(n)o/(q)uit: yes
Enter Toolkit Location
[ default is /usr/local/cuda-9.0 ]:
Do you want to install a symbolic link at /usr/local/cuda?
(y)es/(n)o/(q)uit: y
Install the CUDA 9.0 Samples?
(y)es/(n)o/(q)uit: y
Enter CUDA Samples Location
[ default is /home/yuens ]:
安装成功则会显示以下信息:
Installing the NVIDIA display driver...
Installing the CUDA Toolkit in /usr/local/cuda-9.0 ...
Missing recommended library: libGLU.so
Missing recommended library: libXmu.so
Installing the CUDA Samples in /home/yuanshuai ...
Copying samples to /home/yuanshuai/NVIDIA_CUDA-9.0_Samples now...
Finished copying samples.
===========
= Summary =
===========
Driver: Installed
Toolkit: Installed in /usr/local/cuda-9.0
Samples: Installed in /home/yuanshuai, but missing recommended libraries
Please make sure that
- PATH includes /usr/local/cuda-9.0/bin
- LD_LIBRARY_PATH includes /usr/local/cuda-9.0/lib64, or, add /usr/local/cuda-9.0/lib64 to /etc/ld.so.conf and run ldconfig as root
To uninstall the CUDA Toolkit, run the uninstall script in /usr/local/cuda-9.0/bin
To uninstall the NVIDIA Driver, run nvidia-uninstall
Please see CUDA_Installation_Guide_Linux.pdf in /usr/local/cuda-9.0/doc/pdf for detailed information on setting up CUDA.
Logfile is /tmp/cuda_install_5544.log
安装失败也会给出Logfile的地址,只需要看看log的内容是啥,并解决就OK(像我上面一开始提到的如果没有安装gcc/cc/icc/g++等编译器,就会导致安装cuda失败,这都会在log里面写的很清楚并给出解决方案)。
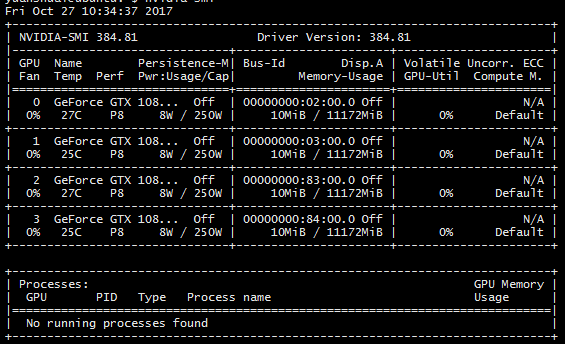
检查是否安装成功,在命令行输入:nvidia-smi,如果得到以下类似的内容,说明安装成功:
Get Docker CE for Ubuntu | Docker Documentation
https://docs.docker.com/engine/installation/linux/docker-ce/ubuntu/#uninstall-old-versions 我们用的系统是Xenial 16.04 (LTS),所以查看Ubuntu这个版本的部分,首先若先前有安装docker需要先卸载(若没有安装过则无需执行),执行命令:
sudo apt-get remove docker docker-engine docker.io
Docker的安装有多个方式,这里以最常见的方式(文档第一种)为例:
首先依次执行以下命令(反斜杠\代表一行,只是换行写更清晰),把docker仓库加进到apt里:
sudo apt-get update
sudo apt-get install \
apt-transport-https \
ca-certificates \
curl \
software-properties-common
curl -fsSL https://download.docker.com/linux/ubuntu/gpg | sudo apt-key add -
sudo apt-key fingerprint 0EBFCD88
sudo add-apt-repository \
"deb [arch=amd64] https://download.docker.com/linux/ubuntu \
$(lsb_release -cs) \
stable"
正式安装docker:
sudo apt-get update
sudo apt-get install docker-ce
apt-cache madison docker-ce
sudo docker run hello-world
最后一个命令是验证docker是否安装成功,它会下载并执行hello-world镜像。如果安装正确,执行后的结果应该类似下面这样:
Unable to find image 'hello-world:latest' locally
latest: Pulling from library/hello-world
5b0f327be733: Pull complete
Digest: sha256:07d5f7800dfe37b8c2196c7b1c524c33808ce2e0f74e7aa00e603295ca9a0972
Status: Downloaded newer image for hello-world:latest
Hello from Docker!
This message shows that your installation appears to be working correctly.
To generate this message, Docker took the following steps:
1. The Docker client contacted the Docker daemon.
2. The Docker daemon pulled the "hello-world" image from the Docker Hub.
3. The Docker daemon created a new container from that image which runs the
executable that produces the output you are currently reading.
4. The Docker daemon streamed that output to the Docker client, which sent it
to your terminal.
To try something more ambitious, you can run an Ubuntu container with:
$ docker run -it ubuntu bash
Share images, automate workflows, and more with a free Docker ID: https://cloud.docker.com/
For more examples and ideas, visit: https://docs.docker.com/engine/userguide/
NVIDIA/nvidia-docker: Build and run Docker containers leveraging NVIDIA GPUs
https://github.com/NVIDIA/nvidia-docker 可以看到在Quick start小节,选择我们Ubuntu的发行版,依次执行命令:
# Install nvidia-docker and nvidia-docker-plugin
wget -P /tmp https://github.com/NVIDIA/nvidia-docker/releases/download/v1.0.1/nvidia-docker_1.0.1-1_amd64.deb
sudo dpkg -i /tmp/nvidia-docker*.deb && rm /tmp/nvidia-docker*.deb
# Test nvidia-smi 验证是否安装成功
nvidia-docker run --rm nvidia/cuda nvidia-smi
上面最后一条命令是检查是否安装成功,安装成功,则会显示关于GPU的信息,类似前面的一个截图:
然后在执行下面这句,默认用nvdia-docker替代docker命令:
echo 'alias docker=nvidia-docker' >> ~/.bashrc
bash
tensorflow/tensorflow – Docker Hub
https://hub.docker.com/r/tensorflow/tensorflow/ 根据需要的版本下载tensorflow镜像并开启tensorflow容器:
$ nvidia-docker run -it -p 8888:8888 tensorflow/tensorflow:latest-gpu
[I 02:51:21.230 NotebookApp] Writing notebook server cookie secret to /root/.local/share/jupyter/runtime/notebook_cookie_secret
[W 02:51:21.242 NotebookApp] WARNING: The notebook server is listening on all IP addresses and not using encryption. This is not recommended.
[I 02:51:21.249 NotebookApp] Serving notebooks from local directory: /notebooks
[I 02:51:21.249 NotebookApp] 0 active kernels
[I 02:51:21.249 NotebookApp] The Jupyter Notebook is running at: http://[all ip addresses on your system]:8888/?token=8f90cc7b9ad6ccc4f36f53f347c7a314220bbcb82dd416ea
[I 02:51:21.249 NotebookApp] Use Control-C to stop this server and shut down all kernels (twice to skip confirmation).
[C 02:51:21.249 NotebookApp]
Copy/paste this URL into your browser when you connect for the first time,
to login with a token: http://localhost:8888/?token=8f90cc7b9ad6ccc4f36f53f347c7a314220bbcb82dd416ea [I 02:51:31.832 NotebookApp] 302 GET / (172.17.0.1) 0.74ms
[I 02:51:31.943 NotebookApp] 302 GET /tree? (172.17.0.1) 1.44ms
其中看到有个网址:
http://localhost:8888/?token=8f90cc7b9ad6ccc4f36f53f347c7a314220bbcb82dd416ea
每个人的网址在token=后面的内容是不一样的,现在我们打开浏览器,输入网址:
http://localhost:8888/
这时会出现如下画面:
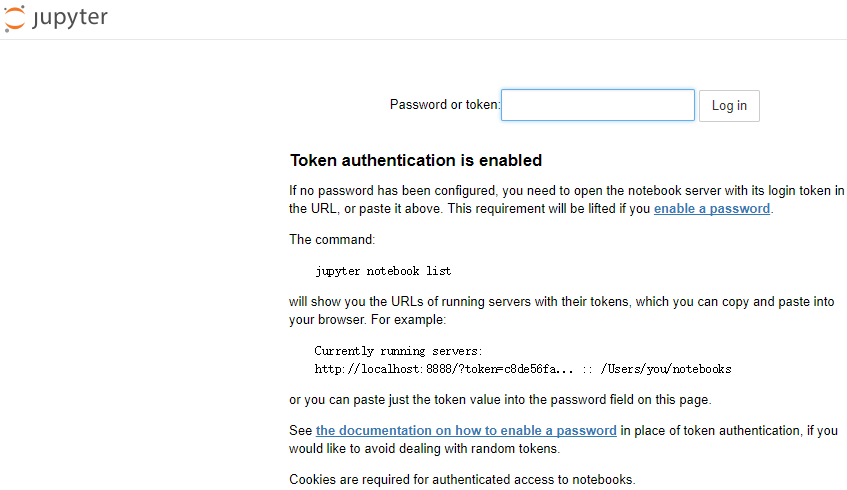
输入刚刚token后面的值后,点击login会看到一下画面:
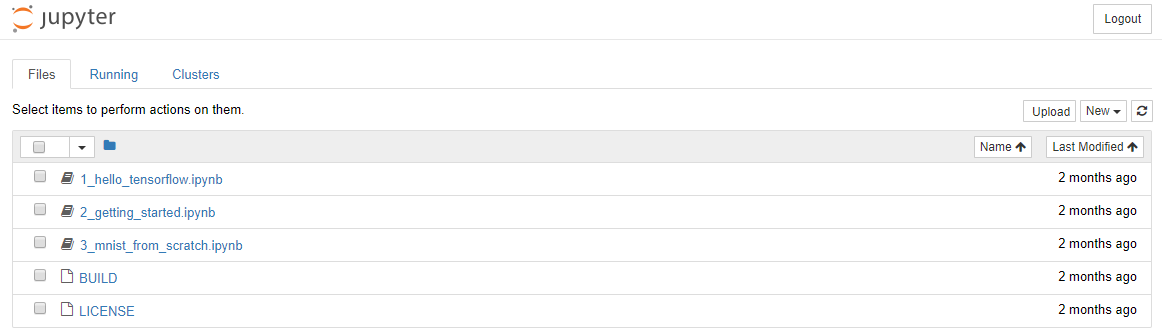
点击第一个1_hello_tensorflow.ipynb,然后可以选择执行所有代码(见下图):
下载该镜像使用命令:
docker pull kaggle/python:latest
这个镜像包含了tensorflow和xgboost。下面请看:
In [1]: import xgboost as xgb
In [2]: xgb.__version__
Out[2]: '0.6'
In [3]: import tensorflow as tf
In [4]: tf.__version__
Out[4]: '1.3.0'
This entry was posted in
学习笔记·杂 and tagged
TensorFlow on
2017年10月27日.
本文目录
准备工作安装CUDA9.0
安装Docker
安装NVIDIA-Docker
下载使用TensorFlow镜像
CPU版本
GPU版本
如何使用
下载使用Kaggle镜像
准备工作
首先需要安装一些基本的组件,否则后面安装cuda会失败(比方会因为缺失gcc/g++/cc等编译工具安装cuda失败等等),所以先执行下面的命令:sudo apt-get update
sudo apt-get install -y build-essential git
| 1 2 | sudo apt-get update sudo apt-get install -y build-essential git |
里面列举了不同系列下支持CUDA的显卡列表,因为需要翻墙,这里只列出GeForce系列的部分显卡(左边是卡的名字,右边是CUDA计算力,数值越大越好):
| GPU | Compute Capability |
|---|---|
| NVIDIA TITAN Xp | 6.1 |
| NVIDIA TITAN X | 6.1 |
| GeForce GTX 1080 Ti | 6.1 |
| GeForce GTX 1080 | 6.1 |
| GeForce GTX 1070 | 6.1 |
| GeForce GTX 1060 | 6.1 |
| GeForce GTX 1050 | 6.1 |
| GeForce GTX TITAN X | 5.2 |
| GeForce GTX TITAN Z | 3.5 |
| GeForce GTX TITAN Black | 3.5 |
| GeForce GTX TITAN | 3.5 |
| GeForce GTX 980 Ti | 5.2 |
| GeForce GTX 980 | 5.2 |
| GeForce GTX 970 | 5.2 |
| GeForce GTX 960 | 5.2 |
| GeForce GTX 950 | 5.2 |
安装CUDA9.0
从官网下载cuda:CUDA Toolkit Download | NVIDIA Developerhttps://developer.nvidia.com/cuda-downloads?target_os=Linux&target_arch=x86_64&target_distro=Ubuntu&target_version=1604&target_type=runfilelocal
点击进入链接看到如下图,根据咱们的系统版本(Linux的Ubuntu发行版的16.04,x86架构),选择对应的选项,Installer Type建议选择第一个。
下载完成后,根据官网给出的命令提示,对下载好的文件执行如下命令安装cuda:
sudo sh cuda_9.0.176_384.81_linux.run
| 1 | sudo sh cuda_9.0.176_384.81_linux.run |
Do you accept the previously read EULA?
accept/decline/quit: accept
Install NVIDIA Accelerated Graphics Driver for Linux-x86_64 384.81?
(y)es/(n)o/(q)uit: y
Do you want to install the OpenGL libraries?
(y)es/(n)o/(q)uit [ default is yes ]: y
Do you want to run nvidia-xconfig?
This will update the system X configuration file so that the NVIDIA X driver
is used. The pre-existing X configuration file will be backed up.
This option should not be used on systems that require a custom
X configuration, such as systems with multiple GPU vendors.
(y)es/(n)o/(q)uit [ default is no ]:
Install the CUDA 9.0 Toolkit?
(y)es/(n)o/(q)uit: yes
Enter Toolkit Location
[ default is /usr/local/cuda-9.0 ]:
Do you want to install a symbolic link at /usr/local/cuda?
(y)es/(n)o/(q)uit: y
Install the CUDA 9.0 Samples?
(y)es/(n)o/(q)uit: y
Enter CUDA Samples Location
[ default is /home/yuens ]:
| 1 2 3 4 5 6 7 8 9 10 11 12 13 14 15 16 17 18 19 20 21 22 23 24 25 26 27 28 29 | Do you accept the previously read EULA? accept/decline/quit: accept Install NVIDIA Accelerated Graphics Driver for Linux-x86_64 384.81? (y)es/(n)o/(q)uit: y Do you want to install the OpenGL libraries? (y)es/(n)o/(q)uit [ default is yes ]: y Do you want to run nvidia-xconfig? This will update the system X configuration file so that the NVIDIA X driver is used. The pre-existing X configuration file will be backed up. This option should not be used on systems that require a custom X configuration, such as systems with multiple GPU vendors. (y)es/(n)o/(q)uit [ default is no ]: Install the CUDA 9.0 Toolkit? (y)es/(n)o/(q)uit: yes Enter Toolkit Location [ default is /usr/local/cuda-9.0 ]: Do you want to install a symbolic link at /usr/local/cuda? (y)es/(n)o/(q)uit: y Install the CUDA 9.0 Samples? (y)es/(n)o/(q)uit: y Enter CUDA Samples Location [ default is /home/yuens ]: |
Installing the NVIDIA display driver...
Installing the CUDA Toolkit in /usr/local/cuda-9.0 ...
Missing recommended library: libGLU.so
Missing recommended library: libXmu.so
Installing the CUDA Samples in /home/yuanshuai ...
Copying samples to /home/yuanshuai/NVIDIA_CUDA-9.0_Samples now...
Finished copying samples.
===========
= Summary =
===========
Driver: Installed
Toolkit: Installed in /usr/local/cuda-9.0
Samples: Installed in /home/yuanshuai, but missing recommended libraries
Please make sure that
- PATH includes /usr/local/cuda-9.0/bin
- LD_LIBRARY_PATH includes /usr/local/cuda-9.0/lib64, or, add /usr/local/cuda-9.0/lib64 to /etc/ld.so.conf and run ldconfig as root
To uninstall the CUDA Toolkit, run the uninstall script in /usr/local/cuda-9.0/bin
To uninstall the NVIDIA Driver, run nvidia-uninstall
Please see CUDA_Installation_Guide_Linux.pdf in /usr/local/cuda-9.0/doc/pdf for detailed information on setting up CUDA.
Logfile is /tmp/cuda_install_5544.log
| 1 2 3 4 5 6 7 8 9 10 11 12 13 14 15 16 17 18 19 20 21 22 23 24 25 26 27 | Installing the NVIDIA display driver... Installing the CUDA Toolkit in /usr/local/cuda-9.0 ... Missing recommended library: libGLU.so Missing recommended library: libXmu.so Installing the CUDA Samples in /home/yuanshuai ... Copying samples to /home/yuanshuai/NVIDIA_CUDA-9.0_Samples now... Finished copying samples. =========== = Summary = =========== Driver: Installed Toolkit: Installed in /usr/local/cuda-9.0 Samples: Installed in /home/yuanshuai, but missing recommended libraries Please make sure that - PATH includes /usr/local/cuda-9.0/bin - LD_LIBRARY_PATH includes /usr/local/cuda-9.0/lib64, or, add /usr/local/cuda-9.0/lib64 to /etc/ld.so.conf and run ldconfig as root To uninstall the CUDA Toolkit, run the uninstall script in /usr/local/cuda-9.0/bin To uninstall the NVIDIA Driver, run nvidia-uninstall Please see CUDA_Installation_Guide_Linux.pdf in /usr/local/cuda-9.0/doc/pdf for detailed information on setting up CUDA. Logfile is /tmp/cuda_install_5544.log |
检查是否安装成功,在命令行输入:nvidia-smi,如果得到以下类似的内容,说明安装成功:
安装Docker
打开官网关于docker installation for Linux的文档页(我建议还是打开下面的链接,看看):Get Docker CE for Ubuntu | Docker Documentation
https://docs.docker.com/engine/installation/linux/docker-ce/ubuntu/#uninstall-old-versions 我们用的系统是Xenial 16.04 (LTS),所以查看Ubuntu这个版本的部分,首先若先前有安装docker需要先卸载(若没有安装过则无需执行),执行命令:
sudo apt-get remove docker docker-engine docker.io
| 1 | sudo apt-get remove docker docker-engine docker.io |
首先依次执行以下命令(反斜杠\代表一行,只是换行写更清晰),把docker仓库加进到apt里:
sudo apt-get update
sudo apt-get install \
apt-transport-https \
ca-certificates \
curl \
software-properties-common
curl -fsSL https://download.docker.com/linux/ubuntu/gpg | sudo apt-key add -
sudo apt-key fingerprint 0EBFCD88
sudo add-apt-repository \
"deb [arch=amd64] https://download.docker.com/linux/ubuntu \
$(lsb_release -cs) \
stable"
| 1 2 3 4 5 6 7 8 9 10 11 12 13 14 15 16 | sudo apt-get update sudo apt-get install \ apt-transport-https \ ca-certificates \ curl \ software-properties-common curl -fsSL https://download.docker.com/linux/ubuntu/gpg | sudo apt-key add - sudo apt-key fingerprint 0EBFCD88 sudo add-apt-repository \ "deb [arch=amd64] https://download.docker.com/linux/ubuntu \ $(lsb_release -cs) \ stable" |
sudo apt-get update
sudo apt-get install docker-ce
apt-cache madison docker-ce
sudo docker run hello-world
| 1 2 3 4 5 6 7 | sudo apt-get update sudo apt-get install docker-ce apt-cache madison docker-ce sudo docker run hello-world |
Unable to find image 'hello-world:latest' locally
latest: Pulling from library/hello-world
5b0f327be733: Pull complete
Digest: sha256:07d5f7800dfe37b8c2196c7b1c524c33808ce2e0f74e7aa00e603295ca9a0972
Status: Downloaded newer image for hello-world:latest
Hello from Docker!
This message shows that your installation appears to be working correctly.
To generate this message, Docker took the following steps:
1. The Docker client contacted the Docker daemon.
2. The Docker daemon pulled the "hello-world" image from the Docker Hub.
3. The Docker daemon created a new container from that image which runs the
executable that produces the output you are currently reading.
4. The Docker daemon streamed that output to the Docker client, which sent it
to your terminal.
To try something more ambitious, you can run an Ubuntu container with:
$ docker run -it ubuntu bash
Share images, automate workflows, and more with a free Docker ID: https://cloud.docker.com/
For more examples and ideas, visit: https://docs.docker.com/engine/userguide/
| 1 2 3 4 5 6 7 8 9 10 11 12 13 14 15 16 17 18 19 20 21 22 23 24 25 | Unable to find image 'hello-world:latest' locally latest: Pulling from library/hello-world 5b0f327be733: Pull complete Digest: sha256:07d5f7800dfe37b8c2196c7b1c524c33808ce2e0f74e7aa00e603295ca9a0972 Status: Downloaded newer image for hello-world:latest Hello from Docker! This message shows that your installation appears to be working correctly. To generate this message, Docker took the following steps: 1. The Docker client contacted the Docker daemon. 2. The Docker daemon pulled the "hello-world" image from the Docker Hub. 3. The Docker daemon created a new container from that image which runs the executable that produces the output you are currently reading. 4. The Docker daemon streamed that output to the Docker client, which sent it to your terminal. To try something more ambitious, you can run an Ubuntu container with: $ docker run -it ubuntu bash Share images, automate workflows, and more with a free Docker ID: https://cloud.docker.com/ For more examples and ideas, visit: https://docs.docker.com/engine/userguide/ |
安装NVIDIA-Docker
安装完成docker并检查安装正确(能跑出来hello-world)后,如果需要docker容器中有gpu支持,需要再安装NVIDIA-Docker,同样找到并打开该项目的主页:NVIDIA/nvidia-docker: Build and run Docker containers leveraging NVIDIA GPUs
https://github.com/NVIDIA/nvidia-docker 可以看到在Quick start小节,选择我们Ubuntu的发行版,依次执行命令:
# Install nvidia-docker and nvidia-docker-plugin
wget -P /tmp https://github.com/NVIDIA/nvidia-docker/releases/download/v1.0.1/nvidia-docker_1.0.1-1_amd64.deb
sudo dpkg -i /tmp/nvidia-docker*.deb && rm /tmp/nvidia-docker*.deb
# Test nvidia-smi 验证是否安装成功
nvidia-docker run --rm nvidia/cuda nvidia-smi
| 1 2 3 4 5 6 7 8 9 | # Install nvidia-docker and nvidia-docker-plugin wget -P /tmp https://github.com/NVIDIA/nvidia-docker/releases/download/v1.0.1/nvidia-docker_1.0.1-1_amd64.deb sudo dpkg -i /tmp/nvidia-docker*.deb && rm /tmp/nvidia-docker*.deb # Test nvidia-smi 验证是否安装成功 nvidia-docker run --rm nvidia/cuda nvidia-smi |
然后在执行下面这句,默认用nvdia-docker替代docker命令:
echo 'alias docker=nvidia-docker' >> ~/.bashrc
bash
| 1 2 | echo 'alias docker=nvidia-docker' >> ~/.bashrc bash |
下载使用TensorFlow镜像
打开dockerhub关于tensorflow的页面:tensorflow/tensorflow – Docker Hub
https://hub.docker.com/r/tensorflow/tensorflow/ 根据需要的版本下载tensorflow镜像并开启tensorflow容器:
CPU版本
docker run -it -p 8888:8888 tensorflow/tensorflow| 1 | docker run -it -p 8888:8888 tensorflow/tensorflow |
GPU版本
nvidia-docker run -it -p 8888:8888 tensorflow/tensorflow:latest-gpu| 1 | nvidia-docker run -it -p 8888:8888 tensorflow/tensorflow:latest-gpu |
如何使用
执行以上命令的结果类似如下:$ nvidia-docker run -it -p 8888:8888 tensorflow/tensorflow:latest-gpu
[I 02:51:21.230 NotebookApp] Writing notebook server cookie secret to /root/.local/share/jupyter/runtime/notebook_cookie_secret
[W 02:51:21.242 NotebookApp] WARNING: The notebook server is listening on all IP addresses and not using encryption. This is not recommended.
[I 02:51:21.249 NotebookApp] Serving notebooks from local directory: /notebooks
[I 02:51:21.249 NotebookApp] 0 active kernels
[I 02:51:21.249 NotebookApp] The Jupyter Notebook is running at: http://[all ip addresses on your system]:8888/?token=8f90cc7b9ad6ccc4f36f53f347c7a314220bbcb82dd416ea
[I 02:51:21.249 NotebookApp] Use Control-C to stop this server and shut down all kernels (twice to skip confirmation).
[C 02:51:21.249 NotebookApp]
Copy/paste this URL into your browser when you connect for the first time,
to login with a token: http://localhost:8888/?token=8f90cc7b9ad6ccc4f36f53f347c7a314220bbcb82dd416ea [I 02:51:31.832 NotebookApp] 302 GET / (172.17.0.1) 0.74ms
[I 02:51:31.943 NotebookApp] 302 GET /tree? (172.17.0.1) 1.44ms
| 1 2 3 4 5 6 7 8 9 10 11 12 13 14 | $ nvidia-docker run -it -p 8888:8888 tensorflow/tensorflow:latest-gpu [I 02:51:21.230 NotebookApp] Writing notebook server cookie secret to /root/.local/share/jupyter/runtime/notebook_cookie_secret [W 02:51:21.242 NotebookApp] WARNING: The notebook server is listening on all IP addresses and not using encryption. This is not recommended. [I 02:51:21.249 NotebookApp] Serving notebooks from local directory: /notebooks [I 02:51:21.249 NotebookApp] 0 active kernels [I 02:51:21.249 NotebookApp] The Jupyter Notebook is running at: http://[all ip addresses on your system]:8888/?token=8f90cc7b9ad6ccc4f36f53f347c7a314220bbcb82dd416ea [I 02:51:21.249 NotebookApp] Use Control-C to stop this server and shut down all kernels (twice to skip confirmation). [C 02:51:21.249 NotebookApp] Copy/paste this URL into your browser when you connect for the first time, to login with a token: http://localhost:8888/?token=8f90cc7b9ad6ccc4f36f53f347c7a314220bbcb82dd416ea [I 02:51:31.832 NotebookApp] 302 GET / (172.17.0.1) 0.74ms [I 02:51:31.943 NotebookApp] 302 GET /tree? (172.17.0.1) 1.44ms |
http://localhost:8888/?token=8f90cc7b9ad6ccc4f36f53f347c7a314220bbcb82dd416ea
| 1 | http://localhost:8888/?token=8f90cc7b9ad6ccc4f36f53f347c7a314220bbcb82dd416ea |
http://localhost:8888/
| 1 | http://localhost:8888/ |
输入刚刚token后面的值后,点击login会看到一下画面:
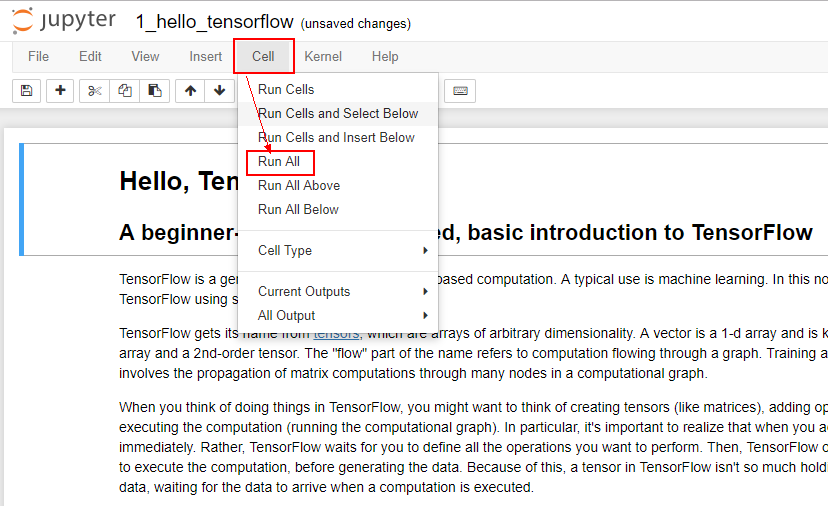
点击第一个1_hello_tensorflow.ipynb,然后可以选择执行所有代码(见下图):
下载使用Kaggle镜像
其实kaggle官方提供了好些个镜像,这里以python的为例,即kaggle/python:latest,这个镜像地址在:https://hub.docker.com/r/kaggle/python/下载该镜像使用命令:
docker pull kaggle/python:latest
| 1 | docker pull kaggle/python:latest |
In [1]: import xgboost as xgb
In [2]: xgb.__version__
Out[2]: '0.6'
In [3]: import tensorflow as tf
In [4]: tf.__version__
Out[4]: '1.3.0'
| 1 2 3 4 5 6 7 8 9 | In [1]: import xgboost as xgb In [2]: xgb.__version__ Out[2]: '0.6' In [3]: import tensorflow as tf In [4]: tf.__version__ Out[4]: '1.3.0' |
This entry was posted in
学习笔记·杂 and tagged
TensorFlow on
2017年10月27日.

相关文章推荐
- Ubuntu 16.04安装CUDA9+Docker CE+NVIDIA-Docker+TensorFlow/XGBoost
- 双显卡 ubuntu16.04 安装 NVIDIA驱动 + CUDA + cuDNN + tensorflow-gpu + keras
- ubuntu16.04 64位 cpu安装tensorflow+theano+keras+caffe+xgboost
- 华硕笔记本(GTX 1060显卡)安装Ubuntu16.04+Nvidia显卡驱动+Cuda8.0+cudnn6.0+ROS+Opencv3.2+Caffe+Tensorflow
- Ubuntu 16.04 nvidia cuda cudnn tensorflow-gpu 配置
- 华硕B250主板安装Ubuntu16.04+gtx1050Ti显卡驱动+cuda8.0+cudnn5.1+opencv3.1+caffe+tensorflow
- ubuntu16.04-LTS+cuda-9.1+docker+tensorflow-gpu
- ubuntu16.04 +NVIDIA驱动+cuda8.0+cudnn+andaconda+tensorflow(GPU版)+Spyder+pycharm全套配置
- 第一篇文章献给艰难的Ubuntu16.04安装caffe之旅 cuda tensorflow Theano
- Ubuntu16.04+cuda8.0+cuDNNV5.1 + Tensorflow+ GT 840M安装小结
- ubuntu16.04 + NVIDIA驱动 + CUDA + cuDNN + tensorflow-gpu + keras安装
- ubuntu16.04+CUDA本地安装+cuDNN本地安装+tensorflow
- Ubuntu16.04下安装Cuda8.0+Caffe+TensorFlow-gpu+Pycharm过程(Simple)
- Ubuntu16.04安装CUDA7.5+Caffe+tensorflow
- Ubuntu16.04下安装Cuda8.0+Caffe+TensorFlow-gpu+Pycharm过程(2018年1月23)
- Ubuntu16.04安装XGBoost简明教程
- ubuntu16.04 TensorFlow object Detection API安装
- Ubuntu 16.04 + GTX1080ti + CUDA8.0 + cudnn5.1 + tensorflow
- Ubuntu16.04 +cuda8.0+cudnn+caffe+theano+tensorflow配置明细
- ubuntu16.04+tnesorflow1.5+anaconda5+cuda9.0+cudnn7不走弯路安装方法