带你逐步深入了解SSM框架——淘淘商城项目之redis缓存
2018-01-02 20:51
686 查看
1. 课程计划
1、 Redis服务搭建2、 为功能添加缓存功能
2. redis介绍
2.1. 什么是redis
Redis是用C语言开发的一个开源的高性能键值对(key-value)数据库。它通过提供多种键值数据类型来适应不同场景下的存储需求,目前为止Redis支持的键值数据类型如下:
字符串类型
散列类型
列表类型
集合类型
有序集合类型。
2.2. redis的应用场景
缓存(数据查询、短连接、新闻内容、商品内容等等)。(最多使用)分布式集群架构中的session分离。
聊天室的在线好友列表。
任务队列。(秒杀、抢购、12306等等)
应用排行榜。
网站访问统计。
数据过期处理(可以精确到毫秒)
2.3. Redis的安装
redis是C语言开发,建议在linux上运行,本教程使用Centos6.4作为安装环境。安装redis需要先将官网下载的源码进行编译,编译依赖gcc环境,如果没有gcc环境,需要安装gcc:yum install gcc-c++
n 版本说明
本教程使用redis3.0版本。3.0版本主要增加了redis集群功能。
n 源码下载
从官网下载
http://download.redis.io/releases/redis-3.0.0.tar.gz
将redis-3.0.0.tar.gz拷贝到/usr/local下
n 解压源码
tar -zxvf redis-3.0.0.tar.gz
n 进入解压后的目录进行编译
cd /usr/local/redis-3.0.0
make
n 安装到指定目录,如 /usr/local/redis
cd /usr/local/redis-3.0.0
make PREFIX=/usr/local/redis install
n redis.conf
redis.conf是redis的配置文件,redis.conf在redis源码目录。
注意修改port作为redis进程的端口,port默认6379。
n 拷贝配置文件到安装目录下
进入源码目录,里面有一份配置文件 redis.conf,然后将其拷贝到安装路径下
cd /usr/local/redis
mkdir conf
cp /usr/local/redis-3.0.0/redis.conf /usr/local/redis/bin
n 安装目录bin下的文件列表


redis3.0新增的redis-sentinel是redis集群管理工具可实现高可用。
配置文件目录:

2.4.redis启动
2.4.1. 前端模式启动
直接运行bin/redis-server将以前端模式启动,前端模式启动的缺点是ssh命令窗口关闭则redis-server程序结束,不推荐使用此方法。如下图: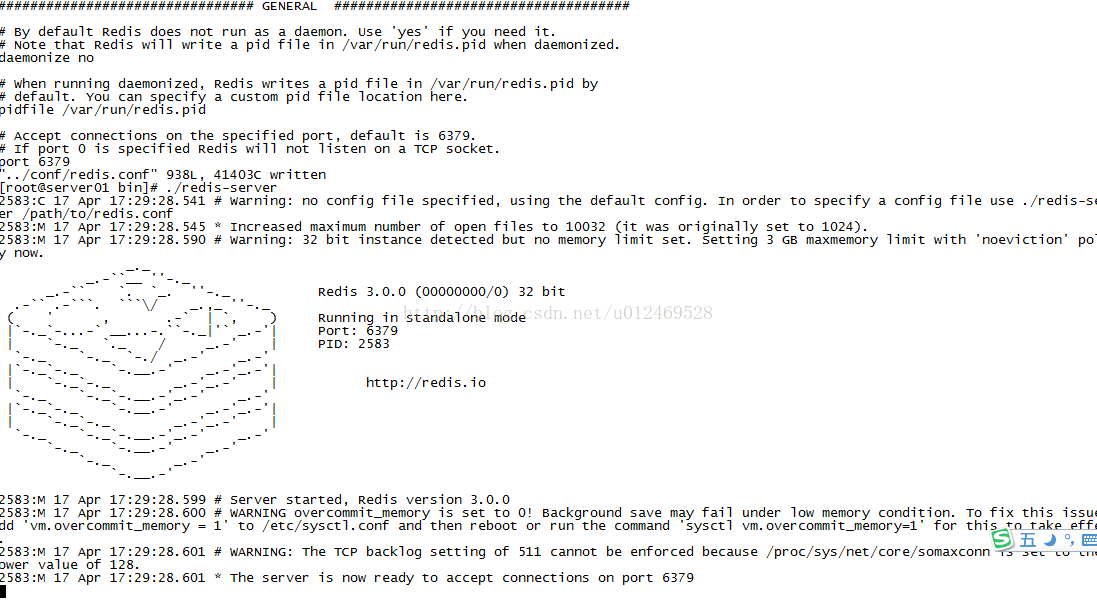
2.4.2. 后端模式启动
修改redis.conf配置文件,daemonize yes 以后端模式启动。执行如下命令启动redis:
cd /usr/local/redis
./bin/redis-server ./redis.conf
redis默认使用6379端口。

也可更改redis.conf文件,修改端口号:

2.5. 通过jedis连接redis单机
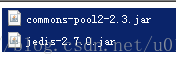
2.5.1. jar包
pom坐标:<dependency>
<groupId>redis.clients</groupId>
<artifactId>jedis</artifactId>
<version>2.7.0</version>
</dependency>
jar包如下:
2.5.2. 单实例连接
通过创建单实例jedis对象连接redis服务,如下代码://单实例连接redis
@Test
publicvoid testJedisSingle() {
Jedisjedis =new Jedis("192.168.101.3", 6379);
jedis.set("name","bar");
Stringname = jedis.get("name");
System.out.println(name);
jedis.close();
}
1. 外部连接不上redis的解决方法
由于linux防火墙默认开启,redis的服务端口6379并不在开放规则之内,所有需要将此端口开放访问或者关闭防火墙。关闭防火墙命令:sevice iptablesstop
如果是修改防火墙规则,可以修改:/etc/sysconfig/iptables文件
2.5.3. 使用连接池连接
通过单实例连接redis不能对redis连接进行共享,可以使用连接池对redis连接进行共享,提高资源利用率,使用jedisPool连接redis服务,如下代码:@Test
publicvoid pool() {
JedisPoolConfigconfig =new JedisPoolConfig();
//最大连接数
config.setMaxTotal(30);
//最大连接空闲数
config.setMaxIdle(2);
JedisPoolpool =new JedisPool(config,"192.168.101.3", 6379);
Jedisjedis =null;
try {
jedis = pool.getResource();
jedis.set("name","lisi");
Stringname = jedis.get("name");
System.out.println(name);
}catch(Exception ex){
ex.printStackTrace();
}finally{
if(jedis !=null){
//关闭连接
jedis.close();
}
}
}
详细的连接池配置参数参考下节jedis和spring整合中applicationContext.xml的配置内容。
2.5.4. jedis与spring整合
配置spring配置文件applicationContext.xml<?xml version="1.0"encoding="UTF-8"?>
<beans xmlns="http://www.springframework.org/schema/beans"
xmlns:xsi="http://www.w3.org/2001/XMLSchema-instance"xmlns:mvc="http://www.springframework.org/schema/mvc"
xmlns:context="http://www.springframework.org/schema/context"
xmlns:aop="http://www.springframework.org/schema/aop"xmlns:tx="http://www.springframework.org/schema/tx"
xsi:schemaLocation="http://www.springframework.org/schema/beans
http://www.springframework.org/schema/beans/spring-beans-3.2.xsd http://www.springframework.org/schema/mvc http://www.springframework.org/schema/mvc/spring-mvc-3.2.xsd http://www.springframework.org/schema/context http://www.springframework.org/schema/context/spring-context-3.2.xsd http://www.springframework.org/schema/aop http://www.springframework.org/schema/aop/spring-aop-3.2.xsd http://www.springframework.org/schema/tx http://www.springframework.org/schema/tx/spring-tx-3.2.xsd">
<!--连接池配置 -->
<beanid="jedisPoolConfig"class="redis.clients.jedis.JedisPoolConfig">
<!--最大连接数 -->
<propertyname="maxTotal"value="30"/>
<!--最大空闲连接数 -->
<propertyname="maxIdle"value="10"/>
<!--每次释放连接的最大数目 -->
<propertyname="numTestsPerEvictionRun"value="1024"/>
<!--释放连接的扫描间隔(毫秒) -->
<propertyname="timeBetweenEvictionRunsMillis"value="30000"/>
<!--连接最小空闲时间 -->
<propertyname="minEvictableIdleTimeMillis"value="1800000"/>
<!--连接空闲多久后释放,当空闲时间>该值且空闲连接>最大空闲连接数时直接释放
-->
<propertyname="softMinEvictableIdleTimeMillis"value="10000"/>
<!--获取连接时的最大等待毫秒数,小于零:阻塞不确定的时间,默认-1
-->
<propertyname="maxWaitMillis"value="1500"/>
<!--在获取连接的时候检查有效性,默认false
-->
<propertyname="testOnBorrow"value="true"/>
<!--在空闲时检查有效性,默认false
-->
<propertyname="testWhileIdle"value="true"/>
<!--连接耗尽时是否阻塞, false报异常,ture阻塞直到超时,默认true
-->
<propertyname="blockWhenExhausted"value="false"/>
</bean>
<!--redis单机通过连接池 -->
<beanid="jedisPool"class="redis.clients.jedis.JedisPool"destroy-method="close">
<constructor-argname="poolConfig" ref="jedisPoolConfig"/>
<constructor-argname="host" value="192.168.25.145"/>
<constructor-argname="port" value="6379"/>
</bean>
测试代码:
private ApplicationContextapplicationContext;
@Before
publicvoid init() {
applicationContext =new ClassPathXmlApplicationContext(
"classpath:applicationContext.xml");
}
@Test
publicvoid testJedisPool() {
JedisPoolpool = (JedisPool)applicationContext.getBean("jedisPool");
try {
jedis= pool.getResource();
jedis.set("name","lisi");
Stringname = jedis.get("name");
System.out.println(name);
}catch(Exception ex){
ex.printStackTrace();
}finally{
if(jedis !=null){
//关闭连接
jedis.close();
}
}
}
3. redis集群
3.1. 集群原理
3.1.1. redis-cluster架构图
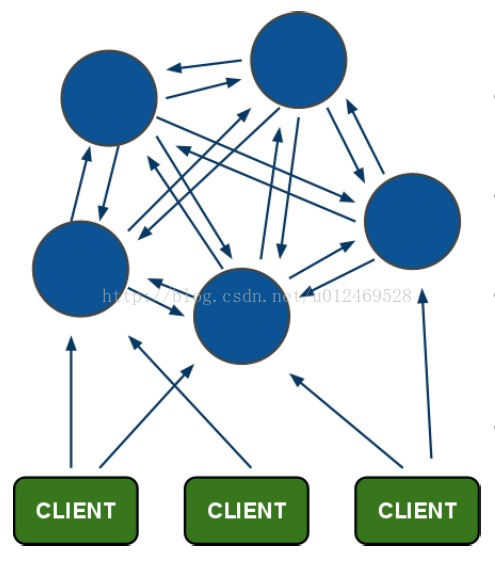
架构细节:
(1)所有的redis节点彼此互联(PING-PONG机制),内部使用二进制协议优化传输速度和带宽.
(2)节点的fail是通过集群中超过半数的节点检测失效时才生效.
(3)客户端与redis节点直连,不需要中间proxy层.客户端不需要连接集群所有节点,连接集群中任何一个可用节点即可
(4)redis-cluster把所有的物理节点映射到[0-16383]slot上,cluster负责维护node<->slot<->value
Redis集群中内置了 16384个哈希槽,当需要在
Redis集群中放置一个 key-value时,redis先对
key使用 crc16算法算出一个结果,然后把结果对 16384求余数,这样每个
key都会对应一个编号在 0-16383之间的哈希槽,redis会根据节点数量大致均等的将哈希槽映射到不同的节点
3.1.2. redis-cluster投票:容错

(1)领着投票过程是集群中所有master参与,如果半数以上master节点与master节点通信超过(cluster-node-timeout),认为当前master节点挂掉.
(2):什么时候整个集群不可用(cluster_state:fail)?
a:如果集群任意master挂掉,且当前master没有slave.集群进入fail状态,也可以理解成集群的slot映射[0-16383]不完成时进入fail状态.
ps : redis-3.0.0.rc1加入cluster-require-full-coverage参数,默认关闭,打开集群兼容部分失败.
b:如果集群超过半数以上master挂掉,无论是否有slave集群进入fail状态.
ps:当集群不可用时,所有对集群的操作做都不可用,收到((error)
CLUSTERDOWN The cluster is down)错误
3.2.ruby环境
redis集群管理工具redis-trib.rb依赖ruby环境,首先需要安装ruby环境:安装ruby
yum install ruby
yum install rubygems
安装ruby和redis的接口程序
拷贝redis-3.0.0.gem至/usr/local下
执行:
gem install /usr/local/redis-3.0.0.gem
3.3. 创建集群:
3.3.1. 集群结点规划
这里在同一台服务器用不同的端口表示不同的redis服务器,如下:主节点:192.168.101.3:7001 192.168.101.3:7002 192.168.101.3:7003
从节点:192.168.101.3:7004 192.168.101.3:7005 192.168.101.3:7006
在/usr/local下创建redis-cluster目录,其下创建7001、7002。。7006目录,如下:
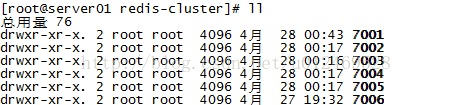
将redis安装目录bin下的文件拷贝到每个700X目录内,同时将redis源码目录src下的redis-trib.rb拷贝到redis-cluster目录下。
修改每个700X目录下的redis.conf配置文件:
port XXXX
#bind 192.168.101.3
cluster-enabled yes
3.3.2. 启动每个结点redis服务
分别进入7001、7002、...7006目录,执行:./redis-server ./redis.conf
查看redis进程:

3.3.3. 执行创建集群命令
执行redis-trib.rb,此脚本是ruby脚本,它依赖ruby环境。./redis-trib.rb create --replicas 1 192.168.101.3:7001 192.168.101.3:7002192.168.101.3:7003 192.168.101.3:7004 192.168.101.3:7005 192.168.101.3:7006
| ./redis-trib.rb create --replicas 1 192.168.131.102:7001 192.168.131.102:7002 192.168.131.102:7003 192.168.131.102:7004 192.168.131.102:7005 192.168.131.102:7006 |
redis集群至少需要3个主节点,每个主节点有一个从节点总共6个节点
replicas指定为1表示每个主节点有一个从节点
注意:
如果执行时报如下错误:
[ERR]Node XXXXXX is not empty. Either the node already knows other nodes (check withCLUSTER NODES) or contains some key in database 0
解决方法是删除生成的配置文件nodes.conf,如果不行则说明现在创建的结点包括了旧集群的结点信息,需要删除redis的持久化文件后再重启redis,比如:appendonly.aof、dump.rdb
创建集群输出如下:
>>> Creating cluster
Connecting to node 192.168.101.3:7001: OK
Connecting to node 192.168.101.3:7002: OK
Connecting to node 192.168.101.3:7003: OK
Connecting to node 192.168.101.3:7004: OK
Connecting to node 192.168.101.3:7005: OK
Connecting to node 192.168.101.3:7006: OK
>>> Performing hash slotsallocation on 6 nodes...
Using 3 masters:
192.168.101.3:7001
192.168.101.3:7002
192.168.101.3:7003
Adding replica 192.168.101.3:7004 to192.168.101.3:7001
Adding replica 192.168.101.3:7005 to192.168.101.3:7002
Adding replica 192.168.101.3:7006 to192.168.101.3:7003
M: cad9f7413ec6842c971dbcc2c48b4ca959eb5db4192.168.101.3:7001
slots:0-5460 (5461 slots) master
M: 4e7c2b02f0c4f4cfe306d6ad13e0cfee90bf5841192.168.101.3:7002
slots:5461-10922 (5462 slots) master
M: 1a8420896c3ff60b70c716e8480de8e50749ee65192.168.101.3:7003
slots:10923-16383 (5461 slots) master
S: 69d94b4963fd94f315fba2b9f12fae1278184fe8192.168.101.3:7004
replicates cad9f7413ec6842c971dbcc2c48b4ca959eb5db4
S: d2421a820cc23e17a01b597866fd0f750b698ac5192.168.101.3:7005
replicates 4e7c2b02f0c4f4cfe306d6ad13e0cfee90bf5841
S: 444e7bedbdfa40714ee55cd3086b8f0d5511fe54192.168.101.3:7006
replicates 1a8420896c3ff60b70c716e8480de8e50749ee65
Can I set the above configuration? (type'yes' to accept): yes
>>> Nodes configuration updated
>>> Assign a different configepoch to each node
>>> Sending CLUSTER MEET messagesto join the cluster
Waiting for the cluster to join...
>>> Performing Cluster Check(using node 192.168.101.3:7001)
M: cad9f7413ec6842c971dbcc2c48b4ca959eb5db4192.168.101.3:7001
slots:0-5460 (5461 slots) master
M: 4e7c2b02f0c4f4cfe306d6ad13e0cfee90bf5841192.168.101.3:7002
slots:5461-10922 (5462 slots) master
M: 1a8420896c3ff60b70c716e8480de8e50749ee65192.168.101.3:7003
slots:10923-16383 (5461 slots) master
M: 69d94b4963fd94f315fba2b9f12fae1278184fe8192.168.101.3:7004
slots: (0 slots) master
replicates cad9f7413ec6842c971dbcc2c48b4ca959eb5db4
M: d2421a820cc23e17a01b597866fd0f750b698ac5192.168.101.3:7005
slots: (0 slots) master
replicates 4e7c2b02f0c4f4cfe306d6ad13e0cfee90bf5841
M: 444e7bedbdfa40714ee55cd3086b8f0d5511fe54192.168.101.3:7006
slots: (0 slots) master
replicates 1a8420896c3ff60b70c716e8480de8e50749ee65
[OK] All nodes agree about slotsconfiguration.
>>> Check for open slots...
>>> Check slots coverage...
[OK] All 16384 slots covered.
3.4. 查询集群信息
集群创建成功登陆任意redis结点查询集群中的节点情况。客户端以集群方式登陆:

说明:
./redis-cli -c -h192.168.101.3 -p 7001,其中-c表示以集群方式连接redis,-h指定ip地址,-p指定端口号
cluster nodes 查询集群结点信息
cluster info 查询集群状态信息

3.5. 添加主节点
集群创建成功后可以向集群中添加节点,下面是添加一个master主节点添加7007结点,参考集群结点规划章节添加一个“7007”目录作为新节点。
执行下边命令:
./redis-trib.rb add-node 192.168.101.3:7007 192.168.101.3:7001

查看集群结点发现7007已添加到集群中:

3.5.1. hash槽重新分配
添加完主节点需要对主节点进行hash槽分配这样该主节才可以存储数据。redis集群有16384个槽,集群中的每个结点分配自已槽,通过查看集群结点可以看到槽占用情况。

给刚添加的7007结点分配槽:
第一步:连接上集群
./redis-trib.rb reshard 192.168.101.3:7001(连接集群中任意一个可用结点都行)
第二步:输入要分配的槽数量

输入 500表示要分配500个槽
第三步:输入接收槽的结点id
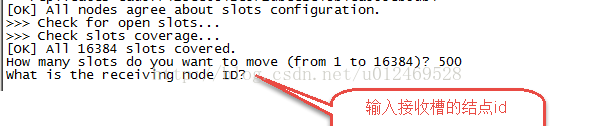
这里准备给7007分配槽,通过cluster nodes查看7007结点id为15b809eadae88955e36bcdbb8144f61bbbaf38fb
输入:15b809eadae88955e36bcdbb8144f61bbbaf38fb
第四步:输入源结点id

这里输入all
第五步:输入yes开始移动槽到目标结点id

3.6. 添加从节点
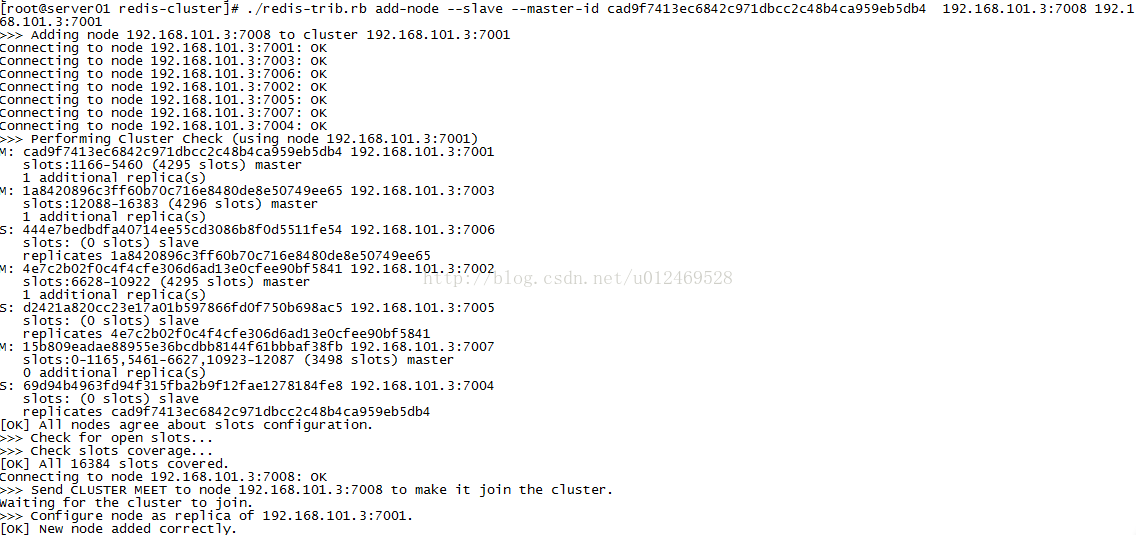
集群创建成功后可以向集群中添加节点,下面是添加一个slave从节点。添加7008从结点,将7008作为7007的从结点。
./redis-trib.rbadd-node --slave --master-id主节点id添加节点的ip和端口集群中已存在节点ip和端口
执行如下命令:
./redis-trib.rb add-node --slave--master-id cad9f7413ec6842c971dbcc2c48b4ca959eb5db4 192.168.101.3:7008 192.168.101.3:7001
cad9f7413ec6842c971dbcc2c48b4ca959eb5db4 是7007结点的id,可通过cluster nodes查看。
注意:如果原来该结点在集群中的配置信息已经生成cluster-config-file指定的配置文件中(如果cluster-config-file没有指定则默认为nodes.conf),这时可能会报错:
[ERR]Node XXXXXX is not empty. Either the node already knows other nodes (check withCLUSTER NODES) or contains some key in database 0
解决方法是删除生成的配置文件nodes.conf,删除后再执行./redis-trib.rb add-node指令
查看集群中的结点,刚添加的7008为7007的从节点:

3.7. 删除结点:
./redis-trib.rb del-node 127.0.0.1:70054b45eb75c8b428fbd77ab979b85080146a9bc017删除已经占有hash槽的结点会失败,报错如下:
[ERR] Node 127.0.0.1:7005 is not empty!Reshard data away and try again.
需要将该结点占用的hash槽分配出去(参考hash槽重新分配章节)。
3.8. jedisCluster
3.8.1. 测试代码
//连接redis集群@Test
publicvoid testJedisCluster() {
JedisPoolConfigconfig =new JedisPoolConfig();
//最大连接数
config.setMaxTotal(30);
//最大连接空闲数
config.setMaxIdle(2);
//集群结点
Set<HostAndPort>jedisClusterNode =new HashSet<HostAndPort>();
jedisClusterNode.add(new HostAndPort("192.168.101.3", 7001));
jedisClusterNode.add(new HostAndPort("192.168.101.3", 7002));
jedisClusterNode.add(new HostAndPort("192.168.101.3", 7003));
jedisClusterNode.add(new HostAndPort("192.168.101.3", 7004));
jedisClusterNode.add(new HostAndPort("192.168.101.3", 7005));
jedisClusterNode.add(new HostAndPort("192.168.101.3", 7006));
JedisClusterjc =new JedisCluster(jedisClusterNode, config);
JedisClusterjcd =new JedisCluster(jedisClusterNode);
jcd.set("name","zhangsan");
Stringvalue = jcd.get("name");
System.out.println(value);
}
3.8.2. 使用spring
配置applicationContext.xml<!--连接池配置 -->
<beanid="jedisPoolConfig"class="redis.clients.jedis.JedisPoolConfig">
<!--最大连接数 -->
<propertyname="maxTotal"value="30"/>
<!--最大空闲连接数 -->
<propertyname="maxIdle"value="10"/>
<!--每次释放连接的最大数目 -->
<propertyname="numTestsPerEvictionRun"value="1024"/>
<!--释放连接的扫描间隔(毫秒) -->
<propertyname="timeBetweenEvictionRunsMillis"value="30000"/>
<!--连接最小空闲时间 -->
<propertyname="minEvictableIdleTimeMillis"value="1800000"/>
<!--连接空闲多久后释放,当空闲时间>该值且空闲连接>最大空闲连接数时直接释放
-->
<propertyname="softMinEvictableIdleTimeMillis"value="10000"/>
<!--获取连接时的最大等待毫秒数,小于零:阻塞不确定的时间,默认-1
-->
<propertyname="maxWaitMillis"value="1500"/>
<!--在获取连接的时候检查有效性,默认false
-->
<propertyname="testOnBorrow"value="true"/>
<!--在空闲时检查有效性,默认false
-->
<propertyname="testWhileIdle"value="true"/>
<!--连接耗尽时是否阻塞, false报异常,ture阻塞直到超时,默认true
-->
<propertyname="blockWhenExhausted"value="false"/>
</bean>
<!--redis集群 -->
<beanid="jedisCluster"class="redis.clients.jedis.JedisCluster">
<constructor-argindex="0">
<set>
<beanclass="redis.clients.jedis.HostAndPort">
<constructor-argindex="0"value="192.168.101.3"></constructor-arg>
<constructor-argindex="1"value="7001"></constructor-arg>
</bean>
<beanclass="redis.clients.jedis.HostAndPort">
<constructor-argindex="0"value="192.168.101.3"></constructor-arg>
<constructor-argindex="1"value="7002"></constructor-arg>
</bean>
<beanclass="redis.clients.jedis.HostAndPort">
<constructor-argindex="0"value="192.168.101.3"></constructor-arg>
<constructor-argindex="1"value="7003"></constructor-arg>
</bean>
<beanclass="redis.clients.jedis.HostAndPort">
<constructor-argindex="0"value="192.168.101.3"></constructor-arg>
<constructor-argindex="1"value="7004"></constructor-arg>
</bean>
<beanclass="redis.clients.jedis.HostAndPort">
<constructor-argindex="0"value="192.168.101.3"></constructor-arg>
<constructor-argindex="1"value="7005"></constructor-arg>
</bean>
<beanclass="redis.clients.jedis.HostAndPort">
<constructor-argindex="0"value="192.168.101.3"></constructor-arg>
<constructor-argindex="1"value="7006"></constructor-arg>
</bean>
</set>
</constructor-arg>
<constructor-argindex="1"ref="jedisPoolConfig"></constructor-arg>
</bean>
测试代码
private ApplicationContextapplicationContext;
@Before
publicvoid init() {
applicationContext =new ClassPathXmlApplicationContext(
"classpath:applicationContext.xml");
}
//redis集群
@Test
publicvoid testJedisCluster() {
JedisClusterjedisCluster = (JedisCluster)applicationContext
.getBean("jedisCluster");
jedisCluster.set("name","zhangsan");
Stringvalue =jedisCluster.get("name");
System.out.println(value);
}
4. 系统添加缓存逻辑
添加缓存逻辑的原则:缓存逻辑不能影响正常的业务逻辑执行。4.1. 添加缓存后系统架构

4.2. 首页大广告位添加缓存
4.2.1. 缓存逻辑
查询内容时先到redis中查询是否有改信息,如果有使用redis中的数据,如果没有查询数据库,然后将数据缓存至redis。返回结果。2、要添加缓存的位置为:
ContentServiceImpl.java
3、实现步骤
a) 先创建一个key,对应一个hash数据类型
b) 在hash中缓存数据,每条数据对应的key为cid
c) 把内容列表转换成json数据存储。
4.2.2. 缓存实现
| @Override public TaotaoResult getContentList(longcid)throws Exception{ //缓存逻辑,先判断缓存中是否有内容 try { StringcontentStr =cluster.hget(TB_CONTENT_KEY,cid +""); if (!StringUtils.isBlank(contentStr)) { //把json字符串转换成对象列表 List<TbContent>list = JsonUtils.jsonToList(contentStr, TbContent.class); //返回结果 return TaotaoResult.ok(list); } }catch (Exceptione) { e.printStackTrace(); //缓存不能影响正常逻辑 } //从数据库中加载数据 TbContentExample example = new TbContentExample(); //添加条件 Criteria criteria = example.createCriteria(); criteria.andCategoryIdEqualTo(cid); List<TbContent> list = contentMapper.selectByExample(example); //把结果添加到redis数据库中 try { cluster.hset(TB_CONTENT_KEY,cid +"", JsonUtils.objectToJson(list)); }catch (Exceptione) { e.printStackTrace(); //缓存不能影响正常逻辑 } //返回结果 return TaotaoResult.ok(list); } |
4.3. 商品分类列表缓存
5. 缓存同步
5.1. 同步逻辑分析
当数据库中的内容信息发生改变后,例如首页大广告为的广告内容发生变化后,如何实现redis中的数据同步更新呢?可以在taotao-rest工程中发布一个服务,就是专门同步数据用的,其实只需要把缓存中的数据清空即可。当管理后台更新了内容信息后,需要调用此服务。5.2. 服务实现
5.2.1. Mapper
此服务不需要mapper内容。只需要JedisCluster对象。5.2.2. Service
使用JedisCluster清空对应的cid的内容即可。| @Service publicclass ClearCacheServiceImplimplements ClearCacheService { @Autowired private JedisClustercluster; @Value("${TB_CONTENT_KEY}") private StringTB_CONTENT_KEY; @Override public TaotaoResult clearContentCache(Longcid)throws Exception { //删除cid对应的内容 cluster.hdel(TB_CONTENT_KEY, cid.toString()); return TaotaoResult.ok(); } } |
5.2.3. Controller
| @Controller @RequestMapping("/content") publicclass ContentController { @Autowired private ContentServicecontentService; @RequestMapping("/category/{cid}") @ResponseBody public TaotaoResult getContentList(@PathVariable Longcid) { TaotaoResult result = null; try { result = contentService.getContentList(cid); } catch (Exceptione) { e.printStackTrace(); return TaotaoResult.build(500,e.getMessage()); } returnresult; } } |
5.2.4. 内容更新逻辑
更新内容后调用taotao-rest服务清空缓存。
相关文章推荐
- 带你逐步深入了解SSM框架——淘淘商城项目之商品详情页面实现
- 带你逐步深入了解SSM框架——淘淘商城项目之项目总结
- 带你逐步深入了解SSM框架——淘淘商城项目之单点登录系统实现
- 带你逐步深入了解SSM框架——淘淘商城项目之购物车+订单实现
- 带你逐步深入了解SSM框架——淘淘商城项目之框架整合,后台系统搭建
- 带你逐步深入了解SSM框架——淘淘商城项目之前台工程搭建、首页商品类目显示
- 带你逐步深入了解SSM框架——淘淘商城项目之solr服务器搭建、搜索功能实现
- 带你逐步深入了解SSM框架——淘淘商城项目之系统架构和Nginx服务器介绍
- 带你逐步深入了解SSM框架——淘淘商城项目之商品规格实现
- 带你逐步深入了解SSM框架——淘淘商城项目之实现商品添加
- 带你逐步深入了解SSM框架——淘淘商城项目之CMS系统
- 带你逐步深入了解SSM框架——淘淘商城项目之项目介绍及搭建maven工程
- 带你逐步深入了解SSM框架——淘淘商城项目之生产环境搭建、系统部署
- 带你逐步深入了解SSM框架——Mybatis框架详解
- 带你逐步深入了解SSM框架——SpringMVC框架详解
- 通过项目逐步深入了解Mybatis<一>
- SSM入门项目-4-Redis解决缓存问题
- 通过项目逐步深入了解Mybatis<三>
- J2EE项目系列(四)--SSM框架构建积分系统和基本商品检索系统(Spring+SpringMVC+MyBatis+Lucene+Redis+MAVEN)(1)框架整合构建
- 通过项目逐步深入了解Mybatis<三>