MySQL数据库使用——MySQL在C/C++的API接口
2017-12-28 21:07
841 查看
MySQL C API移植
移植MySQL头文件
Makefile工程
Visual Studio工程
移植MySQL库文件
Makefile工程
Visual Studio工程
添加MySQL示例
MySQL C API
头文件包含
登录MySQLmysql_initmysql_real_connect
操作MySQLmysql_query
关闭MySQLmysql_close
读取MySQL数据mysql_store_result
测试程序
MySQL C API移植
移植MySQL C头文件
Makefile工程
Visual Studio工程
移植MySQL C库文件
Makefile工程
Visual Studio工程
引用boost库
添加MySQL示例
MySQL C API
头文件包含
MySQL异常类SQLException
登录MySQLmysqlget_mysql_driver_instance
操作MySQLexecuteexecuteQueryexecuteUpdate
关闭MySQLclose
读取MySQL数据executeQuery
测试程序
直接操作MySQL,输入命令效率低,将MySQL嵌入程序中,封装接口,让程序去访问MySQL,才能最大效益利用MySQL。
移植之后即使设备没装MySQL也可以编译代码,只是没有MySQL不能运行而已,工程不因设备未MySQL而不能编译通过。
命令:sudo apt-get install libmysqlclient-dev
安装好后的头文件在:/usr/include/mysql
Windows的MySQL头文件即在安装目录里面。
windows和linux的头文件结构略有差异,但大体都是相等的,此次移植是linux的MySQL头文件。
不推荐使用C++操作头文件,因为需要用到boost库,boost库安装编译繁琐。
将头文件全部复制到工程头文件中。
命令:test_makefile/inc$ cp /usr/include/mysql/ ./ -rf
复制之后的工程头文件目录如下图所示

同头文件一样,linux要安装libmysqlclient-dev才能使用API接口的头文件。
命令:
安装好后的库文件在:/usr/lib/mysql和/usr/lib下
库文件位置:
文件位置即MySQL安装位置。
如下图所示
将库文件全部拷贝到工程库文件目录下
项目引用库文件,如下图所示
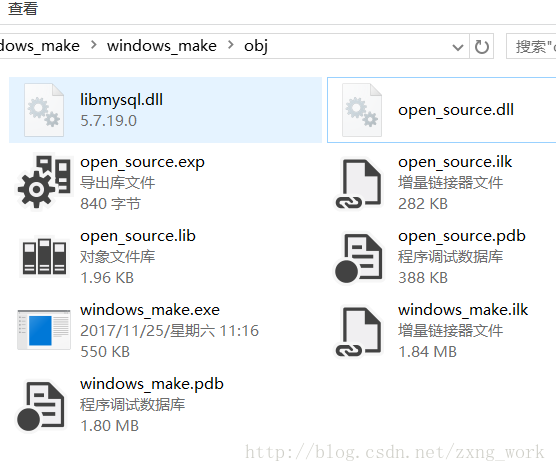
添加工程运行环境dll。为保证程序运行后不需要依赖系统的环境变量,需要将dll放到编译器的输出文件夹中,如定义了obj为输出文件夹,就dll放到该文件夹中。如下图所示。
module_MySQL.cpp
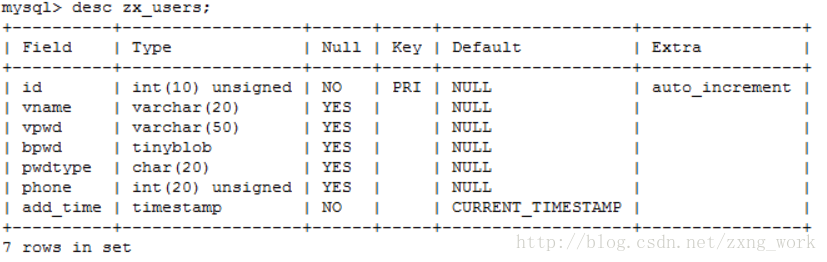
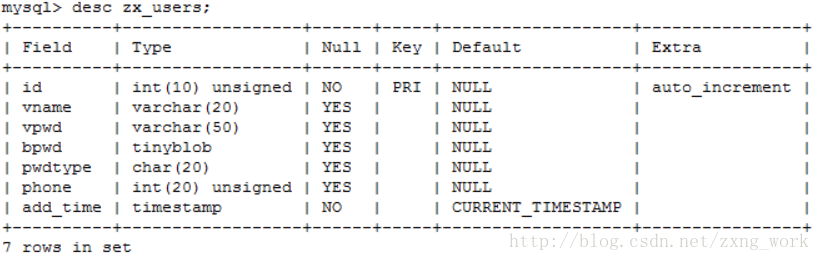
数据库结构下图所示。
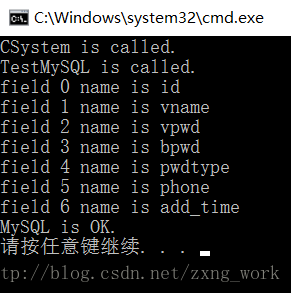
示例工程运行结果如下图所示。
clientflag连接标志在文件:mysql_com.h 以#define CLIENT_*定义
以下截取片段:
示例:登录MySQL数据库
失败时调用mysql_error(),返回值为具体失败的描述
示例:操作MySQL数据库
命令错误时的打印如下图所示:

示例:关闭MySQL数据库
读取字段函数 :mysql_fetch_fields()
读取字段数量函数 :mysql_num_fields()
读取数据函数 :mysql_fetch_row()
释放结果函数 :mysql_free_result(result);
函数原型
mysql_fetch_fields返回的是字段类型,包括字段名,字段长度等字段属性
MYSQL_FIELD结构体定义:mysql.h
读取具体数据重点:
mysql_fetch_row返回的是一个char型的双指针,指向对应字段数量的数组。数组里面的数据数据以string的形式展现,若字段为空,内容为NULL。读完一组字段后再调用则指向下一个字段,到底则返回NULL。
数据库数据如下图所示
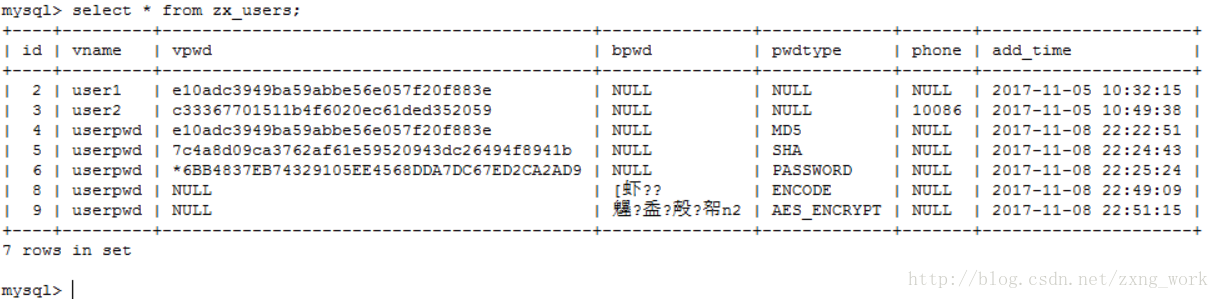
函数API读取数据运行结果如下图所示。

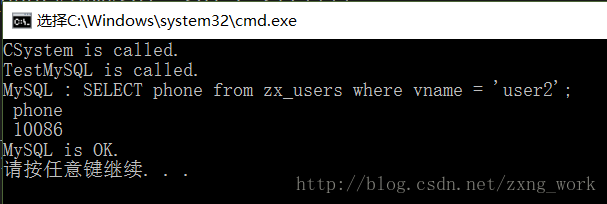
读取过滤的MySQL命令:SELECT phone from zx_users where vname = ‘user2’;
读取结果如下图所示。
官方文档下载:
https://downloads.mysql.com/docs/connector-cpp-en.a4.pdf
使用条件:

Windows在安装MySQL的时候已经安装了相应的库和头文件。
Linux安装时没有包含,需要到MySQL官网下载相应的库和头文件。
官网下载地址:
https://dev.mysql.com/downloads/connector/cpp/
如下图所示。
将头文件拷贝到工程的头文件inc中
将头文件添加到Makefile工程中,编辑Makefile
C++操作头文件:
文件结构如下所示
引用头文件如下图所示
库文件编译添加到Makefile工程中,编辑Makefile
文件位置即MySQL安装位置。
如下图所示

将库文件全部拷贝到工程库文件目录下
项目引用库文件,如下图所示
添加工程运行环境dll。为保证程序运行后不需要依赖系统的环境变量,需要将dll放到编译器的输出文件夹中,如定义了obj为输出文件夹,就dll放到该文件夹中。如下图所示。
引用boost库头文件和库文件:
因为boost库比较大一般引用的是电脑的路径,为了与可移植的工程配置分开,将boost库头文件和库文件在工程配置的VC++目录中,如下图所示。
添加完毕之后不需要在连接器上添加库文件。
Linux的由于boost库添加进系统变量中,编译时直接调用头文件即可。
没有添加的需要编辑/etc/profile文件
module_MySQLcpp.cpp
示例工程运行结果如下图所示。
类的接口调用
类的打印,如输入错误SQL命令,MySQL函数抛异常,捕获到的异常打印信息为
错误MySQL指令:std::string sql = “SELECC * from zx_users;”;
动态库函数定义
MySQL驱动操作类:
C++操作函数登录MySQL的步骤
函数原型
重点:
sql::SQLString不能接收std::string直传,需要调用c_str()转成C字符串的形式传。
三个函数都是可以执行操作MySQL,从返回值可以看出其功能。
可以根据语句的需要调用不同的执行函数:
pMysqlconnection->close();
ResultSet类定义头文件:Connector.C++ 1.1\include\cppconn\resultset.h
结果通过字符串描述的字段获取MySQL字段中的数据内容,前提是需要知道该字段的数据类型,查看字段类型命令:DESC
其中Type即字段的类型。
ResultSet类读取数据函数原型
字段描述字符串同样不能直接传string,需要调用c_str()转成C字符串的形式传。
数据库数据如下图所示

函数API读取数据运行结果如下图所示。

移植MySQL头文件
Makefile工程
Visual Studio工程
移植MySQL库文件
Makefile工程
Visual Studio工程
添加MySQL示例
MySQL C API
头文件包含
登录MySQLmysql_initmysql_real_connect
操作MySQLmysql_query
关闭MySQLmysql_close
读取MySQL数据mysql_store_result
测试程序
MySQL C API移植
移植MySQL C头文件
Makefile工程
Visual Studio工程
移植MySQL C库文件
Makefile工程
Visual Studio工程
引用boost库
添加MySQL示例
MySQL C API
头文件包含
MySQL异常类SQLException
登录MySQLmysqlget_mysql_driver_instance
操作MySQLexecuteexecuteQueryexecuteUpdate
关闭MySQLclose
读取MySQL数据executeQuery
测试程序
直接操作MySQL,输入命令效率低,将MySQL嵌入程序中,封装接口,让程序去访问MySQL,才能最大效益利用MySQL。
MySQL C API移植
包含MySQL的工程文件不应直接关联电脑已安装的MySQL,因为不同电脑服务器安装的位置不一样,每次移植都需要重新部署安装环境。应该将MySQL的头文件以及操作的库文件一并拷贝到工程文件中,这样即使移植到别的安装有MySQL电脑或服务器,就不需要重新定位头文件以及相关的库文件,直接操作访问数据库。除非随着MySQL的版本升级导致接口参数改变,否则就可以直接利用。移植之后即使设备没装MySQL也可以编译代码,只是没有MySQL不能运行而已,工程不因设备未MySQL而不能编译通过。
移植MySQL头文件
在linux中构建的Makefile工程要安装libmysqlclient-dev才能使用API接口的头文件。命令:sudo apt-get install libmysqlclient-dev
安装好后的头文件在:/usr/include/mysql
ghost@ghost-machine:/usr/include$ ls mysql/
big_endian.h                my_global.h             plugin_audit.h
binary_log_types.h          my_list.h               plugin_auth_common.h
byte_order_generic.h        mysql                   plugin_ftparser.h
byte_order_generic_x86.h    mysql_com.h             plugin_group_replication.h
decimal.h                   mysql_com_server.h      plugin.h
errmsg.h                    mysqld_ername.h         plugin_keyring.h
keycache.h                  mysqld_error.h          plugin_validate_password.h
little_endian.h             mysql_embed.h           psi
m_ctype.h                   mysql.h                 sql_common.h
m_string.h                  mysql_time.h            sql_state.h
my_alloc.h                  mysql_version.h         sslopt-case.h
my_byteorder.h              mysqlx_ername.h         sslopt-longopts.h
my_command.h                mysqlx_error.h          sslopt-vars.h
my_compiler.h               mysqlx_version.h        thr_cond.h
my_config.h                 my_sys.h                thr_mutex.h
my_dbug.h                   my_thread.h             thr_rwlock.h
my_dir.h                    my_thread_local.h       typelib.h
my_getopt.h                 my_xml.h
Windows的MySQL头文件即在安装目录里面。
MySQL头文件:C:\Program Files\MySQL\MySQL Server 5.7\include\
C++操作头文件:C:\Program Files\MySQL\Connector.C++ 1.1
windows和linux的头文件结构略有差异,但大体都是相等的,此次移植是linux的MySQL头文件。
不推荐使用C++操作头文件,因为需要用到boost库,boost库安装编译繁琐。
将头文件全部复制到工程头文件中。
命令:test_makefile/inc$ cp /usr/include/mysql/ ./ -rf
复制之后的工程头文件目录如下图所示
Makefile工程:
将头文件加入到Makefile中,编辑Makefile。NC += -I$(DIR)/inc/mysql
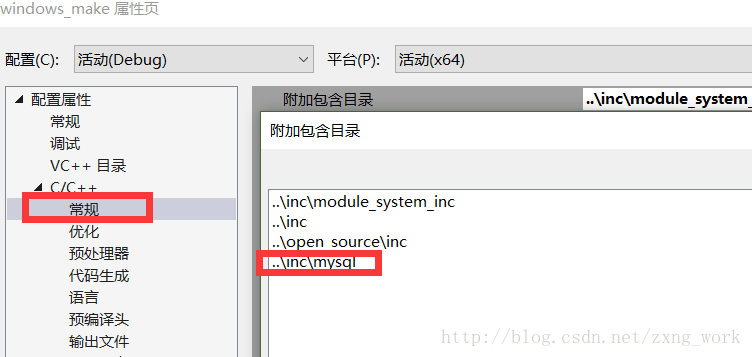
Visual Studio工程
引用头文件如下图所示移植MySQL库文件
Makefile工程
由于Makefile工程移植的库文件为.so或.a的库文件,因此一定要移植Linux下的MySQL库文件。同头文件一样,linux要安装libmysqlclient-dev才能使用API接口的头文件。
命令:
sudo apt-get install libmysqlclient-dev
安装好后的库文件在:/usr/lib/mysql和/usr/lib下
Visual Studio工程
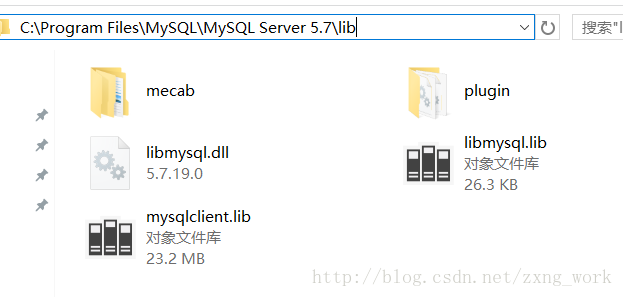
与Linux不同的是,Visual Studio工程移植的库文件为.lib或.dll的库文件。库文件位置:
C:\Program Files\MySQL\MySQL Server 5.7\lib
文件位置即MySQL安装位置。
如下图所示
将库文件全部拷贝到工程库文件目录下
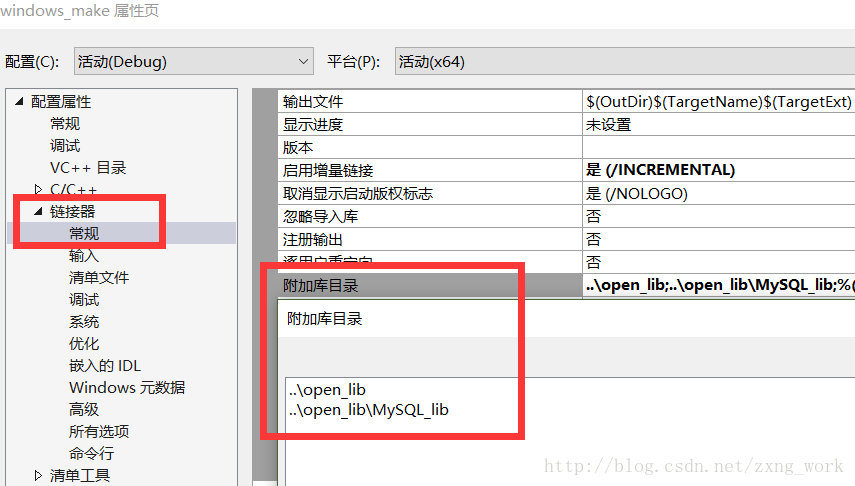
├── open_lib
│   ├── MySQL_lib
│   │   ├── libmysql.dll
│   │   ├── libmysql.lib
│   │   └── mysqlclient.lib
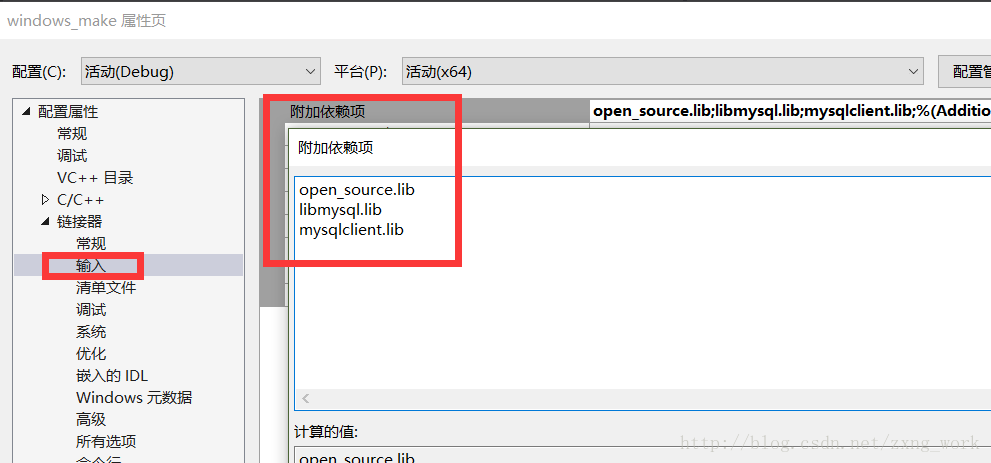
项目引用库文件,如下图所示
添加工程运行环境dll。为保证程序运行后不需要依赖系统的环境变量,需要将dll放到编译器的输出文件夹中,如定义了obj为输出文件夹,就dll放到该文件夹中。如下图所示。
添加MySQL示例
工程添加MySQL示例测试MySQL移植工程。module_MySQL.cpp
#include "module_MySQL.h"
#include <iostream>
#include <string>
#include <mysql/mysql.h>

using namespace std;

void TestMySQL(void)
{
cout << __FUNCTION__ << " is called." << endl;

MYSQL mysql;
mysql_init(&mysql);
mysql_real_connect(&mysql, "localhost", "zxpro-admin", "qwerty", "zx_mysql", 3306, NULL, 0);

//MySQL命令
string sql = "select * from zx_users;";
mysql_query(&mysql, sql.c_str());

try
{
MYSQL_RES *result = mysql_store_result(&mysql);
if (!result)
throw string("MySQL not result!");

//获取字段数量
int num_fields = mysql_num_fields(result);
if(0 == num_fields)
throw string("MySQL fields number is 0!");

//获取字段名
MYSQL_FIELD *fields = mysql_fetch_fields(result);
if (!fields)
throw string("MySQL fields fetch is error!");

for (int i = 0; i < num_fields; i++)
{
cout << "field " << i << " name is " << fields[i].name << endl;
}

cout << "MySQL is OK." << endl;
}
catch (string &error_msg)
{
cout << error_msg << endl;
}
catch (...)
{
cout << "MySQL operation is error!" << endl;
}

mysql_close(&mysql);
}
数据库结构下图所示。
示例工程运行结果如下图所示。
MySQL C API
官方文档:https://dev.mysql.com/doc/refman/5.7/en/c-api.html头文件包含
要使用MySQL的接口API,需要包含头文件#include <mysql/mysql.h>
登录MySQL:mysql_init(),mysql_real_connect()
函数原型:MYSQL * STDCALL mysql_init(MYSQL *mysql); //成功返回*mysql指针,失败返回NULL。 MYSQL * STDCALL mysql_real_connect(MYSQL *mysql, const char *host, //MySQL的IP,远程登录输入远程登录的IP地址 const char *user, //登录用户 const char *passwd, //登录密码 const char *db, //使用的数据库名称 unsigned int port, //MySQL端口 const char *unix_socket, //是否使用socket机制登录,NULL:否 unsigned long clientflag); //连接标志,通常为0 //成功返回*mysql指针,失败返回NULL。
clientflag连接标志在文件:mysql_com.h 以#define CLIENT_*定义
以下截取片段:
#define CLIENT_LONG_PASSWORD        1           /* new more secure passwords */
#define CLIENT_FOUND_ROWS           2           /* Found instead of affected rows */
#define CLIENT_LONG_FLAG            4           /* Get all column flags */
#define CLIENT_CONNECT_WITH_DB      8           /* One can specify db on connect */
#define CLIENT_NO_SCHEMA            16          /* Don't allow database.table.column */
#define CLIENT_COMPRESS             32          /* Can use compression protocol */
#define CLIENT_ODBC                 64          /* Odbc client */
#define CLIENT_LOCAL_FILES          128         /* Can use LOAD DATA LOCAL */
#define CLIENT_IGNORE_SPACE         256         /* Ignore spaces before '(' */
#define CLIENT_PROTOCOL_41          512         /* New 4.1 protocol */
#define CLIENT_INTERACTIVE          1024        /* This is an interactive client */
#define CLIENT_SSL                  2048        /* Switch to SSL after handshake */
#define CLIENT_IGNORE_SIGPIPE       4096        /* IGNORE sigpipes */
#define CLIENT_TRANSACTIONS         8192        /* Client knows about transactions */
#define CLIENT_RESERVED             16384       /* Old flag for 4.1 protocol  */
#define CLIENT_RESERVED2            32768       /* Old flag for 4.1 authentication */
示例:登录MySQL数据库
try
{
if (!mysql_init(&mysql))
throw string("MySQL init is error!");

if (!mysql_real_connect(&mysql, "localhost", "zxpro-admin", "qwerty", "zx_mysql", 3306, NULL, 0))
throw string("MySQL connect is error!");

catch (string &error_msg)
{
cout << error_msg << endl;
}
catch (...)
{
cout << "MySQL operation is error!" << endl;
}

mysql_close(&mysql);
操作MySQL:mysql_query()
函数原型:int STDCALL mysql_query(MYSQL *mysql, //MySQL操作结构体 const char *q); //操作命令 //成功返回0,失败返回1
失败时调用mysql_error(),返回值为具体失败的描述
示例:操作MySQL数据库
try
{
…………………

string sql = "SELECT * from zx_users;";
if (mysql_query(&mysql, sql.c_str()))
{
string err_string = mysql_error(&mysql);

if(err_string.empty())
throw string("MySQL query is error!");
else
throw err_string;
}
………………
}
catch (string &error_msg)
{
cout << error_msg << endl;
}
catch (...)
{
cout << "MySQL operation is error!" << endl;
}

mysql_close(&mysql);
命令错误时的打印如下图所示:
关闭MySQL:mysql_close()
函数原型:void STDCALL mysql_close(MYSQL *sock);
示例:关闭MySQL数据库
mysql_close(&mysql);
读取MySQL数据:mysql_store_result ()
获取命令结果函数 :mysql_store_result()读取字段函数 :mysql_fetch_fields()
读取字段数量函数 :mysql_num_fields()
读取数据函数 :mysql_fetch_row()
释放结果函数 :mysql_free_result(result);
函数原型
MYSQL_RES * STDCALL mysql_store_result(MYSQL *mysql);
unsigned int STDCALL mysql_num_fields(MYSQL_RES *res);
MYSQL_FIELD * STDCALL mysql_fetch_fields(MYSQL_RES *res);

typedef char **MYSQL_ROW;       /* return data as array of strings */
MYSQL_ROW   STDCALL mysql_fetch_row(MYSQL_RES *result);
void STDCALL mysql_free_result(MYSQL_RES *result);
mysql_fetch_fields返回的是字段类型,包括字段名,字段长度等字段属性
MYSQL_FIELD结构体定义:mysql.h
typedef struct st_mysql_field {
char *name;                   /* Name of column */

………………………….
} MYSQL_FIELD;
读取具体数据重点:
mysql_fetch_row返回的是一个char型的双指针,指向对应字段数量的数组。数组里面的数据数据以string的形式展现,若字段为空,内容为NULL。读完一组字段后再调用则指向下一个字段,到底则返回NULL。
测试程序
try
{
………………………………….

//MySQL命令
string sql = "SELECT * from zx_users;";
if (mysql_query(&mysql, sql.c_str()))
{
string err_string = mysql_error(&mysql);

if(err_string.empty())
throw string("MySQL query is error!");
else
throw err_string;
}
cout << "MySQL : " << sql << endl;

MYSQL_RES *result = mysql_store_result(&mysql);
if (!result)
throw string("MySQL not result!");
//获取字段数量
int num_fields = mysql_num_fields(result);
if(0 == num_fields)
throw string("MySQL fields number is 0!");
//获取字段名
MYSQL_FIELD *fields = mysql_fetch_fields(result);
if (!fields)
throw string("MySQL fields fetch is error!");

for (int i = 0; i < num_fields; i++)
{
cout << " " << fields[i].name;
}
cout << endl;

while (MYSQL_ROW row = mysql_fetch_row(result)) //获取整条数据内容
{
for (int i = 0; i < num_fields; i++)
{
if (NULL == row[i])
{
cout << " NULL";
}
else
{
cout << " " << row[i];
}
}
cout << endl;
}

mysql_free_result(result);

cout << "MySQL is OK." << endl;
}
catch (string &error_msg)
{
cout << error_msg << endl;
}
catch (...)
{
cout << "MySQL operation is error!" << endl;
}
数据库数据如下图所示
函数API读取数据运行结果如下图所示。
读取过滤的MySQL命令:SELECT phone from zx_users where vname = ‘user2’;
读取结果如下图所示。
MySQL C++ API移植
之所以将C++的API与C分分离,因为C++可以用C的API,但C++可以将操作封装到类里面,但需要安装boost库支持。需要重新配置C++的头文件和库文件。官方文档下载:
https://downloads.mysql.com/docs/connector-cpp-en.a4.pdf
使用条件:
Windows在安装MySQL的时候已经安装了相应的库和头文件。
Linux安装时没有包含,需要到MySQL官网下载相应的库和头文件。
官网下载地址:
https://dev.mysql.com/downloads/connector/cpp/
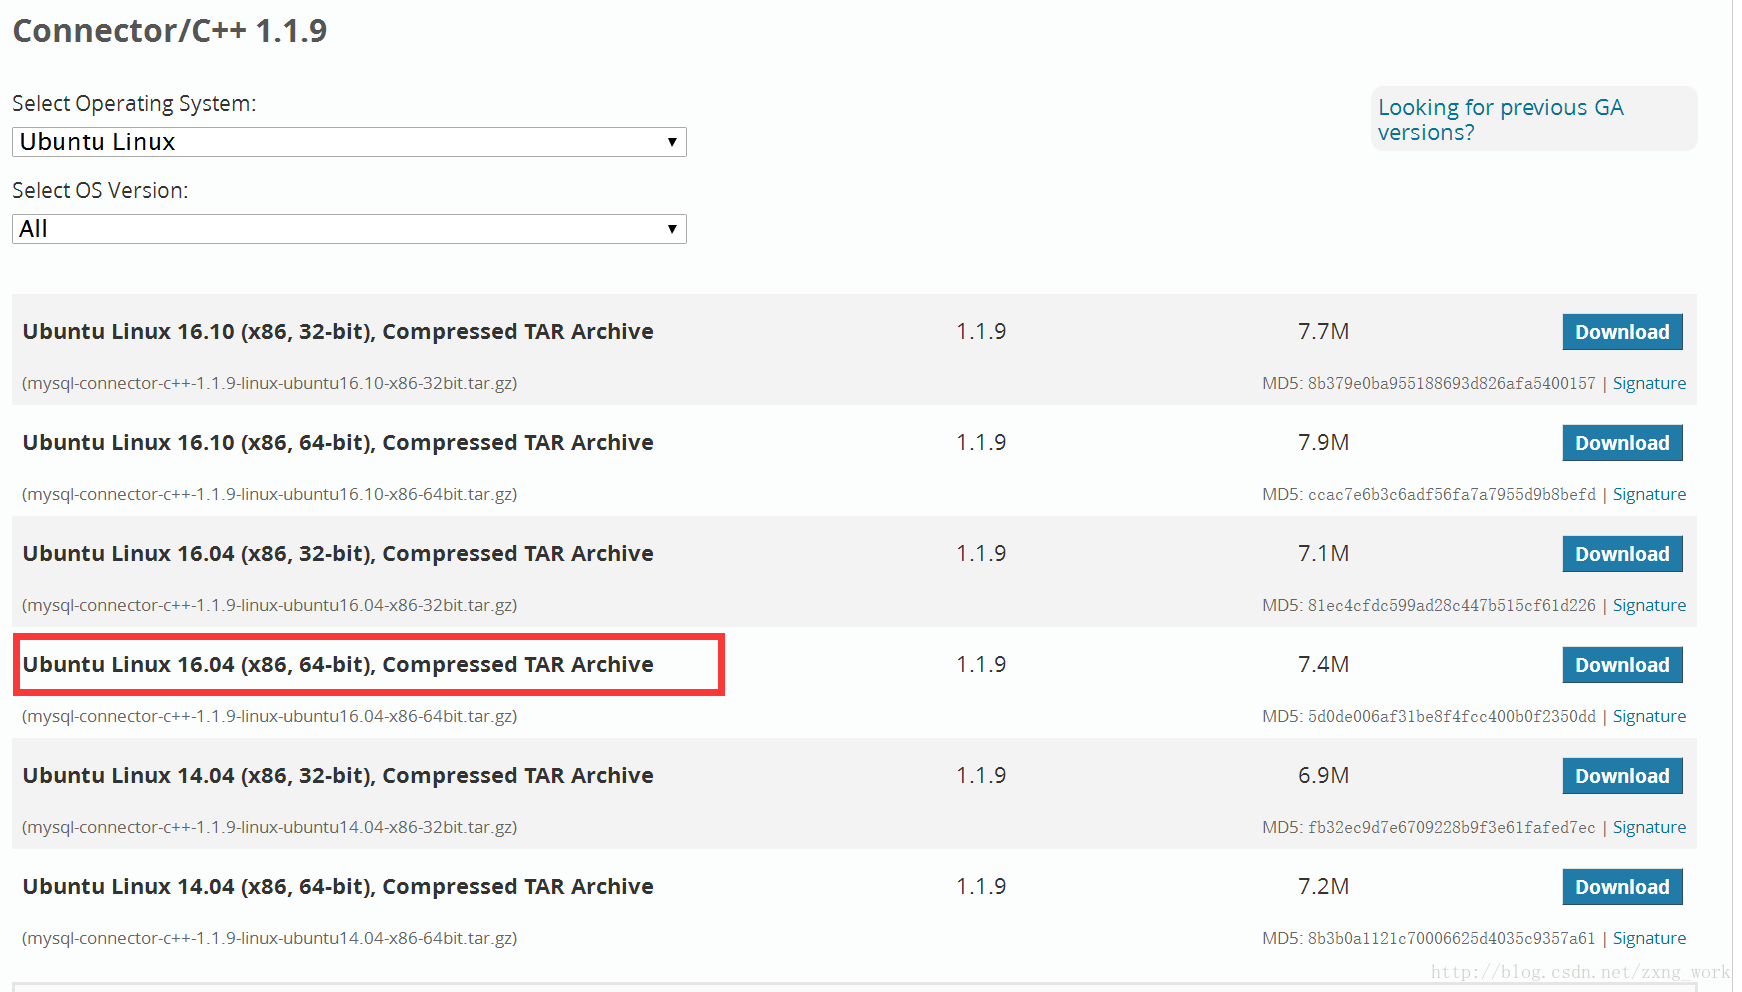
如下图所示。
移植MySQL C++头文件
要使用C++类封装的API,必须重新移植其头文件和库文件,移植后可以不用C API的头文件。Makefile工程
解压下载好的文件,解压后工程如下所示~/Tools/mysql_connector_cpp$ tree . ├── COPYING ├── include │ ├── cppconn │ │ ├── build_config.h │ │ ├── config.h │ │ ├── connection.h │ │ ├── datatype.h │ │ ├── driver.h │ │ ├── exception.h │ │ ├── metadata.h │ │ ├── parameter_metadata.h │ │ ├── prepared_statement.h │ │ ├── resultset.h │ │ ├── resultset_metadata.h │ │ ├── sqlstring.h │ │ ├── statement.h │ │ ├── variant.h │ │ ├── version_info.h │ │ └── warning.h │ ├── mysql_connection.h │ ├── mysql_driver.h │ └── mysql_error.h ├── lib │ ├── libmysqlcppconn.so -> libmysqlcppconn.so.7 │ ├── libmysqlcppconn.so.7 -> libmysqlcppconn.so.7.1.1.9 │ ├── libmysqlcppconn.so.7.1.1.9 │ └── libmysqlcppconn-static.a ├── Licenses_for_Third-Party_Components.txt └── README 3 directories, 26 files ~/Tools/mysql_connector_cpp$
将头文件拷贝到工程的头文件inc中
~/inc/Connector.C++ 1.1$ tree
.
├── COPYING.txt
├── include
│   ├── cppconn
│   │   ├── build_config.h
│   │   ├── config.h
│   │   ├── connection.h
│   │   ├── datatype.h
│   │   ├── driver.h
│   │   ├── exception.h
│   │   ├── metadata.h
│   │   ├── parameter_metadata.h
│   │   ├── prepared_statement.h
│   │   ├── resultset.h
│   │   ├── resultset_metadata.h
│   │   ├── sqlstring.h
│   │   ├── statement.h
│   │   ├── variant.h
│   │   ├── version_info.h
│   │   └── warning.h
│   ├── mysql_connection.h
│   ├── mysql_driver.h
│   └── mysql_error.h
├── Licenses_for_Third-Party_Components.txt
└── README.txt

2 directories, 22 files
~/inc/Connector.C++ 1.1$
将头文件添加到Makefile工程中,编辑Makefile
INC += -I$(DIR)/mysql_connector_cpp/include
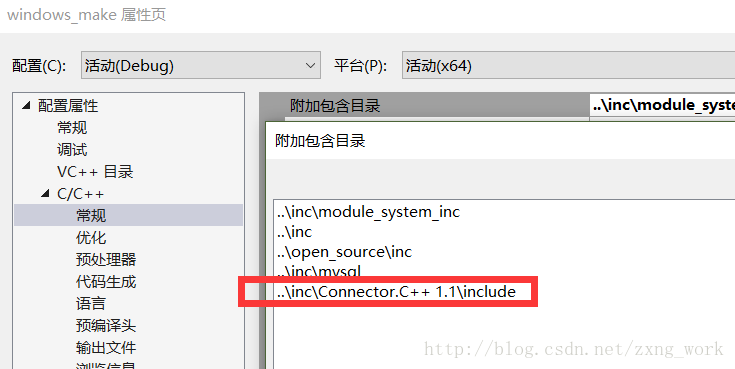
Visual Studio工程
Windows在安装MySQLd的时候已经安装了相应的库和头文件。C++操作头文件:
C:\Program Files\MySQL\Connector.C++ 1.1
文件结构如下所示
~/Connector.C++ 1.1$ tree
.
├── COPYING.txt
├── include
│   ├── cppconn
│   │   ├── build_config.h
│   │   ├── config.h
│   │   ├── connection.h
│   │   ├── datatype.h
│   │   ├── driver.h
│   │   ├── exception.h
│   │   ├── metadata.h
│   │   ├── parameter_metadata.h
│   │   ├── prepared_statement.h
│   │   ├── resultset.h
│   │   ├── resultset_metadata.h
│   │   ├── sqlstring.h
│   │   ├── statement.h
│   │   ├── variant.h
│   │   ├── version_info.h
│   │   └── warning.h
│   ├── mysql_connection.h
│   ├── mysql_driver.h
│   └── mysql_error.h
├── lib
│   └── opt
│       ├── mysqlcppconn.dll
│       ├── mysqlcppconn.lib
│       └── mysqlcppconn-static.lib
├── Licenses_for_Third-Party_Components.txt
└── README.txt

4 directories, 25 files
~/Connector.C++ 1.1$
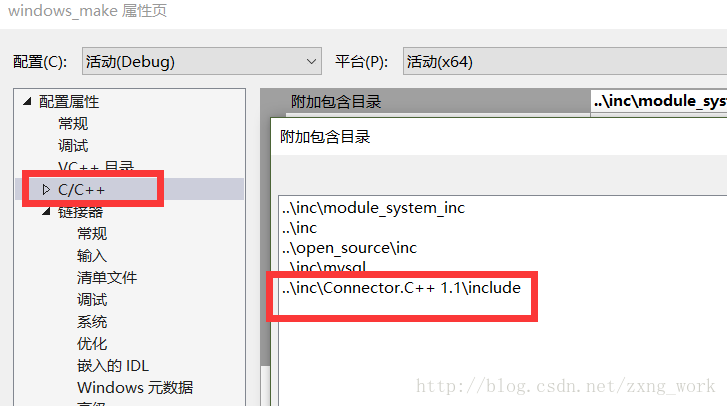
引用头文件如下图所示
移植MySQL C++库文件
Makefile工程
将库文件拷贝到工程的库目录中~/open_lib$ tree . ├── gtest.a ├── libmysqlclient.so └── MySQL_lib ├── libmysqlcppconn.so ├── libmysqlcppconn.so.7 ├── libmysqlcppconn.so.7.1.1.9 ├── libmysqlcppconn-static.a ├── libmysql.dll ├── libmysql.lib ├── mysqlclient.lib ├── mysqlcppconn.dll ├── mysqlcppconn.lib └── mysqlcppconn-static.lib 1 directory, 12 files ~/open_lib$
库文件编译添加到Makefile工程中,编辑Makefile
MYSQL_LIB += -L$(DIR)/open_lib/MySQL_lib -lmysqlcppconn
Visual Studio工程
库文件位置:C:\Program Files\MySQL\Connector.C++ 1.1\lib\opt文件位置即MySQL安装位置。
如下图所示
将库文件全部拷贝到工程库文件目录下
├── open_lib
│   ├── MySQL_lib
│   │   ├── libmysql.dll
│   │   ├── libmysql.lib
│   │   ├── mysqlclient.lib
│   │   ├── mysqlcppconn.dll
│   │   ├── mysqlcppconn.lib
│   │   └── mysqlcppconn-static.lib
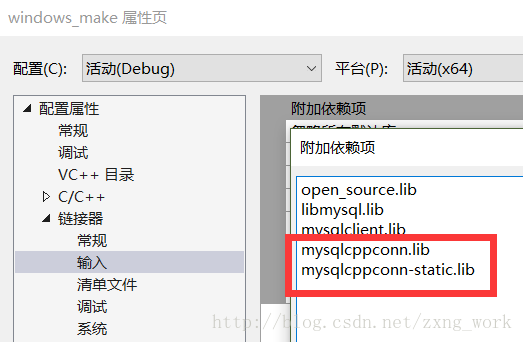
项目引用库文件,如下图所示
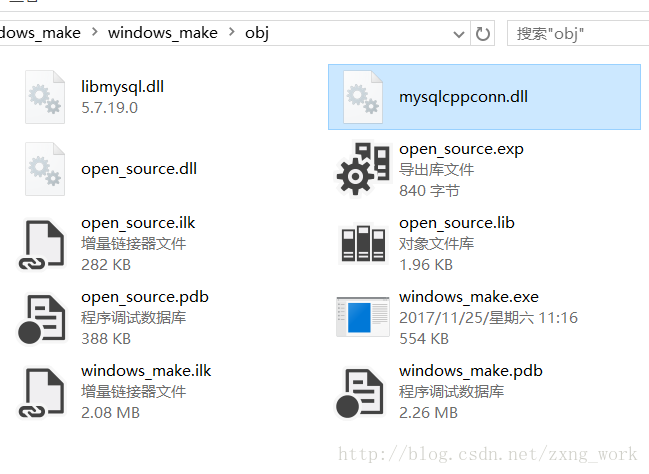
添加工程运行环境dll。为保证程序运行后不需要依赖系统的环境变量,需要将dll放到编译器的输出文件夹中,如定义了obj为输出文件夹,就dll放到该文件夹中。如下图所示。
引用boost库
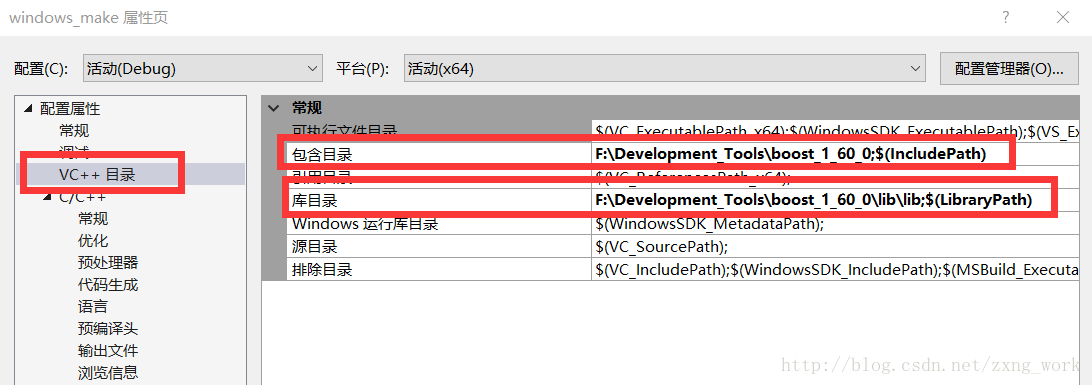
MySQL的C++操作函数需要boost库的支持,因此将编译好的boost库头文件位置以及库路径添加进工程中。引用boost库头文件和库文件:
因为boost库比较大一般引用的是电脑的路径,为了与可移植的工程配置分开,将boost库头文件和库文件在工程配置的VC++目录中,如下图所示。
添加完毕之后不需要在连接器上添加库文件。
Linux的由于boost库添加进系统变量中,编译时直接调用头文件即可。
没有添加的需要编辑/etc/profile文件
export BOOST_INCLUDE=/home/ghost/Tools/boost_1_60_0:$CPLUS_INCLUDE_PATH
export BOOST_LIBRARY=/home/ghost/Tools/boost_1_60_0/stage/lib:$LIBRARY_PATH
export BOOST_LD_LIBRARY=/home/ghost/Tools/boost_1_60_0/stage/lib:$LD_LIBRARY_PATH
添加MySQL示例
工程添加MySQL示例测试MySQL移植工程。module_MySQLcpp.cpp
#include "module_MySQLcpp.h"
#include <iostream>
#include <string>
#include <vector>
#include <mysql_driver.h>
#include <mysql_connection.h>
#include <cppconn/statement.h>
#include <cppconn/prepared_statement.h>
#include <cppconn/driver.h>
#include <cppconn/metadata.h>
#include <cppconn/exception.h>
using namespace std;
using namespace sql;
void TestCppSQL(void)
{
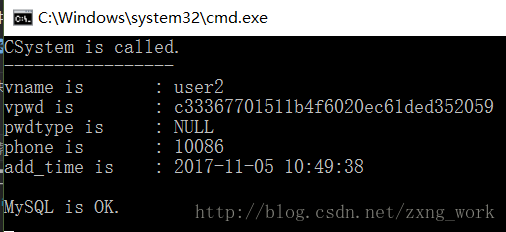
std::string sql = " SELECT * from zx_users where vname = 'user2';";
try
{
sql::mysql::MySQL_Driver *pMysqldriver = mysql::get_mysql_driver_instance();
if (NULL == pMysqldriver)
throw string("MySQL get_mysql_driver_instance is Error.");
sql::Connection *pMysqlconnection = pMysqldriver->connect("localhost",
"zxpro-admin",
"qwerty");
if (NULL == pMysqlconnection)
throw string("MySQL connect is Error.");
Statement *pMysqlstat = pMysqlconnection->createStatement();
if (NULL == pMysqlstat)
throw string("MySQL createStatement is Error.");
if(pMysqlstat->execute("use zx_mysql;"))
throw string("MySQL execute is Error.");
sql::ResultSet *result = pMysqlstat->executeQuery(sql.c_str());
if(NULL == result)
throw string("MySQL executeQuery is Error.");
while (result->next())
{
cout << "-----------------" << endl;
cout << "vname is : " << result->getString("vname").c_str() << endl;
cout << "vpwd is : " << result->getString("vpwd").c_str() << endl;
string pwdtype = result->getString("pwdtype").c_str();
cout << "pwdtype is : " << (pwdtype.empty() ? "NULL" : pwdtype) << endl;
string phone = result->getString("phone").c_str();
cout << "phone is : " << (phone.empty() ? "NULL" : phone) << endl;
cout << "add_time is : " << result->getString("add_time").c_str() << endl;
cout << endl;
}
cout << "MySQL is OK." << endl;
delete result;
result = NULL;
delete pMysqlstat;
pMysqlstat = NULL;
pMysqlconnection->close();
delete pMysqlconnection;
pMysqlconnection = NULL;
}
catch (const SQLException &CMysqlErr)
{
cout << "SQL what :" << CMysqlErr.what() << endl;
cout << "SQL Error code :" << CMysqlErr.getErrorCode() << endl;
cout << "SQL State :" << CMysqlErr.getSQLStateCStr() << endl;
}
catch (const std::string &Err_Msg)
{
cout << Err_Msg << endl;
}
catch (const std::exception &Err)
{
cout << "exception what :"<< Err.what() << endl;
}
catch (...)
{
cout << "MySQL operation is error!" << endl;
}
}示例工程运行结果如下图所示。
MySQL C++ API
头文件包含
要使用MySQL的接口API,需要包含头文件#include <mysql_driver.h> #include <mysql_connection.h> #include <cppconn/statement.h> #include <cppconn/prepared_statement.h> #include <cppconn/driver.h> #include <cppconn/metadata.h> #include <cppconn/exception.h> //使用MySQL命名空间 using namespace sql;
MySQL异常类:SQLException
类的说明class CPPCONN_PUBLIC_FUNC SQLException : public std::runtime_error
类的接口调用
catch (SQLException &CMysqlErr)
{
cout << "SQL what           :" << CMysqlErr.what() << endl;
cout << "SQL Error code :" << CMysqlErr.getErrorCode() << endl;
cout << "SQL State          :" << CMysqlErr.getSQLStateCStr() << endl;
}
类的打印,如输入错误SQL命令,MySQL函数抛异常,捕获到的异常打印信息为
错误MySQL指令:std::string sql = “SELECC * from zx_users;”;
CSystem is called.
SQL what       :You have an error in your SQL syntax; check the manual that corresponds to your MySQL server version for the right syntax to use near 'SELECC * from zx_users' at line 1
SQL Error code :1064
SQL State      :42000
登录MySQL:mysql::get_mysql_driver_instance()
函数原型:CPPCONN_PUBLIC_FUNC MySQL_Driver * get_driver_instance();
static inline MySQL_Driver * get_mysql_driver_instance() { return get_driver_instance(); }动态库函数定义
#if defined(_WIN32)
// mysqlcppconn_EXPORTS is added by cmake and defined for dynamic lib build only
#ifdef mysqlcppconn_EXPORTS
#define CPPCONN_PUBLIC_FUNC __declspec(dllexport)
#else
// this is for static build
#ifdef CPPCONN_LIB_BUILD
#define CPPCONN_PUBLIC_FUNC
#else
// this is for clients using dynamic lib
#define CPPCONN_PUBLIC_FUNC __declspec(dllimport)
#endif
#endif
#else
#define CPPCONN_PUBLIC_FUNC
#endif
MySQL驱动操作类:
class CPPCONN_PUBLIC_FUNC MySQL_Driver : public sql::Driver
{
boost::scoped_ptr< ::sql::mysql::NativeAPI::NativeDriverWrapper > proxy;

public:
MySQL_Driver();
MySQL_Driver(const ::sql::SQLString & clientLib);

virtual ~MySQL_Driver();

sql::Connection * connect(const sql::SQLString& hostName, //MySQL的IP,远程登录输入远程登录的IP地址
const sql::SQLString& userName,   //登录用户
const sql::SQLString& password);  //登录密码

sql::Connection * connect(sql::ConnectOptionsMap & options);

int getMajorVersion();

int getMinorVersion();

int getPatchVersion();

const sql::SQLString & getName();

void threadInit();

void threadEnd();

private:
/* Prevent use of these */
MySQL_Driver(const MySQL_Driver &);
void operator=(MySQL_Driver &);
};
C++操作函数登录MySQL的步骤
sql::mysql::MySQL_Driver *pMysqldriver = mysql::get_mysql_driver_instance();
if (nullptr == pMysqldriver)
throw string("MySQL_Driver is error");

sql::Connection *pMysqlconnection = pMysqldriver->connect("localhost",
"zxpro-admin",
"qwerty");

//指定端口用此登录
sql::Connection *pMysqlconnection = pMysqldriver->connect("tcp://localhost:3306", //指定端口
"zxpro-admin",
"qwerty");

if (nullptr == pMysqlconnection)
throw string("MySQL Connection is error!");
操作MySQL:execute(),executeQuery(),executeUpdate()
使用前通过连接得到的指针先调用创建语句函数:createStatement()Statement *pMysqlstat = pMysqlconnection->createStatement();
pMysqlstat->execute("use zx_mysql;");
sql::ResultSet *result = pMysqlstat->executeQuery(sql.c_str());函数原型
virtual Statement *createStatement() = 0;
virtual bool execute(const sql::SQLString& sql) = 0;
virtual ResultSet * executeQuery(const sql::SQLString& sql) = 0;
virtual int executeUpdate(const sql::SQLString& sql) = 0;
重点:
sql::SQLString不能接收std::string直传,需要调用c_str()转成C字符串的形式传。
三个函数都是可以执行操作MySQL,从返回值可以看出其功能。
bool execute()              :返回的是语句的操作成功与失败。
ResultSet * executeQuery()  :返回类指针ResultSet,说明需要获得MySQL语句查询的结果
int executeUpdate           :返回整型,说明返回被更新的个数
可以根据语句的需要调用不同的执行函数:
mysql> select vname, phone from zx_users where pwdtype = 'MD5';
+-----------+-----------+
| vname     | phone     |
+-----------+-----------+
| user1     | 123456    |
| userpwd   | NULL      |
+-----------+-----------+
2 rows in set

mysql> update zx_users set phone = 321654 where pwdtype = 'MD5';
Query OK, 2 rows affected
Rows matched: 2  Changed: 2  Warnings: 0

mysql> use zx_mysql;
Database changed
关闭MySQL:close()
调用类sql::Connection的关闭函数close()来关闭MySQL的连接。pMysqlconnection->close();
读取MySQL数据:executeQuery()
调用该函数后,会获得数据结果类ResultSet的指针。ResultSet类定义头文件:Connector.C++ 1.1\include\cppconn\resultset.h
结果通过字符串描述的字段获取MySQL字段中的数据内容,前提是需要知道该字段的数据类型,查看字段类型命令:DESC
其中Type即字段的类型。
cout << "vname is       : " << result->getString("vname").c_str() << endl;
string phone = result->getString("phone").c_str();
cout << "phone is       : " << (phone.empty() ? "NULL" : phone) << endl;
ResultSet类读取数据函数原型
//获取字符型数据
virtual SQLString getString(const sql::SQLString& columnLabel) const = 0;

//获取int型数据
virtual int32_t     getInt(const sql::SQLString& columnLabel) const = 0;
virtual uint32_t    getUInt(const sql::SQLString& columnLabel) const = 0;
virtual int64_t     getInt64(const sql::SQLString& columnLabel) const = 0;
virtual uint64_t    getUInt64(const sql::SQLString& columnLabel) const = 0;

//获取二进制数据
virtual std::istream * getBlob(const sql::SQLString& columnLabel) const = 0;
字段描述字符串同样不能直接传string,需要调用c_str()转成C字符串的形式传。
测试程序
std::string sql = "SELECT * from zx_users;";

try
{
………

sql::ResultSet *result = pMysqlstat->executeQuery(sql.c_str());
if(NULL == result)
throw string("MySQL executeQuery is Error.");

while (result->next())
{
cout << "-----------------" << endl;
cout << "vname is       : " << result->getString("vname").c_str() << endl;
cout << "vpwd is        : " << result->getString("vpwd").c_str() << endl;
string pwdtype = result->getString("pwdtype").c_str();
cout << "pwdtype is     : " << (pwdtype.empty() ? "NULL" : pwdtype) << endl;
string phone = result->getString("phone").c_str();
cout << "phone is       : " << (phone.empty() ? "NULL" : phone) << endl;
cout << "add_time is    : " << result->getString("add_time").c_str() << endl;
cout << endl;
}

cout << "MySQL is OK." << endl;

delete result;
result = NULL;

delete pMysqlstat;
pMysqlstat = NULL;

pMysqlconnection->close();
delete pMysqlconnection;
pMysqlconnection = NULL;
}
catch (const SQLException &CMysqlErr)
{
cout << "SQL what       :" << CMysqlErr.what() << endl;
cout << "SQL Error code :" << CMysqlErr.getErrorCode() << endl;
cout << "SQL State      :" << CMysqlErr.getSQLStateCStr() << endl;
}
catch (const std::string &Err_Msg)
{
cout << Err_Msg << endl;
}
catch (const std::exception &Err)
{
cout << "exception  what :"<< Err.what() << endl;
}
catch (...)
{
cout << "MySQL operation is error!" << endl;
}
数据库数据如下图所示
函数API读取数据运行结果如下图所示。

相关文章推荐
- 使用MySQL connector/C++链接MySQL数据库
- 使用MySQL connector/C++链接MySQL数据库
- Linux学习之CentOS--CentOS6.5下Mysql数据库的安装及C/C++连接使用Mysql
- 使用MySQL connector/C++链接MySQL数据库
- 使用MySQLConnector/C++连接MySQL数据库
- 使用MySQL connector/C++链接MySQL数据库
- 使用MySQL connector/C++链接MySQL数据库
- C++使用mysql 库访问MYSQL数据库,mysql_init函数破坏内存的问题
- 使用MySQL connector/C++链接MySQL数据库
- 使用mysql.data.mysqlclient实现C#连接MySQL数据库
- 为 DEV-C++ 生成 libmysql.a 的过程 及 windows下 devc++ c语言访问mysql数据库 环境配置
- Mysql数据库服务器性能配置优化三 -- Mysql编译配置优化,XtraDB使用,my.cnf优化
- MySQL C++接口的安装与使用
- [原创]mysql++的编译及使用mysql++连接mysql数据库
- 【转】使用Mysql-connector-c++插入数据时乱码解决
- 使用MySQL自带工具mysqlhotcopy快速备份mysql数据库
- mysql-connector-c++-noinstall-1.0.5-win32-vs2005 使用心得
- Linux下eclipse及mysql安装,c++访问mysql数据库
- VS 2010中使用MySQL Connector C/C++的问题
- 使用Hibernate连接MySQL数据库,MySQL连接超时断开的问题