springbatch和定时器读取txt文件批量导入数据库
2017-12-25 12:26
483 查看
百度云案例下载地址:
spring batch批量读取txt文件demo案例下载:链接:https://pan.baidu.com/s/1gfRP0cF 密码:uxni
启动:找到SpringbatchApplication,右键--run as --java application(springboot启动方式)
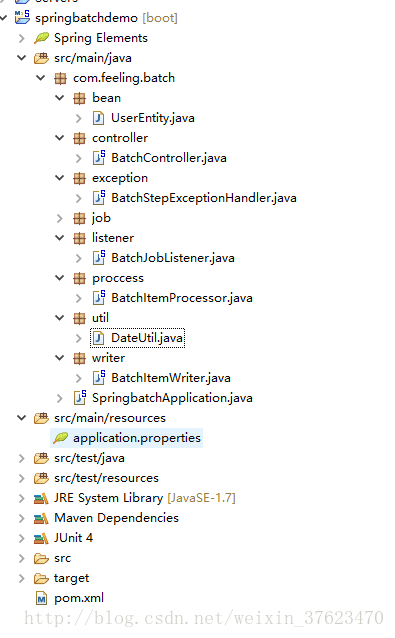
目录结构:
1、springBatch的job的step方法有reader,processor,writer方法。
reader从本地文件读取内容,processor对读取的每行数据进行处理的过程,writer,将处理过的数据进行存储操作。

(1)第一种启动springbatch创建job方式
尽量不要用@Autowired(required
= false)
(2)第二种启动springbatch创建job方式
在SpringbatchApplication加上@EnableScheduling//定时器
package com.feeling.batch.controller;
import javax.annotation.Resource;
import org.springframework.batch.core.Job;
import org.springframework.batch.core.JobExecution;
import org.springframework.batch.core.JobParametersBuilder;
import org.springframework.batch.core.launch.JobLauncher;
import org.springframework.batch.core.launch.JobOperator;
import org.springframework.beans.factory.annotation.Autowired;
import org.springframework.scheduling.annotation.Scheduled;
import org.springframework.stereotype.Component;
@Component
public class BatchController {
@Autowired
JobLauncher jobLauncher;
@Autowired
JobOperator jobOperator;
@Resource(name="messagebatchinsertjob")
private Job batchJob;
/**
* 每天读取txt文件,
* 并且把txt文件数据处理后保存到新的txt中
* 代表一个简单的界面来启动Job一个给定的一组 JobParameters
* JobLauncher.run(Job job, JobParameters jobParameters)
* @throws Exception
*/
@Scheduled(cron = "0 0/1 * * * ?")
public void job3() throws Exception {
JobExecution run = jobLauncher.run(batchJob, newJobParametersBuilder().addLong("time",System.currentTimeMillis()).toJobParameters());
run.getId();
}
}
2、创建job的所在类
package com.feeling.batch.job;
import java.io.File;
import org.slf4j.Logger;
import org.slf4j.LoggerFactory;
import org.springframework.batch.core.Job;
import org.springframework.batch.core.Step;
import org.springframework.batch.core.configuration.annotation.JobBuilderFactory;
import org.springframework.batch.core.configuration.annotation.StepBuilderFactory;
import org.springframework.batch.item.file.FlatFileItemReader;
import org.springframework.batch.item.file.mapping.DefaultLineMapper;
import org.springframework.batch.item.file.mapping.FieldSetMapper;
import org.springframework.batch.item.file.transform.DelimitedLineTokenizer;
import org.springframework.batch.item.file.transform.FieldSet;
import org.springframework.beans.factory.annotation.Autowired;
import org.springframework.context.annotation.Bean;
import org.springframework.context.annotation.Configuration;
import org.springframework.core.io.FileSystemResource;
import org.springframework.core.task.SimpleAsyncTaskExecutor;
import org.springframework.transaction.PlatformTransactionManager;
import org.springframework.validation.BindException;
import com.feeling.batch.bean.UserEntity;
import com.feeling.batch.exception.BatchStepExceptionHandler;
import com.feeling.batch.listener.BatchJobListener;
import com.feeling.batch.proccess.BatchItemProcessor;
import com.feeling.batch.util.DateUtil;
import com.feeling.batch.writer.BatchItemWriter;
@Configuration
public class BatchJob {
private static final Logger logger = LoggerFactory.getLogger(BatchJob.class);
@Autowired
public JobBuilderFactory jobBuilderFactory;
@Autowired
public StepBuilderFactory stepBuilderFactory;
@Autowired
public PlatformTransactionManager platformTransactionManager;
@Autowired
public BatchStepExceptionHandler exceptionHandler;
@Autowired
public BatchItemWriter batchitemwriter;
@Autowired
public BatchItemProcessor batchitemprocessor;
/**
* 构建job
* 创建bean,然后用@Resource(name="batchJob")创建对象
* 1、当第二天重启前一天的任务时!!!文件日期有异
* @param listener
* @return
*/
@Bean("messagebatchinsertjob")
public Job MessageBatchInsertJob(BatchJobListener listener) {
return jobBuilderFactory.get("MessageBatchInsertJob").listener(listener).flow(MessageBatchInsertStep()).end()
.build();
}
/**
* 声明发送到MQ step
* 1、Skip:如果处理过程中某条记录是错误的,如CSV文件中格式不正确的行,那么可以直接跳过该对象,继续处理下一个。
* 2、在chunk元素上定义skip-limit属性,告诉Spring最多允许跳过多少个items,超过则job失败
* 3、Restart:如果将job状态存储在数据库中,而一旦它执行失败, 那么就可以选择重启job实例, 并继续上次的执行位置。
* 4、最后,对于执行失败的job作业,我们可以重新启动,并让他们从上次断开的地方继续执行。要达到这一点,只需要使用和上次 一模一样的参数来启动job,
* 则Spring Batch会自动从数据库中找到这个实例然后继续执行。你也可以拒绝重启,或者参数控 制某个 job中的一个tep可以重启的次数(一般来说多次重试都失败了,那我们可能需要放弃。)
*
* @return
*/
@Bean
public Step MessageBatchInsertStep() {
logger.info("MessageBatchInsertStep");
return stepBuilderFactory.get("MessageBatchInsertStep").<UserEntity, UserEntity>chunk(100).reader(fileRead()).processor(batchitemprocessor)
.writer(batchitemwriter).faultTolerant().skip(Exception.class).skipLimit(100)
.taskExecutor(new SimpleAsyncTaskExecutor()).startLimit(10).allowStartIfComplete(true)
.exceptionHandler(exceptionHandler) // 设置并发方式执行exceptionHandler,异常时打印日志并抛出异常
.throttleLimit(10) // 并发任务数为 10,默认为4
.transactionManager(platformTransactionManager).build();
}
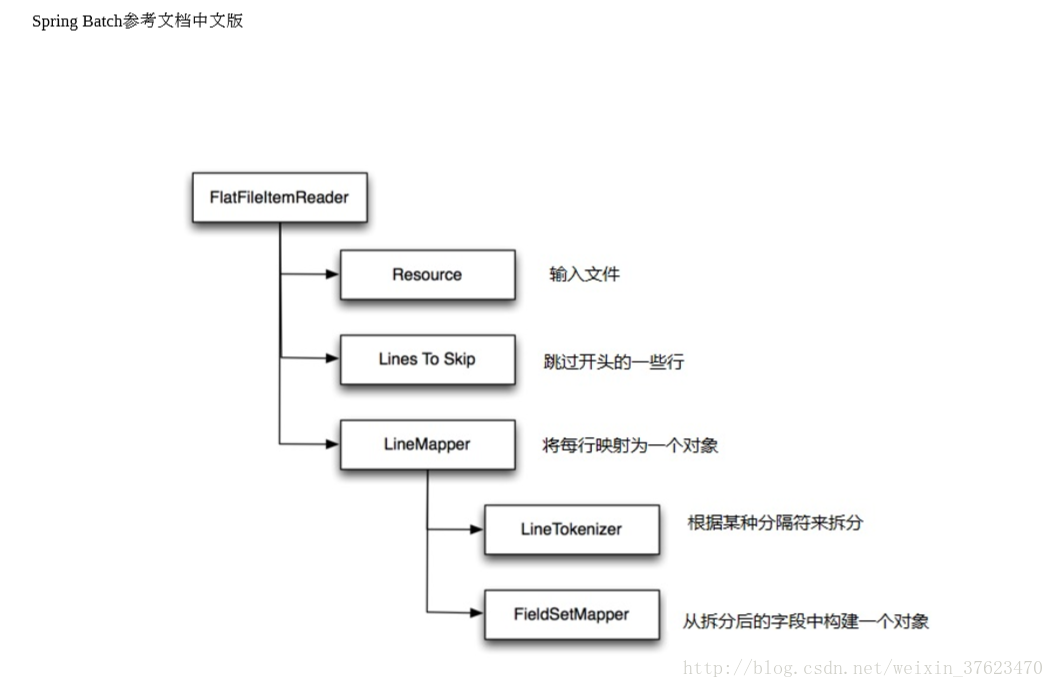
public FlatFileItemReader<UserEntity> fileRead() {
System.out.println("fileRead()方法开始");
FlatFileItemReader<UserEntity> fileRead = new FlatFileItemReader<>();
fileRead.setEncoding("UTF-8");
fileRead.setResource(new FileSystemResource(new File("E:\\user.txt")));
//fileRead.setLinesToSkip(2);跳过开头多少行
DefaultLineMapper<UserEntity> lineMapper = new DefaultLineMapper<UserEntity>();
lineMapper.setLineTokenizer(new DelimitedLineTokenizer(","));
lineMapper.setFieldSetMapper(new FieldSetMapper<UserEntity>() {
@Override
public UserEntity mapFieldSet(FieldSet fieldSet) throws BindException {
UserEntity user = new UserEntity();
try {
user.setUsername(fieldSet.readString(0));
user.setAge(fieldSet.readInt(1));
user.setSex(fieldSet.readChar(2));
user.setBirthday(DateUtil.parseDate(fieldSet.readString(3)));
} catch (Exception e) {
logger.error("解析异常:"+e.getMessage());
}
return user;
}
});
fileRead.setLineMapper(lineMapper);
return fileRead;
}
}
3、proccesser类
package com.feeling.batch.proccess;
import org.springframework.batch.item.ItemProcessor;
import org.springframework.stereotype.Component;
import com.feeling.batch.bean.UserEntity;
@Component
public class BatchItemProcessor implements ItemProcessor<UserEntity, UserEntity> {
@Override
public UserEntity process(UserEntity user) throws Exception {
// TODO Auto-generated method stub
return user;
}
}
4、writer类
5、application.properties
spring.datasource.type=com.alibaba.druid.pool.DruidDataSource
spring.datasource.url=jdbc:oracle:thin:@127.0.0.1:1521:orcl
spring.datasource.driver-class-name=oracle.jdbc.driver.OracleDriver
spring.datasource.username=admin
spring.datasource.password=admin
#启动时不启动job
spring.batch.job.enabled=false
#初始化批量
spring.batch.initializer.enabled=true
6、springboot方式启动类
package com.feeling.batch;
import javax.sql.DataSource;
import org.mybatis.spring.annotation.MapperScan;
import org.springframework.batch.core.configuration.annotation.EnableBatchProcessing;
import org.springframework.batch.core.repository.JobRepository;
import org.springframework.batch.core.repository.support.JobRepositoryFactoryBean;
import org.springframework.boot.SpringApplication;
import org.springframework.boot.autoconfigure.EnableAutoConfiguration;
import org.springframework.context.annotation.Bean;
import org.springframework.context.annotation.ComponentScan;
import org.springframework.context.annotation.Configuration;
import org.springframework.scheduling.annotation.EnableScheduling;
import org.springframework.transaction.PlatformTransactionManager;
@Configuration
@ComponentScan(basePackages = { "com.feeling.batch.*" }) // 将该包下的文件纳入容器中
@EnableAutoConfiguration
@EnableBatchProcessing//springbatch
@EnableScheduling//定时器
@MapperScan(basePackages = { "com.feeling.batch.mapper" })//mybatis的Mapper层扫描
public class SpringbatchApplication {
public static void main(String[] args) {
SpringApplication.run(SpringbatchApplication.class, args);
}
/**
* JobRepository是上述所有定型的持久机制。它提供了CRUD操作JobLauncher,Job以及 Step实现。
* 当 Job第一次启动,一个 JobExecution被从库中获得,和执行过程中StepExecution和 JobExecution实现方式是通过将它们传递到存储库坚持:
* @param dataSource
* @param transactionManager
* @return
*/
@Bean
public JobRepository jobRepositoryFactoryBean(DataSource dataSource,PlatformTransactionManager transactionManager){
JobRepositoryFactoryBean jobRepositoryFactoryBean = new JobRepositoryFactoryBean();
jobRepositoryFactoryBean.setTransactionManager(transactionManager);
jobRepositoryFactoryBean.setDataSource(dataSource);
jobRepositoryFactoryBean.setIsolationLevelForCreate("ISOLATION_READ_COMMITTED");
try {
jobRepositoryFactoryBean.afterPropertiesSet();
return jobRepositoryFactoryBean.getObject();
} catch (Exception e) {
//logger.error("创建jobRepositoryFactoryBean异常:{}",e.getMessage());
}
return null;
}
}
7、springBatch监听,可以对每次批量任务进行统计
package com.feeling.batch.listener;
import org.slf4j.Logger;
import org.slf4j.LoggerFactory;
import org.springframework.batch.core.JobExecution;
import org.springframework.batch.core.JobExecutionListener;
import org.springframework.stereotype.Component;
@Component
public class BatchJobListener implements JobExecutionListener {
private static final Logger log = LoggerFactory.getLogger(BatchJobListener.class);
public void afterJob(JobExecution jobExecution) {
log.info("任务处理结束");
}
public void beforeJob(JobExecution jobExecution) {
log.info("任务处理开始");
}
}
8、springBatch的异常处理类
package com.feeling.batch.exception;
import org.slf4j.Logger;
import org.slf4j.LoggerFactory;
import org.springframework.batch.core.JobInterruptedException;
import org.springframework.batch.repeat.RepeatContext;
import org.springframework.batch.repeat.exception.DefaultExceptionHandler;
import org.springframework.stereotype.Component;
@Component
public class BatchStepExceptionHandler extends DefaultExceptionHandler {
private static final Logger logger = LoggerFactory.getLogger(BatchStepExceptionHandler.class);
@Override
public void handleException(RepeatContext context, Throwable throwable) throws Throwable {
logger.error("Step运行时异常:"+throwable.getMessage());
throw new JobInterruptedException("Step运行时异常:"+throwable.getMessage());
}
}
9、pom.xml
springbatch,数据库mybatis,密码加密,spring类型,jdk,tomcat,定时器等jar包的引入
<project xmlns="http://maven.apache.org/POM/4.0.0" xmlns:xsi="http://www.w3.org/2001/XMLSchema-instance"
xsi:schemaLocation="http://maven.apache.org/POM/4.0.0 http://maven.apache.org/xsd/maven-4.0.0.xsd"> <modelVersion>4.0.0</modelVersion>
<groupId>com.feeling.batch</groupId>
<artifactId>springbatchdemo</artifactId>
<version>0.0.1-SNAPSHOT</version>
<properties>
<project.build.sourceEncoding>UTF-8</project.build.sourceEncoding>
<spring.version>4.3.9.RELEASE</spring.version>
</properties>
<!-- springboot必须的jar包 -->
<parent>
<groupId>org.springframework.boot</groupId>
<artifactId>spring-boot-starter-parent</artifactId>
<version>1.4.5.RELEASE</version>
<relativePath /> <!-- lookup parent from repository -->
</parent>
<dependencies>
<!-- 阿里巴巴密码加密使用的jar包 -->
<dependency>
<groupId>com.alibaba</groupId>
<artifactId>druid-spring-boot-starter</artifactId>
<version>1.1.6</version>
</dependency>
<!-- springboot必须的jar包 -->
<dependency>
<groupId>org.springframework.boot</groupId>
<artifactId>spring-boot-starter-test</artifactId>
<scope>test</scope>
</dependency>
<!-- 连接数据库的启动类 -->
<dependency>
<groupId>com.feeling</groupId>
<artifactId>oracle.ojdbc</artifactId>
<version>11.2.0</version>
</dependency>
<!-- springboot web 加载的jar包 -->
<dependency>
<groupId>org.springframework.boot</groupId>
<artifactId>spring-boot-starter-web</artifactId>
</dependency>
<!-- springbootMybatis注解依赖的jar包 -->
<dependency>
<groupId>org.mybatis.spring.boot</groupId>
<artifactId>mybatis-spring-boot-starter</artifactId>
<version>1.1.1</version>
</dependency>
<!--在基础IOC功能上提供扩展服务,此外还提供许多企业级服务的支持,有邮件服务、任务调度、JNDI定位,EJB集成、远程访问、缓存以及多种视图层框架的支持。 -->
<dependency>
<groupId>org.springframework</groupId>
<artifactId>spring-context</artifactId>
</dependency>
<!--Spring的核心工具包 -->
<dependency>
<groupId>org.springframework</groupId>
<artifactId>spring-core</artifactId>
</dependency>
<!--Spring IOC的基础实现,包含访问配置文件、创建和管理bean等。 -->
<dependency>
<groupId>org.springframework</groupId>
<artifactId>spring-beans</artifactId>
</dependency>
<!-- 为JDBC、Hibernate、JDO、JPA等提供的一致的声明式和编程式事务管理。 -->
<dependency>
<groupId>org.springframework</groupId>
<artifactId>spring-tx</artifactId>
</dependency>
<!-- Spring context的扩展支持,用于MVC方面 -->
<dependency>
<groupId>org.springframework</groupId>
<artifactId>spring-context-support</artifactId>
</dependency>
<!-- 包含Web应用开发时,用到Spring框架时所需的核心类,包括自动载入WebApplicationContext特性的类、Struts与JSF集成类、文件上传的支持类、Filter类和大量工具辅助类 -->
<dependency>
<groupId>org.springframework</groupId>
<artifactId>spring-webmvc</artifactId>
</dependency>
<!-- 为简化jms api的使用而做的简单封装 -->
<dependency>
<groupId>org.springframework</groupId>
<artifactId>spring-jms</artifactId>
</dependency>
<!--整合第三方的orm实现,如hibernate,ibatis,jdo以及spring 的jpa实现 -->
<dependency>
<groupId>org.springframework</groupId>
<artifactId>spring-orm</artifactId>
</dependency>
<!--springbatch核心包 -->
<dependency>
<groupId>org.springframework.batch</groupId>
<artifactId>spring-batch-core</artifactId>
</dependency>
<!-- springbatch启动包 -->
<dependency>
<groupId>org.springframework.boot</groupId>
<artifactId>spring-boot-starter-batch</artifactId>
</dependency>
<dependency>
<groupId>org.springframework</groupId>
<artifactId>spring-core</artifactId>
</dependency>
<dependency>
<groupId>junit</groupId>
<artifactId>junit</artifactId>
<scope>test</scope>
</dependency>
</dependencies>
<build>
<plugins>
<!-- 自带jdk配置 -->
<plugin>
<groupId>org.apache.maven.plugins</groupId>
<artifactId>maven-compiler-plugin</artifactId>
<configuration>
<version>2.5.1</version>
<source>1.7</source>
<target>1.7</target>
</configuration>
</plugin>
<plugin>
<groupId>org.apache.maven.plugins</groupId>
<artifactId>maven-jar-plugin</artifactId>
<configuration>
<archive>
<addMavenDescriptor>false</addMavenDescriptor>
<manifest>
<addClasspath>true</addClasspath>
<classpathPrefix>lib/</classpathPrefix>
<mainClass>com.feeling.mc.admin.AdminAppliction</mainClass>
</manifest>
</archive>
</configuration>
</plugin>
<plugin>
<groupId>org.apache.maven.plugins</groupId>
<artifactId>maven-dependency-plugin</artifactId>
<executions>
<execution>
<id>copy</id>
<phase>package</phase>
<goals>
<goal>copy-dependencies</goal>
</goals>
<configuration>
<outputDirectory>${project.build.directory}/lib</outputDirectory>
</configuration>
</execution>
</executions>
</plugin>
</plugins>
<!-- 如果不使用resource插件的话,默认情况下,打包jar包不会把webapp下的东西打包进来 ,参考http://blog.csdn.net/u012849872/article/details/51035938 -->
<resources>
<!-- 打包时将jsp文件拷贝到META-INF目录下 -->
<resource>
<!-- 指定resources插件处理哪个目录下的资源文件 -->
<directory>src/main/webapp</directory>
<!--将项目中的src/main/webapp目录下的内容打包到了META-INF/resources路径下 -->
<targetPath>META-INF/resources</targetPath>
<includes>
<include>**/**</include>
</includes>
</resource>
<resource>
<directory>src/main/resources</directory>
<includes>
<include>**/**</include>
</includes>
<filtering>false</filtering>
</resource>
</resources>
</build>
</project>10,实体类,读取文件每行对应的实体类
package com.feeling.batch.bean;
import java.util.Date;
public class UserEntity {
private String username;
private int age;
private char sex;
private Date birthday;
public String getUsername() {
return username;
}
public void setUsername(String username) {
this.username = username;
}
public int getAge() {
return age;
}
public void setAge(int age) {
this.age = age;
}
public char getSex() {
return sex;
}
public void setSex(char sex) {
this.sex = sex;
}
public Date getBirthday() {
return birthday;
}
public void setBirthday(Date birthday) {
this.birthday = birthday;
}
public UserEntity(String username, int age, char sex, Date birthday) {
super();
this.username = username;
this.age = age;
this.sex = sex;
this.birthday = birthday;
}
public UserEntity() {
super();
// TODO Auto-generated constructor stub
}
}
spring batch批量读取txt文件demo案例下载:链接:https://pan.baidu.com/s/1gfRP0cF 密码:uxni
启动:找到SpringbatchApplication,右键--run as --java application(springboot启动方式)
目录结构:
1、springBatch的job的step方法有reader,processor,writer方法。
reader从本地文件读取内容,processor对读取的每行数据进行处理的过程,writer,将处理过的数据进行存储操作。
(1)第一种启动springbatch创建job方式
尽量不要用@Autowired(required
= false)
package com.feeling.mc.batch.control;

import java.util.HashMap;
import java.util.List;
import java.util.Map;
import org.springframework.batch.core.Job;
import org.springframework.batch.core.JobParameters;
import org.springframework.batch.core.JobParametersBuilder;
import org.springframework.batch.core.launch.JobLauncher;
import org.springframework.beans.BeansException;
import org.springframework.beans.factory.annotation.Autowired;
import org.springframework.context.ApplicationContext;
import org.springframework.context.ApplicationContextAware;
import org.springframework.scheduling.annotation.Scheduled;
import org.springframework.stereotype.Component;
import com.feeling.mc.common.utils.DateUtil;
import com.feeling.mc.db.entity.BatchManager;
import com.feeling.mc.db.mapper.messager.BatchManagerMapper;

@Component
public class DemoController implements ApplicationContextAware{
@Autowired(required = false)
JobLauncher jobLauncher;

private ApplicationContext applicationContext;

public JobParameters jobParameters;

@Autowired
private BatchManagerMapper managerMapper;

//@Scheduled(cron = "0 0 8 * * ?") // 早上8点
// 每分钟跑一次
@Scheduled(cron = "0 0/1 * * * ?")
public void imp() throws Exception {
Job job = (Job)this.applicationContext.getBean("ReaderBatchMessage");
jobParameters = new JobParametersBuilder().addLong("time", System.currentTimeMillis()).toJobParameters();
jobLauncher.run(job, jobParameters);
}

@Override
public void setApplicationContext(ApplicationContext applicationContext) throws BeansException {
this.applicationContext = applicationContext;
}
}
(2)第二种启动springbatch创建job方式
在SpringbatchApplication加上@EnableScheduling//定时器
package com.feeling.batch.controller;
import javax.annotation.Resource;
import org.springframework.batch.core.Job;
import org.springframework.batch.core.JobExecution;
import org.springframework.batch.core.JobParametersBuilder;
import org.springframework.batch.core.launch.JobLauncher;
import org.springframework.batch.core.launch.JobOperator;
import org.springframework.beans.factory.annotation.Autowired;
import org.springframework.scheduling.annotation.Scheduled;
import org.springframework.stereotype.Component;
@Component
public class BatchController {
@Autowired
JobLauncher jobLauncher;
@Autowired
JobOperator jobOperator;
@Resource(name="messagebatchinsertjob")
private Job batchJob;
/**
* 每天读取txt文件,
* 并且把txt文件数据处理后保存到新的txt中
* 代表一个简单的界面来启动Job一个给定的一组 JobParameters
* JobLauncher.run(Job job, JobParameters jobParameters)
* @throws Exception
*/
@Scheduled(cron = "0 0/1 * * * ?")
public void job3() throws Exception {
JobExecution run = jobLauncher.run(batchJob, newJobParametersBuilder().addLong("time",System.currentTimeMillis()).toJobParameters());
run.getId();
}
}
2、创建job的所在类
package com.feeling.batch.job;
import java.io.File;
import org.slf4j.Logger;
import org.slf4j.LoggerFactory;
import org.springframework.batch.core.Job;
import org.springframework.batch.core.Step;
import org.springframework.batch.core.configuration.annotation.JobBuilderFactory;
import org.springframework.batch.core.configuration.annotation.StepBuilderFactory;
import org.springframework.batch.item.file.FlatFileItemReader;
import org.springframework.batch.item.file.mapping.DefaultLineMapper;
import org.springframework.batch.item.file.mapping.FieldSetMapper;
import org.springframework.batch.item.file.transform.DelimitedLineTokenizer;
import org.springframework.batch.item.file.transform.FieldSet;
import org.springframework.beans.factory.annotation.Autowired;
import org.springframework.context.annotation.Bean;
import org.springframework.context.annotation.Configuration;
import org.springframework.core.io.FileSystemResource;
import org.springframework.core.task.SimpleAsyncTaskExecutor;
import org.springframework.transaction.PlatformTransactionManager;
import org.springframework.validation.BindException;
import com.feeling.batch.bean.UserEntity;
import com.feeling.batch.exception.BatchStepExceptionHandler;
import com.feeling.batch.listener.BatchJobListener;
import com.feeling.batch.proccess.BatchItemProcessor;
import com.feeling.batch.util.DateUtil;
import com.feeling.batch.writer.BatchItemWriter;
@Configuration
public class BatchJob {
private static final Logger logger = LoggerFactory.getLogger(BatchJob.class);
@Autowired
public JobBuilderFactory jobBuilderFactory;
@Autowired
public StepBuilderFactory stepBuilderFactory;
@Autowired
public PlatformTransactionManager platformTransactionManager;
@Autowired
public BatchStepExceptionHandler exceptionHandler;
@Autowired
public BatchItemWriter batchitemwriter;
@Autowired
public BatchItemProcessor batchitemprocessor;
/**
* 构建job
* 创建bean,然后用@Resource(name="batchJob")创建对象
* 1、当第二天重启前一天的任务时!!!文件日期有异
* @param listener
* @return
*/
@Bean("messagebatchinsertjob")
public Job MessageBatchInsertJob(BatchJobListener listener) {
return jobBuilderFactory.get("MessageBatchInsertJob").listener(listener).flow(MessageBatchInsertStep()).end()
.build();
}
/**
* 声明发送到MQ step
* 1、Skip:如果处理过程中某条记录是错误的,如CSV文件中格式不正确的行,那么可以直接跳过该对象,继续处理下一个。
* 2、在chunk元素上定义skip-limit属性,告诉Spring最多允许跳过多少个items,超过则job失败
* 3、Restart:如果将job状态存储在数据库中,而一旦它执行失败, 那么就可以选择重启job实例, 并继续上次的执行位置。
* 4、最后,对于执行失败的job作业,我们可以重新启动,并让他们从上次断开的地方继续执行。要达到这一点,只需要使用和上次 一模一样的参数来启动job,
* 则Spring Batch会自动从数据库中找到这个实例然后继续执行。你也可以拒绝重启,或者参数控 制某个 job中的一个tep可以重启的次数(一般来说多次重试都失败了,那我们可能需要放弃。)
*
* @return
*/
@Bean
public Step MessageBatchInsertStep() {
logger.info("MessageBatchInsertStep");
return stepBuilderFactory.get("MessageBatchInsertStep").<UserEntity, UserEntity>chunk(100).reader(fileRead()).processor(batchitemprocessor)
.writer(batchitemwriter).faultTolerant().skip(Exception.class).skipLimit(100)
.taskExecutor(new SimpleAsyncTaskExecutor()).startLimit(10).allowStartIfComplete(true)
.exceptionHandler(exceptionHandler) // 设置并发方式执行exceptionHandler,异常时打印日志并抛出异常
.throttleLimit(10) // 并发任务数为 10,默认为4
.transactionManager(platformTransactionManager).build();
}
public FlatFileItemReader<UserEntity> fileRead() {
System.out.println("fileRead()方法开始");
FlatFileItemReader<UserEntity> fileRead = new FlatFileItemReader<>();
fileRead.setEncoding("UTF-8");
fileRead.setResource(new FileSystemResource(new File("E:\\user.txt")));
//fileRead.setLinesToSkip(2);跳过开头多少行
DefaultLineMapper<UserEntity> lineMapper = new DefaultLineMapper<UserEntity>();
lineMapper.setLineTokenizer(new DelimitedLineTokenizer(","));
lineMapper.setFieldSetMapper(new FieldSetMapper<UserEntity>() {
@Override
public UserEntity mapFieldSet(FieldSet fieldSet) throws BindException {
UserEntity user = new UserEntity();
try {
user.setUsername(fieldSet.readString(0));
user.setAge(fieldSet.readInt(1));
user.setSex(fieldSet.readChar(2));
user.setBirthday(DateUtil.parseDate(fieldSet.readString(3)));
} catch (Exception e) {
logger.error("解析异常:"+e.getMessage());
}
return user;
}
});
fileRead.setLineMapper(lineMapper);
return fileRead;
}
}
3、proccesser类
package com.feeling.batch.proccess;
import org.springframework.batch.item.ItemProcessor;
import org.springframework.stereotype.Component;
import com.feeling.batch.bean.UserEntity;
@Component
public class BatchItemProcessor implements ItemProcessor<UserEntity, UserEntity> {
@Override
public UserEntity process(UserEntity user) throws Exception {
// TODO Auto-generated method stub
return user;
}
}
4、writer类
package com.feeling.mc.batch.writer;

import java.util.List;

import org.springframework.batch.core.configuration.annotation.StepScope;
import org.springframework.batch.item.ItemWriter;
import org.springframework.beans.factory.annotation.Autowired;
import org.springframework.stereotype.Component;

import com.feeling.mc.batch.service.McMessageService;
import com.feeling.mc.core.module.McMessage;

@Component
@StepScope
public class ReaderMessageBatchWriter implements ItemWriter<McMessage>{

@Autowired
private McMessageService mcMessageService;
@Override
public void write(List<? extends McMessage> items) throws Exception {
try {
for (McMessage msg : items) {//在此可以进行对数据存储到数据库操作
mcMessageService.addMessageBatch(msg);
}

} catch (Exception e) {

}

}

}
5、application.properties
spring.datasource.type=com.alibaba.druid.pool.DruidDataSource
spring.datasource.url=jdbc:oracle:thin:@127.0.0.1:1521:orcl
spring.datasource.driver-class-name=oracle.jdbc.driver.OracleDriver
spring.datasource.username=admin
spring.datasource.password=admin
#启动时不启动job
spring.batch.job.enabled=false
#初始化批量
spring.batch.initializer.enabled=true
6、springboot方式启动类
package com.feeling.batch;
import javax.sql.DataSource;
import org.mybatis.spring.annotation.MapperScan;
import org.springframework.batch.core.configuration.annotation.EnableBatchProcessing;
import org.springframework.batch.core.repository.JobRepository;
import org.springframework.batch.core.repository.support.JobRepositoryFactoryBean;
import org.springframework.boot.SpringApplication;
import org.springframework.boot.autoconfigure.EnableAutoConfiguration;
import org.springframework.context.annotation.Bean;
import org.springframework.context.annotation.ComponentScan;
import org.springframework.context.annotation.Configuration;
import org.springframework.scheduling.annotation.EnableScheduling;
import org.springframework.transaction.PlatformTransactionManager;
@Configuration
@ComponentScan(basePackages = { "com.feeling.batch.*" }) // 将该包下的文件纳入容器中
@EnableAutoConfiguration
@EnableBatchProcessing//springbatch
@EnableScheduling//定时器
@MapperScan(basePackages = { "com.feeling.batch.mapper" })//mybatis的Mapper层扫描
public class SpringbatchApplication {
public static void main(String[] args) {
SpringApplication.run(SpringbatchApplication.class, args);
}
/**
* JobRepository是上述所有定型的持久机制。它提供了CRUD操作JobLauncher,Job以及 Step实现。
* 当 Job第一次启动,一个 JobExecution被从库中获得,和执行过程中StepExecution和 JobExecution实现方式是通过将它们传递到存储库坚持:
* @param dataSource
* @param transactionManager
* @return
*/
@Bean
public JobRepository jobRepositoryFactoryBean(DataSource dataSource,PlatformTransactionManager transactionManager){
JobRepositoryFactoryBean jobRepositoryFactoryBean = new JobRepositoryFactoryBean();
jobRepositoryFactoryBean.setTransactionManager(transactionManager);
jobRepositoryFactoryBean.setDataSource(dataSource);
jobRepositoryFactoryBean.setIsolationLevelForCreate("ISOLATION_READ_COMMITTED");
try {
jobRepositoryFactoryBean.afterPropertiesSet();
return jobRepositoryFactoryBean.getObject();
} catch (Exception e) {
//logger.error("创建jobRepositoryFactoryBean异常:{}",e.getMessage());
}
return null;
}
}
7、springBatch监听,可以对每次批量任务进行统计
package com.feeling.batch.listener;
import org.slf4j.Logger;
import org.slf4j.LoggerFactory;
import org.springframework.batch.core.JobExecution;
import org.springframework.batch.core.JobExecutionListener;
import org.springframework.stereotype.Component;
@Component
public class BatchJobListener implements JobExecutionListener {
private static final Logger log = LoggerFactory.getLogger(BatchJobListener.class);
public void afterJob(JobExecution jobExecution) {
log.info("任务处理结束");
}
public void beforeJob(JobExecution jobExecution) {
log.info("任务处理开始");
}
}
8、springBatch的异常处理类
package com.feeling.batch.exception;
import org.slf4j.Logger;
import org.slf4j.LoggerFactory;
import org.springframework.batch.core.JobInterruptedException;
import org.springframework.batch.repeat.RepeatContext;
import org.springframework.batch.repeat.exception.DefaultExceptionHandler;
import org.springframework.stereotype.Component;
@Component
public class BatchStepExceptionHandler extends DefaultExceptionHandler {
private static final Logger logger = LoggerFactory.getLogger(BatchStepExceptionHandler.class);
@Override
public void handleException(RepeatContext context, Throwable throwable) throws Throwable {
logger.error("Step运行时异常:"+throwable.getMessage());
throw new JobInterruptedException("Step运行时异常:"+throwable.getMessage());
}
}
9、pom.xml
springbatch,数据库mybatis,密码加密,spring类型,jdk,tomcat,定时器等jar包的引入
<project xmlns="http://maven.apache.org/POM/4.0.0" xmlns:xsi="http://www.w3.org/2001/XMLSchema-instance"
xsi:schemaLocation="http://maven.apache.org/POM/4.0.0 http://maven.apache.org/xsd/maven-4.0.0.xsd"> <modelVersion>4.0.0</modelVersion>
<groupId>com.feeling.batch</groupId>
<artifactId>springbatchdemo</artifactId>
<version>0.0.1-SNAPSHOT</version>
<properties>
<project.build.sourceEncoding>UTF-8</project.build.sourceEncoding>
<spring.version>4.3.9.RELEASE</spring.version>
</properties>
<!-- springboot必须的jar包 -->
<parent>
<groupId>org.springframework.boot</groupId>
<artifactId>spring-boot-starter-parent</artifactId>
<version>1.4.5.RELEASE</version>
<relativePath /> <!-- lookup parent from repository -->
</parent>
<dependencies>
<!-- 阿里巴巴密码加密使用的jar包 -->
<dependency>
<groupId>com.alibaba</groupId>
<artifactId>druid-spring-boot-starter</artifactId>
<version>1.1.6</version>
</dependency>
<!-- springboot必须的jar包 -->
<dependency>
<groupId>org.springframework.boot</groupId>
<artifactId>spring-boot-starter-test</artifactId>
<scope>test</scope>
</dependency>
<!-- 连接数据库的启动类 -->
<dependency>
<groupId>com.feeling</groupId>
<artifactId>oracle.ojdbc</artifactId>
<version>11.2.0</version>
</dependency>
<!-- springboot web 加载的jar包 -->
<dependency>
<groupId>org.springframework.boot</groupId>
<artifactId>spring-boot-starter-web</artifactId>
</dependency>
<!-- springbootMybatis注解依赖的jar包 -->
<dependency>
<groupId>org.mybatis.spring.boot</groupId>
<artifactId>mybatis-spring-boot-starter</artifactId>
<version>1.1.1</version>
</dependency>
<!--在基础IOC功能上提供扩展服务,此外还提供许多企业级服务的支持,有邮件服务、任务调度、JNDI定位,EJB集成、远程访问、缓存以及多种视图层框架的支持。 -->
<dependency>
<groupId>org.springframework</groupId>
<artifactId>spring-context</artifactId>
</dependency>
<!--Spring的核心工具包 -->
<dependency>
<groupId>org.springframework</groupId>
<artifactId>spring-core</artifactId>
</dependency>
<!--Spring IOC的基础实现,包含访问配置文件、创建和管理bean等。 -->
<dependency>
<groupId>org.springframework</groupId>
<artifactId>spring-beans</artifactId>
</dependency>
<!-- 为JDBC、Hibernate、JDO、JPA等提供的一致的声明式和编程式事务管理。 -->
<dependency>
<groupId>org.springframework</groupId>
<artifactId>spring-tx</artifactId>
</dependency>
<!-- Spring context的扩展支持,用于MVC方面 -->
<dependency>
<groupId>org.springframework</groupId>
<artifactId>spring-context-support</artifactId>
</dependency>
<!-- 包含Web应用开发时,用到Spring框架时所需的核心类,包括自动载入WebApplicationContext特性的类、Struts与JSF集成类、文件上传的支持类、Filter类和大量工具辅助类 -->
<dependency>
<groupId>org.springframework</groupId>
<artifactId>spring-webmvc</artifactId>
</dependency>
<!-- 为简化jms api的使用而做的简单封装 -->
<dependency>
<groupId>org.springframework</groupId>
<artifactId>spring-jms</artifactId>
</dependency>
<!--整合第三方的orm实现,如hibernate,ibatis,jdo以及spring 的jpa实现 -->
<dependency>
<groupId>org.springframework</groupId>
<artifactId>spring-orm</artifactId>
</dependency>
<!--springbatch核心包 -->
<dependency>
<groupId>org.springframework.batch</groupId>
<artifactId>spring-batch-core</artifactId>
</dependency>
<!-- springbatch启动包 -->
<dependency>
<groupId>org.springframework.boot</groupId>
<artifactId>spring-boot-starter-batch</artifactId>
</dependency>
<dependency>
<groupId>org.springframework</groupId>
<artifactId>spring-core</artifactId>
</dependency>
<dependency>
<groupId>junit</groupId>
<artifactId>junit</artifactId>
<scope>test</scope>
</dependency>
</dependencies>
<build>
<plugins>
<!-- 自带jdk配置 -->
<plugin>
<groupId>org.apache.maven.plugins</groupId>
<artifactId>maven-compiler-plugin</artifactId>
<configuration>
<version>2.5.1</version>
<source>1.7</source>
<target>1.7</target>
</configuration>
</plugin>
<plugin>
<groupId>org.apache.maven.plugins</groupId>
<artifactId>maven-jar-plugin</artifactId>
<configuration>
<archive>
<addMavenDescriptor>false</addMavenDescriptor>
<manifest>
<addClasspath>true</addClasspath>
<classpathPrefix>lib/</classpathPrefix>
<mainClass>com.feeling.mc.admin.AdminAppliction</mainClass>
</manifest>
</archive>
</configuration>
</plugin>
<plugin>
<groupId>org.apache.maven.plugins</groupId>
<artifactId>maven-dependency-plugin</artifactId>
<executions>
<execution>
<id>copy</id>
<phase>package</phase>
<goals>
<goal>copy-dependencies</goal>
</goals>
<configuration>
<outputDirectory>${project.build.directory}/lib</outputDirectory>
</configuration>
</execution>
</executions>
</plugin>
</plugins>
<!-- 如果不使用resource插件的话,默认情况下,打包jar包不会把webapp下的东西打包进来 ,参考http://blog.csdn.net/u012849872/article/details/51035938 -->
<resources>
<!-- 打包时将jsp文件拷贝到META-INF目录下 -->
<resource>
<!-- 指定resources插件处理哪个目录下的资源文件 -->
<directory>src/main/webapp</directory>
<!--将项目中的src/main/webapp目录下的内容打包到了META-INF/resources路径下 -->
<targetPath>META-INF/resources</targetPath>
<includes>
<include>**/**</include>
</includes>
</resource>
<resource>
<directory>src/main/resources</directory>
<includes>
<include>**/**</include>
</includes>
<filtering>false</filtering>
</resource>
</resources>
</build>
</project>10,实体类,读取文件每行对应的实体类
package com.feeling.batch.bean;
import java.util.Date;
public class UserEntity {
private String username;
private int age;
private char sex;
private Date birthday;
public String getUsername() {
return username;
}
public void setUsername(String username) {
this.username = username;
}
public int getAge() {
return age;
}
public void setAge(int age) {
this.age = age;
}
public char getSex() {
return sex;
}
public void setSex(char sex) {
this.sex = sex;
}
public Date getBirthday() {
return birthday;
}
public void setBirthday(Date birthday) {
this.birthday = birthday;
}
public UserEntity(String username, int age, char sex, Date birthday) {
super();
this.username = username;
this.age = age;
this.sex = sex;
this.birthday = birthday;
}
public UserEntity() {
super();
// TODO Auto-generated constructor stub
}
}

相关文章推荐
- springbatch和定时器读取txt文件批量导入数据库
- sql 读取本地txt文件批量插入数据库
- 使用hibernate读取txt文件导入数据库
- 使用hibernate读取txt文件导入数据库
- c#读取txt文件并导入到数据库
- 用java实现从txt文本文件批量导入数据至数据库
- Java连接数据库+连续读取文件夹下txt文件+读取出txt文件后字符串简单分割连接处理+导入jar包
- hibernate 读取txt文件导入数据库
- 基于PHP读取TXT文件向数据库导入海量数据的方法
- 基于PHP读取TXT文件向数据库导入海量数据的方法
- SQL 数据的导入导出,对远程(MSsql,OracleAccess,)数据库的操作以及读取Excel,txt文件中的数据
- [导入]数据库中存储与读取文件
- txt文件分割导入数据库
- java读取本地txt文件并插入数据库
- PHP读取TXT文件写入数据库
- 数据库导入txt文件(不含sql语句)
- node.js 读取csv文件数据处理导入mongodb 数据库
- 使用Greendao进行批量添加数据(Android Studio读取assets下的数据库文件)
- Python从数据库读取大量数据批量写入文件
- 一个简单的从txt文件中读取数据插入数据库