vue 虚拟dom实现原理
2017-12-14 10:03
821 查看
Vue版本: 2.3.2
在
首先,我们还是来看下
实际上是调用了src/core/instance/lifecycle.js中的
注意上面的代码中定义了一个
实例化一个
完成视图的更新工作事实上就是调用了
在这个方法当中最为关键的就是
接下来就让我们看下
在对
每一个
比如,我定义了一个
最后渲染出的实际的
让我们再回到
更新真实
接下来:
这其中的
首先进行文本节点的判断,若
在
当
若
若
若
这里着重分析下
在开始遍历
首先从第一个节点开始比较,不管是

第二轮的

第三轮的

第四轮的

第五轮的
遍历的过程结束后,
在
如果不存在这个
如果存在这个
通过以上分析,给
带有
注意在第一轮的


转自 https://github.com/DDFE/DDFE-blog/issues/18
virtual-dom(后文简称
vdom)的概念大规模的推广还是得益于
react出现,
virtual-dom也是
react这个框架的非常重要的特性之一。相比于频繁的手动去操作
dom而带来性能问题,
vdom很好的将
dom做了一层映射关系,进而将在我们本需要直接进行
dom的一系列操作,映射到了操作
vdom,而
vdom上定义了关于真实
dom的一些关键的信息,
vdom完全是用
js去实现,和宿主浏览器没有任何联系,此外得益于
js的执行速度,将原本需要在真实
dom进行的
创建节点,
删除节点,
添加节点等一系列复杂的
dom操作全部放到
vdom中进行,这样就通过操作
vdom来提高直接操作的
dom的效率和性能。
Vue在
2.0版本也引入了
vdom。其
vdom算法是基于snabbdom算法所做的修改。
在
Vue的整个应用生命周期当中,每次需要更新视图的时候便会使用
vdom。那么在
Vue当中,
vdom是如何和
Vue这个框架融合在一起工作的呢?以及大家常常提到的
vdom的
diff算法又是怎样的呢?接下来就通过这篇文章简单的向大家介绍下
Vue当中的
vdom是如何去工作的。
首先,我们还是来看下
Vue生命周期当中初始化的最后阶段:将
vm实例挂载到
dom上,源码在src/core/instance/init.js
Vue.prototype._init = function () {
...
vm.$mount(vm.$options.el)
...
}实际上是调用了src/core/instance/lifecycle.js中的
mountComponent方法,
mountComponent函数的定义是:
export function mountComponent (
vm: Component,
el: ?Element,
hydrating?: boolean
): Component {
// vm.$el为真实的node
vm.$el = el
// 如果vm上没有挂载render函数
if (!vm.$options.render) {
// 空节点
vm.$options.render = createEmptyVNode
}
// 钩子函数
callHook(vm, 'beforeMount')

let updateComponent
/* istanbul ignore if */
if (process.env.NODE_ENV !== 'production' && config.performance && mark) {
...
} else {
// updateComponent为监听函数, new Watcher(vm, updateComponent, noop)
updateComponent = () => {
// Vue.prototype._render 渲染函数
// vm._render() 返回一个VNode
// 更新dom
// vm._render()调用render函数,会返回一个VNode,在生成VNode的过程中,会动态计算getter,同时推入到dep里面
vm._update(vm._render(), hydrating)
}
}

// 新建一个_watcher对象
// vm实例上挂载的_watcher主要是为了更新DOM
// vm/expression/cb
vm._watcher = new Watcher(vm, updateComponent, noop)
hydrating = false

// manually mounted instance, call mounted on self
// mounted is called for render-created child components in its inserted hook
if (vm.$vnode == null) {
vm._isMounted = true
callHook(vm, 'mounted')
}
return vm
}
注意上面的代码中定义了一个
updateComponent函数,这个函数执行的时候内部会调用
vm._update(vm._render(),
hyddrating)
方法,其中
vm._render方法会返回一个新的
vnode,(关于
vm_render是如何生成
vnode的建议大家看看
vue的关于
compile阶段的代码),然后传入
vm._update方法后,就用这个新的
vnode和老的
vnode进行
diff,最后完成
dom的更新工作。那么
updateComponent都是在什么时候去进行调用呢?
vm._watcher = new Watcher(vm, updateComponent, noop)
实例化一个
watcher,在求值的过程中
this.value
= this.lazy ? undefined : this.get()
,会调用
this.get()方法,因此在实例化的过程当中
Dep.target会被设为这个
watcher,通过调用
vm._render()方法生成新的
Vnode并进行
diff的过程中完成了模板当中变量依赖收集工作。即这个
watcher被添加到了在模板当中所绑定变量的依赖当中。一旦
model中的响应式的数据发生了变化,这些响应式的数据所维护的
dep数组便会调用
dep.notify()方法完成所有依赖遍历执行的工作,这里面就包括了视图的更新即
updateComponent方法,它是在
mountComponent中的定义的。
updateComponent方法的定义是:
updateComponent = () => {
vm._update(vm._render(), hydrating)
}
完成视图的更新工作事实上就是调用了
vm._update方法,这个方法接收的第一个参数是刚生成的
Vnode,调用的
vm._update方法(src/core/instance/lifecycle.js)的定义是
Vue.prototype._update = function (vnode: VNode, hydrating?: boolean) {
const vm: Component = this
if (vm._isMounted) {
callHook(vm, 'beforeUpdate')
}
const prevEl = vm.$el
const prevVnode = vm._vnode
const prevActiveInstance = activeInstance
activeInstance = vm
// 新的vnode
vm._vnode = vnode
// Vue.prototype.__patch__ is injected in entry points
// based on the rendering backend used.
// 如果需要diff的prevVnode不存在,那么就用新的vnode创建一个真实dom节点
if (!prevVnode) {
// initial render
// 第一个参数为真实的node节点
vm.$el = vm.__patch__(
vm.$el, vnode, hydrating, false /* removeOnly */,
vm.$options._parentElm,
vm.$options._refElm
)
} else {
// updates
// 如果需要diff的prevVnode存在,那么首先对prevVnode和vnode进行diff,并将需要的更新的dom操作已patch的形式打到prevVnode上,并完成真实dom的更新工作
vm.$el = vm.__patch__(prevVnode, vnode)
}
activeInstance = prevActiveInstance
// update __vue__ reference
if (prevEl) {
prevEl.__vue__ = null
}
if (vm.$el) {
vm.$el.__vue__ = vm
}
// if parent is an HOC, update its $el as well
if (vm.$vnode && vm.$parent && vm.$vnode === vm.$parent._vnode) {
vm.$parent.$el = vm.$el
}
}
在这个方法当中最为关键的就是
vm.__patch__方法,这也是整个
virtaul-dom当中最为核心的方法,主要完成了
prevVnode和
vnode的
diff过程并根据需要操作的
vdom节点打
patch,最后生成新的真实
dom节点并完成视图的更新工作。
接下来就让我们看下
vm.__patch__里面到底发生了什么:
function patch (oldVnode, vnode, hydrating, removeOnly, parentElm, refElm) {
// 当oldVnode不存在时
if (isUndef(oldVnode)) {
// 创建新的节点
createElm(vnode, insertedVnodeQueue, parentElm, refElm)
} else {
const isRealElement = isDef(oldVnode.nodeType)
if (!isRealElement && sameVnode(oldVnode, vnode)) {
// patch existing root node
// 对oldVnode和vnode进行diff,并对oldVnode打patch
patchVnode(oldVnode, vnode, insertedVnodeQueue, removeOnly)
}
}
}
在对
oldVnode和
vnode类型判断中有个
sameVnode方法,这个方法决定了是否需要对
oldVnode和
vnode进行
diff及
patch的过程。
function sameVnode (a, b) {
return (
a.key === b.key &&
a.tag === b.tag &&
a.isComment === b.isComment &&
isDef(a.data) === isDef(b.data) &&
sameInputType(a, b)
)
}sameVnode会对传入的2个
vnode进行基本属性的比较,只有当基本属性相同的情况下才认为这个2个
vnode只是局部发生了更新,然后才会对这2个
vnode进行
diff,如果2个
vnode的基本属性存在不一致的情况,那么就会直接跳过
diff的过程,进而依据
vnode新建一个真实的dom,同时删除老的
dom节点。
vnode基本属性的定义可以参见源码:src/vdom/vnode.js里面对于
vnode的定义。
constructor (
tag?: string,
data?: VNodeData,         // 关于这个节点的data值,包括attrs,style,hook等
children?: ?Array<VNode>, // 子vdom节点
text?: string,        // 文本内容
elm?: Node,           // 真实的dom节点
context?: Component,  // 创建这个vdom的上下文
componentOptions?: VNodeComponentOptions
) {
this.tag = tag
this.data = data
this.children = children
this.text = text
this.elm = elm
this.ns = undefined
this.context = context
this.functionalContext = undefined
this.key = data && data.key
this.componentOptions = componentOptions
this.componentInstance = undefined
this.parent = undefined
this.raw = false
this.isStatic = false
this.isRootInsert = true
this.isComment = false
this.isCloned = false
this.isOnce = false
}

// DEPRECATED: alias for componentInstance for backwards compat.
/* istanbul ignore next */
get child (): Component | void {
return this.componentInstance
}
}
每一个
vnode都映射到一个真实的
dom节点上。其中几个比较重要的属性:
tag属性即这个
vnode的标签属性
data属性包含了最后渲染成真实
dom节点后,节点上的
class,
attribute,
style以及绑定的事件
children属性是
vnode的子节点
text属性是文本属性
elm属性为这个
vnode对应的真实
dom节点
key属性是
vnode的标记,在
diff过程中可以提高
diff的效率,后文有讲解
比如,我定义了一个
vnode,它的数据结构是:
{
tag: 'div'
data: {
id: 'app',
class: 'page-box'
},
children: [
{
tag: 'p',
text: 'this is demo'
}
]
}
最后渲染出的实际的
dom结构就是:
<div id="app" class="page-box">
<p>this is demo</p>
</div>
让我们再回到
patch函数当中,在当
oldVnode不存在的时候,这个时候是
root节点初始化的过程,因此调用了
createElm(vnode,
insertedVnodeQueue, parentElm, refElm)
方法去创建一个新的节点。而当
oldVnode是
vnode且
sameVnode(oldVnode,
vnode)
2个节点的基本属性相同,那么就进入了2个节点的
diff过程。
diff的过程主要是通过调用
patchVnode(src/core/vdom/patch.js)方法进行的:
function patchVnode(oldVnode, vnode, insertedVnodeQueue, removeOnly) {
...
}
if (isDef(data) && isPatchable(vnode)) {
// cbs保存了hooks钩子函数: 'create', 'activate', 'update', 'remove', 'destroy'
// 取出cbs保存的update钩子函数,依次调用,更新attrs/style/class/events/directives/refs等属性
for (i = 0; i < cbs.update.length; ++i) cbs.update[i](oldVnode, vnode)
if (isDef(i = data.hook) && isDef(i = i.update)) i(oldVnode, vnode)
}更新真实
dom节点的
data属性,相当于对
dom节点进行了预处理的操作
接下来:
...
const elm = vnode.elm = oldVnode.elm
const oldCh = oldVnode.children
const ch = vnode.children
// 如果vnode没有文本节点
if (isUndef(vnode.text)) {
// 如果oldVnode的children属性存在且vnode的属性也存在
if (isDef(oldCh) && isDef(ch)) {
// updateChildren,对子节点进行diff
if (oldCh !== ch) updateChildren(elm, oldCh, ch, insertedVnodeQueue, removeOnly)
} else if (isDef(ch)) {
// 如果oldVnode的text存在,那么首先清空text的内容
if (isDef(oldVnode.text)) nodeOps.setTextContent(elm, '')
// 然后将vnode的children添加进去
addVnodes(elm, null, ch, 0, ch.length - 1, insertedVnodeQueue)
} else if (isDef(oldCh)) {
// 删除elm下的oldchildren
removeVnodes(elm, oldCh, 0, oldCh.length - 1)
} else if (isDef(oldVnode.text)) {
// oldVnode有子节点,而vnode没有,那么就清空这个节点
nodeOps.setTextContent(elm, '')
}
} else if (oldVnode.text !== vnode.text) {
// 如果oldVnode和vnode文本属性不同,那么直接更新真是dom节点的文本元素
nodeOps.setTextContent(elm, vnode.text)
}
这其中的
diff过程中又分了好几种情况,
oldCh为
oldVnode的子节点,
ch为
Vnode的子节点:
首先进行文本节点的判断,若
oldVnode.text !== vnode.text,那么就会直接进行文本节点的替换;
在
vnode没有文本节点的情况下,进入子节点的
diff;
当
oldCh和
ch都存在且不相同的情况下,调用
updateChildren对子节点进行
diff;
若
oldCh不存在,
ch存在,首先清空
oldVnode的文本节点,同时调用
addVnodes方法将
ch添加到
elm真实
dom节点当中;
若
oldCh存在,
ch不存在,则删除
elm真实节点下的
oldCh子节点;
若
oldVnode有文本节点,而
vnode没有,那么就清空这个文本节点。
这里着重分析下
updateChildren(src/core/vdom/patch.js)方法,它也是整个
diff过程中最重要的环节:
function updateChildren (parentElm, oldCh, newCh, insertedVnodeQueue, removeOnly) {
// 为oldCh和newCh分别建立索引,为之后遍历的依据
let oldStartIdx = 0
let newStartIdx = 0
let oldEndIdx = oldCh.length - 1
let oldStartVnode = oldCh[0]
let oldEndVnode = oldCh[oldEndIdx]
let newEndIdx = newCh.length - 1
let newStartVnode = newCh[0]
let newEndVnode = newCh[newEndIdx]
let oldKeyToIdx, idxInOld, elmToMove, refElm

// 直到oldCh或者newCh被遍历完后跳出循环
while (oldStartIdx <= oldEndIdx && newStartIdx <= newEndIdx) {
if (isUndef(oldStartVnode)) {
oldStartVnode = oldCh[++oldStartIdx] // Vnode has been moved left
} else if (isUndef(oldEndVnode)) {
oldEndVnode = oldCh[--oldEndIdx]
} else if (sameVnode(oldStartVnode, newStartVnode)) {
patchVnode(oldStartVnode, newStartVnode, insertedVnodeQueue)
oldStartVnode = oldCh[++oldStartIdx]
newStartVnode = newCh[++newStartIdx]
} else if (sameVnode(oldEndVnode, newEndVnode)) {
patchVnode(oldEndVnode, newEndVnode, insertedVnodeQueue)
oldEndVnode = oldCh[--oldEndIdx]
newEndVnode = newCh[--newEndIdx]
} else if (sameVnode(oldStartVnode, newEndVnode)) { // Vnode moved right
patchVnode(oldStartVnode, newEndVnode, insertedVnodeQueue)
canMove && nodeOps.insertBefore(parentElm, oldStartVnode.elm, nodeOps.nextSibling(oldEndVnode.elm))
oldStartVnode = oldCh[++oldStartIdx]
newEndVnode = newCh[--newEndIdx]
} else if (sameVnode(oldEndVnode, newStartVnode)) { // Vnode moved left
patchVnode(oldEndVnode, newStartVnode, insertedVnodeQueue)
// 插入到老的开始节点的前面
canMove && nodeOps.insertBefore(parentElm, oldEndVnode.elm, oldStartVnode.elm)
oldEndVnode = oldCh[--oldEndIdx]
newStartVnode = newCh[++newStartIdx]
} else {
// 如果以上条件都不满足,那么这个时候开始比较key值,首先建立key和index索引的对应关系
if (isUndef(oldKeyToIdx)) oldKeyToIdx = createKeyToOldIdx(oldCh, oldStartIdx, oldEndIdx)
idxInOld = isDef(newStartVnode.key) ? oldKeyToIdx[newStartVnode.key] : null
// 如果idxInOld不存在
// 1. newStartVnode上存在这个key,但是oldKeyToIdx中不存在
// 2. newStartVnode上并没有设置key属性
if (isUndef(idxInOld)) { // New element
// 创建新的dom节点
// 插入到oldStartVnode.elm前面
// 参见createElm方法
createElm(newStartVnode, insertedVnodeQueue, parentElm, oldStartVnode.elm)
newStartVnode = newCh[++newStartIdx]
} else {
elmToMove = oldCh[idxInOld]
/* istanbul ignore if */
if (process.env.NODE_ENV !== 'production' && !elmToMove) {
warn(
'It seems there are duplicate keys that is causing an update error. ' +
'Make sure each v-for item has a unique key.'
)

// 将找到的key一致的oldVnode再和newStartVnode进行diff
if (sameVnode(elmToMove, newStartVnode)) {
patchVnode(elmToMove, newStartVnode, insertedVnodeQueue)
oldCh[idxInOld] = undefined
// 移动node节点
canMove && nodeOps.insertBefore(parentElm, newStartVnode.elm, oldStartVnode.elm)
newStartVnode = newCh[++newStartIdx]
} else {
// same key but different element. treat as new element
// 创建新的dom节点
createElm(newStartVnode, insertedVnodeQueue, parentElm, oldStartVnode.elm)
newStartVnode = newCh[++newStartIdx]
}
}
}
}
// 如果最后遍历的oldStartIdx大于oldEndIdx的话
if (oldStartIdx > oldEndIdx) {        // 如果是老的vdom先被遍历完
refElm = isUndef(newCh[newEndIdx + 1]) ? null : newCh[newEndIdx + 1].elm
// 添加newVnode中剩余的节点到parentElm中
addVnodes(parentElm, refElm, newCh, newStartIdx, newEndIdx, insertedVnodeQueue)
} else if (newStartIdx > newEndIdx) { // 如果是新的vdom先被遍历完,则删除oldVnode里面所有的节点
// 删除剩余的节点
removeVnodes(parentElm, oldCh, oldStartIdx, oldEndIdx)
}
}
在开始遍历
diff前,首先给
oldCh和
newCh分别分配一个
startIndex和
endIndex来作为遍历的索引,当
oldCh或者
newCh遍历完后(遍历完的条件就是
oldCh或者
newCh的
startIndex
>= endIndex
),就停止
oldCh和
newCh的
diff过程。接下来通过实例来看下整个
diff的过程(节点属性中不带
key的情况):
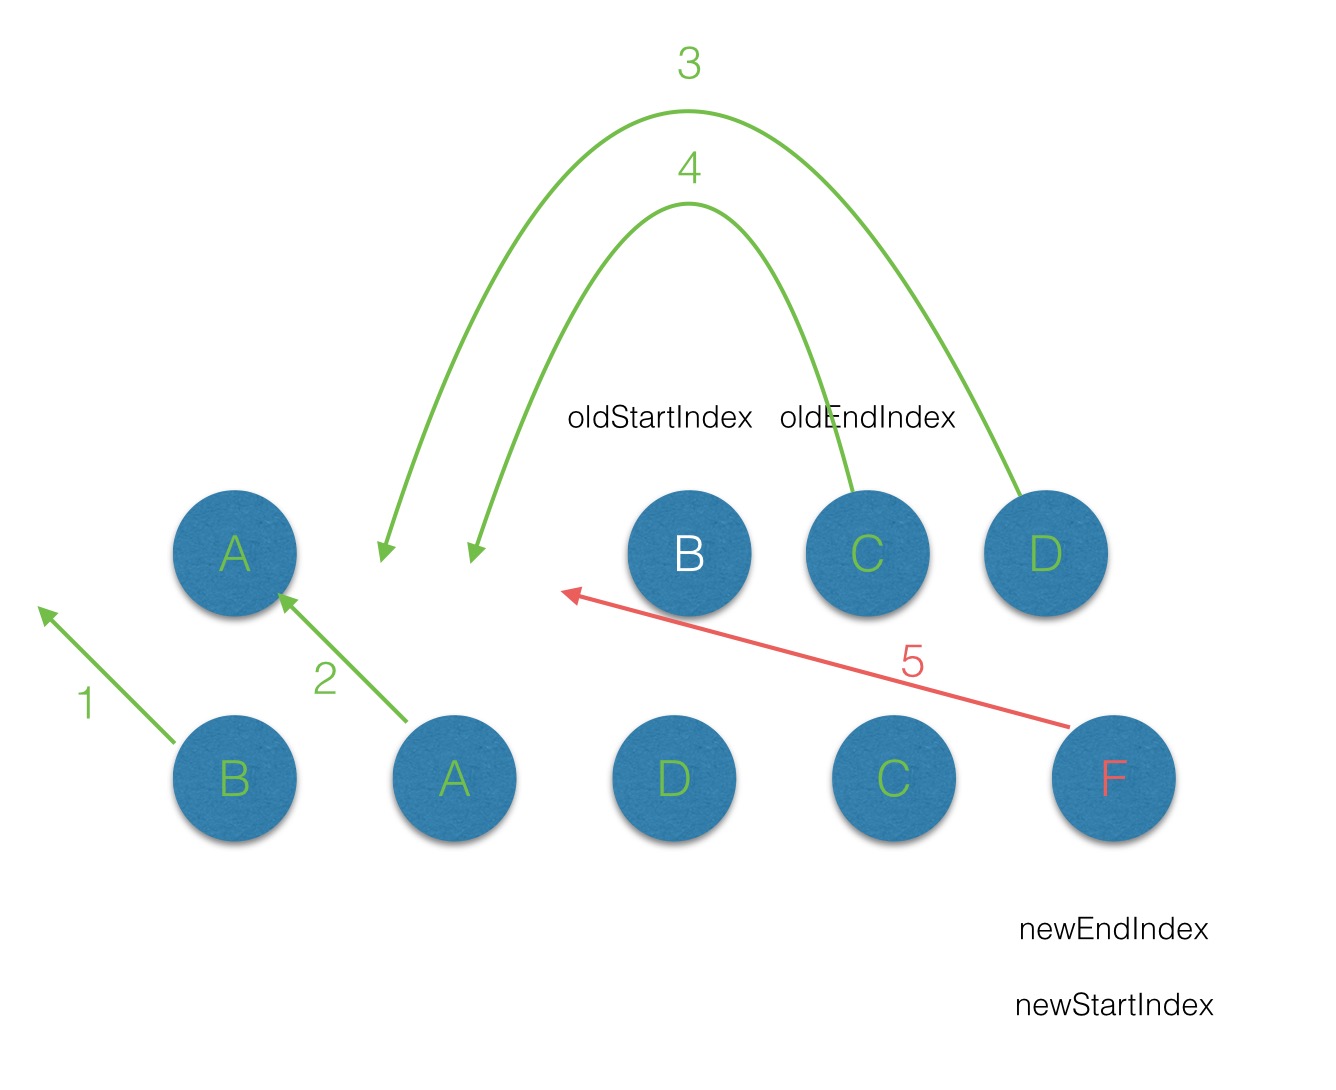
首先从第一个节点开始比较,不管是
oldCh还是
newCh的起始或者终止节点都不存在
sameVnode,同时节点属性中是不带
key标记的,因此第一轮的
diff完后,
newCh的
startVnode被添加到
oldStartVnode的前面,同时
newStartIndex前移一位;
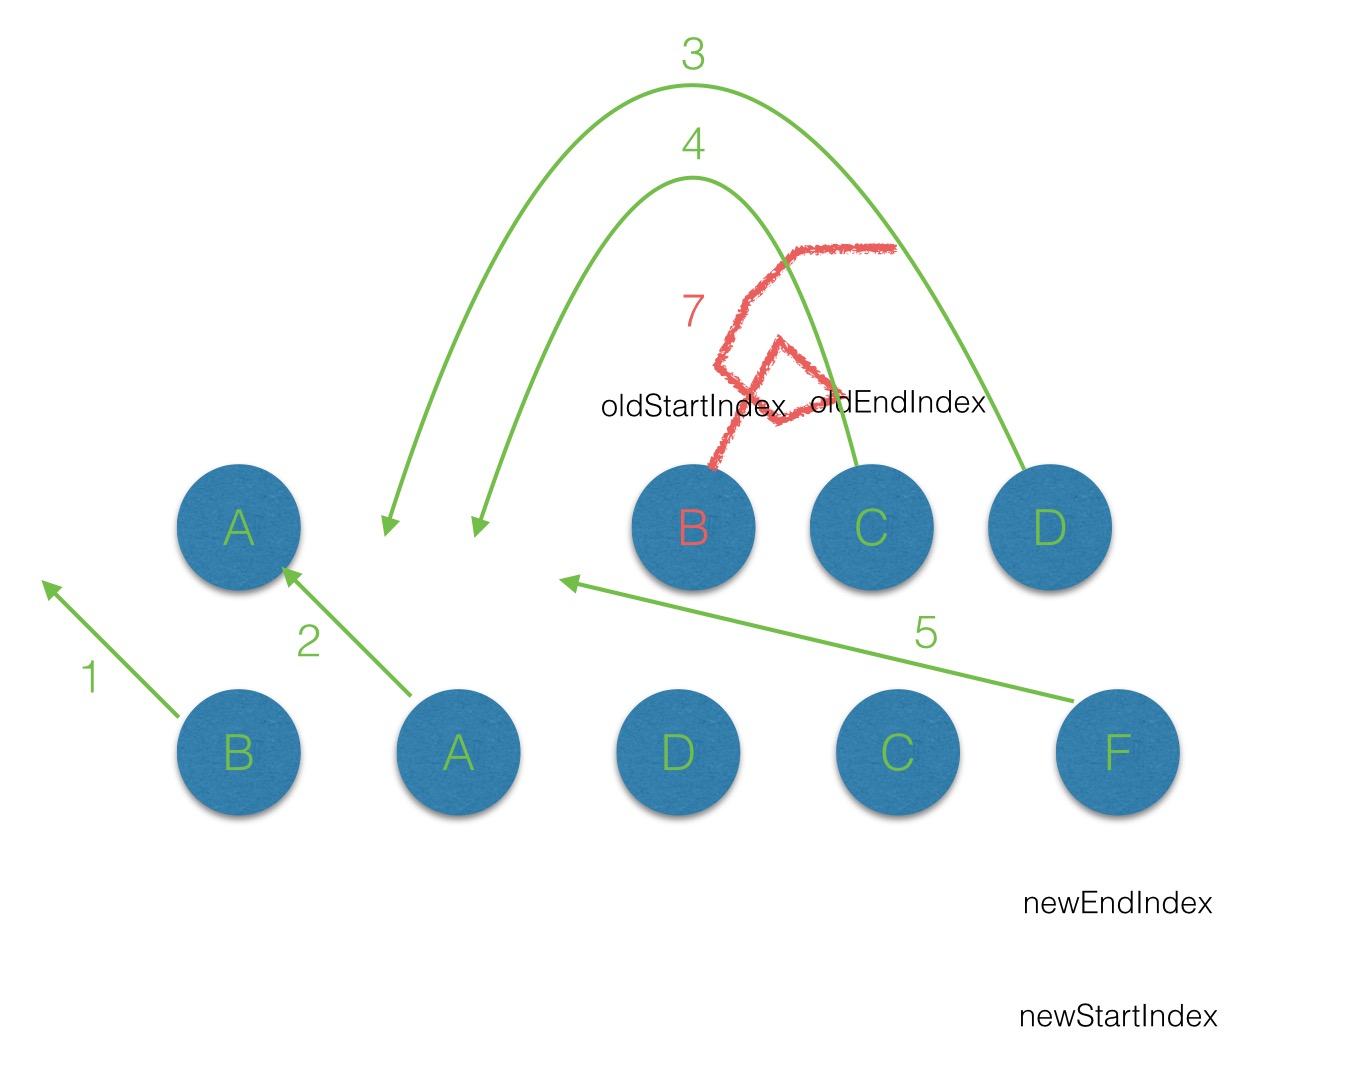
第二轮的
diff中,满足
sameVnode(oldStartVnode,
newStartVnode)
,因此对这2个
vnode进行
diff,最后将
patch打到
oldStartVnode上,同时
oldStartVnode和
newStartIndex都向前移动一位
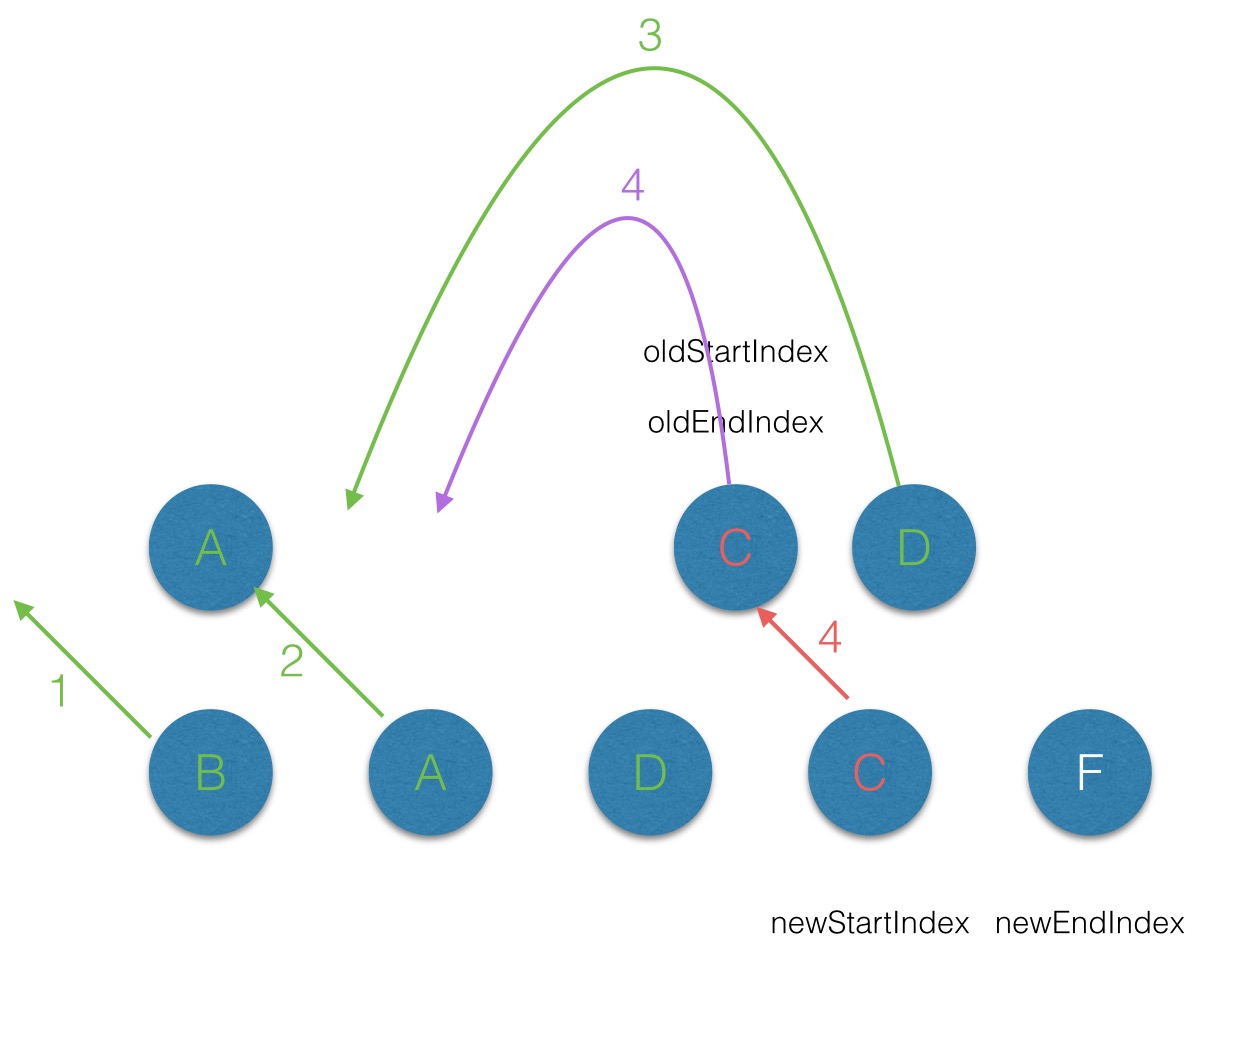
第三轮的
diff中,满足
sameVnode(oldEndVnode,
newStartVnode)
,那么首先对
oldEndVnode和
newStartVnode进行
diff,并对
oldEndVnode进行
patch,并完成
oldEndVnode移位的操作,最后
newStartIndex前移一位,
oldStartVnode后移一位;
第四轮的
diff中,过程同步骤3;
第五轮的
diff中,同过程1;
遍历的过程结束后,
newStartIdx > newEndIdx,说明此时
oldCh存在多余的节点,那么最后就需要将这些多余的节点删除。
在
vnode不带
key的情况下,每一轮的
diff过程当中都是
起始和
结束节点进行比较,直到
oldCh或者
newCh被遍历完。而当为
vnode引入
key属性后,在每一轮的
diff过程中,当
起始和
结束节点都没有找到
sameVnode时,首先对
oldCh中进行
key值与索引的映射:
if (isUndef(oldKeyToIdx)) oldKeyToIdx = createKeyToOldIdx(oldCh, oldStartIdx, oldEndIdx)
idxInOld = isDef(newStartVnode.key) ? oldKeyToIdx[newStartVnode.key] : null
createKeyToOldIdx(src/core/vdom/patch.js)方法,用以将
oldCh中的
key属性作为
键,而对应的节点的索引作为
值。然后再判断在
newStartVnode的属性中是否有
key,且是否在
oldKeyToIndx中找到对应的节点。
如果不存在这个
key,那么就将这个
newStartVnode作为新的节点创建且插入到原有的
root的子节点中:
if (isUndef(idxInOld)) { // New element
// 创建新的dom节点
// 插入到oldStartVnode.elm前面
// 参见createElm方法
createElm(newStartVnode, insertedVnodeQueue, parentElm, oldStartVnode.elm)
newStartVnode = newCh[++newStartIdx]
}
如果存在这个
key,那么就取出
oldCh中的存在这个
key的
vnode,然后再进行
diff的过程:
elmToMove = oldCh[idxInOld]
/* istanbul ignore if */
if (process.env.NODE_ENV !== 'production' && !elmToMove) {

// 将找到的key一致的oldVnode再和newStartVnode进行diff
if (sameVnode(elmToMove, newStartVnode)) {
patchVnode(elmToMove, newStartVnode, insertedVnodeQueue)
// 清空这个节点
oldCh[idxInOld] = undefined
// 移动node节点
canMove && nodeOps.insertBefore(parentElm, newStartVnode.elm, oldStartVnode.elm)
newStartVnode = newCh[++newStartIdx]
} else {
// same key but different element. treat as new element
// 创建新的dom节点
createElm(newStartVnode, insertedVnodeQueue, parentElm, oldStartVnode.elm)
newStartVnode = newCh[++newStartIdx]
}
通过以上分析,给
vdom上添加
key属性后,遍历
diff的过程中,当
起始点,
结束点的
搜寻及
diff出现还是无法匹配的情况下时,就会用
key来作为唯一标识,来进行
diff,这样就可以提高
diff效率。
带有
Key属性的
vnode的
diff过程可见下图:
注意在第一轮的
diff过后
oldCh上的
B节点被删除了,但是
newCh上的
B节点上
elm属性保持对
oldCh上
B节点的
elm引用。
转自 https://github.com/DDFE/DDFE-blog/issues/18

相关文章推荐
- Vue 2.0 的数据依赖/virtual-dom实现原理简析
- Vue通过操作Dom元素 实现 拖拽文件到网页进行文件上传【JS/JQ 原理也是一样的】
- Vue实现virtual-dom的原理简析
- 全面理解虚拟DOM,实现虚拟DOM
- vue过渡动画实现原理
- virtual-dom原理与简单实现
- 剖析Vue原理&实现双向绑定MVVM
- Vue 2.0的数据依赖实现原理代码简析
- vue双向绑定的原理及实现双向绑定MVVM源码分析
- Angular和Vue双向数据绑定的实现原理(重点是vue的双向绑定)
- vue实现数据双向绑定的原理
- 虚拟地球原理与实现
- Vue2.0源码阅读笔记--双向绑定实现原理
- vue.js在虚拟dom重载完成后调用代码或者初始化插件
- FTP服务器工作原理及如何通过PAM认证实现虚拟用户登录;
- vue.js实现数据驱动视图原理
- 全面理解虚拟DOM,实现虚拟DOM
- 解读.Net虚拟框架的实现原理