(推荐) Istio:Google、IBM 和 Lyft 联合开源的微服务框架
2017-12-11 11:12
597 查看
Istio是Google、IBM和Lyft联合开源的微服务Service Mesh框架,旨在解决大量微服务的发现、连接、管理、监控以及安全等问题。
Istio的主要特性包括:
HTTP、gRPC和TCP网络流量的自动负载均衡
丰富的路由规则,细粒度的网络流量行为控制
流量加密、服务间认证,以及强身份声明
全范围(Fleet-wide)策略执行
深度遥测和报告
Istio从逻辑上可以分为数据平面和控制平面:
数据平面主要由一系列的智能代理(Envoy)组成,管理微服务之间的网络通信
控制平面负责管理和配置这些智能代理,并动态执行策略
Istio架构可以如下图所示

主要由以下组件构成
Envoy:Lyft开源的高性能代理总线,支持动态服务发现、负载均衡、TLS终止、HTTP/2和gPRC代理、健康检查、性能测量等功能。Envoy以sidecar的方式部署在相关的服务的Pod中。
Mixer:负责访问控制、执行策略并从Envoy代理中收集遥测数据。Mixer支持灵活的插件模型,方便扩展
Pilot:用户和Istio的接口,验证用户提供的配置和路由策略并发送给Istio组件,管理Envoy示例的生命周期
Istio-Auth:提供服务间和终端用户的认证机制
Istio目前仅支持Kubernetes,在部署Istio之前需要先部署好Kubernetes集群并配置好kubectl客户端。
如果碰到下面的错误
需要给用户授予admin权限
两种方式(选择其一执行)
禁止Auth:kubectl apply -f install/kubernetes/istio.yaml
启用Auth:kubectl apply -f install/kubernetes/istio-auth.yaml
等一会所有Pod启动后,可以通过NodePort或负载均衡服务的外网IP来访问这些服务。比如通过NodePort方式,先查询服务的NodePort
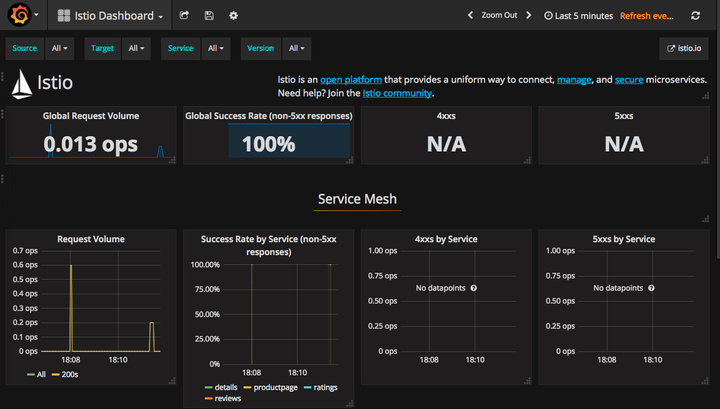
通过http://<kubernetes-ip>:32070/dashboard/db/istio-dashboard访问Grafana服务
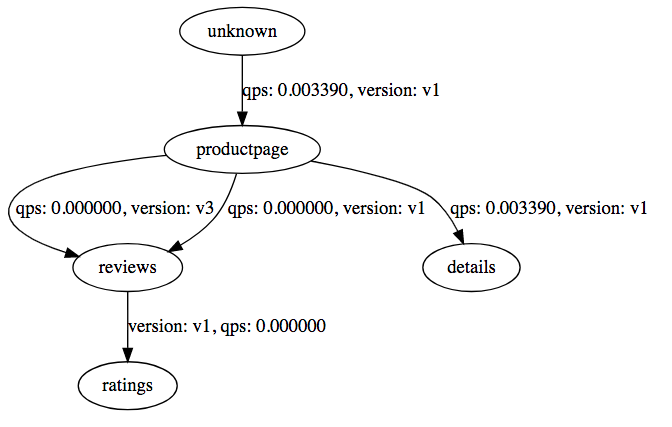
通过http://<kubernetes-ip>:31072/dotviz访问ServiceGraph服务,展示服务之间调用关系图
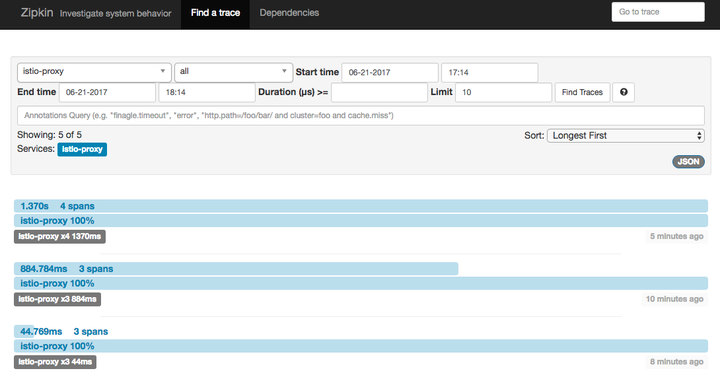
通过http://<kubernetes-ip>:30032访问Zipkin跟踪页面
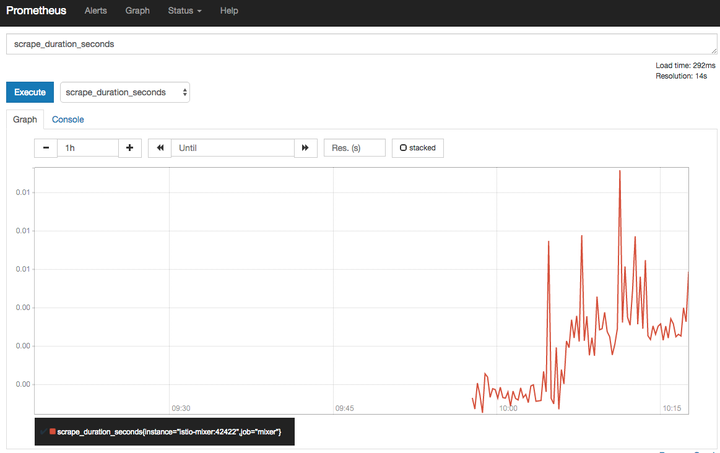
通过http://<kubernetes-ip>:30890访问Prometheus页面
在部署应用时,需要通过istioctl kube-inject给Pod自动插入Envoy容器,即
比如Istio提供的BookInof示例:
原始应用如下图所示
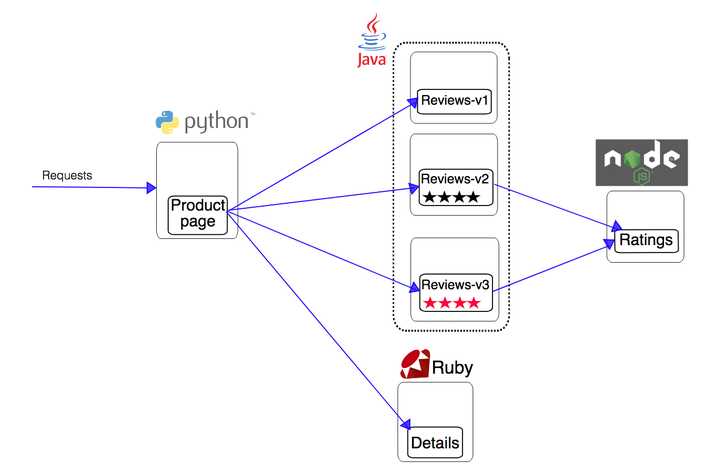
istioctl kube-inject在原始应用的每个Pod中插入了一个Envoy容器
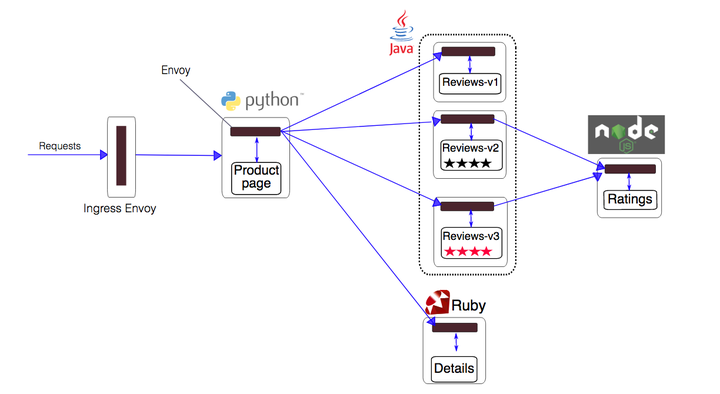
服务启动后,可以通过Ingress地址http://<ingress-address>/productpage来访问BookInfo应用
转自:https://zhuanlan.zhihu.com/p/27512075
Istio的主要特性包括:
HTTP、gRPC和TCP网络流量的自动负载均衡
丰富的路由规则,细粒度的网络流量行为控制
流量加密、服务间认证,以及强身份声明
全范围(Fleet-wide)策略执行
深度遥测和报告
原理
Istio从逻辑上可以分为数据平面和控制平面:数据平面主要由一系列的智能代理(Envoy)组成,管理微服务之间的网络通信
控制平面负责管理和配置这些智能代理,并动态执行策略
Istio架构可以如下图所示
主要由以下组件构成
Envoy:Lyft开源的高性能代理总线,支持动态服务发现、负载均衡、TLS终止、HTTP/2和gPRC代理、健康检查、性能测量等功能。Envoy以sidecar的方式部署在相关的服务的Pod中。
Mixer:负责访问控制、执行策略并从Envoy代理中收集遥测数据。Mixer支持灵活的插件模型,方便扩展
Pilot:用户和Istio的接口,验证用户提供的配置和路由策略并发送给Istio组件,管理Envoy示例的生命周期
Istio-Auth:提供服务间和终端用户的认证机制
安装
Istio目前仅支持Kubernetes,在部署Istio之前需要先部署好Kubernetes集群并配置好kubectl客户端。
下载Istio
curl -L https://git.io/getIstio | sh -
cd istio-0.1.6/
cp bin/istioctl /usr/local/bin/
创建RBAC角色和绑定
$ kubectl apply -f install/kubernetes/istio-rbac-beta.yaml
clusterrole "istio-pilot" created
clusterrole "istio-ca" created
clusterrole "istio-sidecar" created
rolebinding "istio-pilot-admin-role-binding" created
rolebinding "istio-ca-role-binding" created
rolebinding "istio-ingress-admin-role-binding" created
rolebinding "istio-sidecar-role-binding" created
如果碰到下面的错误
Error from server (Forbidden): error when creating "install/kubernetes/istio-rbac-beta.yaml": clusterroles.rbac.authorization.k8s.io "istio-pilot" is forbidden: attempt to grant extra privileges: [{[*] [istio.io] [istioconfigs] [] []} {[*] [istio.io] [istioconfigs.istio.io] [] []} {[*] [extensions] [thirdpartyresources] [] []} {[*] [extensions] [thirdpartyresources.extensions] [] []} {[*] [extensions] [ingresses] [] []} {[*] [] [configmaps] [] []} {[*] [] [endpoints] [] []} {[*] [] [pods] [] []} {[*] [] [services] [] []}] user=&{user@example.org [...]需要给用户授予admin权限
kubectl create clusterrolebinding myname-cluster-admin-binding --clusterrole=cluster-admin --user=myname@example.org
部署Istio核心服务
两种方式(选择其一执行)禁止Auth:kubectl apply -f install/kubernetes/istio.yaml
启用Auth:kubectl apply -f install/kubernetes/istio-auth.yaml
部署Prometheus、Grafana和Zipkin插件
kubectl apply -f install/kubernetes/addons/prometheus.yaml
kubectl apply -f install/kubernetes/addons/grafana.yaml
kubectl apply -f install/kubernetes/addons/servicegraph.yaml
kubectl apply -f install/kubernetes/addons/zipkin.yaml
等一会所有Pod启动后,可以通过NodePort或负载均衡服务的外网IP来访问这些服务。比如通过NodePort方式,先查询服务的NodePort
$ kubectl get svc grafana -o jsonpath='{.spec.ports[0].nodePort}'
32070
$ kubectl get svc servicegraph -o jsonpath='{.spec.ports[0].nodePort}'
31072
$ kubectl get svc zipkin -o jsonpath='{.spec.ports[0].nodePort}'
30032
$ kubectl get svc prometheus -o jsonpath='{.spec.ports[0].nodePort}'
30890
通过http://<kubernetes-ip>:32070/dashboard/db/istio-dashboard访问Grafana服务
通过http://<kubernetes-ip>:31072/dotviz访问ServiceGraph服务,展示服务之间调用关系图
通过http://<kubernetes-ip>:30032访问Zipkin跟踪页面
通过http://<kubernetes-ip>:30890访问Prometheus页面
部署示例应用
在部署应用时,需要通过istioctl kube-inject给Pod自动插入Envoy容器,即kubectl create -f <(istioctl kube-inject -f <your-app-spec>.yaml)
比如Istio提供的BookInof示例:
kubectl apply -f <(istioctl kube-inject -f samples/apps/bookinfo/bookinfo.yaml)
原始应用如下图所示
istioctl kube-inject在原始应用的每个Pod中插入了一个Envoy容器
服务启动后,可以通过Ingress地址http://<ingress-address>/productpage来访问BookInfo应用
$ kubectl describe ingress
Name:            gateway
Namespace:        default
Address:        192.168.0.77
Default backend:    default-http-backend:80 (10.8.0.4:8080)
Rules:
Host    Path    Backends
----    ----    --------
*
/productpage     productpage:9080 (<none>)
/login         productpage:9080 (<none>)
/logout     productpage:9080 (<none>)
Annotations:
Events:    <none>
转自:https://zhuanlan.zhihu.com/p/27512075

相关文章推荐
- Google、IBM 和 Lyft 联合开源的微服务 Service Mesh 框架 Istio
- Istio:Google、IBM 和 Lyft 联合开源的微服务 Service Mesh 框架
- Google、IBM和Lyft开源的微服务管理框架Istio安装文档
- Google、IBM和Lyft开源的微服务管理框架Istio安装文档
- Google、IBM和Lyft开源的微服务管理框架Istio安装与试用
- Google、IBM和Lyft开源其大型微服务系统管理工具Istio
- 【OpenSource】【Glide】Google 推荐的图片加载开源框架 Glide
- 【OpenSource】【Glide】Google 推荐的图片加载开源框架 Glide
- 【OpenSource】【Glide】Google 推荐的图片加载开源框架 Glide
- 【OpenSource】【Glide】Google 推荐的图片加载开源框架 Glide
- 【OpenSource】【Glide】Google 推荐的图片加载开源框架 Glide
- 谷歌,IBM和Lyft开源大型微服务系统管理工具lstio
- 【OpenSource】【Glide】Google 推荐的图片加载开源框架 Glide
- 【OpenSource】【Glide】Google 推荐的图片加载开源框架 Glide
- 【OpenSource】【Glide】Google 推荐的图片加载开源框架 Glide
- 推荐最新的Asp.Net Core 下开源的AOP框架 AspectCore
- 记录学习过程之六款值得推荐的android(安卓)开源框架简介
- 玩转Google开源C++单元测试框架Google Test系列(gtest)(总)
- Android开源框架推荐
- 【C++】玩转Google开源C++单元测试框架Google Test系列(gtest)之八 - 打造自己的单元测试框架