Spring源码分析1 — 容器启动流程
2017-12-08 17:35
906 查看
1 主要类
部署web应用时,web容器(比如Tomcat)会读取配置在web.xml中的监听器,从而启动spring容器。有了spring容器之后,我们才能使用spring的IOC AOP等特性。弄清spring容器启动流程,有利于理解spring IOC中的各种特性,比如BeanPostProcessor,MessageSource,ApplicationListener等。我们先来看下容器启动流程中涉及的主要类。ContextLoaderListener:注册在web.xml中,web应用启动时,会创建它,并回调它的initWebApplicationContext()方法,从而创建并启动spring容器。必须继承ServletContextListener。
WebApplicationContext:用于web应用的spring容器上下文,它代表了spring容器,继承自ApplicationContext。是一个接口,在ContextLoader.properties配置文件中可以声明它的实现类。默认实现类为XmlWebApplicationContext。ApplicationContext继承自BeanFactory,并扩展了它的很多功能。
ServletContext:web容器(如tomcat)的上下文,不要和ApplicationContext搞混了。
2 流程
2.1 web容器启动过程
web容器为spring提供了宿主环境ServletContext,启动时读取web.xml,如下<?xml version="1.0" encoding="UTF-8"?> <web-app xmlns="http://xmlns.jcp.org/xml/ns/javaee" xmlns:xsi="http://www.w3.org/2001/XMLSchema-instance" xsi:schemaLocation="http://xmlns.jcp.org/xml/ns/javaee http://xmlns.jcp.org/xml/ns/javaee/web-app_3_1.xsd" version="3.1"> <!--web项目中上下文初始化参数, name value的形式 --> <context-param> <param-name>contextConfigLocation</param-name> <param-value>/WEB-INF/applicationContext.xml</param-value> </context-param> <!--ContextLoaderListener,会通过它的监听启动spring容器--> <listener> <listener-class>org.springframework.web.context.ContextLoaderListener</listener-class> </listener> <!--DispatherServlet,前端MVC核心,分发器,SpringMVC的核心--> <servlet> <servlet-name>dispatcher</servlet-name> <servlet-class>org.springframework.web.servlet.DispatcherServlet</servlet-class> <load-on-startup>1</load-on-startup> </servlet> </web-app>
web容器的初始化过程为
web容器(如tomcat)读取web.xml, 读取文件中两个节点和
容器创建ServletContext,它是web的上下文,整个web项目都会用到它
读取context-param节点,它以 键值对的形式出现。将节点值转化为键值对,传给ServletContext
容器创建中的实例,创建监听器。监听器必须继承ServletContextListener
调用ServletContextListener的contextInitialized()方法,spring容器的创建和初始化就是在这个方法中
2.2 initWebApplicationContext 创建容器和beans
在web容器初始化过程中,会创建节点的监听器,并调用它的contextInitialized()方法。这个方法中会完成spring容器的创建,初始化,以及beans的创建。默认listener为ContextLoaderListener,下面详细分析public WebApplicationContext initWebApplicationContext(ServletContext servletContext) {
// 判断是否已经有WebApplicationContext容器了,如果有就不用创建了
if (servletContext.getAttribute(WebApplicationContext.ROOT_WEB_APPLICATION_CONTEXT_ATTRIBUTE) != null) {
throw new IllegalStateException(
"Cannot initialize context because there is already a root application context present - " +
"check whether you have multiple ContextLoader* definitions in your web.xml!");
}
// 省略一段log
...
try {
// 创建WebApplicationContext
if (this.context == null) {
this.context = createWebApplicationContext(servletContext);
}
// 判断context有没有父context,取决于web.xml配置文件中locatorFactorySelector参数,如果有父context,则加载它
if (this.context instanceof ConfigurableWebApplicationContext) {
ConfigurableWebApplicationContext cwac = (ConfigurableWebApplicationContext) this.context;
if (!cwac.isActive()) {
if (cwac.getParent() == null) {
ApplicationContext parent = loadParentContext(servletContext);
cwac.setParent(parent);
}
// refresh容器,这一步会创建beans,后面详细分析
configureAndRefreshWebApplicationContext(cwac, servletContext);
}
}
// 将spring容器context,挂载到servletContext这个web容器全局变量中。ServletContext是web容器的上下文。web容器指的是Tomcat等部署web应用的容器,不要和spring容器搞混了。
servletContext.setAttribute(WebApplicationContext.ROOT_WEB_APPLICATION_CONTEXT_ATTRIBUTE, this.context);
// 将spring容器context赋值给currentContext变量,保存下来
ClassLoader ccl = Thread.currentThread().getContextClassLoader();
if (ccl == ContextLoader.class.getClassLoader()) {
currentContext = this.context;
}
else if (ccl != null) {
currentContextPerThread.put(ccl, this.context);
}
// 省略一段log
...
return this.context;
}
// 省略一段异常catch处理
}initWebApplicationContext()主要做三件事
创建WebApplicationContext,通过createWebApplicationContext()方法
加载spring配置文件,并创建beans。通过configureAndRefreshWebApplicationContext()方法
将spring容器context挂载到ServletContext 这个web容器上下文中。通过servletContext.setAttribute()方法。
2.2.1 createWebApplicationContext 创建spring容器
protected WebApplicationContext createWebApplicationContext(ServletContext sc) {
// 获取WebApplicationContext实现类的class对象,WebApplicationContext只是一个接口,需要有具体的实现类,默认的实现类是XmlWebApplicationContext
Class<?> contextClass = determineContextClass(sc);
// 自定义WebApplicationContext必须继承自ConfigurableWebApplicationContext
if (!ConfigurableWebApplicationContext.class.isAssignableFrom(contextClass)) {
throw new ApplicationContextException("Custom context class [" + contextClass.getName() +
"] is not of type [" + ConfigurableWebApplicationContext.class.getName() + "]");
}
// 由class对象创建实例对象
return (ConfigurableWebApplicationContext) BeanUtils.instantiateClass(contextClass);
}
创建spring容器的流程比较简单,具体为两步
获取WebApplicationContext实现类的class对象
根据class对象创建实例对象
那么class对象是怎么获取的呢,具体我们看determineContextClass()方法
protected Class<?> determineContextClass(ServletContext servletContext) {
// 读取web.xml中的contextClass元素,它是配置在<context-param>节点中的
String contextClassName = servletContext.getInitParameter(CONTEXT_CLASS_PARAM);
// 如果web.xml中配置了contextClass,则直接由类名创建class对象
if (contextClassName != null) {
try {
return ClassUtils.forName(contextClassName, ClassUtils.getDefaultClassLoader());
}
catch (ClassNotFoundException ex) {
throw new ApplicationContextException(
"Failed to load custom context class [" + contextClassName + "]", ex);
}
}
// 如果没有配置contextClass,则读取defaultStrategies的WebApplicationContext这个属性,这个属性在ContextLoader.properties文件中配置的,我们后面详解。之后利用读取的类名创建class对象
else {
contextClassName = defaultStrategies.getProperty(WebApplicationContext.class.getName());
try {
return ClassUtils.forName(contextClassName, ContextLoader.class.getClassLoader());
}
catch (ClassNotFoundException ex) {
throw new ApplicationContextException(
"Failed to load default context class [" + contextClassName + "]", ex);
}
}
}
defaultStrategies的创建过程如下
private static final String DEFAULT_STRATEGIES_PATH = "ContextLoader.properties";
private static final Properties defaultStrategies;

static {
// 读取ContextLoader.properties这个配置文件,生成defaultStrategies对象。我们可以把各种默认配置信息都放在这里。例如WebApplicationContext的实现类的类名
try {
ClassPathResource resource = new ClassPathResource(DEFAULT_STRATEGIES_PATH, ContextLoader.class);
defaultStrategies = PropertiesLoaderUtils.loadProperties(resource);
}
catch (IOException ex) {
throw new IllegalStateException("Could not load 'ContextLoader.properties': " + ex.getMessage());
}
}
默认的ContextLoader.properties 文件如下
org.springframework.web.context.WebApplicationContext=org.springframework.web.context.support.XmlWebApplicationContext
恍然大悟了吧,这个配置文件中声明了WebApplicationContext的实现类类名为XmlWebApplicationContext,也就是说默认采用XmlWebApplicationContext这个spring容器。
2.2.2 configureAndRefreshWebApplicationContext加载spring配置文件,创建beans
创建完Spring容器后,就会加载spring配置文件,并创建beans。这个过程在configureAndRefreshWebApplicationContext()方法protected void configureAndRefreshWebApplicationContext(ConfigurableWebApplicationContext wac, ServletContext sc) {
// 设置ApplicationContext的id,无关紧要,省略
...
// web容器引用ServletContext,设置到spring容器ApplicationContext中
wac.setServletContext(sc);
// 读取web.xml中的contextConfigLocation元素的值,它指明了spring容器配置文件的地址。不采用注解方式时,beans的声明就在这个文件中。这个文件是spring容器的最重要的配置文件。contextConfigLocation元素在web.xml的<context-param>节点中声明的,可以参见文章最开始的一个web.xml例子
String configLocationParam = sc.getInitParameter(CONFIG_LOCATION_PARAM);
if (configLocationParam != null) {
wac.setConfigLocation(configLocationParam);
}
// 初始化Servlet的propertySources,不用太care
ConfigurableEnvironment env = wac.getEnvironment();
if (env instanceof ConfigurableWebEnvironment) {
((ConfigurableWebEnvironment) env).initPropertySources(sc, null);
}
// 个性化配置,没做啥事,一般用默认的即可
customizeContext(sc, wac);
// 最重要的一步,
wac.refresh();
}// 读取spring xml配置文件,创建和初始化benas,最核心的方法
public void refresh() throws BeansException, IllegalStateException {
synchronized (this.startupShutdownMonitor) {
// 准备工作,设置ApplicationContext中的一些标志位,如closed设为false,active设为true。校验添加了required标志的属性,如果他们为空,则抛出MissingRequiredPropertiesException异常。此处比较简单,可自行分析
prepareRefresh();
// 读取spring xml配置文件,后面详细分析
ConfigurableListableBeanFactory beanFactory = obtainFreshBeanFactory();
// 设置容器beanFactory的各种成员属性,比如beanClassLoader,beanPostProcessors。这里的beanPostProcessor都是系统默认的,不是用户自定义的。比如负责注入ApplicationContext引用到各种Aware中的ApplicationContextAwareProcessor容器后处理器。
prepareBeanFactory(beanFactory);
try {
// 调用默认的容器后处理器,如ServletContextAwareProcessor
postProcessBeanFactory(beanFactory);
// 初始化并调用所有注册的容器后处理器BeanFactoryPostProcessor,此处比较麻烦,但不算关键,可自行分析
invokeBeanFactoryPostProcessors(beanFactory);
// 注册bean后处理器,将实现了BeanPostProcessor接口的bean找到。先将实现了PriorityOrdered接口的bean排序并注册到容器BeanFactory中,然后将实现了Ordered接口的排序并注册到容器中,最后注册剩下的。
registerBeanPostProcessors(beanFactory);
// 初始化MessageSource,用来处理国际化。如果有beanName为“messageSource”,则初始化。否则使用默认的。
initMessageSource();
// 初始化ApplicationEventMulticaster,用来进行事件广播。如果有beanName为"applicationEventMulticaster",则初始化它。否则使用默认的SimpleApplicationEventMulticaster。广播事件会发送给所有监听器,也就是实现了ApplicationListener的类。关于spring事件体系,可以参见 http://blog.csdn.net/caihaijiang/article/details/7460888 initApplicationEventMulticaster();
// 初始化其他特殊的bean。子类可以override这个方法。如WebApplicationContext的themeSource
onRefresh();
// 注册事件监听器,也就是所有实现了ApplicationListener的类。会将监听器加入到事件广播器ApplicationEventMulticaster中,所以在广播时就可以发送消息给所有监听器了。
registerListeners();
// 初始化所有剩下的singleton bean(没有标注lazy-init的),后面详细分析
finishBeanFactoryInitialization(beanFactory);
// 最后一步,完成refresh。回调LifecycleProcessor,发送ContextRefreshedEvent事件等,比较简单,可自行分析
finishRefresh();
}
catch (BeansException ex) {
// 异常处理,省略
...
}
finally {
// 清理资源
resetCommonCaches();
}
}
}refresh()方法流程很多,并且都很复杂。我们后面分两篇文章重点来分析obtainFreshBeanFactory()和finishBeanFactoryInitialization()。前一个读取并解析XML配置文件,后一个创建并初始化普通singleton bean。
3 流程图
spring容器初始化的整个流程图如下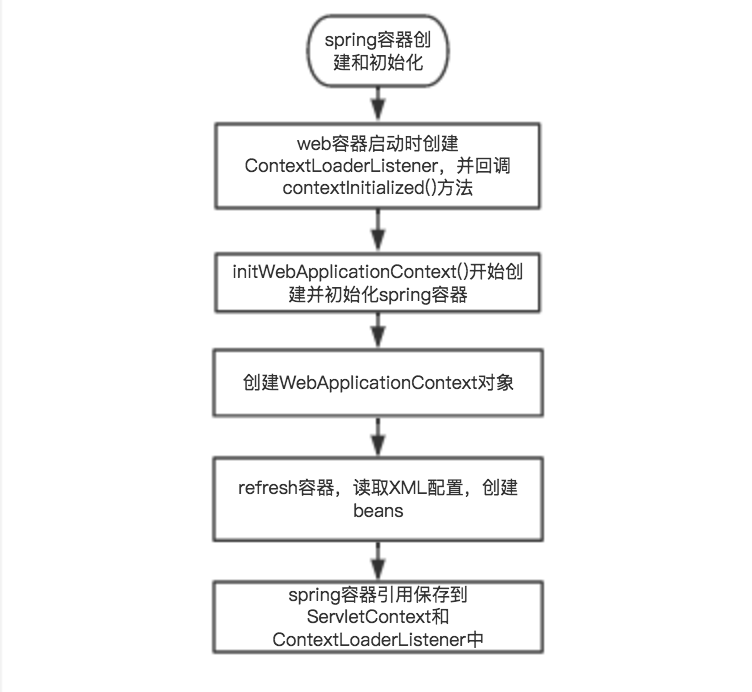
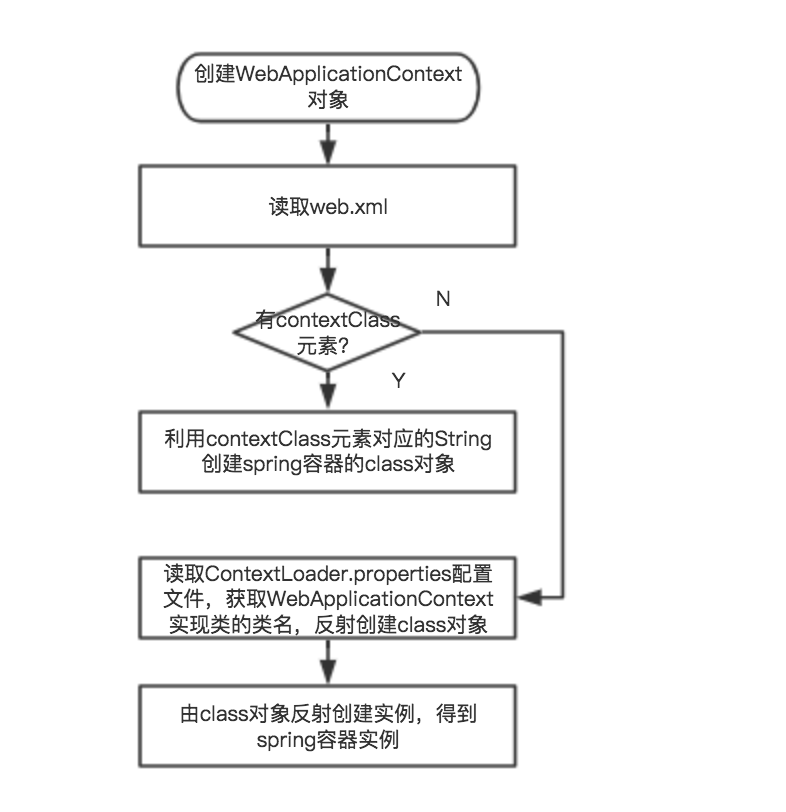
创建WebApplicationContext对象流程如下
读取XML配置文件,创建beans流程如下

转载至:http://blog.csdn.net/u013510838/article/details/75092612

相关文章推荐
- Spring Boot源码分析之启动流程
- spring源码之旅(2)_applicationcontext启动流程分析
- Spring boot源码分析-AnnotationConfigApplicationContext非web环境下的启动容器(2)
- Spring源码分析: SpringMVC启动流程与DispatcherServlet请求处理流程
- Spring原理与源码分析系列(二)- Spring IoC容器启动过程分析(上)
- 四 spring 源码分析--- 容器启动 时序图
- 转:Spring源码分析:IOC容器在web容器中的启动
- Spring IOC容器启动流程源码解析(一)——容器概念详解及源码初探
- Spring原理与源码分析系列(三)- Spring IoC容器启动过程分析(下)
- 【spring源码分析】之启动
- spark core源码分析4 worker启动流程
- Spring源码分析--Ioc容器定位解析资源文件并注册BeanDefinition
- 【Spring启动过程分析】(1)启动流程简介
- Spring Boot启动过程源码分析
- spark 1.6.0 core源码分析4 worker启动流程
- spring启动加载过程源码分析
- Spring源代码分析之(二):IOC容器在web容器中的启动
- spark core源码分析2 master启动流程
- (十)Spring事务处理 - IoC容器的事务处理源码分析
- Spring源码分析总结——容器的功能扩展