Spring Boot JDBC 连接数据库
2017-12-03 10:40
585 查看
文本将对在Spring Boot构建的Web应用中,基于MYSQL数据库的几种数据库连接方式进行介绍。
包括JDBC、JPA、MyBatis、多数据源和事务。
1、属性配置文件(application.properties)
2
3
4
如果使用JNDI,则可以替代 spring.datasource 的 url、username、password,如:
值得一提的是,无论是Spring Boot默认的DataSource配置还是你自己的DataSource bean,都会引用到外部属性文件中的属性配置。所以假设你自定义的DataSource bean,你可以在定义bean时设置属性,也可以在属性文件中,以“spring.datasource.*”的方式使属性配置外部化。
2、pom.xml 配置maven依赖
2
3
4
5
6
7
8
9
10
3、Java代码范例
StudentService.java
2
3
4
5
6
7
8
9
10
11
12
13
14
15
16
17
18
19
20
21
22
23
24
25
26
27
28
29
30
31
32
33
34
35
36
37
38
39
40
41
42
43
44
Student.java 实体类
2
3
4
5
6
7
8
9
10
11
12
13
14
15
16
17
18
19
20
21
22
23
StudentController.java
2
3
4
5
6
7
8
9
10
11
12
13
14
15
16
17
18
19
20
21
22
23
24
25
26
27
28
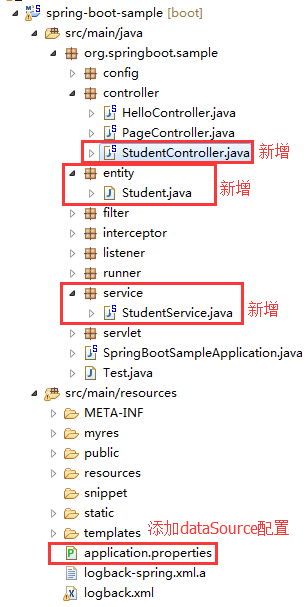
本文对工程添加文件后工程结构图:
然后启动项目,访问地址: http://localhost:8080/myspringboot/stu/list 响应结果如下:
2
3
4
5
6
7
8
9
10
11
12
13
14
15
16
17
18
19
20
21
22
23
24
25
26
27
28
29
30
31
32
33
34
35
36
37
38
39
40
41
42
43
44
Tomcat7之前,Tomcat本质应用了DBCP连接池技术来实现的JDBC数据源,但在Tomcat7之后,Tomcat提供了新的JDBC连接池方案,作为DBCP的替换或备选方案,解决了许多之前使用DBCP的不利之处,并提高了性能。详细请参考:http://wiki.jikexueyuan.com/project/tomcat/tomcat-jdbc-pool.html
Spring Boot为我们准备了最佳的数据库连接池方案,只需要在属性文件(例如application.properties)中配置需要的连接池参数即可。
我们使用Tomcat数据源连接池,需要依赖tomcat-jdbc,只要应用中添加了spring-boot-starter-jdbc 或 spring-boot-starter-data-jpa依赖,则无需担心这点,因为将会自动添加 tomcat-jdbc 依赖。
假如我们想用其他方式的连接池技术,只要配置自己的DataSource bean,即可覆盖Spring Boot的自动配置。
请看我的数据源配置:
2
3
4
5
6
7
8
9
10
11
12
13
14
配置过连接池的开发人员对这些属性的意义都有所认识。
我们打开DEBUG日志输出,logback.xml 中添加:
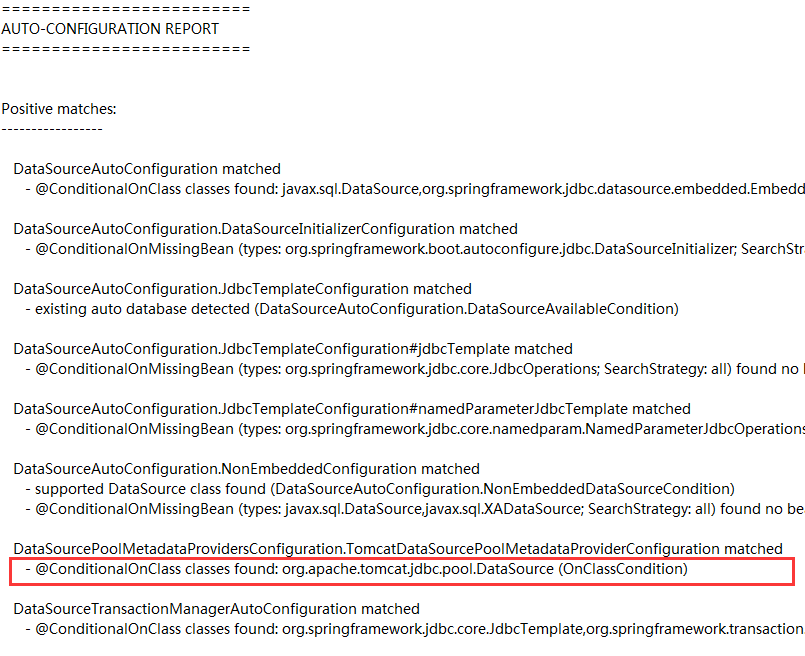
然后启动项目,注意观察日志输出,如下图中会显示自动启用了连接池:
我在上面的数据源配置中添加了过滤器,并设置了延迟时间为0(故意设置很低,实际项目中请修改):
这个时候,我们访问 http://localhost:8080/myspringboot/stu/list 观察日志,会发现框架自动将大于该时间的数据查询进行警告输出,如下:
包括JDBC、JPA、MyBatis、多数据源和事务。
JDBC 连接数据库
1、属性配置文件(application.properties)spring.datasource.url=jdbc:mysql://localhost:3306/test spring.datasource.username=root spring.datasource.password=123456 spring.datasource.driver-class-name=com.mysql.jdbc.Driver1
2
3
4
如果使用JNDI,则可以替代 spring.datasource 的 url、username、password,如:
spring.datasource.jndi-name=java:tomcat/datasources/example1
值得一提的是,无论是Spring Boot默认的DataSource配置还是你自己的DataSource bean,都会引用到外部属性文件中的属性配置。所以假设你自定义的DataSource bean,你可以在定义bean时设置属性,也可以在属性文件中,以“spring.datasource.*”的方式使属性配置外部化。
2、pom.xml 配置maven依赖
<!-- MYSQL --> <dependency> <groupId>mysql</groupId> <artifactId>mysql-connector-java</artifactId> </dependency> <!-- Spring Boot JDBC --> <dependency> <groupId>org.springframework.boot</groupId> <artifactId>spring-boot-starter-jdbc</artifactId> </dependency>1
2
3
4
5
6
7
8
9
10
3、Java代码范例
StudentService.java
package org.springboot.sample.service; import java.sql.ResultSet; import java.sql.SQLException; import java.util.List; import org.springboot.sample.entity.Student; import org.springframework.beans.factory.annotation.Autowired; import org.springframework.jdbc.core.JdbcTemplate; import org.springframework.jdbc.core.RowMapper; import org.springframework.stereotype.Service; /** * Studeng Service * * @author 单红宇(365384722) * @myblog http://blog.csdn.net/catoop/ * @create 2016年1月12日 */ @Service public class StudentService { @Autowired private JdbcTemplate jdbcTemplate; public List<Student> getList(){ String sql = "SELECT ID,NAME,SCORE_SUM,SCORE_AVG, AGE FROM STUDENT"; return (List<Student>) jdbcTemplate.query(sql, new RowMapper<Student>(){ @Override public Student mapRow(ResultSet rs, int rowNum) throws SQLException { Student stu = new Student(); stu.setId(rs.getInt("ID")); stu.setAge(rs.getInt("AGE")); stu.setName(rs.getString("NAME")); stu.setSumScore(rs.getString("SCORE_SUM")); stu.setAvgScore(rs.getString("SCORE_AVG")); return stu; } }); } }1
2
3
4
5
6
7
8
9
10
11
12
13
14
15
16
17
18
19
20
21
22
23
24
25
26
27
28
29
30
31
32
33
34
35
36
37
38
39
40
41
42
43
44
Student.java 实体类
package org.springboot.sample.entity; import java.io.Serializable; /** * 学生实体 * * @author 单红宇(365384722) * @myblog http://blog.csdn.net/catoop/ * @create 2016年1月12日 */ public class Student implements Serializable{ private static final long serialVersionUID = 2120869894112984147L; private int id; private String name; private String sumScore; private String avgScore; private int age; // 节省文章长度,get set 方法省略 }1
2
3
4
5
6
7
8
9
10
11
12
13
14
15
16
17
18
19
20
21
22
23
StudentController.java
package org.springboot.sample.controller;
import java.util.List;
import org.slf4j.Logger;
import org.slf4j.LoggerFactory;
import org.springboot.sample.entity.Student;
import org.springboot.sample.service.StudentService;
import org.springframework.beans.factory.annotation.Autowired;
import org.springframework.web.bind.annotation.RequestMapping;
import org.springframework.web.bind.annotation.RestController;
@RestController
@RequestMapping("/stu")
public class StudentController {
private static final Logger logger = LoggerFactory.getLogger(StudentController.class);
@Autowired
private StudentService studentService;
@RequestMapping("/list")
public List<Student> getStus(){
logger.info("从数据库读取Student集合");
return studentService.getList();
}
}12
3
4
5
6
7
8
9
10
11
12
13
14
15
16
17
18
19
20
21
22
23
24
25
26
27
28
本文对工程添加文件后工程结构图:
然后启动项目,访问地址: http://localhost:8080/myspringboot/stu/list 响应结果如下:
[
{
id: 1,
name: "小明",
sumScore: "252",
avgScore: "84",
age: 1
},
{
id: 2,
name: "小王",
sumScore: "187",
avgScore: "62.3",
age: 1
},
{
id: 3,
name: "莉莉",
sumScore: "",
avgScore: "",
age: 0
},
{
id: 4,
name: "柱子",
sumScore: "230",
avgScore: "76.7",
age: 1
},
{
id: 5,
name: "大毛",
sumScore: "",
avgScore: "",
age: 0
},
{
id: 6,
name: "亮子",
sumScore: "0",
avgScore: "0",
age: 1
}
]12
3
4
5
6
7
8
9
10
11
12
13
14
15
16
17
18
19
20
21
22
23
24
25
26
27
28
29
30
31
32
33
34
35
36
37
38
39
40
41
42
43
44
连接池说明
Tomcat7之前,Tomcat本质应用了DBCP连接池技术来实现的JDBC数据源,但在Tomcat7之后,Tomcat提供了新的JDBC连接池方案,作为DBCP的替换或备选方案,解决了许多之前使用DBCP的不利之处,并提高了性能。详细请参考:http://wiki.jikexueyuan.com/project/tomcat/tomcat-jdbc-pool.htmlSpring Boot为我们准备了最佳的数据库连接池方案,只需要在属性文件(例如application.properties)中配置需要的连接池参数即可。
我们使用Tomcat数据源连接池,需要依赖tomcat-jdbc,只要应用中添加了spring-boot-starter-jdbc 或 spring-boot-starter-data-jpa依赖,则无需担心这点,因为将会自动添加 tomcat-jdbc 依赖。
假如我们想用其他方式的连接池技术,只要配置自己的DataSource bean,即可覆盖Spring Boot的自动配置。
请看我的数据源配置:
spring.datasource.url=jdbc:mysql://localhost:3306/test
spring.datasource.username=root
spring.datasource.password=123456
spring.datasource.driver-class-name=com.mysql.jdbc.Driver
1
spring.datasource.max-idle=10
spring.datasource.max-wait=10000
spring.datasource.min-idle=5
spring.datasource.initial-size=5
spring.datasource.validation-query=SELECT 1
spring.datasource.test-on-borrow=false
spring.datasource.test-while-idle=true
spring.datasource.time-between-eviction-runs-millis=18800
spring.datasource.jdbc-interceptors=ConnectionState;SlowQueryReport(threshold=0)
2
3
4
5
6
7
8
9
10
11
12
13
14
配置过连接池的开发人员对这些属性的意义都有所认识。
我们打开DEBUG日志输出,logback.xml 中添加:
<logger name="org.springframework.boot" level="DEBUG"/>1
然后启动项目,注意观察日志输出,如下图中会显示自动启用了连接池:
我在上面的数据源配置中添加了过滤器,并设置了延迟时间为0(故意设置很低,实际项目中请修改):
spring.datasource.jdbc-interceptors=ConnectionState;SlowQueryReport(threshold=0)1
这个时候,我们访问 http://localhost:8080/myspringboot/stu/list 观察日志,会发现框架自动将大于该时间的数据查询进行警告输出,如下:
2016-01-12 23:27:06.710 WARN 17644 --- [nio-8080-exec-1] o.a.t.j.p.interceptor.SlowQueryReport : Slow Query Report SQL=SELECT ID,NAME,SCORE_SUM,SCORE_AVG, AGE FROM STUDENT; time=3 ms;1

相关文章推荐
- SpringBoot实践之---JDBC连接数据库
- Spring Boot JDBC 连接数据库
- Spring Boot JDBC 连接数据库
- SpringBoot - JDBC 连接数据库
- Spring Boot JDBC 连接数据库
- Spring Boot JDBC 连接数据库示例
- springboot 多数据源(三种数据库连接池--JDBC,dbcp2,Druid)
- Spring Boot MyBatis 连接数据库
- 学习Spring boot 数据库连接
- Spring的连接数据库以及JDBC模板(实例讲解)
- spring-jdbc模板连接数据库(增删改查)
- SpringBoot 连接数据库
- 使用Spring JDBC框架连接并操作数据库
- 简单的用jdbc使spring boot项目同时连接Oracle和Mysql数据源
- spring-boot-data-jpa 连接数据库
- Spring Boot MyBatis 连接数据库
- Spring中使用JDBC连接数据库的配置
- spring boot 连接数据库
- Hibernate、SpringJDBC中在注解模式下获取数据库连接
- spring-boot-data-jpa 连接数据库