ubuntu中FastDFS+Nginx环境搭建
2017-11-23 14:47
405 查看
准备
nginx1.8.0、FastDFS_v5.08、fastdfs-nginx-module_v1.16。可于网上自行下载。本文初始压缩包存放位置: /home/jwing/Downloads/
FastDFS的安装
cd /usr/local
// 下载安装libfastcommon
git clone https://github.com/happyfish100/libfastcommon.git cd libfastcommon/
./make.sh
./make.sh install
// 创建软链接
export LD_LIBRARY_PATH=/usr/lib64/
ln -s /usr/lib64/libfastcommon.so /usr/local/lib/libfastcommon.so
// 下载安装fastdfs
tar -zxvf /home/jwing/Downloads/FastDFS.tar.gz
cd FastDFS/
./make.sh
./make.sh install
/etc/fdfs/下会自动生成3个配置文件,去掉sample字样后继续以下步骤
// 复制http.conf与mime.types文件到/etc/fdfs/下
cd conf/
cp http.conf /etc/fdfs/
cp mime.types /etc/fdfs/
cp storage_ids.conf /etc/fdfs
先建立几个文件夹
mkdir /home/jwing/fastdfs
mkdir /home/jwing/fastdfs/client
mkdir /home/jwing/fastdfs/tracker
mkdir /home/jwing/fastdfs/storage
修改配置文件
storage.conf
vi /etc/fdfs/storage.conf
// 添加
http.disabled=true
// 修改
base_path=/home/jwing/fastdfs/storage #用于存放日志。
store_path0=/home/jwing/fastdfs/storage
http.server_port=88
// ip为tracker服务开启的ip地址,这里为本机地址
tracker_server=192.168.131.130:22122
tracker.conf
vi /etc/fdfs/tracker.conf
// 修改
base_path=/home/jwing/fastdfs/tracker #用于存放日志。
http.server_port=8090
client.conf
vi /etc/fdfs/client.conf
// 修改
base_path=/home/jwing/fastdfs/client #用于存放日志。
http.server_port=88
// 在http.server_port下方  原本前方有2个'#',去掉一个
#include http.conf
安装fastdfs-nginx-module模块
cd /usr/local/
apt-get install libssl-dev zlib1g-dev libpcre3-dev
tar -zxvf nginx-1.8.0.tar.gz
tar -zxvf fastdfs-nginx-module_v1.16.tar.gz
cd nginx-1.8.0
./configure --prefix=/usr/local/nginx --with-http_gzip_static_module --add-module=/home/alpha/tools/fastdfs-nginx-module/src
make
make install
创建M00的链接
ln -s /home/jwing/fastdfs/storage/data /home/jwing/fastdfs/storage/data/M00
修改nginx.conf:
vi /usr/local/nginx/conf/nginx.conf
// 添加server
server {
  listen 88;
  location / {
    root /home/fastdfs/storage/data;
    index index.html index.htm;
   }
  location /group1/M00 {
     root /home/fastdfs/storage/data;
    ngx_fastdfs_module;
  }
}
测试
开启服务:fdfs_storaged /etc/fdfs/storage.conf fdfs_trackerd /etc/fdfs/tracker.conf /usr/local/nginx/sbin/nginx // 查看是否成功开启 ps -aux|grep fdfs ps -aux|grep nginx

文件上传:
// 上传fastdfs自带的一张图片
fdfs_test /etc/fdfs/client.conf upload /usr/local/FastDFS/conf/anti-steal.jpg
出现以下情况则为成功上传:
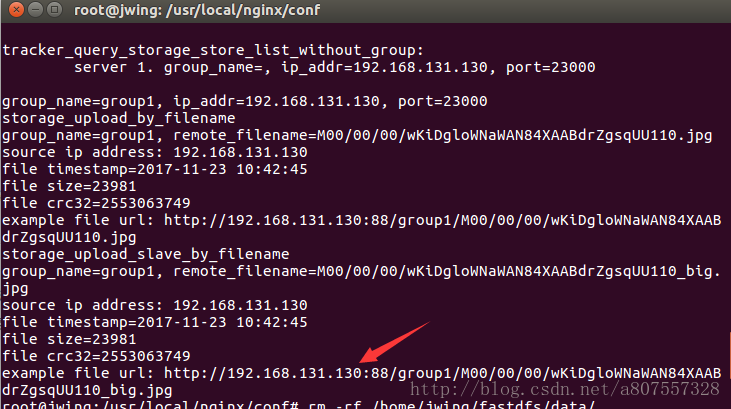
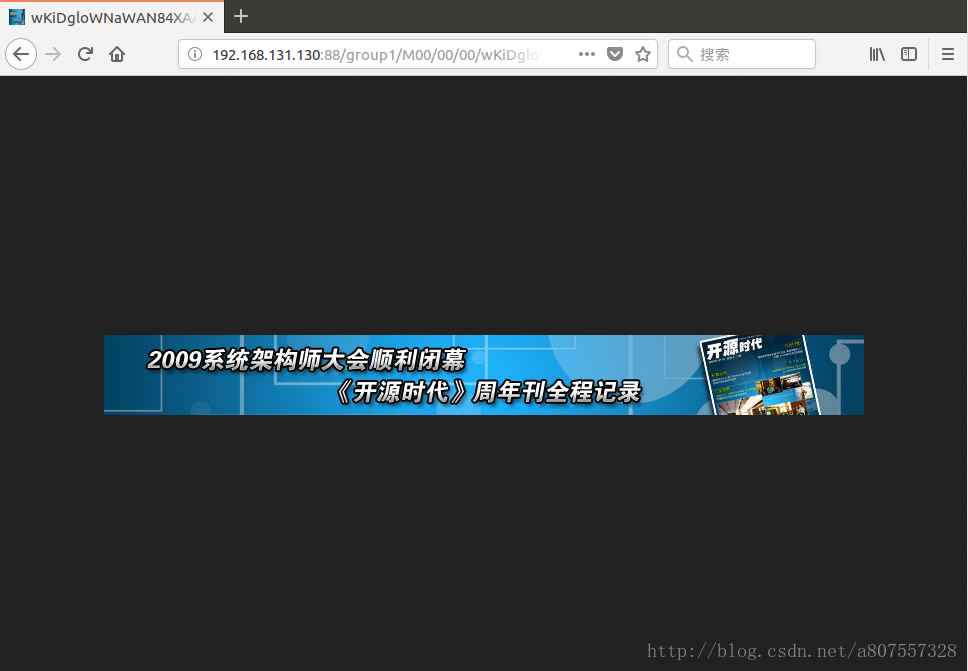
直接访问给出的url,若成功访问图片,则成功。
删除上传的文件:
fdfs_test /etc/fdfs/client.conf delete group1/M00/00/00/wKiDgloWNaWAN84XAABdrZgsqUU110_big.jpg
常见问题:
首先确认nginx能否访问80端口首页,确保nginx配置是正确的。
nginx错误日志位置:/usr/local/nginx/logs/error.log
storage错误日志位置:/home/jwing/fastdfs/storage/logs/storaged.log
具体错误可查看错误日志。
1、fastdfs-nginx-module/src/common.c:21:25: fatal error: fdfs_define.h:
解决方法:ln -s /usr/include/fast* /usr/local/include/
2、file not exist
解决方法:确保配置文件中配置的路径正确,配置文件不生效的情况也可以通过
ln -s来创建软连接至相应路径
3、访问路径时页面返回404错误
解决方法:可能是nginx没有权限,在nginx.conf配置中加入user root;

相关文章推荐
- ubuntu中FastDFS+Nginx环境搭建
- ubuntu中FastDFS+Nginx环境搭建
- ubuntu中FastDFS+Nginx环境搭建
- ubuntu中FastDFS+Nginx环境搭建
- ubuntu中FastDFS+Nginx环境搭建
- ubuntu中FastDFS+Nginx环境搭建
- ubuntu中FastDFS+Nginx环境搭建
- ubuntu中FastDFS+Nginx环境搭建
- ubuntu中FastDFS+Nginx环境搭建
- ubuntu中FastDFS+Nginx环境搭建
- ubuntu中FastDFS+Nginx环境搭建
- ubuntu中FastDFS+Nginx环境搭建
- ubuntu中FastDFS+Nginx环境搭建
- ubuntu中FastDFS+Nginx环境搭建
- ubuntu中FastDFS+Nginx环境搭建
- ubuntu中FastDFS+Nginx环境搭建
- ubuntu中FastDFS+Nginx环境搭建
- ubuntu中FastDFS+Nginx环境搭建
- ubuntu中FastDFS+Nginx环境搭建
- ubuntu中FastDFS+Nginx环境搭建