Nginx+Tomcat搭建集群,Spring Session+Redis实现Session共享
2017-11-13 10:09
1041 查看
小伙伴们好久不见!最近略忙,博客写的有点少,嗯,要加把劲。OK,今天给大家带来一个JavaWeb中常用的架构搭建,即Nginx+Tomcat搭建服务集群,然后通过Spring Session+Redis实现Session共享。
阅读本文需要有如下知识点:
1.Nginx的安装、配置
2.Spring+SpringMVC基本配置
3.Redis缓存的使用
Nginx和Redis我打算后期写几篇博客来介绍,这里小伙伴如果对这两个概念不懂的话可以先自行百度,对于Spring+SpringMVC的使用如果小伙伴有疑问,可以移步这里Spring&SpringMVC框架。
使用IntelliJ IDEA创建Maven项目,并添加相关依赖,依赖如下:
2
3
4
5
6
7
8
9
10
11
12
13
14
15
16
17
18
19
20
21
22
23
24
25
26
27
28
29
30
31
这里要添加的依赖略多,不过大致可以分为如下三类:
1.Redis的Java客户端,这个通过Java代码来操作Redis
2.Spring Data Redis,这个用来简化Redis操作
3.Spring Session,这个用来进行Session的管理
4.Spring
首先在resources文件夹下创建spring+springmvc的配置文件:
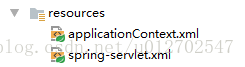
然后在web.xml文件中配置spring和springmvc,如下:
2
3
4
5
6
7
8
9
10
11
12
13
14
15
16
17
18
19
20
然后在applicationContext.xml文件中简单的配置一下spring,如下:
2
3
配置Spring容器要扫描的注解。
然后在spring-servlet.xml中配置SpringMVC容器要扫描的注解,如下:
2
3
4
5
6
7
8
9
10
11
12
spring-servlet.xml的配置相对要简单一些。
OK,至此,Spring+SpringMVC的环境就搭建成功了。
Session一直是我们做集群时一个比较头疼的问题,之前有一个GitHub上的开源控件tomcat-redis-session-manager,但是这个东西目前只支持到Tomcat7,不是最佳选项,我们也可以使用Nginx提供的ip_tables,将同一个请求ip定位到同一台服务器上,但是这样没有办法充分利用服务集群的性能,Spring Session的出现可以很好的帮助我们解决这些问题,它具有如下特点:
1.Spring Session提供了redis、jvm的map、mongo、gemfire、hazelcast、jdbc等多种存储session的容器的方式。
2.同一个浏览器同一个网站,支持多个session。
3.不依赖于cookie。可通过header来传递sessionID
4.WebSocket和spring-session结合,同步生命周期管理。
5.使用简单
OK,接下来我们来看看怎么配置我们的Spring Session,首先在web.xml文件中添加过滤器:
2
3
4
5
6
7
8
这里使用了Spring Web提供的代理过滤器,将拦截到的请求全部交给一个名为springSessionRepositoryFilter的过滤器进行处理。OK,然后在applicationContext.xml中配置Spring Session和Redis,如下:
2
3
4
5
6
hostName即为redis的地址,port为redis的服务端口。
OK,写完这一切就OK了,我们来写一个简单的jsp页面测试一下,测试前记得启动你的redis服务哦。
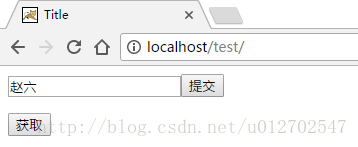
index.jsp页面如下:
2
3
4
5
6
7
8
9
10
11
12
13
14
该页面我尽量做得简单,有两个按钮,第一个向session中存数据,第二个按钮从session中取数据,对应的Controller如下:
2
3
4
5
6
7
8
9
10
11
12
13
14
当我向httpsession中写数据时,这些数据会自动存储到redis缓存/数据库中。在返回session数据时我加上了项目部署路径,是为了在部署到集群上之后区分这个请求是由哪台服务器处理的。启动项目,页面如下:
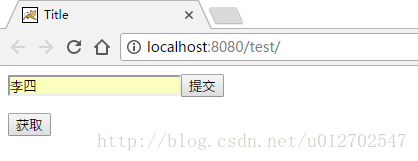
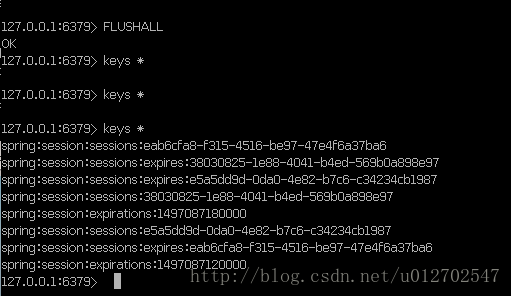
点击提交,会将数据保存到redis 中,如下:
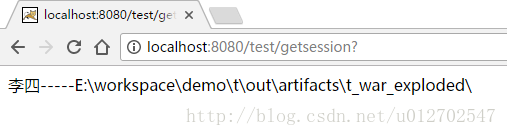
然后再回到起始页面,点击获取按钮,即可以拿到Session中的值,如下:
OK,很简单吧!
至此,我们的Spring Session+Redis实现Session共享这个功能就完成了。接下来我们来看看如何为这个简单的web项目搭建集群。
1.下载Nginx(地址http://nginx.org/),我这里使用的Nginx版本是nginx-1.12.0
2.下载Tomcat,我这里使用的Tomcat版本是apache-tomcat-8.5.12
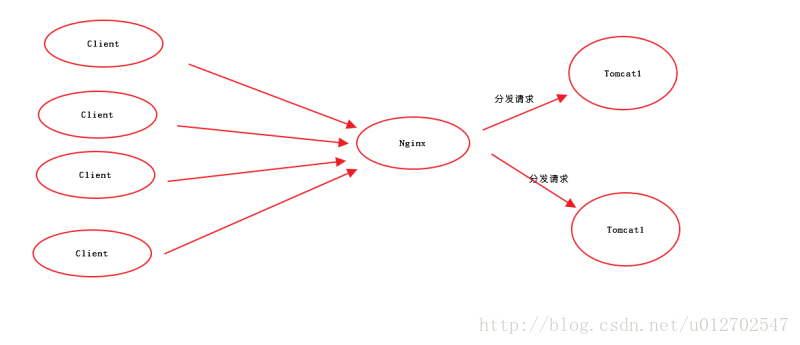
网络拓扑图如下:
将下载的Tomcat复制成两份,如下:

修改Tomcat的配置文件(conf/server.xml),重新设置端口号,每一个Tomcat的server.xml都需要修改三处,如下:
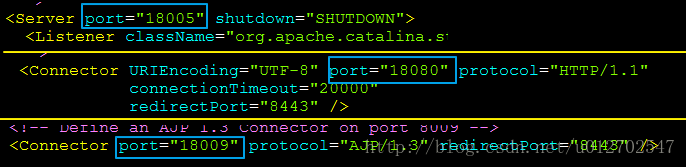
要修改的地方有三处,我将给默认的端口号前面都加1,然后第二个Tomcat我给这三个地方的端口号前面都加2,这样方便我一会在同一台机器上跑多个Tomcat。
OK,做好这一切之后,可以先启动这两个Tomcat,看看能不能正常访问。
OK,两台Tomcat都配置好之后,我们将刚才的项目拷贝到tomcat的webapps目录下,给两个Tomcat都拷贝。这里就不赘述了。
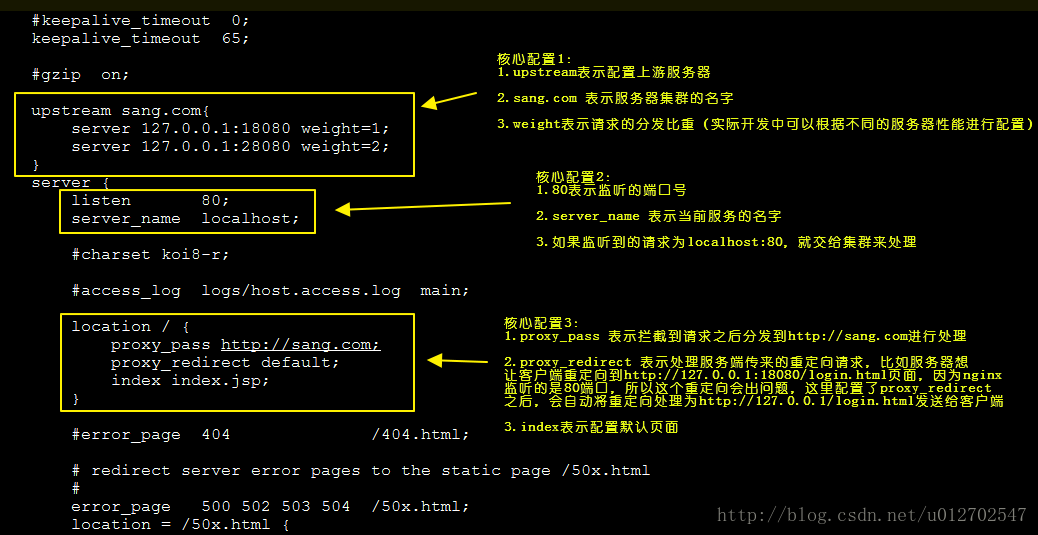
下载Nginx,解压后,配置conf/nginx.conf文件,如下:
配置完成后,启动nginx。再测试。
向session中存数据:
从session中取数据:
多取几次,你会看到请求是由不同的服务器处理的,如下:


OK,至此,我们的所有工作就做完啦!有问题欢迎留言交流。项目下载地址:
http://download.csdn.net/detail/u012702547/9866761
阅读本文需要有如下知识点:
1.Nginx的安装、配置
2.Spring+SpringMVC基本配置
3.Redis缓存的使用
Nginx和Redis我打算后期写几篇博客来介绍,这里小伙伴如果对这两个概念不懂的话可以先自行百度,对于Spring+SpringMVC的使用如果小伙伴有疑问,可以移步这里Spring&SpringMVC框架。
创建Maven项目,添加依赖
使用IntelliJ IDEA创建Maven项目,并添加相关依赖,依赖如下:<dependencies>
<!-- Jedis -->
<dependency>
<groupId>redis.clients</groupId>
<artifactId>jedis</artifactId>
<version>2.9.0</version>
</dependency>
<!-- Spring Data Redis -->
<dependency>
<groupId>org.springframework.data</groupId>
<artifactId>spring-data-redis</artifactId>
<version>1.8.4.RELEASE</version>
</dependency>
<!-- Spring Session -->
<dependency>
<groupId>org.springframework.session</groupId>
<artifactId>spring-session</artifactId>
<version>1.3.1.RELEASE</version>
</dependency>
<!-- Apache Commons Pool -->
<dependency>
<groupId>org.apache.commons</groupId>
<artifactId>commons-pool2</artifactId>
<version>2.4.2</version>
</dependency>
<dependency>
<groupId>org.springframework</groupId>
<artifactId>spring-webmvc</artifactId>
<version>${spring-framework.version}</version>
</dependency>
</dependencies>12
3
4
5
6
7
8
9
10
11
12
13
14
15
16
17
18
19
20
21
22
23
24
25
26
27
28
29
30
31
这里要添加的依赖略多,不过大致可以分为如下三类:
1.Redis的Java客户端,这个通过Java代码来操作Redis
2.Spring Data Redis,这个用来简化Redis操作
3.Spring Session,这个用来进行Session的管理
4.Spring
搭建Spring+SpringMVC环境
首先在resources文件夹下创建spring+springmvc的配置文件: 然后在web.xml文件中配置spring和springmvc,如下:
<context-param>
<param-name>contextConfigLocation</param-name>
<param-value>classpath:applicationContext.xml</param-value>
</context-param>
<listener>
<listener-class>org.springframework.web.context.ContextLoaderListener</listener-class>
</listener>
<servlet>
<servlet-name>springmvc</servlet-name>
<servlet-class>org.springframework.web.servlet.DispatcherServlet</servlet-class>
<init-param>
<param-name>contextConfigLocation</param-name>
<param-value>classpath:spring-servlet.xml</param-value>
</init-param>
<load-on-startup>1</load-on-startup>
</servlet>
<servlet-mapping>
<servlet-name>springmvc</servlet-name>
<url-pattern>/</url-pattern>
</servlet-mapping>
1
2
3
4
5
6
7
8
9
10
11
12
13
14
15
16
17
18
19
20
然后在applicationContext.xml文件中简单的配置一下spring,如下:
<context:component-scan base-package="org.sang" use-default-filters="false">
<context:exclude-filter type="annotation" expression="org.springframework.stereotype.Controller"/>
</context:component-scan>
1
2
3
配置Spring容器要扫描的注解。
然后在spring-servlet.xml中配置SpringMVC容器要扫描的注解,如下:
<?xml version="1.0" encoding="UTF-8"?>
<beans xmlns="http://www.springframework.org/schema/beans"
xmlns:xsi="http://www.w3.org/2001/XMLSchema-instance" xmlns:mvc="http://www.springframework.org/schema/mvc"
xmlns:context="http://www.springframework.org/schema/context"
xsi:schemaLocation="http://www.springframework.org/schema/beans http://www.springframework.org/schema/beans/spring-beans.xsd http://www.springframework.org/schema/mvc http://www.springframework.org/schema/mvc/spring-mvc.xsd http://www.springframework.org/schema/context http://www.springframework.org/schema/context/spring-context.xsd"> <mvc:annotation-driven/>

<context:component-scan base-package="org.sang" use-default-filters="false">
<context:include-filter type="annotation" expression="org.springframework.stereotype.Controller"/>
</context:component-scan>

</beans>
1
2
3
4
5
6
7
8
9
10
11
12
spring-servlet.xml的配置相对要简单一些。
OK,至此,Spring+SpringMVC的环境就搭建成功了。
配置Spring Session和Redis
Session一直是我们做集群时一个比较头疼的问题,之前有一个GitHub上的开源控件tomcat-redis-session-manager,但是这个东西目前只支持到Tomcat7,不是最佳选项,我们也可以使用Nginx提供的ip_tables,将同一个请求ip定位到同一台服务器上,但是这样没有办法充分利用服务集群的性能,Spring Session的出现可以很好的帮助我们解决这些问题,它具有如下特点:1.Spring Session提供了redis、jvm的map、mongo、gemfire、hazelcast、jdbc等多种存储session的容器的方式。
2.同一个浏览器同一个网站,支持多个session。
3.不依赖于cookie。可通过header来传递sessionID
4.WebSocket和spring-session结合,同步生命周期管理。
5.使用简单
OK,接下来我们来看看怎么配置我们的Spring Session,首先在web.xml文件中添加过滤器:
<filter>
<filter-name>springSessionRepositoryFilter</filter-name>
<filter-class>org.springframework.web.filter.DelegatingFilterProxy</filter-class>
</filter>
<filter-mapping>
<filter-name>springSessionRepositoryFilter</filter-name>
<url-pattern>/*</url-pattern>
</filter-mapping>
1
2
3
4
5
6
7
8
这里使用了Spring Web提供的代理过滤器,将拦截到的请求全部交给一个名为springSessionRepositoryFilter的过滤器进行处理。OK,然后在applicationContext.xml中配置Spring Session和Redis,如下:
<bean class="org.springframework.session.data.redis.config.annotation.web.http.RedisHttpSessionConfiguration"/>
<bean class="org.springframework.data.redis.connection.jedis.JedisConnectionFactory">
<property name="hostName" value="192.168.248.128"/>
<property name="port" value="6379"/>
<property name="database" value="0"/>
</bean>
1
2
3
4
5
6
hostName即为redis的地址,port为redis的服务端口。
OK,写完这一切就OK了,我们来写一个简单的jsp页面测试一下,测试前记得启动你的redis服务哦。
测试
index.jsp页面如下:<%@ page contentType="text/html;charset=UTF-8" language="java" %> <html> <head> <title>Title</title> </head> <body> <form action="/setsession"> <input type="text" name="name"><input type="submit" value="提交"> </form> <form action="/getsession"> <input type="submit" value="获取"> </form> </body> </html>1
2
3
4
5
6
7
8
9
10
11
12
13
14
该页面我尽量做得简单,有两个按钮,第一个向session中存数据,第二个按钮从session中取数据,对应的Controller如下:
@Controller
public class HelloController {
@RequestMapping("/setsession")
@ResponseBody
public void setSession(HttpSession session, String name) {
session.setAttribute("name", name);
}

@RequestMapping(value = "/getsession",produces = "text/html;charset=utf-8")
@ResponseBody
public String getSession(HttpSession session, HttpServletRequest req) {
return session.getAttribute("name").toString()+"-----"+req.getServletContext().getRealPath("/");
}
}12
3
4
5
6
7
8
9
10
11
12
13
14
当我向httpsession中写数据时,这些数据会自动存储到redis缓存/数据库中。在返回session数据时我加上了项目部署路径,是为了在部署到集群上之后区分这个请求是由哪台服务器处理的。启动项目,页面如下:
点击提交,会将数据保存到redis 中,如下:
然后再回到起始页面,点击获取按钮,即可以拿到Session中的值,如下:
OK,很简单吧!
至此,我们的Spring Session+Redis实现Session共享这个功能就完成了。接下来我们来看看如何为这个简单的web项目搭建集群。
搭建集群的准备工作
1.下载Nginx(地址http://nginx.org/),我这里使用的Nginx版本是nginx-1.12.0 2.下载Tomcat,我这里使用的Tomcat版本是apache-tomcat-8.5.12
网络拓扑图如下:
将下载的Tomcat复制成两份,如下:
修改Tomcat的配置文件(conf/server.xml),重新设置端口号,每一个Tomcat的server.xml都需要修改三处,如下:
要修改的地方有三处,我将给默认的端口号前面都加1,然后第二个Tomcat我给这三个地方的端口号前面都加2,这样方便我一会在同一台机器上跑多个Tomcat。
OK,做好这一切之后,可以先启动这两个Tomcat,看看能不能正常访问。
部署项目
OK,两台Tomcat都配置好之后,我们将刚才的项目拷贝到tomcat的webapps目录下,给两个Tomcat都拷贝。这里就不赘述了。
配置Nginx
下载Nginx,解压后,配置conf/nginx.conf文件,如下: 配置完成后,启动nginx。再测试。
测试
向session中存数据: 从session中取数据:
多取几次,你会看到请求是由不同的服务器处理的,如下:
OK,至此,我们的所有工作就做完啦!有问题欢迎留言交流。项目下载地址:
http://download.csdn.net/detail/u012702547/9866761

相关文章推荐
- 使用nginx搭建集群tomcat8,redis实现session共享,文件共享问题
- 使用nginx搭建集群tomcat8,redis实现session共享,文件共享问题
- Nginx+Tomcat搭建集群,Spring Session+Redis实现Session共享
- Nginx+Tomcat搭建集群,Spring Session+Redis实现Session共享
- 使用nginx搭建集群tomcat8,redis实现session共享,文件共享问题
- 搭建nginx+tomcat+memcache三套集群,开发简单springboot工程,实现session共享(持续更新中)
- Nginx+Tomcat搭建集群,Spring Session+Redis实现Session共享
- Nginx+Tomcat搭建集群,Spring Session+Redis实现Session共享
- 图文并茂超详细搭建redis缓存服务器(nginx+tomcat+redis+mysql实现session会话共享)
- Redis+Tomcat+Nginx集群实现Session共享,Tomcat Session共享
- 搭建Nginx(负载均衡)+Redis(Session共享)+Tomcat集群
- Linux高可用(HA)之Nginx+Redis+Tomcat集群实现session保持和共享
- Nginx +Tomcat集群搭建 Redis实现session共享
- Nginx+Tomcat+Redis搭建共享SESSION集群
- 初步搭建Nginx(负载均衡)+Redis(Session共享)+Tomcat集群
- tomcat+nginx 分布式集群 redis实现session共享
- Nginx+Redis+Tomcat实现session共享的集群
- Nginx+Tomcat+Redis实现应用服务器集群负载均衡和Session共享
- 【原创】搭建Nginx(负载均衡)+Redis(Session共享)+Tomcat集群
- 搭建Nginx(负载均衡)+Redis(Session共享)+Tomcat集群