10、Spring技术栈-整合Redis,使用RedisTemplate实现数据缓存实战
2017-11-07 18:24
951 查看
关于Redis的介绍,我们不做过多讲解,有兴趣可直接参考Redis官方网站(百度一下,你就知道)。
1、整合准备工作
在本机安装Redis,windows版本Redis下载链接:https://github.com/MSOpenTech/redis,下载之后按照一般安装方式默认安装就可以了,安装完之后启动Redis。
示例所使用spring-data-redis版本:1.7.5.RELEASE
redis-clients版本:2.9.0
zkclient版本:0.10
dubbo版本:2.8.4
本文是即(Spring技术栈-整合dubbo、zookeeper)之后的一个实际应用场景,也是采用分布式的方式进行开发实现,如果对dubbo或者zookeeper不熟悉,可先阅读上文了解。
2、示例场景介绍
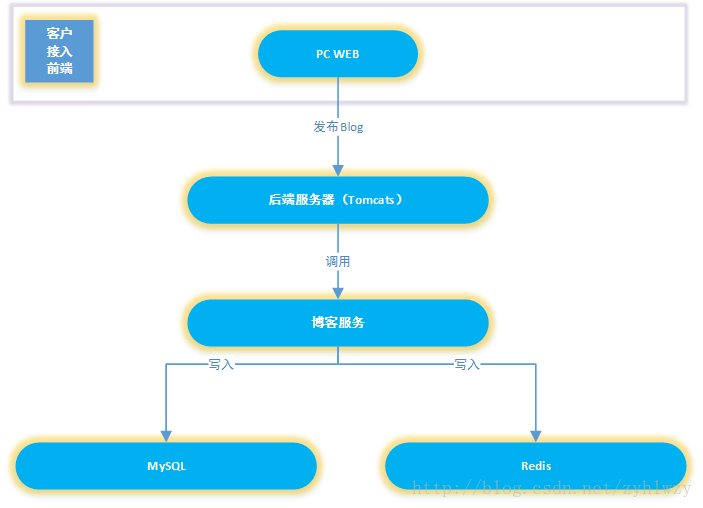
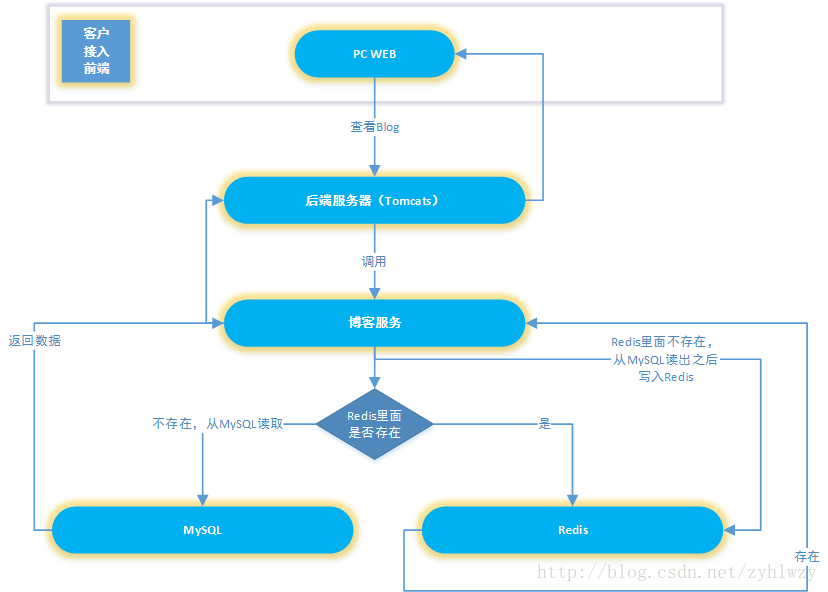
我们通过一个实例来介绍如何整合Redis并使用RedisTemplate实现数据缓存。我们有这样一个需求,在博客系统中,用户发表一篇博客,我们需要将博客存到MySQL的同时保存一份到Redis中,读取博客内容时先从Redis里查询,如果Redis中已经缓存,则从缓存直接读取,否则从数据库读取并缓存到Redis中,下次读取则直接从缓存读取。
发布博客流程如下图所示:
查看博客流程如下图所示:
3、在博客服务项目中添加依赖
注意:redis_clients_version为2.9.0,spring_data_redis_version版本为1.7.5.RELEASE
4、在resources目录添加spring-context-redis.xml,并写入如下内容
5、在spring-context.xml中引入spring-context-redis.xml文件
spring-context.xml中添加如下内容:
6、在resources目录添加config.properties,并写入如下内容
7、实现RedisUtils工具类
由于我们使用RedisTemplate来实现数据的写入、删除、读取等操作,但是如果在每个需要用到RedisTemplate的地方都是用RedisTemplate对象的话,相对比较麻烦,会重复写很多代码,所以我们自己封装一个RedisUtils工具类来实现数据的写入、读取等操作。具体实现如下:
项目源码:http://download.csdn.net/download/zyhlwzy/10108090
注意:数据脚本在源码文件的blog/database下;
由于系统所使用的dubbo版本是2.8.4,但是此版本的dubbo官方并没有更新到Maven仓库,所以必须下载dubbo源码编译并上传到自己的私有库,示例源码的私服地址为http://192.168.199.252:8081/nexus/content/groups/public/,读者需要自己建私服,自行编译,具体操作方法读者自行百度,方法很多。
相似文章: Spring整合Redis实现数据缓存
1、整合准备工作
在本机安装Redis,windows版本Redis下载链接:https://github.com/MSOpenTech/redis,下载之后按照一般安装方式默认安装就可以了,安装完之后启动Redis。
示例所使用spring-data-redis版本:1.7.5.RELEASE
redis-clients版本:2.9.0
zkclient版本:0.10
dubbo版本:2.8.4
本文是即(Spring技术栈-整合dubbo、zookeeper)之后的一个实际应用场景,也是采用分布式的方式进行开发实现,如果对dubbo或者zookeeper不熟悉,可先阅读上文了解。
2、示例场景介绍
我们通过一个实例来介绍如何整合Redis并使用RedisTemplate实现数据缓存。我们有这样一个需求,在博客系统中,用户发表一篇博客,我们需要将博客存到MySQL的同时保存一份到Redis中,读取博客内容时先从Redis里查询,如果Redis中已经缓存,则从缓存直接读取,否则从数据库读取并缓存到Redis中,下次读取则直接从缓存读取。
发布博客流程如下图所示:
查看博客流程如下图所示:
3、在博客服务项目中添加依赖
<dependency>
<groupId>redis.clients</groupId>
<artifactId>jedis</artifactId>
<version>${redis_clients_version}</version>
</dependency>
<dependency>
<groupId>org.springframework.data</groupId>
<artifactId>spring-data-redis</artifactId>
<version>${spring_data_redis_version}</version>
</dependency>
注意:redis_clients_version为2.9.0,spring_data_redis_version版本为1.7.5.RELEASE
4、在resources目录添加spring-context-redis.xml,并写入如下内容
<?xml version="1.0" encoding="UTF-8"?>
<beans xmlns="http://www.springframework.org/schema/beans"
xmlns:xsi="http://www.w3.org/2001/XMLSchema-instance" xmlns:context="http://www.springframework.org/schema/context"
xmlns:jdbc="http://www.springframework.org/schema/jdbc" xmlns:jee="http://www.springframework.org/schema/jee"
xmlns:tx="http://www.springframework.org/schema/tx" xmlns:util="http://www.springframework.org/schema/util"
xmlns:task="http://www.springframework.org/schema/task" xmlns:cache="http://www.springframework.org/schema/cache"
xmlns:c='http://www.springframework.org/schema/c' xmlns:p="http://www.springframework.org/schema/p"
xsi:schemaLocation=" http://www.springframework.org/schema/beans http://www.springframework.org/schema/beans/spring-beans-4.0.xsd http://www.springframework.org/schema/context http://www.springframework.org/schema/context/spring-context-4.0.xsd http://www.springframework.org/schema/jdbc http://www.springframework.org/schema/jdbc/spring-jdbc-4.0.xsd http://www.springframework.org/schema/jee http://www.springframework.org/schema/jee/spring-jee-4.0.xsd http://www.springframework.org/schema/tx http://www.springframework.org/schema/tx/spring-tx-4.0.xsd http://www.springframework.org/schema/util http://www.springframework.org/schema/util/spring-util-4.0.xsd http://www.springframework.org/schema/task http://www.springframework.org/schema/task/spring-task-4.0.xsd http://www.springframework.org/schema/cache http://www.springframework.org/schema/cache/spring-cache-3.1.xsd"
default-lazy-init="true">

<!-- 开启spring cache注解功能 -->
<cache:annotation-driven cache-manager="redisCacheManager" />

<context:annotation-config />

<context:property-placeholder
ignore-unresolvable="true" location="classpath:config.properties" />

<!-- Redis -->
<bean id="poolConfig" class="redis.clients.jedis.JedisPoolConfig" >
<property name="maxTotal" value="${redis.maxTotal}"/>
<property name="maxIdle" value="${redis.maxIdle}" />
<property name="maxWaitMillis" value="${redis.maxWait}" />
<property name="testOnBorrow" value="${redis.testOnBorrow}" />
</bean>

<!-- redis服务器中心 -->
<bean id="jedisConnectionFactory"  class="org.springframework.data.redis.connection.jedis.JedisConnectionFactory" >
<property name="poolConfig" ref="poolConfig" />
<property name="port" value="${redis.port}" />
<property name="hostName" value="${redis.host}" />
<property name="timeout" value="${redis.timeout}" ></property>
</bean>

<bean id="redisTemplate" class="org.springframework.data.redis.core.RedisTemplate">
<property name="connectionFactory" ref="jedisConnectionFactory" />
<property name="keySerializer">
<bean
class="org.springframework.data.redis.serializer.StringRedisSerializer" />
</property>
<property name="valueSerializer">
<bean
class="org.springframework.data.redis.serializer.JdkSerializationRedisSerializer" />
</property>
</bean>

<!-- redis缓存管理器 -->
<bean id="redisCacheManager" class="org.springframework.data.redis.cache.RedisCacheManager">
<constructor-arg name="redisOperations" ref="redisTemplate" />
</bean>

<bean id="redisUtils" class="ron.blog.blog_service.utils.RedisUtils" />
</beans>
5、在spring-context.xml中引入spring-context-redis.xml文件
spring-context.xml中添加如下内容:
<import resource="classpath:spring-context-redis.xml" />
6、在resources目录添加config.properties,并写入如下内容
#Redis信息配置
#绑定的主机地址
redis.host=127.0.0.1
#Redis监听端口,默认端口为6379
redis.port=6379
#授权密码(本例子没有使用)
redis.password=123456
#最大空闲数:空闲链接数大于maxIdle时,将进行回收
redis.maxIdle=100
#最大连接数:能够同时建立的“最大链接个数”
redis.maxTotal=300
#最大等待时间:单位ms
redis.maxWait=1000
#使用连接时,检测连接是否成功
redis.testOnBorrow=true
#当客户端闲置多长时间后关闭连接,如果指定为0,表示关闭该功能
redis.timeout=10000
redis.usePool=true
7、实现RedisUtils工具类
由于我们使用RedisTemplate来实现数据的写入、删除、读取等操作,但是如果在每个需要用到RedisTemplate的地方都是用RedisTemplate对象的话,相对比较麻烦,会重复写很多代码,所以我们自己封装一个RedisUtils工具类来实现数据的写入、读取等操作。具体实现如下:
public class RedisUtils {
/**
* RedisTemplate是一个简化Redis数据访问的一个帮助类,
* 此类对Redis命令进行高级封装,通过此类可以调用ValueOperations和ListOperations等等方法。
*/
@Autowired
private RedisTemplate<Serializable, Object> redisTemplate;

/**
* 批量删除对应的value
*
* @param keys
*/
public void remove(final String... keys) {
for (String key : keys) {
remove(key);
}
}

/**
* 批量删除key
*
* @param pattern
*/
public void removePattern(final String pattern) {
Set<Serializable> keys = redisTemplate.keys(pattern);
if (keys.size() > 0)
redisTemplate.delete(keys);
}

/**
* 删除对应的value
* @param key
*/
public void remove(final String key) {
if (exists(key)) {
redisTemplate.delete(key);
}
}

/**
* 缓存是否存在
* @param key
* @return
*/
public boolean exists(final String key) {
return redisTemplate.hasKey(key);
}

/**
* 读取缓存
* @param key
* @return
*/
public Object get(final String key) {
Object result = null;
ValueOperations<Serializable, Object> operations = redisTemplate.opsForValue();
result = operations.get(key);
return result;
}

/**
*
* @Author Ron
* @param key
* @param hashKey
* @return
*/
public Object get(final String key, final String hashKey){
Object result = null;
HashOperations<Serializable,Object,Object> operations = redisTemplate.opsForHash();
result = operations.get(key, hashKey);
return result;
}

/**
* 写入缓存
*
* @param key
* @param value
* @return
*/
public boolean set(final String key, Object value) {
boolean result = false;
try {
ValueOperations<Serializable, Object> operations = redisTemplate.opsForValue();
operations.set(key, value);
result = true;
} catch (Exception e) {
e.printStackTrace();
}
return result;
}

/**
*
* @Author Ron
* @param key
* @param hashKey
* @param value
* @return
*/
public boolean set(final String key, final String hashKey, Object value) {
boolean result = false;
try {
HashOperations<Serializable,Object,Object> operations = redisTemplate.opsForHash();
operations.put(key, hashKey, value);
result = true;
} catch (Exception e) {
e.printStackTrace();
}
return result;
}

/**
* 写入缓存
*
* @param key
* @param value
* @return
*/
public boolean set(final String key, Object value, Long expireTime) {
boolean result = false;
try {
ValueOperations<Serializable, Object> operations = redisTemplate.opsForValue();
operations.set(key, value);
redisTemplate.expire(key, expireTime, TimeUnit.SECONDS);
result = true;
} catch (Exception e) {
e.printStackTrace();
}
return result;
}
}项目源码:http://download.csdn.net/download/zyhlwzy/10108090
注意:数据脚本在源码文件的blog/database下;
由于系统所使用的dubbo版本是2.8.4,但是此版本的dubbo官方并没有更新到Maven仓库,所以必须下载dubbo源码编译并上传到自己的私有库,示例源码的私服地址为http://192.168.199.252:8081/nexus/content/groups/public/,读者需要自己建私服,自行编译,具体操作方法读者自行百度,方法很多。
相似文章: Spring整合Redis实现数据缓存

相关文章推荐
- 分布式缓存技术redis学习系列(五)——redis实战(redis与spring整合,分布式锁实现)
- 11、Spring技术栈-整合Redis,通过Redis的Master-Slave实现缓存数据读写分离
- 分布式缓存技术redis学习系列(五)——redis实战(redis与spring整合,分布式锁实现)
- 分布式缓存技术redis学习系列(五)——redis实战(redis与spring整合,分布式锁实现)
- jedis与spring整合及简单的使用RedisTemplate操作
- 关于springboot整合redis(使用RedisTemplate操作redis)
- 使用 SpringBoot 之 JPA 整合 Redis 实现缓存
- 分布式缓存技术redis学习系列(五)——spring-data-redis与JedisPool的区别、使用ShardedJedisPool与spring集成的实现及一致性哈希分析
- jedis与spring整合及简单的使用RedisTemplate操作
- spring整合redis实现数据缓存的实例代码
- redis整合spring实现对数据的缓存
- 分布式缓存技术redis学习系列(五)——redis实战(redis与spring整合,分布式锁实现)
- spring boot 整合redis对查询数据做缓存( 利用spring的AOP技术)
- spring boot 整合redis对查询数据做缓存( 利用spring的AOP技术)
- spring整合redis以及使用RedisTemplate的方法
- 12、Spring技术栈-Redis Sentinel实现高可用缓存集群方案实战
- 分布式缓存技术redis学习系列(五)——spring-data-redis与JedisPool的区别、使用ShardedJedisPool与spring集成的实现及一致性哈希分析
- 分布式缓存技术redis学习系列(五)——spring-data-redis与JedisPool的区别、使用ShardedJedisPool与spring集成的实现及一致性哈希分析
- Redis整合Spring结合使用缓存实例
- Spring Boot使用redis做数据缓存