Spring Boot 快速入门
2017-11-01 13:01
585 查看
一、背景介绍
提到微服务我们可能会想到许多热门的知识点,比如Spring Boot、docker、k8s、restful、持续交付、分布式事务,服务拆分等等,接下来我会给大家分享Spring Boot相关的系列知识,同时欢迎大家留言共同讨论,指出不足之处。
相信大部分学习Java的人都会这样的经历,在你第一次接触和学习spring框架的时候,在感叹它的强大同时也会其繁杂的配置拍桌而起,“我”明明配置和视频讲述的一样,为啥我的不能运行呢(然后一些人退却啦)?即使你熟悉了Spring,也会因为一堆反复黏贴xml配置而烦恼,然后有一批聪明人出现,Spring annotation出现极大简化了配置,简化了spring学习曲线,但是拦截器,监听器,事务,数据库连接等还是进行配置。然而,人类对于技术追求是无止境,如实就有人想到如果spring不存在xml配置多好?那么很高兴告诉你,它已经出现,它叫Spring
Boot。
什么是Spring Boot呢?官网是这么说的“Spring Boot makes it easy to create stand-alone, production-gradeSpring based Applications that you can “just run”. ”,大致的意思是:Spring Boot使我们更容易去创建基于Spring的独立和产品级的可以”即时运行“的应用和服务。支持约定大于配置,目的是尽可能快地构建和运行Spring应用。Spring
Boot的主要优点:
(1) 为所有Spring开发者更快的入门;
(2) 开箱即用,提供各种默认配置来简化项目配置;
(3) 提供一系列的非功能性的功能,是常见的大型类的项目(例如:内嵌式容器、安全、健康检查等)
(4) 没有冗余代码生成和XML配置的要求
二、快速入门实例
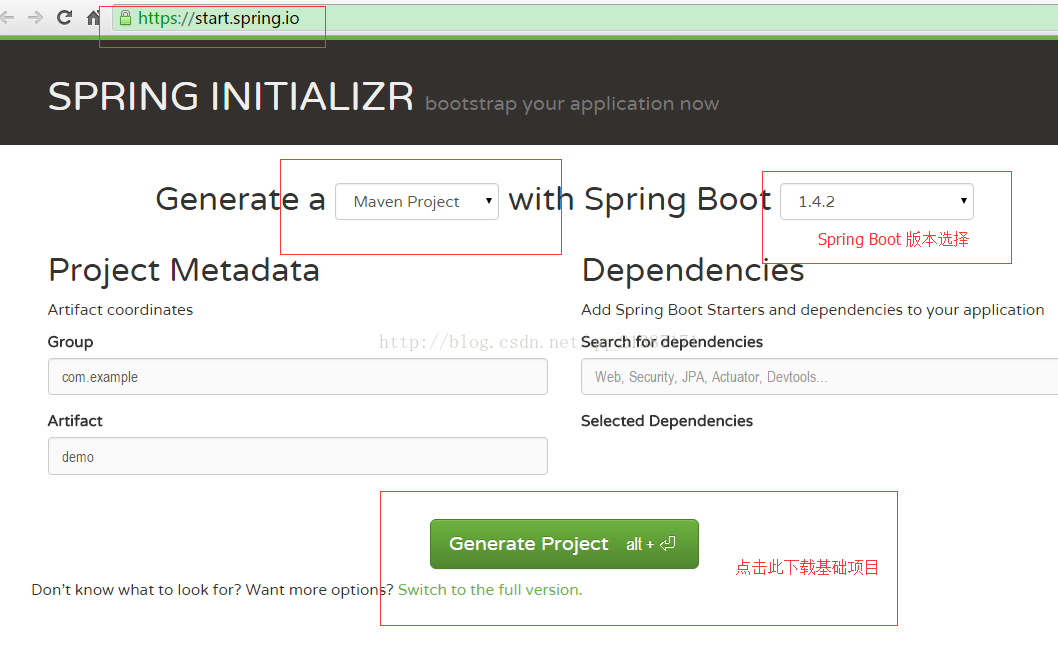
本实例是快速开发一个“Hello World”Web应用程序,通过这个例子对Spring Boot有一个初步的了解,并体验其结构简单、开发快速的特性。除了传统的使用IDEA或者Eclipse创建项目外,SpringBoot提供使用SPRINGINITIALIZR工具(https://start.spring.io)产生基础项目(选择Spring
Boot版本以及其他选项,然后下载即可),项目范例源代码下载地址为:https://github.com/dreamerkr/SpringBoot,
具体如下图所示:
(1) 项目结构简介
我这里是自己手动创建项目,不过和上面Spring提供的工具创建是一样的效果,创建好的项目结构如下所示:
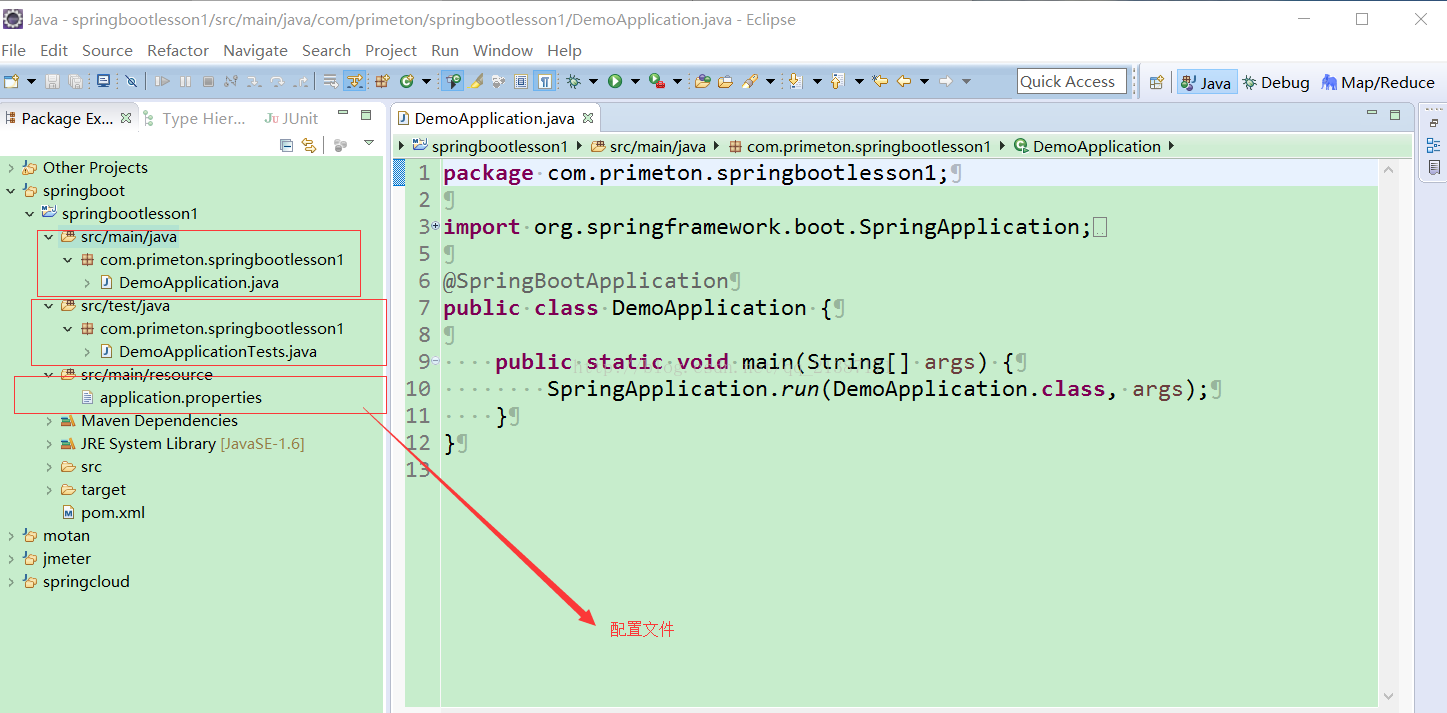
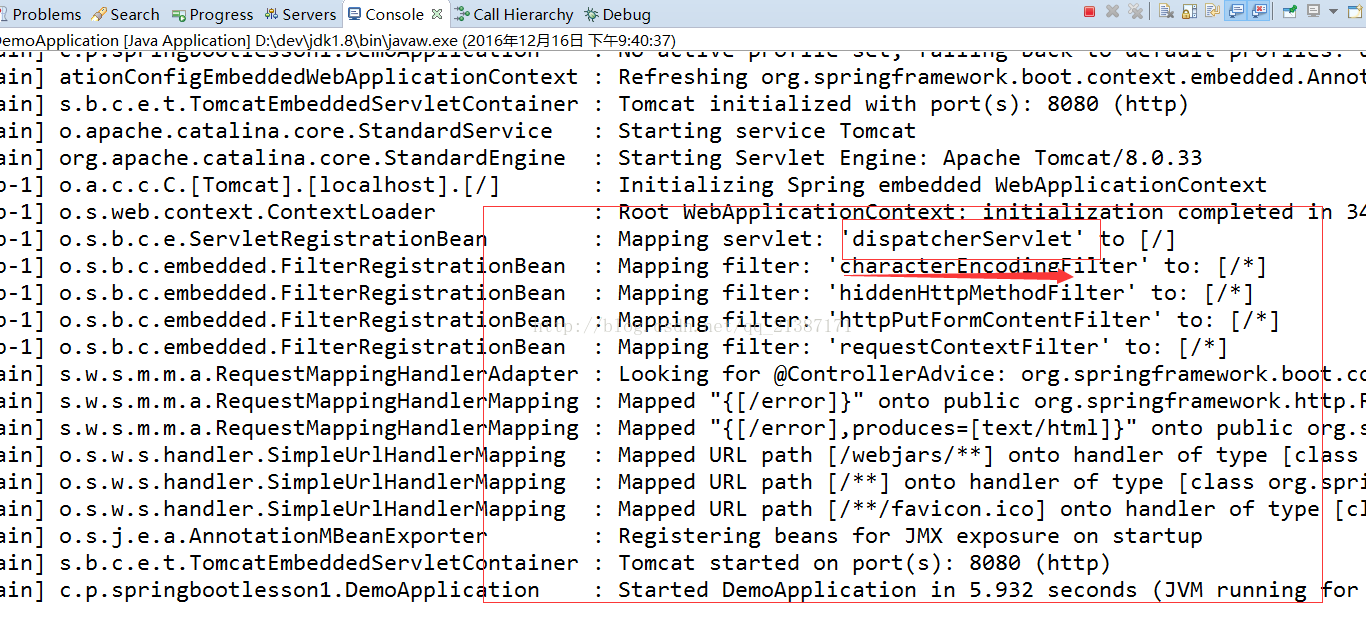
主要有java、resources、test三目录,分别是程序入口、配置文件和测试入口,使用DemoApplication和DemoApplicationTests类均可以启动项目,通过观察启动日志发现使用很多的默认设置,具体如下图所示:
(2) pom.xml文件简介
此文件引入了三个模块分别是starter(核心模块,包括自动配置支持、日志和YAML)、starter-test(测试模块,包括JUnit、Hamcrest、Mockito)、starter-web(Web模块,包括SpringMVC、Tomcat),具体代码如下所示:
[html] view
plain copy
<span style="font-size:14px;"> <parent>
<groupId>org.springframework.boot</groupId>
<artifactId>spring-boot-starter-parent</artifactId>
<version>1.3.5.RELEASE</version>
</parent>
<dependencies>
<dependency>
<groupId>org.springframework.boot</groupId>
<artifactId>spring-boot-starter</artifactId>
</dependency>
<dependency>
<groupId>org.springframework.boot</groupId>
<artifactId>spring-boot-starter-web</artifactId>
</dependency>
<dependency>
<groupId>org.springframework.boot</groupId>
<artifactId>spring-boot-starter-test</artifactId>
<scope>test</scope>
</dependency>
</dependencies></span>
(3) 编写HelloController类
HelloController类的内容如下:
[java] view
plain copy
package com.primeton.springbootlesson1;
import org.springframework.web.bind.annotation.RequestMapping;
import org.springframework.web.bind.annotation.RestController;
/**
*
* TODO 此处填写 class 信息
*
* @author wangzhao (mailto:wangzhao@primeton.com)
*/
@RestController
public class HelloController {
@RequestMapping("/hello")
public String sayHello(){
return "Hello World";
}
}
(4) 编写单元测试用例
DemoApplicationTests类代码如下所示:
[java] view
plain copy
import static org.hamcrest.Matchers.equalTo;
import staticorg.springframework.test.web.servlet.result.MockMvcResultMatchers.content;
import staticorg.springframework.test.web.servlet.result.MockMvcResultMatchers.status;
import org.junit.Before;
import org.junit.Test;
import org.junit.runner.RunWith;
import org.springframework.boot.test.SpringApplicationConfiguration;
import org.springframework.http.MediaType;
import org.springframework.mock.web.MockServletContext;
import org.springframework.test.context.junit4.SpringJUnit4ClassRunner;
import org.springframework.test.context.web.WebAppConfiguration;
import org.springframework.test.web.servlet.MockMvc;
import org.springframework.test.web.servlet.request.MockMvcRequestBuilders;
import org.springframework.test.web.servlet.setup.MockMvcBuilders;
@RunWith(SpringJUnit4ClassRunner.class)
@SpringApplicationConfiguration(classes = MockServletContext.class)
@WebAppConfiguration
public class DemoApplicationTests {
private MockMvc mockMvc;
@Before
public void setUp(){
mockMvc = MockMvcBuilders.standaloneSetup(new HelloController()).build();
}
@Test
public void getHello() throws Exception {
mockMvc.perform(MockMvcRequestBuilders.get("/hello").accept(MediaType.APPLICATION_JSON))
.andExpect(status().isOk())
.andExpect(content().string(equalTo("Hello World")));
}
}
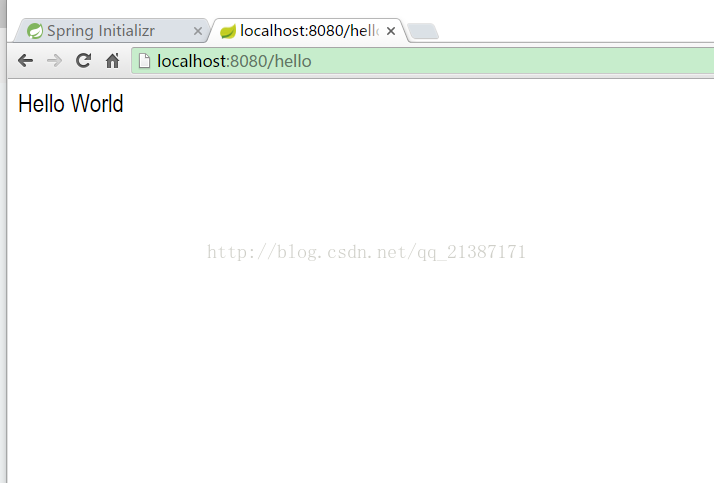
(5) 启动运行范例
运行DemoApplication主程序,然后打开浏览器访问http://localhost:8080/hello,页面显示如下图所示:
提到微服务我们可能会想到许多热门的知识点,比如Spring Boot、docker、k8s、restful、持续交付、分布式事务,服务拆分等等,接下来我会给大家分享Spring Boot相关的系列知识,同时欢迎大家留言共同讨论,指出不足之处。
相信大部分学习Java的人都会这样的经历,在你第一次接触和学习spring框架的时候,在感叹它的强大同时也会其繁杂的配置拍桌而起,“我”明明配置和视频讲述的一样,为啥我的不能运行呢(然后一些人退却啦)?即使你熟悉了Spring,也会因为一堆反复黏贴xml配置而烦恼,然后有一批聪明人出现,Spring annotation出现极大简化了配置,简化了spring学习曲线,但是拦截器,监听器,事务,数据库连接等还是进行配置。然而,人类对于技术追求是无止境,如实就有人想到如果spring不存在xml配置多好?那么很高兴告诉你,它已经出现,它叫Spring
Boot。
什么是Spring Boot呢?官网是这么说的“Spring Boot makes it easy to create stand-alone, production-gradeSpring based Applications that you can “just run”. ”,大致的意思是:Spring Boot使我们更容易去创建基于Spring的独立和产品级的可以”即时运行“的应用和服务。支持约定大于配置,目的是尽可能快地构建和运行Spring应用。Spring
Boot的主要优点:
(1) 为所有Spring开发者更快的入门;
(2) 开箱即用,提供各种默认配置来简化项目配置;
(3) 提供一系列的非功能性的功能,是常见的大型类的项目(例如:内嵌式容器、安全、健康检查等)
(4) 没有冗余代码生成和XML配置的要求
二、快速入门实例
本实例是快速开发一个“Hello World”Web应用程序,通过这个例子对Spring Boot有一个初步的了解,并体验其结构简单、开发快速的特性。除了传统的使用IDEA或者Eclipse创建项目外,SpringBoot提供使用SPRINGINITIALIZR工具(https://start.spring.io)产生基础项目(选择Spring
Boot版本以及其他选项,然后下载即可),项目范例源代码下载地址为:https://github.com/dreamerkr/SpringBoot,
具体如下图所示:
(1) 项目结构简介
我这里是自己手动创建项目,不过和上面Spring提供的工具创建是一样的效果,创建好的项目结构如下所示:
主要有java、resources、test三目录,分别是程序入口、配置文件和测试入口,使用DemoApplication和DemoApplicationTests类均可以启动项目,通过观察启动日志发现使用很多的默认设置,具体如下图所示:
(2) pom.xml文件简介
此文件引入了三个模块分别是starter(核心模块,包括自动配置支持、日志和YAML)、starter-test(测试模块,包括JUnit、Hamcrest、Mockito)、starter-web(Web模块,包括SpringMVC、Tomcat),具体代码如下所示:
[html] view
plain copy
<span style="font-size:14px;"> <parent>
<groupId>org.springframework.boot</groupId>
<artifactId>spring-boot-starter-parent</artifactId>
<version>1.3.5.RELEASE</version>
</parent>
<dependencies>
<dependency>
<groupId>org.springframework.boot</groupId>
<artifactId>spring-boot-starter</artifactId>
</dependency>
<dependency>
<groupId>org.springframework.boot</groupId>
<artifactId>spring-boot-starter-web</artifactId>
</dependency>
<dependency>
<groupId>org.springframework.boot</groupId>
<artifactId>spring-boot-starter-test</artifactId>
<scope>test</scope>
</dependency>
</dependencies></span>
(3) 编写HelloController类
HelloController类的内容如下:
[java] view
plain copy
package com.primeton.springbootlesson1;
import org.springframework.web.bind.annotation.RequestMapping;
import org.springframework.web.bind.annotation.RestController;
/**
*
* TODO 此处填写 class 信息
*
* @author wangzhao (mailto:wangzhao@primeton.com)
*/
@RestController
public class HelloController {
@RequestMapping("/hello")
public String sayHello(){
return "Hello World";
}
}
(4) 编写单元测试用例
DemoApplicationTests类代码如下所示:
[java] view
plain copy
import static org.hamcrest.Matchers.equalTo;
import staticorg.springframework.test.web.servlet.result.MockMvcResultMatchers.content;
import staticorg.springframework.test.web.servlet.result.MockMvcResultMatchers.status;
import org.junit.Before;
import org.junit.Test;
import org.junit.runner.RunWith;
import org.springframework.boot.test.SpringApplicationConfiguration;
import org.springframework.http.MediaType;
import org.springframework.mock.web.MockServletContext;
import org.springframework.test.context.junit4.SpringJUnit4ClassRunner;
import org.springframework.test.context.web.WebAppConfiguration;
import org.springframework.test.web.servlet.MockMvc;
import org.springframework.test.web.servlet.request.MockMvcRequestBuilders;
import org.springframework.test.web.servlet.setup.MockMvcBuilders;
@RunWith(SpringJUnit4ClassRunner.class)
@SpringApplicationConfiguration(classes = MockServletContext.class)
@WebAppConfiguration
public class DemoApplicationTests {
private MockMvc mockMvc;
@Before
public void setUp(){
mockMvc = MockMvcBuilders.standaloneSetup(new HelloController()).build();
}
@Test
public void getHello() throws Exception {
mockMvc.perform(MockMvcRequestBuilders.get("/hello").accept(MediaType.APPLICATION_JSON))
.andExpect(status().isOk())
.andExpect(content().string(equalTo("Hello World")));
}
}
(5) 启动运行范例
运行DemoApplication主程序,然后打开浏览器访问http://localhost:8080/hello,页面显示如下图所示:

相关文章推荐
- Spring基础:快速入门spring boot(2):SPRING INITIALIZR
- Spring Boot快速入门
- Spring基础:快速入门spring boot(3):创建Restful的Web服务
- 【SpringBoot】的快速入门程序
- springboot学习(二) Spring Boot 快速入门
- Spring Boot实战与原理分析之快速入门
- Spring Boot RabbitMQ快速入门 (2)
- 转-Spring Boot 快速入门
- Spring Boot + MyBatis 快速入门
- Spring Boot快速入门及实例
- springboot快速入门(三)——Controller的使用
- springboot快速入门(四)——数据库操作
- Spring Boot 快速入门
- Spring Boot 快速入门
- Spring Boot快速入门教程
- SpringBoot快速入门
- Spring Boot 快速入门
- Spring Boot 快速入门
- spring boot快速入门
- springboot的快速入门