使用Redis实现异步消息队列
2017-10-31 19:08
781 查看
前言
在后端编程时,对需要立即返回的数据我们应当立刻返回,而对于可以慢慢处理而业务复杂的我们可以选择延迟返回。这个实现使用到了异步消息队列。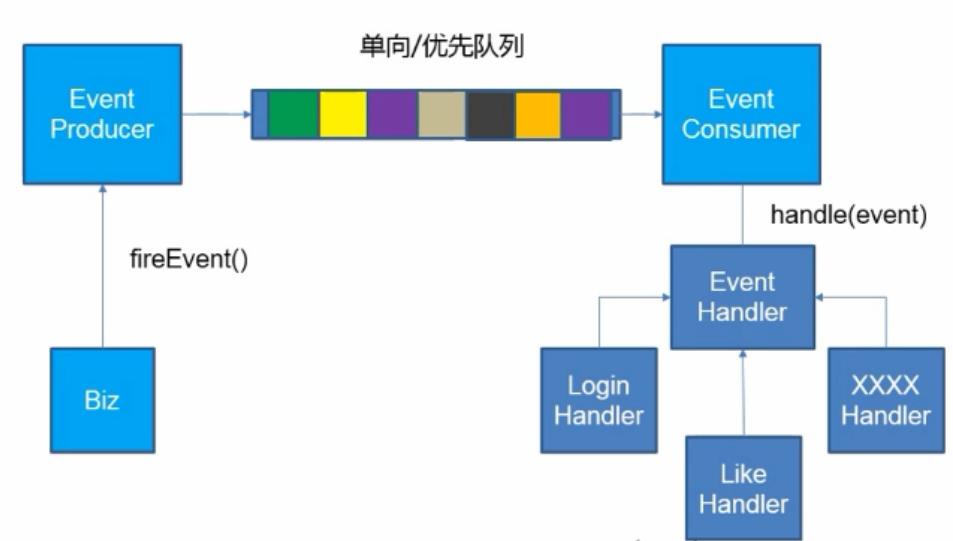
异步消息队列
主要用于实现生产者-消费者模式。也就是说,这个队列应当是可以阻塞的,否者会带来大量的性能浪费。生产者-消费者模式
更加详细的介绍我找到了一篇博客,讲得挺好的,我就不详细说了。生产者消费者模式-Java实现实现
1.定义事件类型 -- 定义Enum类 -- EnumType
用于表示该事件的类型public enum EventType {
//这里列举了四种类型
LIKE(0),
COMMENT(1),
LOGIN(2),
MAIL(3);
private int value;
EventType(int value) {
this.value = value;
}
public int getValue() {
return value;
}
}2.定义事件的实体 -- EventModel
这里说明一下entityOwnerId的必要性。举个例子,当我们给一个人点赞时,系统要给那个人(也就是entityOwnerId)发送一个站内信,通知那个人他被点赞了。当然,我们也可以把entityOwnerId包装在exts里,但因为几乎每一个事件都需要这个字段,所以这里我们开一个字段给他。public class EventModel {
//之前定义的事件类型
private EventType type;
//触发者的id
private int actorId;
//entityId和entityType共同组成了所触发的事件
private int entityId;
private int entityType;
//该事件的拥有者
private int entityOwnerId;
//需要传输的额外信息
private Map<String, String> exts = new HashMap<>();
public Map<String, String> getExts() {
return exts;
}
public EventModel() {
}
public EventModel(EventType type) {
this.type = type;
}
public String getExt(String name) {
return exts.get(name);
}
public EventModel setExt(String name, String value) {
exts.put(name, value);
return this;
}
public EventType getType() {
return type;
}
public EventModel setType(EventType type) {
this.type = type;
return this;
}
public int getActorId() {
return actorId;
}
public EventModel setActorId(int actorId) {
this.actorId = actorId;
return this;
}
public int getEntityId() {
return entityId;
}
public EventModel setEntityId(int entityId) {
this.entityId = entityId;
return this;
}
public int getEntityType() {
return entityType;
}
public EventModel setEntityType(int entityType) {
this.entityType = entityType;
return this;
}
public int getEntityOwnerId() {
return entityOwnerId;
}
public EventModel setEntityOwnerId(int entityOwnerId) {
this.entityOwnerId = entityOwnerId;
return this;
}
}3.生产者的实现 -- EventProducer
这里的队列我们使用Redis的阻塞双向队列list来实现。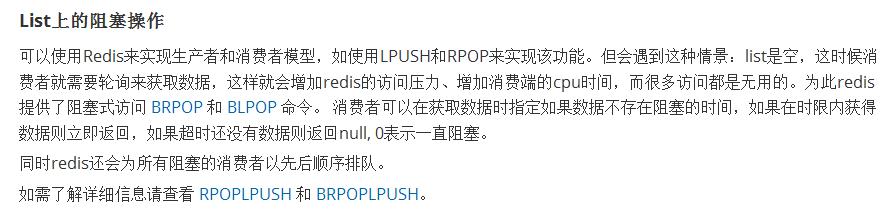
a) 我们先用JSON把事件序列化
b) 再通过lpush把事件推进队列里
EventProducer
@Service
public class EventProducer {

@Autowired
JedisAdapter jedisAdapter;

public boolean fireEvent(EventModel eventModel) {
try {
String json = JSONObject.toJSONString(eventModel);
String key = RedisKeyUtil.getEventQueueKey();
jedisAdapter.lpush(key, json);
return true;
} catch (Exception e) {
return false;
}
}
}
RedisKeyUtil -- 用于统一的管理Redis的Keypublic class RedisKeyUtil {
private static String BIZ_EVENT = "EVENT";
public static String getEventQueueKey() {
return BIZ_EVENT;
}
}JedisAdapter -- 对Jedis的函数进行一层封装@Service
public class JedisAdapter implements InitializingBean {
private static final Logger logger = LoggerFactory.getLogger(JedisAdapter.class);
private Jedis jedis = null;
private JedisPool pool = null;
@Override
public void afterPropertiesSet() throws Exception {
pool = new JedisPool("localhost", 6379);
}
private Jedis getJedis() {
return pool.getResource();
}
public long lpush(String key, String value) {
Jedis jedis = null;
try {
jedis = getJedis();
return jedis.lpush(key, value);
} catch (Exception e) {
logger.error("发生异常" + e.getMessage());
return 0;
} finally {
if (jedis != null) {
jedis.close();
}
}
}
public List<String> brpop(int timeout, String key) {
Jedis jedis = null;
try {
jedis = pool.getResource();
return jedis.brpop(timeout, key);
} catch (Exception e) {
logger.error("发生异常" + e.getMessage());
return null;
} finally {
if (jedis != null) {
jedis.close();
}
}
}
}4.定义一个事件处理器的接口 -- EventHandler
public interface EventHandler {
//事件处理函数
void doHandle(EventModel model);
//获取该事件处理器所支持的事件类型
List<EventType> getSupportEventTypes();
}
5.消费者的实现 -- EventConsumer
a)创建一个类型为Map<EventType, List<EventHandler>>的map,用于存放所有的Handler。b)在afterPropertiesSet函数中(这个函数在sping在初始化完该Bean后会执行),我们通过applicationContext获取实现了EventHandler接口的全部Handler。
b.1)通过for循环,分门别类的把各个Handler放到map中。
b.2)启动线程去消化事件
b.2.1)该线程使用死循环让其不间断的运行。
b.2.2)用brpop把事件拉出来
b.2.3)过滤掉key之后,剩下value,把value用JSON的api转化为EventModel
b.2.4)在map中寻找是否有能处理EventModel的Handler,判断方法是看EventType是否支持。
4000
b.2.5)过滤掉不支持的EventType之后,调用每一个支持该EventType的doHandle方法。
具体代码实现
@Service
public class EventConsumer implements InitializingBean, ApplicationContextAware {
private static final Logger logger = LoggerFactory.getLogger(EventConsumer.class);
private Map<EventType, List<EventHandler>> config = new HashMap<>();
private ApplicationContext applicationContext;
@Autowired
private JedisAdapter jedisAdapter;

@Override
public void afterPropertiesSet() throws Exception {
Map<String, EventHandler> beans = applicationContext.getBeansOfType(EventHandler.class);
if (beans != null) {
for (Map.Entry<String, EventHandler> entry : beans.entrySet()) {
List<EventType> eventTypes = entry.getValue().getSupportEventTypes();
for (EventType type : eventTypes) {
if (!config.containsKey(type)) {
config.put(type, new ArrayList<EventHandler>());
}

// 注册每个事件的处理函数
config.get(type).add(entry.getValue());
}
}
}

// 启动线程去消费事件
Thread thread = new Thread(new Runnable() {
@Override
public void run() {
// 从队列一直消费
while (true) {
String key = RedisKeyUtil.getEventQueueKey();
List<String> messages = jedisAdapter.brpop(0, key);
// 第一个元素是队列名字
for (String message : messages) {
if (message.equals(key)) {
continue;
}

EventModel eventModel = JSON.parseObject(message, EventModel.class);
// 找到这个事件的处理handler列表
if (!config.containsKey(eventModel.getType())) {
logger.error("不能识别的事件");
continue;
}

for (EventHandler handler : config.get(eventModel.getType())) {
handler.doHandle(eventModel);
}
}
}
}
});
thread.start();
}

@Override
public void setApplicationContext(ApplicationContext applicationContext) throws BeansException {
this.applicationContext = applicationContext;
}
}
6.写一个实现了EventHandler接口的实现
@Component
public class LikeHandler implements EventHandler {
@Autowired
MessageService messageService;

@Autowired
UserService userService;

@Override
public void doHandle(EventModel model) {
Message message = new Message();
User user = userService.getUser(model.getActorId());
message.setToId(model.getEntityOwnerId());
message.setContent("用户" + user.getName() +
" 赞了你的资讯,http://127.0.0.1:8080/news/"
+ String.valueOf(model.getEntityId()));
// SYSTEM ACCOUNT
message.setFromId(3);
message.setCreatedDate(new Date());
messageService.addMessage(message);
}

@Override
public List<EventType> getSupportEventTypes() {
return Arrays.asList(EventType.LIKE);
}
}
7.在Controller中调用Producer的fireEvent -- 用于产生一个事件
@Controller
public class LikeController {
@Autowired
LikeService likeService;

@Autowired
HostHolder hostHolder;

@Autowired
NewsService newsService;

@Autowired
EventProducer eventProducer;

@RequestMapping(path = {"/like"}, method = {RequestMethod.GET, RequestMethod.POST})
@ResponseBody
public String like(@Param("newId") int newsId) {
long likeCount = likeService.like(hostHolder.getUser().getId(), EntityType.ENTITY_NEWS, newsId);
// 更新喜欢数
News news = newsService.getById(newsId);
newsService.updateLikeCount(newsId, (int) likeCount);
eventProducer.fireEvent(new EventModel(EventType.LIKE)
.setEntityOwnerId(news.getUserId())
.setActorId(hostHolder.getUser().getId()).setEntityId(newsId));
return ToutiaoUtil.getJSONString(0, String.valueOf(likeCount));
}
}

相关文章推荐
- 使用MongoDB实现消息队列的异步消息功能
- Redis使用总结(3):实现简单的消息队列
- java redis使用之利用jedis实现redis消息队列
- 使用redis的发布订阅模式实现消息队列
- 12.springboot使用redis的订阅功能实现消息队列
- Java使用Redis实现消息队列
- PHP使用php-resque库配合Redis实现MQ消息队列的教程
- [置顶] 【Excel_To_DB】SpringBoot+EasyPoi+Redis消息队列实现Excel批量异步导入数据库(一)
- [置顶] 【Excel_To_DB】SpringBoot+EasyPoi+Redis消息队列实现Excel批量异步导入数据库(三)
- 使用jedis实现Redis消息队列(MQ)的发布(publish)和消息监听(subscribe)
- [置顶] Redis应用3-基于Redis消息队列实现的异步操作
- PHP使用php-resque库配合Redis实现MQ消息队列的教程
- redis实现消息队列&发布/订阅模式使用
- PHP使用Redis实现消息队列
- java redis使用之利用jedis实现redis消息队列
- 使用Redis 实现消息队列
- Spring Boot 系列 | 第六篇:使用Redis实现消息队列
- java redis使用之利用jedis实现redis消息队列
- 使用消息队列实现两进程间实时通信的例子
- 使用微软消息队列实现C#进程间通信