Nginx+keepalived双机热备(主从模式)
2017-10-27 10:43
477 查看
负载均衡技术对于一个网站尤其是大型网站的web服务器集群来说是至关重要的!做好负载均衡架构,可以实现故障转移和高可用环境,避免单点故障,保证网站健康持续运行。
关于负载均衡介绍,可以参考:linux负载均衡总结性说明(四层负载/七层负载)
由于业务扩展,网站的访问量不断加大,负载越来越高。现需要在web前端放置nginx负载均衡,同时结合keepalived对前端nginx实现HA高可用。
1)nginx进程基于Master+Slave(worker)多进程模型,自身具有非常稳定的子进程管理功能。在Master进程分配模式下,Master进程永远不进行业务处理,只是进行任务分发,从而达到Master进程的存活高可靠性,Slave(worker)进程所有的业务信号都
由主进程发出,Slave(worker)进程所有的超时任务都会被Master中止,属于非阻塞式任务模型。
2)Keepalived是Linux下面实现VRRP备份路由的高可靠性运行件。基于Keepalived设计的服务模式能够真正做到主服务器和备份服务器故障时IP瞬间无缝交接。二者结合,可以构架出比较稳定的软件LB方案。
Heartbeat、Corosync、Keepalived这三个集群组件我们到底选哪个好呢?
首先要说明的是,Heartbeat、Corosync是属于同一类型,Keepalived与Heartbeat、Corosync,根本不是同一类型的。
Keepalived使用的vrrp协议方式,虚拟路由冗余协议 (Virtual Router Redundancy Protocol,简称VRRP);
Heartbeat或Corosync是基于主机或网络服务的高可用方式;
简单的说就是,Keepalived的目的是模拟路由器的高可用,Heartbeat或Corosync的目的是实现Service的高可用。
所以一般Keepalived是实现前端高可用,常用的前端高可用的组合有,就是我们常见的LVS+Keepalived、Nginx+Keepalived、HAproxy+Keepalived。而Heartbeat或Corosync是实现服务的高可用,常见的组合有Heartbeat
v3(Corosync)+Pacemaker+NFS+Httpd 实现Web服务器的高可用、Heartbeat
v3(Corosync)+Pacemaker+NFS+MySQL
实现MySQL服务器的高可用。总结一下,Keepalived中实现轻量级的高可用,一般用于前端高可用,且不需要共享存储,一般常用于两个节点的高可用。而Heartbeat(或Corosync)一般用于服务的高可用,且需要共享存储,一般用于多节点的高可用。这个问题我们说明白了。
那heartbaet与corosync又应该选择哪个好?
一般用corosync,因为corosync的运行机制更优于heartbeat,就连从heartbeat分离出来的pacemaker都说在以后的开发当中更倾向于corosync,所以现在corosync+pacemaker是最佳组合。
双机高可用一般是通过虚拟IP(飘移IP)方法来实现的,基于Linux/Unix的IP别名技术。
双机高可用方法目前分为两种:
//负载均衡器上配置的域名都解析到这个VIP上
应用环境如下:
http://nginx.org/download/nginx-1.9.7.tar.gz [root@master-node src]# wget http://www.keepalived.org/software/keepalived-1.3.2.tar.gz
安装nginx
[root@master-node src]# tar -zvxf nginx-1.9.7.tar.gz
[root@master-node src]# cd nginx-1.9.7
添加www用户,其中-M参数表示不添加用户家目录,-s参数表示指定shell类型
[root@master-node nginx-1.9.7]# useradd www -M -s /sbin/nologin
[root@master-node nginx-1.9.7]# vim auto/cc/gcc
#将这句注释掉 取消Debug编译模式 大概在179行
#CFLAGS="$CFLAGS -g"
[root@master-node
nginx-1.9.7]# ./configure --prefix=/usr/local/nginx --user=www
--group=www --with-http_ssl_module --with-http_flv_module
--with-http_stub_status_module --with-http_gzip_static_module
--with-pcre
[root@master-node nginx-1.9.7]# make && make install
安装keepalived
[root@master-node src]# tar -zvxf keepalived-1.3.2.tar.gz
[root@master-node src]# cd keepalived-1.3.2
[root@master-node keepalived-1.3.2]# ./configure
[root@master-node keepalived-1.3.2]# make && make install
[root@master-node keepalived-1.3.2]# cp /usr/local/src/keepalived-1.3.2/keepalived/etc/init.d/keepalived /etc/rc.d/init.d/
[root@master-node keepalived-1.3.2]# cp /usr/local/etc/sysconfig/keepalived /etc/sysconfig/
[root@master-node keepalived-1.3.2]# mkdir /etc/keepalived
[root@master-node keepalived-1.3.2]# cp /usr/local/etc/keepalived/keepalived.conf /etc/keepalived/
[root@master-node keepalived-1.3.2]# cp /usr/local/sbin/keepalived /usr/sbin/
将nginx和keepalive服务加入开机启动服务
[root@master-node keepalived-1.3.2]# echo "/usr/local/nginx/sbin/nginx" >> /etc/rc.local
[root@master-node keepalived-1.3.2]# echo "/etc/init.d/keepalived start" >> /etc/rc.local
103.110.98.14 netmask 255.255.255.192 broadcast 103.110.98.63
inet6 fe80::46a8:42ff:fe17:3ddd prefixlen 64 scopeid 0x20<link>
ether 44:a8:42:17:3d:dd txqueuelen 1000 (Ethernet)
RX packets 133787818 bytes 14858530059 (13.8 GiB)
RX errors 0 dropped 644 overruns 0 frame 0
TX packets 2291619 bytes 426619870 (406.8 MiB)
TX errors 0 dropped 0 overruns 0 carrier 0 collisions 0
device interrupt 16
.......
接着开始绑定VIP(这一步其实可以不用这么直接在外部使用ifconfig绑定。Nginx或Haproxy+Keepalived的七层负载均衡的高可用环境中,VIP就直接在
Keepalived 的配置文件里配置就好,使用命令 ip addr 就能看出 vip;而LVS+Keepalived
四层负载均衡的高可用环境中, vip是要在外面单独设置的(即ifconfig eth0:0 ....的方式创建vip),通过 ifconfig
可以查看出来 vip。)
[root@master-node ~]# ifconfig em1:0 103.110.98.20 broadcast 103.110.98.63 netmask 255.255.255.192 up
[root@master-node ~]# route add -host 103.110.98.20 dev em1:0
查看VIP是否成功绑定了:
[root@master-node ~]# ifconfig
em1: flags=4163<UP,BROADCAST,RUNNING,MULTICAST> mtu 1500
inet 103.110.98.14 netmask 255.255.255.192 broadcast 103.110.98.63
inet6 fe80::46a8:42ff:fe17:3ddd prefixlen 64 scopeid 0x20<link>
ether 44:a8:42:17:3d:dd txqueuelen 1000 (Ethernet)
RX packets 133789569 bytes 14858744709 (13.8 GiB)
RX errors 0 dropped 644 overruns 0 frame 0
TX packets 2291620 bytes 426619960 (406.8 MiB)
TX errors 0 dropped 0 overruns 0 carrier 0 collisions 0
device interrupt 16
em1:0: flags=4163<UP,BROADCAST,RUNNING,MULTICAST> mtu 1500
inet 103.110.98.20 netmask 255.255.255.192 broadcast 103.110.98.63
ether 44:a8:42:17:3d:dd txqueuelen 1000 (Ethernet)
device interrupt 16
.......
[root@master-node ~]# ping 103.110.98.20
PING 103.110.98.20 (103.110.98.20) 56(84) bytes of data.
64 bytes from 103.110.98.20: icmp_seq=1 ttl=64 time=0.044 ms
64 bytes from 103.110.98.20: icmp_seq=2 ttl=64 time=0.036 ms
[root@master-node ~]# route -n
Kernel IP routing table
Destination Gateway Genmask Flags Metric Ref Use Iface
0.0.0.0 103.10.86.1 0.0.0.0 UG 100 0 0 em1
103.10.86.0 0.0.0.0 255.255.255.192 U 100 0 0 em1
103.110.98.20 0.0.0.0 255.255.255.255 UH 0 0 0 em1
192.168.1.0 0.0.0.0 255.255.255.0 U 100 0 0 em2
setenforce 0 #使配置立即生效
[root@master-node ~]# vim /etc/sysconfig/iptables
.......
-A INPUT -s 103.110.98.0/24 -d 224.0.0.18 -j ACCEPT #允许组播地址通信
-A INPUT -s 192.168.1.0/24 -d 224.0.0.18 -j ACCEPT
-A INPUT -s 103.110.98.0/24 -p vrrp -j ACCEPT #允许 VRRP(虚拟路由器冗余协)通信
-A INPUT -s 192.168.1.0/24 -p vrrp -j ACCEPT
-A INPUT -p tcp -m state --state NEW -m tcp --dport 80 -j ACCEPT #开通80端口访问
[root@master-node ~]# /etc/init.d/iptables restart #重启防火墙使配置生效
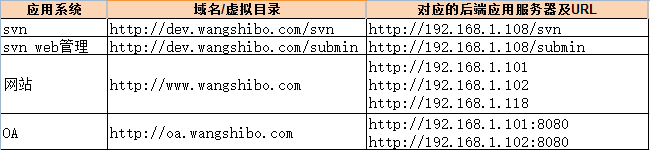
master-node和slave-node两台服务器的nginx的配置完全一样,主要是配置/usr/local/nginx/conf/nginx.conf的http,当然也可以配置vhost虚拟主机目录,然后配置vhost下的比如LB.conf文件。
其中:
多域名指向是通过虚拟主机(配置http下面的server)实现;
同一域名的不同虚拟目录通过每个server下面的不同location实现;
到后端的服务器在vhost/LB.conf下面配置upstream,然后在server或location中通过proxy_pass引用。
要实现前面规划的接入方式,LB.conf的配置如下(添加proxy_cache_path和proxy_temp_path这两行,表示打开nginx的缓存功能):
[root@master-node ~]# mkdir /usr/local/nginx/conf/vhosts
[root@master-node ~]# mkdir /var/www/cache
[root@master-node ~]# ulimit 65535
验证方法(保证从负载均衡器本机到后端真实服务器之间能正常通信):
1)首先在本机用IP访问上面LB.cong中配置的各个后端真实服务器的url
2)然后在本机用域名和路径访问上面LB.cong中配置的各个后端真实服务器的域名/虚拟路径
----------------------------------------------------------------------------------------------------------------------------
后端应用服务器的nginx配置,这里选择192.168.1.108作为例子进行说明
由于这里的192.168.1.108机器是openstack的虚拟机,没有外网ip,不能解析域名。
所以在server_name处也将ip加上,使得用ip也可以访问。
[root@108-server ~]# cat /usr/local/nginx/conf/vhosts/svn.conf
server {
listen 80;
#server_name dev.wangshibo.com;
server_name dev.wangshibo.com 192.168.1.108;
access_log /usr/local/nginx/logs/dev.wangshibo-access.log main;
error_log /usr/local/nginx/logs/dev.wangshibo-error.log;
location / {
root /var/www/html;
index index.html index.php index.htm;
}
}
[root@108-server ~]# ll /var/www/html/
drwxr-xr-x. 2 www www 4096 Dec 7 01:46 submin
drwxr-xr-x. 2 www www 4096 Dec 7 01:45 svn
[root@108-server ~]# cat /var/www/html/svn/index.html
this is the page of svn/192.168.1.108
[root@108-server ~]# cat /var/www/html/submin/index.html
this is the page of submin/192.168.1.108
[root@108-server ~]# cat /etc/hosts
127.0.0.1 localhost localhost.localdomain localhost4 localhost4.localdomain4
::1 localhost localhost.localdomain localhost6 localhost6.localdomain6
192.168.1.108 dev.wangshibo.com
[root@108-server ~]# curl http://dev.wangshibo.com //由于是内网机器不能联网,亦不能解析域名。所以用域名访问没有反应。只能用ip访问
[root@ops-server4 vhosts]# curl http://192.168.1.108 this is 192.168.1.108 page!!!
[root@ops-server4 vhosts]# curl http://192.168.1.108/svn/ //最后一个/符号要加上,否则访问不了。
this is the page of svn/192.168.1.108
[root@ops-server4 vhosts]# curl http://192.168.1.108/submin/ this is the page of submin/192.168.1.108
2.keepalived配置
1)master-node负载机上的keepalived配置(sendmail部署可以参考:linux下sendmail邮件系统安装操作记录)
[root@master-node ~]# cp /etc/keepalived/keepalived.conf /etc/keepalived/keepalived.conf.bak
[root@master-node ~]# vim /etc/keepalived/keepalived.conf
2)slave-node负载机上的keepalived配置
[root@slave-node ~]# cp /etc/keepalived/keepalived.conf /etc/keepalived/keepalived.conf.bak
[root@slave-node ~]# vim /etc/keepalived/keepalived.conf
then
[root@master-node ~]# chmod 755 /opt/chk_nginx.sh
[root@master-node ~]# sh /opt/chk_nginx.sh
80/tcp open http
103.110.98.20/32 scope global em1
valid_lft forever preferred_lft forever
inet 103.110.98.20/26 brd 103.10.86.63 scope global secondary em1:0
valid_lft forever preferred_lft forever
inet6 fe80::46a8:42ff:fe17:3ddd/64 scope link
valid_lft forever preferred_lft forever
......
3)停止主服务器上的keepalived:
[root@master-node ~]# /etc/init.d/keepalived stop
Stopping keepalived (via systemctl): [ OK ]
[root@master-node ~]# /etc/init.d/keepalived status
[root@master-node ~]# ps -ef|grep keepalived
root 26952 24348 0 17:49 pts/0 00:00:00 grep --color=auto keepalived
[root@master-node ~]#
4)然后在从服务器上查看,发现已经接管了VIP:
[root@slave-node ~]# ip addr
.......
2: em1: <BROADCAST,MULTICAST,UP,LOWER_UP> mtu 1500 qdisc mq state UP qlen 1000
link/ether 44:a8:42:17:3c:a5 brd ff:ff:ff:ff:ff:ff
inet 103.110.98.24/26 brd 103.10.86.63 scope global em1
inet 103.110.98.20/32 scope global em1
valid_lft forever preferred_lft forever
inet 103.110.98.20/26 brd 103.10.86.63 scope global secondary em1:0
valid_lft forever preferred_lft forever
inet6 fe80::46a8:42ff:fe17:3ddd/64 scope link
valid_lft forever preferred_lft forever
......
[root@slave-node ~]# ip addr
.......
2: em1: <BROADCAST,MULTICAST,UP,LOWER_UP> mtu 1500 qdisc mq state UP qlen 1000
link/ether 44:a8:42:17:3c:a5 brd ff:ff:ff:ff:ff:ff
inet 103.110.98.24/26 brd 103.10.86.63 scope global em1
inet6 fe80::46a8:42ff:fe17:3ca5/64 scope link
valid_lft forever preferred_lft forever
接着验证下nginx服务故障,看看keepalived监控nginx状态的脚本是否正常?
如下:手动关闭master机器上的nginx服务,最多2秒钟后就会自动起来(因为keepalive监控nginx状态的脚本执行间隔时间为2秒)。域名访问几乎不受影响!
[root@master-node ~]# /usr/local/nginx/sbin/nginx -s stop
[root@master-node ~]# ps -ef|grep nginx
root 28401 24826 0 19:43 pts/1 00:00:00 grep --color=auto nginx
[root@master-node ~]# ps -ef|grep nginx
root 28871 28870 0 19:47 ? 00:00:00 /bin/sh /opt/chk_nginx.sh
root 28875 24826 0 19:47 pts/1 00:00:00 grep --color=auto nginx
[root@master-node ~]# ps -ef|grep nginx
root 28408 1 0 19:43 ? 00:00:00 nginx: master process /usr/local/nginx/sbin/nginx
www 28410 28408 0 19:43 ? 00:00:00 nginx: worker process
www 28411 28408 0 19:43 ? 00:00:00 nginx: worker process
www 28412 28408 0 19:43 ? 00:00:00 nginx: worker process
www 28413 28408 0 19:43 ? 00:00:00 nginx: worker process
最后可以查看两台服务器上的/var/log/messages,观察VRRP日志信息的vip漂移情况~~~~
iptables开启后,没有开放允许VRRP协议通信的策略(也有可能导致脑裂);可以选择关闭iptables
-> keepalived.conf文件配置有误导致,比如interface绑定的设备错误
2)VIP绑定后,外部ping不通
可能的原因是:
-> 网络故障,可以检查下网关是否正常;
-> 网关的arp缓存导致,可以进行arp更新,命令是"arping -I 网卡名 -c 5 -s VIP 网关"
关于负载均衡介绍,可以参考:linux负载均衡总结性说明(四层负载/七层负载)
由于业务扩展,网站的访问量不断加大,负载越来越高。现需要在web前端放置nginx负载均衡,同时结合keepalived对前端nginx实现HA高可用。
1)nginx进程基于Master+Slave(worker)多进程模型,自身具有非常稳定的子进程管理功能。在Master进程分配模式下,Master进程永远不进行业务处理,只是进行任务分发,从而达到Master进程的存活高可靠性,Slave(worker)进程所有的业务信号都
由主进程发出,Slave(worker)进程所有的超时任务都会被Master中止,属于非阻塞式任务模型。
2)Keepalived是Linux下面实现VRRP备份路由的高可靠性运行件。基于Keepalived设计的服务模式能够真正做到主服务器和备份服务器故障时IP瞬间无缝交接。二者结合,可以构架出比较稳定的软件LB方案。
Heartbeat、Corosync、Keepalived这三个集群组件我们到底选哪个好呢?
首先要说明的是,Heartbeat、Corosync是属于同一类型,Keepalived与Heartbeat、Corosync,根本不是同一类型的。
Keepalived使用的vrrp协议方式,虚拟路由冗余协议 (Virtual Router Redundancy Protocol,简称VRRP);
Heartbeat或Corosync是基于主机或网络服务的高可用方式;
简单的说就是,Keepalived的目的是模拟路由器的高可用,Heartbeat或Corosync的目的是实现Service的高可用。
所以一般Keepalived是实现前端高可用,常用的前端高可用的组合有,就是我们常见的LVS+Keepalived、Nginx+Keepalived、HAproxy+Keepalived。而Heartbeat或Corosync是实现服务的高可用,常见的组合有Heartbeat
v3(Corosync)+Pacemaker+NFS+Httpd 实现Web服务器的高可用、Heartbeat
v3(Corosync)+Pacemaker+NFS+MySQL
实现MySQL服务器的高可用。总结一下,Keepalived中实现轻量级的高可用,一般用于前端高可用,且不需要共享存储,一般常用于两个节点的高可用。而Heartbeat(或Corosync)一般用于服务的高可用,且需要共享存储,一般用于多节点的高可用。这个问题我们说明白了。
那heartbaet与corosync又应该选择哪个好?
一般用corosync,因为corosync的运行机制更优于heartbeat,就连从heartbeat分离出来的pacemaker都说在以后的开发当中更倾向于corosync,所以现在corosync+pacemaker是最佳组合。
双机高可用一般是通过虚拟IP(飘移IP)方法来实现的,基于Linux/Unix的IP别名技术。
双机高可用方法目前分为两种:
//负载均衡器上配置的域名都解析到这个VIP上
应用环境如下:
http://nginx.org/download/nginx-1.9.7.tar.gz [root@master-node src]# wget http://www.keepalived.org/software/keepalived-1.3.2.tar.gz
安装nginx
[root@master-node src]# tar -zvxf nginx-1.9.7.tar.gz
[root@master-node src]# cd nginx-1.9.7
添加www用户,其中-M参数表示不添加用户家目录,-s参数表示指定shell类型
[root@master-node nginx-1.9.7]# useradd www -M -s /sbin/nologin
[root@master-node nginx-1.9.7]# vim auto/cc/gcc
#将这句注释掉 取消Debug编译模式 大概在179行
#CFLAGS="$CFLAGS -g"
[root@master-node
nginx-1.9.7]# ./configure --prefix=/usr/local/nginx --user=www
--group=www --with-http_ssl_module --with-http_flv_module
--with-http_stub_status_module --with-http_gzip_static_module
--with-pcre
[root@master-node nginx-1.9.7]# make && make install
安装keepalived
[root@master-node src]# tar -zvxf keepalived-1.3.2.tar.gz
[root@master-node src]# cd keepalived-1.3.2
[root@master-node keepalived-1.3.2]# ./configure
[root@master-node keepalived-1.3.2]# make && make install
[root@master-node keepalived-1.3.2]# cp /usr/local/src/keepalived-1.3.2/keepalived/etc/init.d/keepalived /etc/rc.d/init.d/
[root@master-node keepalived-1.3.2]# cp /usr/local/etc/sysconfig/keepalived /etc/sysconfig/
[root@master-node keepalived-1.3.2]# mkdir /etc/keepalived
[root@master-node keepalived-1.3.2]# cp /usr/local/etc/keepalived/keepalived.conf /etc/keepalived/
[root@master-node keepalived-1.3.2]# cp /usr/local/sbin/keepalived /usr/sbin/
将nginx和keepalive服务加入开机启动服务
[root@master-node keepalived-1.3.2]# echo "/usr/local/nginx/sbin/nginx" >> /etc/rc.local
[root@master-node keepalived-1.3.2]# echo "/etc/init.d/keepalived start" >> /etc/rc.local
103.110.98.14 netmask 255.255.255.192 broadcast 103.110.98.63
inet6 fe80::46a8:42ff:fe17:3ddd prefixlen 64 scopeid 0x20<link>
ether 44:a8:42:17:3d:dd txqueuelen 1000 (Ethernet)
RX packets 133787818 bytes 14858530059 (13.8 GiB)
RX errors 0 dropped 644 overruns 0 frame 0
TX packets 2291619 bytes 426619870 (406.8 MiB)
TX errors 0 dropped 0 overruns 0 carrier 0 collisions 0
device interrupt 16
.......
接着开始绑定VIP(这一步其实可以不用这么直接在外部使用ifconfig绑定。Nginx或Haproxy+Keepalived的七层负载均衡的高可用环境中,VIP就直接在
Keepalived 的配置文件里配置就好,使用命令 ip addr 就能看出 vip;而LVS+Keepalived
四层负载均衡的高可用环境中, vip是要在外面单独设置的(即ifconfig eth0:0 ....的方式创建vip),通过 ifconfig
可以查看出来 vip。)
[root@master-node ~]# ifconfig em1:0 103.110.98.20 broadcast 103.110.98.63 netmask 255.255.255.192 up
[root@master-node ~]# route add -host 103.110.98.20 dev em1:0
查看VIP是否成功绑定了:
[root@master-node ~]# ifconfig
em1: flags=4163<UP,BROADCAST,RUNNING,MULTICAST> mtu 1500
inet 103.110.98.14 netmask 255.255.255.192 broadcast 103.110.98.63
inet6 fe80::46a8:42ff:fe17:3ddd prefixlen 64 scopeid 0x20<link>
ether 44:a8:42:17:3d:dd txqueuelen 1000 (Ethernet)
RX packets 133789569 bytes 14858744709 (13.8 GiB)
RX errors 0 dropped 644 overruns 0 frame 0
TX packets 2291620 bytes 426619960 (406.8 MiB)
TX errors 0 dropped 0 overruns 0 carrier 0 collisions 0
device interrupt 16
em1:0: flags=4163<UP,BROADCAST,RUNNING,MULTICAST> mtu 1500
inet 103.110.98.20 netmask 255.255.255.192 broadcast 103.110.98.63
ether 44:a8:42:17:3d:dd txqueuelen 1000 (Ethernet)
device interrupt 16
.......
[root@master-node ~]# ping 103.110.98.20
PING 103.110.98.20 (103.110.98.20) 56(84) bytes of data.
64 bytes from 103.110.98.20: icmp_seq=1 ttl=64 time=0.044 ms
64 bytes from 103.110.98.20: icmp_seq=2 ttl=64 time=0.036 ms
[root@master-node ~]# route -n
Kernel IP routing table
Destination Gateway Genmask Flags Metric Ref Use Iface
0.0.0.0 103.10.86.1 0.0.0.0 UG 100 0 0 em1
103.10.86.0 0.0.0.0 255.255.255.192 U 100 0 0 em1
103.110.98.20 0.0.0.0 255.255.255.255 UH 0 0 0 em1
192.168.1.0 0.0.0.0 255.255.255.0 U 100 0 0 em2
setenforce 0 #使配置立即生效
[root@master-node ~]# vim /etc/sysconfig/iptables
.......
-A INPUT -s 103.110.98.0/24 -d 224.0.0.18 -j ACCEPT #允许组播地址通信
-A INPUT -s 192.168.1.0/24 -d 224.0.0.18 -j ACCEPT
-A INPUT -s 103.110.98.0/24 -p vrrp -j ACCEPT #允许 VRRP(虚拟路由器冗余协)通信
-A INPUT -s 192.168.1.0/24 -p vrrp -j ACCEPT
-A INPUT -p tcp -m state --state NEW -m tcp --dport 80 -j ACCEPT #开通80端口访问
[root@master-node ~]# /etc/init.d/iptables restart #重启防火墙使配置生效
master-node和slave-node两台服务器的nginx的配置完全一样,主要是配置/usr/local/nginx/conf/nginx.conf的http,当然也可以配置vhost虚拟主机目录,然后配置vhost下的比如LB.conf文件。
其中:
多域名指向是通过虚拟主机(配置http下面的server)实现;
同一域名的不同虚拟目录通过每个server下面的不同location实现;
到后端的服务器在vhost/LB.conf下面配置upstream,然后在server或location中通过proxy_pass引用。
要实现前面规划的接入方式,LB.conf的配置如下(添加proxy_cache_path和proxy_temp_path这两行,表示打开nginx的缓存功能):
[root@master-node ~]# mkdir /var/www/cache
[root@master-node ~]# ulimit 65535
1)首先在本机用IP访问上面LB.cong中配置的各个后端真实服务器的url
2)然后在本机用域名和路径访问上面LB.cong中配置的各个后端真实服务器的域名/虚拟路径
----------------------------------------------------------------------------------------------------------------------------
后端应用服务器的nginx配置,这里选择192.168.1.108作为例子进行说明
由于这里的192.168.1.108机器是openstack的虚拟机,没有外网ip,不能解析域名。
所以在server_name处也将ip加上,使得用ip也可以访问。
[root@108-server ~]# cat /usr/local/nginx/conf/vhosts/svn.conf
server {
listen 80;
#server_name dev.wangshibo.com;
server_name dev.wangshibo.com 192.168.1.108;
access_log /usr/local/nginx/logs/dev.wangshibo-access.log main;
error_log /usr/local/nginx/logs/dev.wangshibo-error.log;
location / {
root /var/www/html;
index index.html index.php index.htm;
}
}
[root@108-server ~]# ll /var/www/html/
drwxr-xr-x. 2 www www 4096 Dec 7 01:46 submin
drwxr-xr-x. 2 www www 4096 Dec 7 01:45 svn
[root@108-server ~]# cat /var/www/html/svn/index.html
this is the page of svn/192.168.1.108
[root@108-server ~]# cat /var/www/html/submin/index.html
this is the page of submin/192.168.1.108
[root@108-server ~]# cat /etc/hosts
127.0.0.1 localhost localhost.localdomain localhost4 localhost4.localdomain4
::1 localhost localhost.localdomain localhost6 localhost6.localdomain6
192.168.1.108 dev.wangshibo.com
[root@108-server ~]# curl http://dev.wangshibo.com //由于是内网机器不能联网,亦不能解析域名。所以用域名访问没有反应。只能用ip访问
[root@ops-server4 vhosts]# curl http://192.168.1.108 this is 192.168.1.108 page!!!
[root@ops-server4 vhosts]# curl http://192.168.1.108/svn/ //最后一个/符号要加上,否则访问不了。
this is the page of svn/192.168.1.108
[root@ops-server4 vhosts]# curl http://192.168.1.108/submin/ this is the page of submin/192.168.1.108
2.keepalived配置
1)master-node负载机上的keepalived配置(sendmail部署可以参考:linux下sendmail邮件系统安装操作记录)
[root@master-node ~]# cp /etc/keepalived/keepalived.conf /etc/keepalived/keepalived.conf.bak
[root@master-node ~]# vim /etc/keepalived/keepalived.conf
[root@slave-node ~]# cp /etc/keepalived/keepalived.conf /etc/keepalived/keepalived.conf.bak
[root@slave-node ~]# vim /etc/keepalived/keepalived.conf
[root@master-node ~]# chmod 755 /opt/chk_nginx.sh
[root@master-node ~]# sh /opt/chk_nginx.sh
80/tcp open http
103.110.98.20/32 scope global em1
valid_lft forever preferred_lft forever
inet 103.110.98.20/26 brd 103.10.86.63 scope global secondary em1:0
valid_lft forever preferred_lft forever
inet6 fe80::46a8:42ff:fe17:3ddd/64 scope link
valid_lft forever preferred_lft forever
......
3)停止主服务器上的keepalived:
[root@master-node ~]# /etc/init.d/keepalived stop
Stopping keepalived (via systemctl): [ OK ]
[root@master-node ~]# /etc/init.d/keepalived status
[root@master-node ~]# ps -ef|grep keepalived
root 26952 24348 0 17:49 pts/0 00:00:00 grep --color=auto keepalived
[root@master-node ~]#
4)然后在从服务器上查看,发现已经接管了VIP:
[root@slave-node ~]# ip addr
.......
2: em1: <BROADCAST,MULTICAST,UP,LOWER_UP> mtu 1500 qdisc mq state UP qlen 1000
link/ether 44:a8:42:17:3c:a5 brd ff:ff:ff:ff:ff:ff
inet 103.110.98.24/26 brd 103.10.86.63 scope global em1
inet 103.110.98.20/32 scope global em1
valid_lft forever preferred_lft forever
inet 103.110.98.20/26 brd 103.10.86.63 scope global secondary em1:0
valid_lft forever preferred_lft forever
inet6 fe80::46a8:42ff:fe17:3ddd/64 scope link
valid_lft forever preferred_lft forever
......
[root@slave-node ~]# ip addr
.......
2: em1: <BROADCAST,MULTICAST,UP,LOWER_UP> mtu 1500 qdisc mq state UP qlen 1000
link/ether 44:a8:42:17:3c:a5 brd ff:ff:ff:ff:ff:ff
inet 103.110.98.24/26 brd 103.10.86.63 scope global em1
inet6 fe80::46a8:42ff:fe17:3ca5/64 scope link
valid_lft forever preferred_lft forever
接着验证下nginx服务故障,看看keepalived监控nginx状态的脚本是否正常?
如下:手动关闭master机器上的nginx服务,最多2秒钟后就会自动起来(因为keepalive监控nginx状态的脚本执行间隔时间为2秒)。域名访问几乎不受影响!
[root@master-node ~]# /usr/local/nginx/sbin/nginx -s stop
[root@master-node ~]# ps -ef|grep nginx
root 28401 24826 0 19:43 pts/1 00:00:00 grep --color=auto nginx
[root@master-node ~]# ps -ef|grep nginx
root 28871 28870 0 19:47 ? 00:00:00 /bin/sh /opt/chk_nginx.sh
root 28875 24826 0 19:47 pts/1 00:00:00 grep --color=auto nginx
[root@master-node ~]# ps -ef|grep nginx
root 28408 1 0 19:43 ? 00:00:00 nginx: master process /usr/local/nginx/sbin/nginx
www 28410 28408 0 19:43 ? 00:00:00 nginx: worker process
www 28411 28408 0 19:43 ? 00:00:00 nginx: worker process
www 28412 28408 0 19:43 ? 00:00:00 nginx: worker process
www 28413 28408 0 19:43 ? 00:00:00 nginx: worker process
最后可以查看两台服务器上的/var/log/messages,观察VRRP日志信息的vip漂移情况~~~~
iptables开启后,没有开放允许VRRP协议通信的策略(也有可能导致脑裂);可以选择关闭iptables
-> keepalived.conf文件配置有误导致,比如interface绑定的设备错误
2)VIP绑定后,外部ping不通
可能的原因是:
-> 网络故障,可以检查下网关是否正常;
-> 网关的arp缓存导致,可以进行arp更新,命令是"arping -I 网卡名 -c 5 -s VIP 网关"

相关文章推荐
- 【Nginx】Tengine+Keepalived实现主从模式双机热备
- Nginx+keepalived双机热备(主从模式)
- Nginx+keepalived双机热备(主从模式)
- Nginx+keepalived双机热备(主从模式)
- Nginx+keepalived双机热备(主从模式)
- keepalived+nginx双机热备(HA高可用,单主从非双主,双主配置文件需要把ip配两个相反的,nginx负载均衡需要参考下文末尾超链接)
- nginx + keepalived 实现HA 主从模式
- Nginx+keepalived 脚本安装主从双机热备自动切换解决方案
- Nginx+keepalived双机热备(主主模式)
- Nginx+keepalived做双机热备,实现负载均衡(主主模式)
- Nginx+keepalived双机热备(主主模式)
- Nginx+Keepalived主从双机热备+自动切换
- Nginx+Keepalived双机热备(主主模式)
- CentOS7 下面通过keepalived 配置nginx 主从方式的双机热备
- Nginx+keepalived主从双机热备自动切换解决方案
- keepalived + nginx 主从模式实现高可用
- Nginx+keepalived主从双机热备自动切换架构
- Nginx+keepalived 脚本安装主从双机热备自动切换解决方案
- keepalived+nginx(主从模式)
- Nginx+keepalived 脚本安装主从双机热备自动切换解决方案