SpringBoot中Tomcat配置(学习SpringBoot实战)
2017-10-07 21:21
609 查看
1、Tomcat配置
Spring Boot默认内嵌的Tomcat为Servlet容器,所以本节只讲对Tomcat配置,其实本节的配置对Tomcat、Jetty和Undertow都是通用的。1.1 配置Tomcat
关于Tomcat的所有属性都在org.springframework.boot.autoconfigure.web.ServerProperties配置类中做了定义,我们只需在application.properties配置属性做配置即可。通用的Servlet容器配置都以"server"作为前缀,而Tomcat特有配置都以"server.tomcat"作为前缀。下面举一些常用的例子。
配置servlet容器
server.port = #配置程序端口,默认为8080
server.session-timeout=#用户session过期,以秒为单位
server.context-path= #配置访问路径,默认为/
配置Tomcat
server.tomcat-uri-encoding = #配置Tomcat编码,默认为UTF-8
server.tomcat.compression = #Tomcat是否开启压缩,默认为关闭off
1.2 代码配置Tomcat
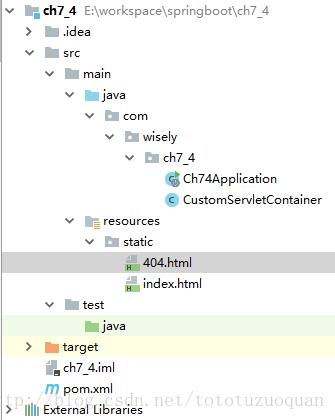
如果你需要通过代码的方式配置servlet容器,则可以注册一个实现EmbeddedServletContainerCustomizer接口的Bean,若想直接配置Tomcat、Jetty、Undertow,则可以直接定义TomcatEmbeddedServletContainerFactor、JettyEmbeddedServletContainerFactor、UndertowEmbeddedServletContainerFactor。1.2.1 编写案例,项目目录如下
1.2.2 pom.xml的内容如下
<?xml version="1.0" encoding="UTF-8"?>
<project xmlns="http://maven.apache.org/POM/4.0.0"
xmlns:xsi="http://www.w3.org/2001/XMLSchema-instance"
xsi:schemaLocation="http://maven.apache.org/POM/4.0.0 http://maven.apache.org/xsd/maven-4.0.0.xsd"> <modelVersion>4.0.0</modelVersion>

<groupId>com.wisely</groupId>
<artifactId>ch7_4</artifactId>
<version>0.0.1-SNAPSHOT</version>
<packaging>jar</packaging>

<name>ch7_4</name>
<description>Demo project for Spring Boot</description>

<parent>
<groupId>org.springframework.boot</groupId>
<artifactId>spring-boot-starter-parent</artifactId>
<version>1.3.0.M1</version>
<relativePath/> <!-- lookup parent from repository -->
</parent>

<properties>
<project.build.sourceEncoding>UTF-8</project.build.sourceEncoding>
<java.version>1.8</java.version>
</properties>

<dependencies>
<dependency>
<groupId>org.springframework.boot</groupId>
<artifactId>spring-boot-starter-web</artifactId>
</dependency>

<dependency>
<groupId>org.springframework.boot</groupId>
<artifactId>spring-boot-starter-test</artifactId>
<scope>test</scope>
</dependency>
</dependencies>

<build>
<plugins>
<plugin>
<groupId>org.springframework.boot</groupId>
<artifactId>spring-boot-maven-plugin</artifactId>
</plugin>
</plugins>
</build>

<repositories>
<repository>
<id>spring-snapshots</id>
<name>Spring Snapshots</name>
<url>https://repo.spring.io/snapshot</url>
<snapshots>
<enabled>true</enabled>
</snapshots>
</repository>
<repository>
<id>spring-milestones</id>
<name>Spring Milestones</name>
<url>https://repo.spring.io/milestone</url>
<snapshots>
<enabled>false</enabled>
</snapshots>
</repository>
</repositories>
<pluginRepositories>
<pluginRepository>
<id>spring-snapshots</id>
<name>Spring Snapshots</name>
<url>https://repo.spring.io/snapshot</url>
<snapshots>
<enabled>true</enabled>
</snapshots>
</pluginRepository>
<pluginRepository>
<id>spring-milestones</id>
<name>Spring Milestones</name>
<url>https://repo.spring.io/milestone</url>
<snapshots>
<enabled>false</enabled>
</snapshots>
</pluginRepository>
</pluginRepositories>

</project>
1.2.3 index.html的内容
<!DOCTYPE html>
<html>
<head>
<meta charset="UTF-8">
<title>Insert title here</title>
</head>
<body>
index page
</body>
</html>
1.2.4 404.html
<!DOCTYPE html>
<html>
<head>
<meta charset="UTF-8">
<title>Insert title here</title>
</head>
<body>
page not found,this is 404 page!
</body>
</html>
1.2.5 CustomServletContainer.java的内容
package com.wisely.ch7_4;

import ch.qos.logback.core.util.TimeUtil;
import org.springframework.boot.context.embedded.ConfigurableEmbeddedServletContainer;
import org.springframework.boot.context.embedded.EmbeddedServletContainerCustomizer;
import org.springframework.boot.context.embedded.ErrorPage;
import org.springframework.http.HttpStatus;
import org.springframework.stereotype.Component;

import java.util.concurrent.TimeUnit;

@Component
public class CustomServletContainer implements EmbeddedServletContainerCustomizer {

@Override
public void customize(ConfigurableEmbeddedServletContainer container) {
container.setPort(8888);
container.addErrorPages(new ErrorPage(HttpStatus.NOT_FOUND, "/404.html"));
container.setSessionTimeout(10, TimeUnit.MINUTES);
}
}
1.2.6 Ch74Application.java的内容
package com.wisely.ch7_4;
import org.springframework.boot.SpringApplication;
import org.springframework.boot.autoconfigure.SpringBootApplication;
import org.springframework.stereotype.Controller;
import org.springframework.web.bind.annotation.RequestMapping;
import org.springframework.web.bind.annotation.ResponseBody;
@Controller
@SpringBootApplication
public class Ch74Application {
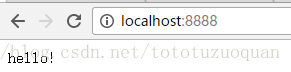
@RequestMapping("/")
@ResponseBody
private String hello() {
return "hello!";
}
@RequestMapping("/toIndex")
public String toIndexPage() {
return "index1";
}
public static void main(String[] args) {
SpringApplication.run(Ch74Application.class,args);
}
}1.2.7 运行
浏览器中输入:http://localhost:8888/toIndex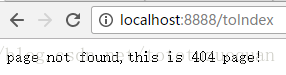
浏览器中输入:http://localhost:8888,最后的效果如下:

相关文章推荐
- SpringBoot中Tomcat配置(学习SpringBoot实战)
- spring boot实战(第七篇)内嵌容器tomcat配置
- spring boot实战(第七篇)内嵌容器tomcat配置
- spring boot实战(第七篇)内嵌容器tomcat配置
- spring boot实战之内嵌容器tomcat配置
- SpringBoot学习-第二章 常用配置方式-<Spring Boot 实战>
- SpringBoot内部配置:“application.properties配置”和”使用XML配置”,读取属性文件中的内容,日志配置,Profile配置(学习:SpringBoot实战)
- Spring Boot 揭秘与实战(五) 服务器篇 - Tomcat 代码配置
- SpringBoot学习-第一章 新的Spring基础-<Spring Boot 实战>
- Spring 、SpringMVC、Mybatis、MySQL、Maven、Tomcat搭建JavaWeb项目流程---学习笔记(一)工具准备及环境配置
- Spring Boot实战之配置使用Sentry上报错误日志(二)
- Spring Boot 基础知识学习(二)——配置文件多环境配置
- spring boot学习1之main和tomcat启动及log日志
- spring boot 学习(十)SpringBoot配置发送Email
- spring boot tomcat配置
- Spring Boot学习---2.将项目打成war包部署到自己的tomcat中
- SpringBoot学习(4) 配置log4j2
- SpringBoot学习笔记(5) Spring Boot集成Redis实现自动配置
- SpringBoot初始教程之Tomcat、Jetty优化以及Https配置(九)
- SpringBoot实战配置