使用kafka作为springcloud bus的消息总线,以及如何自定义总线事件
2017-09-27 18:13
951 查看
springcloud bus默认只支持rabbitmq和kafka两个binder,当然也是可以自己写binder扩展,本文主要介绍使用kafka 作为binder来提供消息总线服务,最新稳定版的Dalston.SR3默认使用的是kafka 0.10.1.1版本,如果你的kafka集群不是这个版本的话,需要整理一下依赖(排除原来的依赖,添加新的kafka相关依赖,官方文档有详细说明),不过也只支持0.9.x和0.10.x两个大版本,如果你是<0.9版本的话,那么就不要用这个版本了,得换低版本的springcloud。
新建一个config-client maven项目:
<?xml version="1.0" encoding="UTF-8"?>
<project xmlns="http://maven.apache.org/POM/4.0.0" xmlns:xsi="http://www.w3.org/2001/XMLSchema-instance"
xsi:schemaLocation="http://maven.apache.org/POM/4.0.0 http://maven.apache.org/xsd/maven-4.0.0.xsd"> <modelVersion>4.0.0</modelVersion>
<groupId>com.example</groupId>
<artifactId>config-client</artifactId>
<version>0.0.1-SNAPSHOT</version>
<packaging>jar</packaging>
<name>config-client</name>
<description>Demo project for Spring Boot</description>
<parent>
<groupId>org.springframework.boot</groupId>
<artifactId>spring-boot-starter-parent</artifactId>
<version>1.5.7.RELEASE</version>
<relativePath/> <!-- lookup parent from repository -->
</parent>
<properties>
<project.build.sourceEncoding>UTF-8</project.build.sourceEncoding>
<project.reporting.outputEncoding>UTF-8</project.reporting.outputEncoding>
<java.version>1.8</java.version>
<spring-cloud.version>Dalston.SR3</spring-cloud.version>
</properties>
<dependencies>
<dependency>
<groupId>org.springframework.cloud</groupId>
<artifactId>spring-cloud-starter-config</artifactId>
</dependency>
<dependency>
<groupId>org.springframework.cloud</groupId>
<artifactId>spring-cloud-starter-eureka</artifactId>
</dependency>
<dependency>
<groupId>org.springframework.cloud</groupId>
<artifactId>spring-cloud-starter-bus-kafka</artifactId>
</dependency>
<dependency>
<groupId>org.springframework.boot</groupId>
<artifactId>spring-boot-starter-web</artifactId>
</dependency>
<dependency>
<groupId>org.springframework.boot</groupId>
<artifactId>spring-boot-starter-actuator</artifactId>
</dependency>
<dependency>
<groupId>org.springframework.retry</groupId>
<artifactId>spring-retry</artifactId>
</dependency>
<dependency>
<groupId>org.springframework.boot</groupId>
<artifactId>spring-boot-starter-aop</artifactId>
</dependency>
<dependency>
<groupId>org.springframework.boot</groupId>
<artifactId>spring-boot-starter-test</artifactId>
<scope>test</scope>
</dependency>
</dependencies>
<dependencyManagement>
<dependencies>
<dependency>
<groupId>org.springframework.cloud</groupId>
<artifactId>spring-cloud-dependencies</artifactId>
<version>${spring-cloud.version}</version>
<type>pom</type>
<scope>import</scope>
</dependency>
</dependencies>
</dependencyManagement>
<build>
<plugins>
<plugin>
<groupId>org.springframework.boot</groupId>
<artifactId>spring-boot-maven-plugin</artifactId>
</plugin>
</plugins>
</build>
</project>
启动类:
package com.example.configclient;
import org.springframework.boot.SpringApplication;
import org.springframework.boot.autoconfigure.SpringBootApplication;
import org.springframework.cloud.bus.jackson.RemoteApplicationEventScan;
import org.springframework.cloud.client.discovery.EnableDiscoveryClient;
@SpringBootApplication
@EnableDiscoveryClient
@RemoteApplicationEventScan(basePackages = "com.example.configclient.event") // tells spring cloud bus to scan for custom events in the current package and subpackages
public class ConfigClientApplication {
public static void main(String[] args) {
SpringApplication.run(ConfigClientApplication.class, args);
}
}
这里除了服务发现注解之外,还配置了一个@RemoteApplicationEventScan注解,用来后面自定义总线事件用的
bootstrap.yml:
eureka:
client:
service-url:
#注册中心集群地址
defaultZone: http://name85:8001/eureka/,http://name86:8001/eureka/,http://name87:8001/eureka/ management:
security:
enabled: false
#logging:
# level:
# root: debug
spring:
cloud:
stream:
#指定用kafka stream来作为默认消息中间件
default-binder: kafka
kafka:
#来自KafkaBinderConfigurationProperties
binder:
brokers: name87:9094
zkNodes: name85:2181,name86:2181,name87:2181/kafka0101
#如果需要传递自定义header信息,需要在此处声明,不然自定义消息头是不会出现在最终消息当中的
# headers: myType
configuration:
auto:
offset:
#可以设置原生kafka属性,比如设置新的消费组从最新的offset开始消费
reset: latest
config:
profile: dev
#高可用配置中心通过服务Id去自动发现config-server服务组
discovery:
enabled: true
service-id: config-server
#使用svn配置时lable是trunk ,github lable是master
label: trunk
#允许失败快速响应
fail-fast: true
#允许拉取配置失败时重试,需要添加spring-retry和spirng-aop依赖,下面配置的都是和默认值一样
retry:
max-attempts: 6
initial-interval: 1000
multiplier: 1.1
max-interval: 2000
application:
name: myapp
server:
port: 7001
---
server:
port: 7001
spring:
profiles: peer1
application:
#用来唯一标识context id, bus会根据上下文id的唯一性来避免处理event的逻辑被重复执行两次
index: 1
cloud:
stream:
bindings:
#springCloudBus topic是默认值可以不配,对应的input output分别是springCloudBusInput,springCloudBusOutput,需要对bus stream定制的话可以配置这两个channel
springCloudBusInput:
destination: springCloudBus
#可以指定消费组,避免每次生成随机group
group: cloud-bus-testgroup:${spring.application.index}
---
server:
port: 7002
spring:
profiles: peer2
application:
index: 2
cloud:
stream:
bindings:
springCloudBusInput:
destination: springCloudBus
group: cloud-bus-testgroup:${spring.application.index}
我这里配置了两个profile到时候会启动两个进程,向一个进程发送总线消息,另外一个进程也能收到消息。
springcloud bus是用springcloud stream来实现消息的发布订阅的,所以配置中有许多stream相关的配置,比如binder的配置和bindings的配置,springcloud bus默认订阅发布的topic是springCloudBus,input channel是springCloudBusInput用来订阅处理消息,output channel是springCloudBusOutput用来发布消息到总线,比如/bus/refresh刷新配置事件,就是通过springCloudBusOutput
channel将事件写入到springCloudBus这个topic中去,这里我们还指定了消费组为cloud-bus-testgroup:${spring.application.index},因此两个进程的消费组是不一样的,如果消费组一样的话,只会有一个进程收到消息,默认是类似anonymous.8fe9494b-d3b5-49d9-b167-4dacd4ebee89这种形式的group,是随机的,所以不同进程的消费组肯定不一样的。
打包运行两个实例:
java -jar config-client.jar --spring.profiles.active=peer1
java -jar config-client.jar --spring.profiles.active=peer2
由于我们引入了配置中心服务,可以测试一下配置刷新总线服务,发送一个POST请求到/bus/refresh,如果开着kafka console consumer的话:可以看到类似消息:
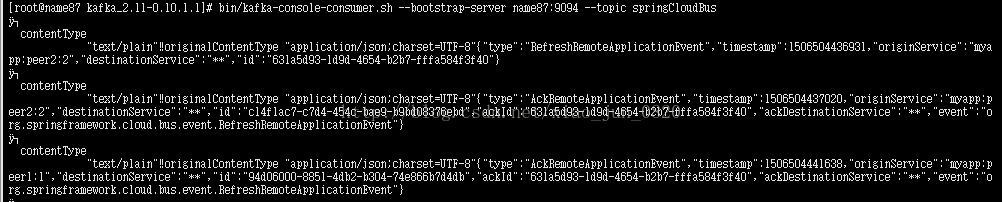
两个进程都收到了这个消息,并像发布方返回了一个ack消息
接下来我们自定义一个总线事件:
package com.example.configclient.event;
import org.springframework.cloud.bus.event.RemoteApplicationEvent;
public class MyCustomRemoteEvent extends RemoteApplicationEvent {
private String message;
//jackson序列化反序列化必须有无参构造函数
public MyCustomRemoteEvent() {
}
public MyCustomRemoteEvent(Object source, String originService, String destinationService, String message) {
// source is the object that is publishing the event
// originService is the unique context ID of the publisher
super(source, originService, destinationService);
this.message = message;
}
public String getMessage() {
return message;
}
public void setMessage(String message) {
this.message = message;
}
}总线事件必须继承自RemoteApplicationEvent,然后我们在自定义事件中增加了一个message属性。
controller:
package com.example.configclient.controller;
import com.example.configclient.event.MyCustomRemoteEvent;
import org.springframework.beans.factory.annotation.Autowired;
import org.springframework.beans.factory.annotation.Value;
import org.springframework.cloud.context.config.annotation.RefreshScope;
import org.springframework.context.ApplicationContext;
import org.springframework.core.env.Environment;
import org.springframework.web.bind.annotation.RequestMapping;
import org.springframework.web.bind.annotation.RequestMethod;
import org.springframework.web.bind.annotation.RequestParam;
import org.springframework.web.bind.annotation.RestController;
@RefreshScope //允许动态刷新配置
@RestController
public class MyController {
//注入ApplicationContext,通过ApplicationContext来publish remote event
private ApplicationContext context;
@Autowired
public MyController(ApplicationContext context) {
this.context = context;
}
@Value("${from}")
private String from;
@Autowired
private Environment env;
@RequestMapping("/from")
public String from() {
return this.from;
}
@RequestMapping("/from-env")
public String fromEnv() {
//也可以通过env来获取
return env.getProperty("my.password", "undefined");
}
@RequestMapping(value = "/publish", method = RequestMethod.POST)
public String publish(@RequestParam(value = "destination", required = false, defaultValue = "**") String destination) {
// each service instance must have a unique context ID
final String myUniqueId = context.getId();
final MyCustomRemoteEvent event =
new MyCustomRemoteEvent(this, myUniqueId, destination, "hello world");
//Since we extended RemoteApplicationEvent and we've configured the scanning of remote events using @RemoteApplicationEventScan, it will be treated as a bus event rather than just a regular ApplicationEvent published in the context.
//因为我们在启动类上设置了@RemoteApplicationEventScan注解,所以通过context发送的时间将变成一个bus event总线事件,而不是在自身context中发布的一个ApplicationEvent
context.publishEvent(event);
return "event published";
}
}
在controller类中我们注入了一个ApplicationContext用来发布总线消息。
在添加一个消息侦听处理类:
package com.example.configclient.listener;
import com.example.configclient.event.MyCustomRemoteEvent;
import org.slf4j.Logger;
import org.slf4j.LoggerFactory;
import org.springframework.context.ApplicationListener;
import org.springframework.stereotype.Component;
//自定义事件侦听
@Component
public class MyCustomRemoteEventListener implements ApplicationListener<MyCustomRemoteEvent> {
private static final Logger logger = LoggerFactory.getLogger(MyCustomRemoteEventListener.class);
//处理自定义事件
@Override
public void onApplicationEvent(MyCustomRemoteEvent myCustomRemoteEvent) {
logger.info("Received MyCustomRemoteEvent - message: " + myCustomRemoteEvent.getMessage());
}
}
重启两个进程,像其中一个进程发送一个请求:post /publish,两个进程在控制台都将会打印:
Received MyCustomRemoteEvent - message: hello world
我们还可以加一个目标服务参数destination过滤: http://localhost:7001/publish?destination=config-server:**,用来限定哪些服务需要接收处理这个事件,其他的将不会处理这个事件。
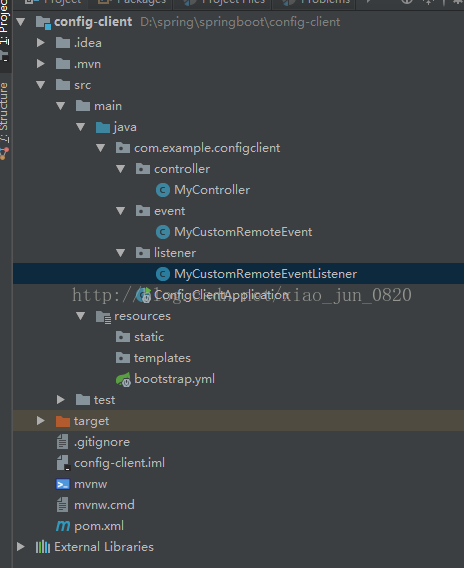
整个工程目录结构:
新建一个config-client maven项目:
<?xml version="1.0" encoding="UTF-8"?>
<project xmlns="http://maven.apache.org/POM/4.0.0" xmlns:xsi="http://www.w3.org/2001/XMLSchema-instance"
xsi:schemaLocation="http://maven.apache.org/POM/4.0.0 http://maven.apache.org/xsd/maven-4.0.0.xsd"> <modelVersion>4.0.0</modelVersion>
<groupId>com.example</groupId>
<artifactId>config-client</artifactId>
<version>0.0.1-SNAPSHOT</version>
<packaging>jar</packaging>
<name>config-client</name>
<description>Demo project for Spring Boot</description>
<parent>
<groupId>org.springframework.boot</groupId>
<artifactId>spring-boot-starter-parent</artifactId>
<version>1.5.7.RELEASE</version>
<relativePath/> <!-- lookup parent from repository -->
</parent>
<properties>
<project.build.sourceEncoding>UTF-8</project.build.sourceEncoding>
<project.reporting.outputEncoding>UTF-8</project.reporting.outputEncoding>
<java.version>1.8</java.version>
<spring-cloud.version>Dalston.SR3</spring-cloud.version>
</properties>
<dependencies>
<dependency>
<groupId>org.springframework.cloud</groupId>
<artifactId>spring-cloud-starter-config</artifactId>
</dependency>
<dependency>
<groupId>org.springframework.cloud</groupId>
<artifactId>spring-cloud-starter-eureka</artifactId>
</dependency>
<dependency>
<groupId>org.springframework.cloud</groupId>
<artifactId>spring-cloud-starter-bus-kafka</artifactId>
</dependency>
<dependency>
<groupId>org.springframework.boot</groupId>
<artifactId>spring-boot-starter-web</artifactId>
</dependency>
<dependency>
<groupId>org.springframework.boot</groupId>
<artifactId>spring-boot-starter-actuator</artifactId>
</dependency>
<dependency>
<groupId>org.springframework.retry</groupId>
<artifactId>spring-retry</artifactId>
</dependency>
<dependency>
<groupId>org.springframework.boot</groupId>
<artifactId>spring-boot-starter-aop</artifactId>
</dependency>
<dependency>
<groupId>org.springframework.boot</groupId>
<artifactId>spring-boot-starter-test</artifactId>
<scope>test</scope>
</dependency>
</dependencies>
<dependencyManagement>
<dependencies>
<dependency>
<groupId>org.springframework.cloud</groupId>
<artifactId>spring-cloud-dependencies</artifactId>
<version>${spring-cloud.version}</version>
<type>pom</type>
<scope>import</scope>
</dependency>
</dependencies>
</dependencyManagement>
<build>
<plugins>
<plugin>
<groupId>org.springframework.boot</groupId>
<artifactId>spring-boot-maven-plugin</artifactId>
</plugin>
</plugins>
</build>
</project>
启动类:
package com.example.configclient;
import org.springframework.boot.SpringApplication;
import org.springframework.boot.autoconfigure.SpringBootApplication;
import org.springframework.cloud.bus.jackson.RemoteApplicationEventScan;
import org.springframework.cloud.client.discovery.EnableDiscoveryClient;
@SpringBootApplication
@EnableDiscoveryClient
@RemoteApplicationEventScan(basePackages = "com.example.configclient.event") // tells spring cloud bus to scan for custom events in the current package and subpackages
public class ConfigClientApplication {
public static void main(String[] args) {
SpringApplication.run(ConfigClientApplication.class, args);
}
}
这里除了服务发现注解之外,还配置了一个@RemoteApplicationEventScan注解,用来后面自定义总线事件用的
bootstrap.yml:
eureka:
client:
service-url:
#注册中心集群地址
defaultZone: http://name85:8001/eureka/,http://name86:8001/eureka/,http://name87:8001/eureka/ management:
security:
enabled: false
#logging:
# level:
# root: debug
spring:
cloud:
stream:
#指定用kafka stream来作为默认消息中间件
default-binder: kafka
kafka:
#来自KafkaBinderConfigurationProperties
binder:
brokers: name87:9094
zkNodes: name85:2181,name86:2181,name87:2181/kafka0101
#如果需要传递自定义header信息,需要在此处声明,不然自定义消息头是不会出现在最终消息当中的
# headers: myType
configuration:
auto:
offset:
#可以设置原生kafka属性,比如设置新的消费组从最新的offset开始消费
reset: latest
config:
profile: dev
#高可用配置中心通过服务Id去自动发现config-server服务组
discovery:
enabled: true
service-id: config-server
#使用svn配置时lable是trunk ,github lable是master
label: trunk
#允许失败快速响应
fail-fast: true
#允许拉取配置失败时重试,需要添加spring-retry和spirng-aop依赖,下面配置的都是和默认值一样
retry:
max-attempts: 6
initial-interval: 1000
multiplier: 1.1
max-interval: 2000
application:
name: myapp
server:
port: 7001
---
server:
port: 7001
spring:
profiles: peer1
application:
#用来唯一标识context id, bus会根据上下文id的唯一性来避免处理event的逻辑被重复执行两次
index: 1
cloud:
stream:
bindings:
#springCloudBus topic是默认值可以不配,对应的input output分别是springCloudBusInput,springCloudBusOutput,需要对bus stream定制的话可以配置这两个channel
springCloudBusInput:
destination: springCloudBus
#可以指定消费组,避免每次生成随机group
group: cloud-bus-testgroup:${spring.application.index}
---
server:
port: 7002
spring:
profiles: peer2
application:
index: 2
cloud:
stream:
bindings:
springCloudBusInput:
destination: springCloudBus
group: cloud-bus-testgroup:${spring.application.index}
我这里配置了两个profile到时候会启动两个进程,向一个进程发送总线消息,另外一个进程也能收到消息。
springcloud bus是用springcloud stream来实现消息的发布订阅的,所以配置中有许多stream相关的配置,比如binder的配置和bindings的配置,springcloud bus默认订阅发布的topic是springCloudBus,input channel是springCloudBusInput用来订阅处理消息,output channel是springCloudBusOutput用来发布消息到总线,比如/bus/refresh刷新配置事件,就是通过springCloudBusOutput
channel将事件写入到springCloudBus这个topic中去,这里我们还指定了消费组为cloud-bus-testgroup:${spring.application.index},因此两个进程的消费组是不一样的,如果消费组一样的话,只会有一个进程收到消息,默认是类似anonymous.8fe9494b-d3b5-49d9-b167-4dacd4ebee89这种形式的group,是随机的,所以不同进程的消费组肯定不一样的。
打包运行两个实例:
java -jar config-client.jar --spring.profiles.active=peer1
java -jar config-client.jar --spring.profiles.active=peer2
由于我们引入了配置中心服务,可以测试一下配置刷新总线服务,发送一个POST请求到/bus/refresh,如果开着kafka console consumer的话:可以看到类似消息:
两个进程都收到了这个消息,并像发布方返回了一个ack消息
接下来我们自定义一个总线事件:
package com.example.configclient.event;
import org.springframework.cloud.bus.event.RemoteApplicationEvent;
public class MyCustomRemoteEvent extends RemoteApplicationEvent {
private String message;
//jackson序列化反序列化必须有无参构造函数
public MyCustomRemoteEvent() {
}
public MyCustomRemoteEvent(Object source, String originService, String destinationService, String message) {
// source is the object that is publishing the event
// originService is the unique context ID of the publisher
super(source, originService, destinationService);
this.message = message;
}
public String getMessage() {
return message;
}
public void setMessage(String message) {
this.message = message;
}
}总线事件必须继承自RemoteApplicationEvent,然后我们在自定义事件中增加了一个message属性。
controller:
package com.example.configclient.controller;
import com.example.configclient.event.MyCustomRemoteEvent;
import org.springframework.beans.factory.annotation.Autowired;
import org.springframework.beans.factory.annotation.Value;
import org.springframework.cloud.context.config.annotation.RefreshScope;
import org.springframework.context.ApplicationContext;
import org.springframework.core.env.Environment;
import org.springframework.web.bind.annotation.RequestMapping;
import org.springframework.web.bind.annotation.RequestMethod;
import org.springframework.web.bind.annotation.RequestParam;
import org.springframework.web.bind.annotation.RestController;
@RefreshScope //允许动态刷新配置
@RestController
public class MyController {
//注入ApplicationContext,通过ApplicationContext来publish remote event
private ApplicationContext context;
@Autowired
public MyController(ApplicationContext context) {
this.context = context;
}
@Value("${from}")
private String from;
@Autowired
private Environment env;
@RequestMapping("/from")
public String from() {
return this.from;
}
@RequestMapping("/from-env")
public String fromEnv() {
//也可以通过env来获取
return env.getProperty("my.password", "undefined");
}
@RequestMapping(value = "/publish", method = RequestMethod.POST)
public String publish(@RequestParam(value = "destination", required = false, defaultValue = "**") String destination) {
// each service instance must have a unique context ID
final String myUniqueId = context.getId();
final MyCustomRemoteEvent event =
new MyCustomRemoteEvent(this, myUniqueId, destination, "hello world");
//Since we extended RemoteApplicationEvent and we've configured the scanning of remote events using @RemoteApplicationEventScan, it will be treated as a bus event rather than just a regular ApplicationEvent published in the context.
//因为我们在启动类上设置了@RemoteApplicationEventScan注解,所以通过context发送的时间将变成一个bus event总线事件,而不是在自身context中发布的一个ApplicationEvent
context.publishEvent(event);
return "event published";
}
}
在controller类中我们注入了一个ApplicationContext用来发布总线消息。
在添加一个消息侦听处理类:
package com.example.configclient.listener;
import com.example.configclient.event.MyCustomRemoteEvent;
import org.slf4j.Logger;
import org.slf4j.LoggerFactory;
import org.springframework.context.ApplicationListener;
import org.springframework.stereotype.Component;
//自定义事件侦听
@Component
public class MyCustomRemoteEventListener implements ApplicationListener<MyCustomRemoteEvent> {
private static final Logger logger = LoggerFactory.getLogger(MyCustomRemoteEventListener.class);
//处理自定义事件
@Override
public void onApplicationEvent(MyCustomRemoteEvent myCustomRemoteEvent) {
logger.info("Received MyCustomRemoteEvent - message: " + myCustomRemoteEvent.getMessage());
}
}
重启两个进程,像其中一个进程发送一个请求:post /publish,两个进程在控制台都将会打印:
Received MyCustomRemoteEvent - message: hello world
我们还可以加一个目标服务参数destination过滤: http://localhost:7001/publish?destination=config-server:**,用来限定哪些服务需要接收处理这个事件,其他的将不会处理这个事件。
整个工程目录结构:

相关文章推荐
- Spring Cloud (20) | Spring Cloud Bus 使用kafka消息总线、gitlab添加webhooks实现自动刷新配置
- SpringCloudBus使用Kafka实现消息总线
- Spring Cloud Bus 消息总线集成Kafka
- Spring Cloud (3) | spring cloud bus 消息总线kafka应用
- spring cloud 中消息总线(bus)使用
- 史上最简单的SpringCloud教程 | 第八篇: 消息总线(Spring Cloud Bus)
- Spring Cloud构建微服务架构(七)消息总线(续:Kafka)
- 第八篇: 消息总线(Spring Cloud Bus)
- Spring Cloud构建微服务架构(七)消息总线(续:Kafka)
- 第八篇: 消息总线(Spring Cloud Bus)
- 第八篇: 消息总线(Spring Cloud Bus)
- 第八篇: 消息总线(Spring Cloud Bus)
- 第八篇: 消息总线(Spring Cloud Bus)
- 史上最简单的SpringCloud教程 | 第八篇: 消息总线(Spring Cloud Bus)
- 第八篇: 消息总线(Spring Cloud Bus)
- 第八篇: 消息总线(Spring Cloud Bus)
- 第八篇: 消息总线(Spring Cloud Bus)
- 史上最简单的SpringCloud教程 | 第八篇: 消息总线(Spring Cloud Bus)
- C#如何创建自定义控件以及添加自定义属性和事件使用
- 第八篇: 消息总线(Spring Cloud Bus)