搭建hibernate环境 使用JDBC连接数据库
2017-09-23 19:17
405 查看
搭建hibernate环境 使用JDBC连接数据库
1.新建一个java项目(测试用)
2.导入hibernate所需的jar包
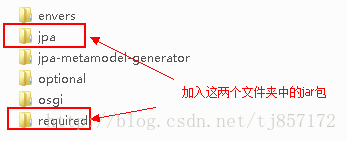
// hibernate所需jar包
antlr-2.7.7.jar
dom4j-1.6.1.jar
hibernate-commons-annotations-4.0.5.Final.jar
hibernate-core-4.3.11.Final.jar
hibernate-jpa-2.1-api-1.0.0.Final.jar
jandex-1.1.0.Final.jar
javassist-3.18.1-GA.jar
jboss-logging-3.1.3.GA.jar
jboss-logging-annotations-1.2.0.Beta1.jar
jboss-transaction-api_1.2_spec-1.0.0.Final.jar

// 连接mysql数据库驱动包
mysql-connector-java-5.1.20-bin.jar
3.配置hibernate.cfg.xml文件:
配置文件所放位置:放在src下目录下
查找方式:
文件的获取:在jar包:hibernate-release-版本号.Final\project\etc 目录下
hibernate.cfg.xml配置文件代码,例如:
<?xml version='1.0' encoding='utf-8'?>
<!DOCTYPE hibernate-configuration PUBLIC
"-//Hibernate/Hibernate Configuration DTD 3.0//EN"
"http://www.hibernate.org/dtd/hibernate-configuration-3.0.dtd">

<hibernate-configuration>
<session-factory>
<!-- mysql配置数据库连接 -->
<property name="connection.driver_class">
org.gjt.mm.mysql.Driver
</property>
<property name="connection.url">jdbc:mysql:///hibernate4</property>
<property name="connection.username">root</property>
<property name="connection.password">123456</property>

<!-- hibernate可选项 -->
<!-- 数据库文言 -->
<property name="dialect">
org.hibernate.dialect.MySQL5Dialect
</property>
<!-- 是否打印sql语句 -->
<property name="show_sql">true</property>
<!-- 格式化sql语句 -->
<property name="format_sql">true</property>
<!-- hbm文件 -->
<mapping resource="cn/hibernate/entity/score.hbm.xml" />
</session-factory>
</hibernate-configuration>
4.配置映射文件 xxx.hbm.xml文件:
<?xml version='1.0' encoding='utf-8'?>
<!DOCTYPE hibernate-mapping PUBLIC
"-//Hibernate/Hibernate Mapping DTD 3.0//EN"
"http://www.hibernate.org/dtd/hibernate-mapping-3.0.dtd">
<hibernate-mapping package="cn.hibernate.entity">
<class name="Score">
<id name="id">
<generator class="native"></generator>
</id>

<property name="stuId"/>
<property name="subjectId"/>
<property name="result"/>
</class>
</hibernate-mapping>
5.HibernateUitl工具类:
用于加载hibernate.cfg.xml配置文件:package cn.hibernate.util;
import org.hibernate.Session;
import org.hibernate.SessionFactory;
import org.hibernate.boot.registry.StandardServiceRegistryBuilder;
import org.hibernate.cfg.Configuration;
/**
* hibernate工具类
* @author tang
*
*/
public class HibernateUitl {
private static Configuration cfg = null;
private static SessionFactory factory = null;
private static Session session = null;
static {
cfg = new Configuration().configure();
factory = cfg.buildSessionFactory(new StandardServiceRegistryBuilder().applySettings(cfg.getProperties())
.build());
}
public static Session getSession() {
if(factory != null) {
return factory.openSession();
}else{
factory = cfg.buildSessionFactory(new StandardServiceRegistryBuilder().applySettings(cfg.getProperties())
.build());
}
return factory.openSession();
}
public static void closeSession() {
if(session != null && session.isOpen()){
session.close();
}
}
}6.添加对应映射文件(xxx.hbm.xml)的实体类:
// 实体类
public class Score {
private int id;
private int stuId;//学生编号
private int subjectId;//科目编号
private double result;//成绩
// 省略 getter 和 setter 方法
}
7.测试类:
public class HibernateTest {

@Test
public void createDB() {
Configuration cfg = new Configuration().configure();
SchemaExport se = new SchemaExport(cfg);
//第一个参数是否生成ddl脚本,第二个参数是否执行到数据库中
se.create(true, true);
}

@Test
public void sqlSave() throws Exception {
Session session = null;
Transaction tx = null;
try {
session = HibernateUitl.getSession();
tx = session.beginTransaction();

Score s = new Score();
s.setId(1);
s.setSubjectId(2);
s.setResult(89);

session.save(s);

tx.commit();
} catch (Exception e) {
if(tx != null)
tx.rollback();
e.printStackTrace();
throw e;
}finally{
HibernateUitl.closeSession();
}
}
}

相关文章推荐
- JSP运行环境的搭建和JDBC数据库连接初级教程- -
- IDEA中使用Maven搭建Hibernate(连接C3P0)环境
- Hibernate4 使用Proxool连接数据库出现 at org.hibernate.engine.jdbc.internal.JdbcServicesImpl.configure(JdbcSer
- C# 点滴——第1篇:C/S客户端(带SQL连接字) 开发环境搭建, 数据库连接字的使用
- 使用jdbc与hibernate将BLOB字段写入数据库
- 各种数据库使用JDBC连接的方式
- 使用JDBC连接ODBC数据库的Java代码
- JRun 使用 Connector/J JDBC 驱动程序连接 MySQL 数据库
- 使用 JDBC 连接不同版本 DB2 数据库的兼容性问题
- 各种常用数据库使用JDBC连接的方式
- 各种数据库使用JDBC连接的方式
- 使用JDBC连接SQL Server 2000数据库实例讲解
- 使用MyEclipse 6.0连接SQL 2000和2005数据库(JDBC) 遇到的问题,急需解决
- 在java中使用jdbc的数据库连接大全
- 配置BEA WebLogic 8.1 JDBC连接--Oracle 8.1.7数据库使用的WebLogic 8.1 JDBC配置
- 使用 JDBC 连接不同版本 DB2 数据库的兼容性问题
- 使用JDBC-ODBC方式连接数据库时,如何在代码中指定ODBC数据源信息
- 使用JDBC连接SQL Server 2005数据库
- 提供各种数据库在JDBC中的连接方法.及在struts与hibernate中的配置
- 使用JDBC连接SQL Server 2000数据库