C# Windows Services 服务
2017-09-18 23:46
381 查看
C# Windows Service-基础教程
本文介绍了如何用C#创建、安装、启动、监控、卸载简单的Windows Service 的内容步骤和注意事项。案例: 应用 windows service 监控电脑cpu和内存使用情况。
创建服务
安装服务
监控cpu服务
卸载服务
1、创建一个windows service服务

OnStart :服务启动的时候执行,
OnStop:服务停止的时候执行
public partial class Service1 : ServiceBase
{
//服务初始化
public Service1()
{
InitializeComponent();
}
//服务启动时执行的代码
protected override void OnStart(string[] args)
{
}
//服务停止时执行的代码
protected override void OnStop()
{
}
}
1、程序代码
using System;
using System.Collections.Generic;
using System.Linq;
using System.Management;
using System.ServiceProcess;
using System.Text;
using System.Threading.Tasks;
using System.Windows.Forms;

namespace ServicesManagementApp
{
static class Program
{

static void Main(string[] args)
{
ServiceBase[] ServicesToRun;
ServicesToRun = new ServiceBase[]
{
new ComputerService()
};
ServiceBase.Run(ServicesToRun);
}

}
}
2、监控cpu和内存代码
using System;
using System.Collections.Generic;
using System.ComponentModel;
using System.Data;
using System.Diagnostics;
using System.IO;
using System.Linq;
using System.ServiceProcess;
using System.Text;
using System.Threading;
using System.Threading.Tasks;

namespace ServicesManagementApp
{
partial class ComputerService : ServiceBase
{
//使用定时器定时执行相应代码
private Timer timer;

public ComputerService()
{
InitializeComponent();
}

protected override void OnStart(string[] args)
{
//定时器,每间隔一个3秒行一次------>OnTimerHandler()方法  //2小时执行1次
//timer = new Timer(OnTimerHandler, null, 0, 1000 * 60 * 60* 2 );
timer = new Timer(OnTimerHandler, null, 0, 1000 * 3);

// TODO: 在此处添加代码以启动服务。
}

protected override void OnStop()
{
timer.Dispose();
// TODO: 在此处添加代码以执行停止服务所需的关闭操作。
}

private void OnTimerHandler(object state)
{
this.SendService_EarlyWarning();
}

//服务测试方法
private void SendService_EarlyWarning()
{
//上次记录CPU的时间
List<decimal> cpuNumList = new List<decimal>();
List<decimal> memoryNumList = new List<decimal>();
TimeSpan prevCpuTime = TimeSpan.Zero;
//Sleep的时间间隔
//int interval = 1000;
SystemInfo sys = new SystemInfo();
//内存大小单位:GB
const int GB_DIV = 1024 * 1024 * 1024;
int stopnum = 0;
bool cpu_sendmail = false;
bool memory_sendmail = false;

while (true)
{
//第一种方法计算CPU使用率
//计算进程cpu使用
decimal cpuUesd = Math.Round((decimal)sys.CpuLoad, 2);
decimal allMemory = sys.PhysicalMemory / (decimal)GB_DIV;
decimal isUsedMemory = Math.Round((sys.PhysicalMemory - sys.MemoryAvailable) / (decimal)GB_DIV, 2);
decimal Used_ratio = Math.Round((decimal)(isUsedMemory / allMemory) * 100, 2);

//第二章方法获取系统CPU和内存使用情
FileDoUtiles.WriteLogInfo(String.Format("系统CPU使用率:{0}%,系统内存使用大小:{1}GB,内存使用率:{2}%", cpuUesd, isUsedMemory, Used_ratio));
stopnum++;
if (stopnum == 11)
{
break;
}
else
{
cpuNumList.Add(cpuUesd);
memoryNumList.Add(Used_ratio);
}
//Thread.Sleep(interval);
}
decimal sumcpuUesd = 0;
decimal sumMemoryUesd = 0;
foreach (var item in cpuNumList)
{
sumcpuUesd = sumcpuUesd + item;
}

foreach (var item in memoryNumList)
{
sumMemoryUesd = sumMemoryUesd + item;
}

//cpu预警
if ((sumcpuUesd / cpuNumList.Count) > 80)
{
FileDoUtiles.WriteLogInfo($"cpu达到预警线, cpuUesdRatio: {(sumcpuUesd / cpuNumList.Count)} %");
//Console.WriteLine($"cpu达到预警线, cpuUesdRatio: {(sumcpuUesd / cpuNumList.Count)} %");
}
else
{
FileDoUtiles.WriteLogInfo($"cpu未达到预警线, cpuUesdRatio: { (sumcpuUesd / cpuNumList.Count)} %");
//Console.WriteLine($"cpu未达到预警线, cpuUesdRatio: {(sumcpuUesd / cpuNumList.Count)} %");
cpu_sendmail = true;

}

//内存预警
if ((sumMemoryUesd / memoryNumList.Count) > 70)
{
//Console.WriteLine($"内存使用达到预警线, memoryUesdRatio: {(sumMemoryUesd / memoryNumList.Count)} %");
FileDoUtiles.WriteLogInfo($"内存使用达到预警线, memoryUesdRatio: {(sumMemoryUesd / memoryNumList.Count)} %");
}
else
{
//Console.WriteLine($"内存使用未达到预警线, memoryUesdRatio: {(sumMemoryUesd / memoryNumList.Count)} %");
FileDoUtiles.WriteLogInfo($"内存使用未达到预警线, memoryUesdRatio: {(sumMemoryUesd / memoryNumList.Count)} %");
memory_sendmail = true;
}

if (cpu_sendmail && memory_sendmail)
{
//发送cpu、内存超额预警邮件
}
else if (!cpu_sendmail && memory_sendmail)
{
//发送内存超额邮件
}
else if (cpu_sendmail && !memory_sendmail)
{
//发送cpu超额邮件
}
}
}
}
3、安装启动服务
创建一个bat文件,指定启动的服务文件路径,文件脚本内容如下。@echo.服务启动...... @echo off @sc create ComputerService binPath= "D:\Projects\ServicesManagementApp\ServicesManagementApp\bin\Debug\ServicesManagementApp.exe" @net start ComputerService @sc config ComputerService start= AUTO @echo off @echo.启动完毕! @pause
4、卸载服务
创建一个bat文件,指定删除的服务名称—ComputerService,文件脚本内容如下。@echo.服务删除 @echo off @sc delete ComputerService @echo off @echo.删除结束! @pause
5、启动服务开始监控
双击bat安装服务文件,即可安装服务。
6、查看服务执行结果

7、卸载服务
双击bat卸载服务文件,即可卸载服务。
2. 创建服务时需注意
1. 添加安装程序
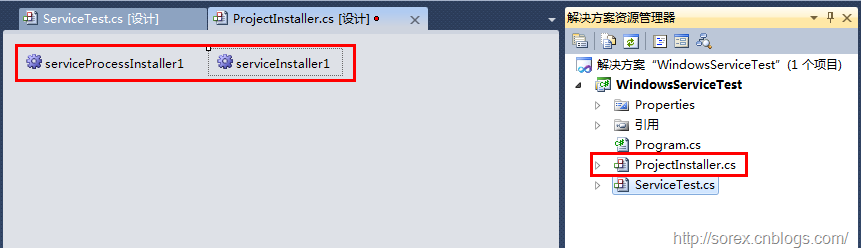
添加安装程序,我们可以看到下图图,自动为我们创建了ProjectInstaller.cs以及2个安装的组件。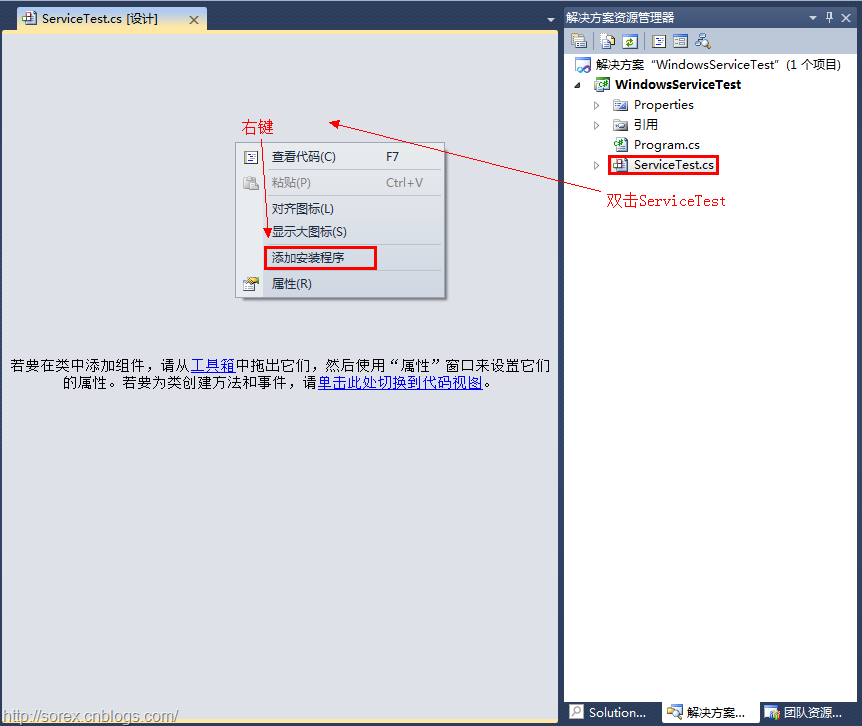
2. 修改安装服务名
右键serviceInsraller1,选择属性,将ServiceName的值改为ComputerService。
3. 修改安装权限
右键serviceProcessInsraller1,选择属性,将Account的值改为LocalSystem。

相关文章推荐
- C#开发、部署Windows Services服务
- C# windows服务:创建Windows服务(Windows Services)的一般步骤
- C#创建Windows服务(Windows Services) 实战之系统定时重启服务
- C#创建Windows服务(Windows Services) 实战之系统定时重启服务
- C#创建Windows服务(Windows Services) 实战之系统定时重启服务
- C#开发Windows Services服务--服务安装失败的解决办法
- C#开发Windows Services服务--服务安装失败的解决办法
- C#创建Windows服务(Windows Services) 实战之系统定时重启服务
- C# windows服务:创建Windows服务(Windows Services)的一般步骤
- C#创建Windows服务(Windows Services) 实战之系统定时重启服务
- C#写的服务出现错误:Windows could not start the NLServices sercice on local Computer. Error 1083:The executable programe that thi
- C#创建Windows服务(Windows Services) 实战之系统定时重启服务
- 在 C# 平台中, 编写 Windows 服务的简单例子
- c# Windows 服务应用程序介绍
- C#写Windows Service(windows服务程序)
- C#创建Windows Service(Windows 服务)基础教程
- 浏览 Windows SharePoint Services Web 站点时收到“Service Unavailable”(服务不可用)错误信息
- c#写windows服务程序
- C# windows服务安装与卸载
- 用C#创建Windows服务(Windows Services)