html-webpack-plugin插件 根据模板生成多页面
2017-09-15 00:00
991 查看
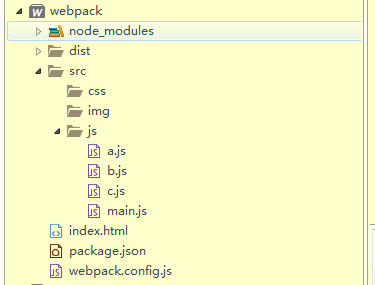
1、项目目录结构为:
2、webpack.config.js配置文件为:
3、执行命令:
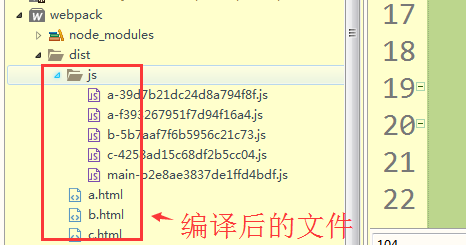
4.编译:

2、webpack.config.js配置文件为:
var htmlWebpackPlugin = require('html-webpack-plugin'); module.exports = { //打包入口
entry: { main: './src/js/main.js', a: './src/js/a.js', b: './src/js/b.js', c: './src/js/c.js' }, //打包后的文件
output: { //不加__dirname 会报错
path: __dirname + '/dist', //注意:使用[name]确保每个文件名都不重复
filename: 'js/[name]-[chunkhash].js', //线上地址配置
publicPath:'http://cdn.com/' }, plugins: [ new htmlWebpackPlugin({ template: 'index.html', filename: 'a.html', title: 'this is a.html', //增加指定的chunks chunks:['main','a'] }), new htmlWebpackPlugin({ template: 'index.html', filename: 'b.html', title: 'this is b.html', //增加指定的chunks
chunks:['main','b'] }), new htmlWebpackPlugin({ template: 'index.html', filename: 'c.html', title: 'this is c.html', //增加指定的chunks
chunks:['main','c'] }) ] }
3、执行命令:
npm run webpack
4.编译:

相关文章推荐
- html-webpack-plugin插件 根据模板生成多页面
- webpack插件:使用HtmlWebpackPlugin在页面中使用EJS语法引用模板文件(二)
- HtmlWebpackPlugin插件使用实现html文件自动生成
- 安装html-webpack-plugin插件时报错
- 根据html页面模板动态生成html页面(c#类)
- [js高手之路]深入浅出webpack教程系列4-插件使用之html-webpack-plugin配置(上)
- webpack插件-html-webpack-plugin
- [js高手之路]深入浅出webpack教程系列6-插件使用之html-webpack-plugin配置(下)
- webpack 插件: html-webpack-plugin
- webpack前端构建工具学习总结(四)之自动化生成项目中的html页面
- +根据html页面模板动态生成html页面(c#类)+
- webpack插件html-webpack-plugin
- webpack插件html-webpack-plugin
- 根据html页面模板动态生成html页面(c#类)
- webpack---htmlWbpackPlugin插件在webpack中的应用
- webpack 插件: html-webpack-plugin
- 根据html页面模板动态生成html页面(c#类)
- webpack学习(三)html-webpack-plugin插件
- webpack 插件之Html-Webpack-Plugin
- 根据html页面模板动态生成html页面(c#类)