Veritas Netbackup Oracle数据库本机备份恢复
2017-09-14 15:29
507 查看
概述: 本次实验环境采用Veritas Netbackup 7.7.3软件版本,对Redhat Linux Oracle数据库的备份和恢复。
Oracle备份恢复实验拓扑:

备份RedHat Linux环境下的Oracle 11gR2数据库到Master Server端;
通过Master Server端恢复Oracle 11gR2数据库
[Master/Media server][192.168.60.59][Winodws Server2008R2]
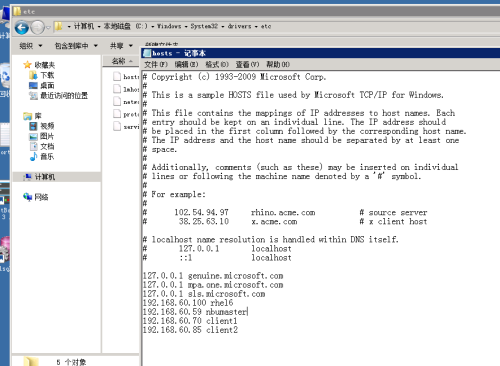
1.修改hosts文件
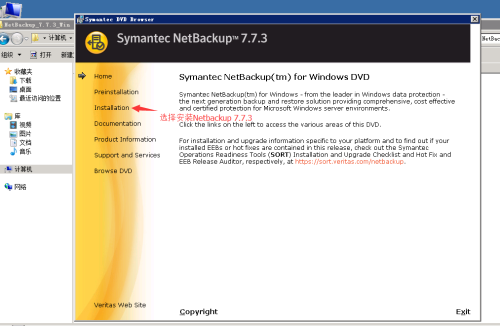
2.上传Netbackup 7.7.3软件解压并安装
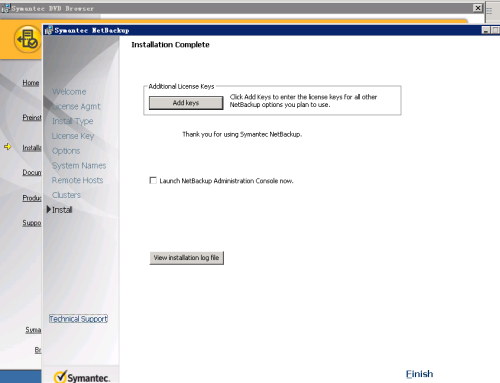
3.输入License授权安装Master Server

4.等待安装完成
[Client][192.168.60.100][Redhat Linux 6.5]
1.修改HOSTNAME
2.修改selinux设置
[Client][192.168.60.100][Redhat Linux 6.5][数据库备份配置]1.连接登陆数据库,开启归档
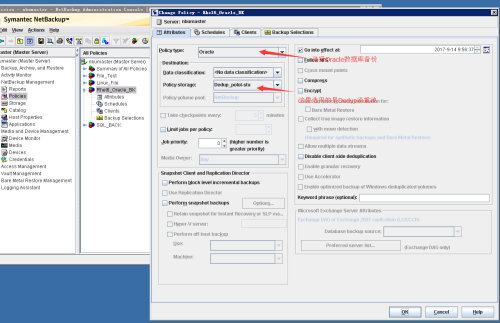
[Master/Media server][192.168.60.59][Windows 2008R2][数据库备份]1.登陆Netbackup客户端软件,新建Policy备份Oracle数据库
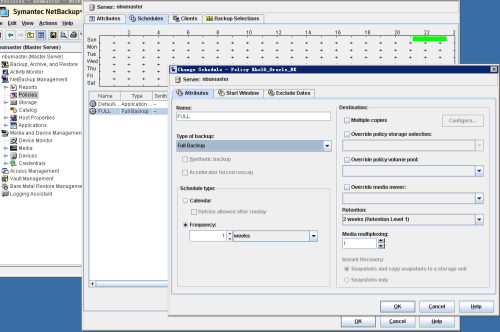
2.策略配置备份时间,FULL备份一周一次,两周一次删除数据
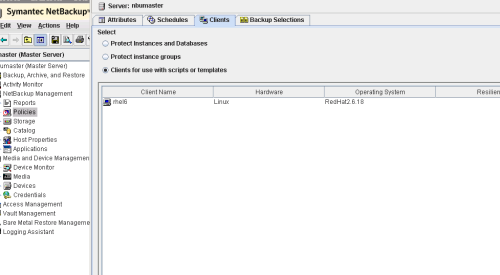
3.选择自定义RMAN脚本备份方式,添加客户端
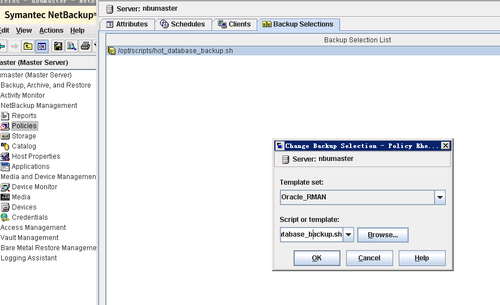
4.选择相应的RMAN脚本进行备份
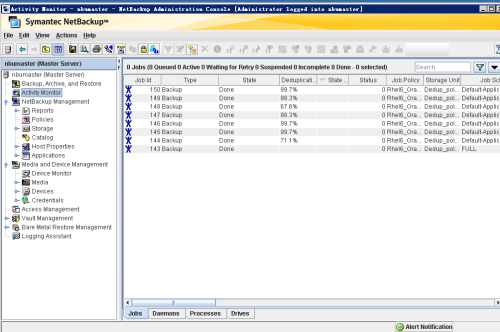
5.选择手动执行备份测试

6.至此Oracle数据库的备份完成
[Client][192.168.60.100][Redhat Linux 6.5][数据库恢复]在这模拟一下数据库故障问题,删除dbf数据文件、ctl控制文件、log日志文件
2.进入RMAN Target,首先恢复数据库控制文件
至此,Oracle数据库的本机通过Netbackup备份恢复实验成功实现。需要注意的是在Netbackup备份数据库的时候,要在数据库端配置script,然后在master端发起备份;而数据库恢复只需在client端发起恢复即可。
| 操作系统 | 主机名 | IP地址 |
| Windows Server 2008R2 | nbumaster | 192.168.60.59 |
| Redhat Linux 6.5 x86_64 | rhel6 | 192.168.60.100 |
备份RedHat Linux环境下的Oracle 11gR2数据库到Master Server端;
通过Master Server端恢复Oracle 11gR2数据库
[Master/Media server][192.168.60.59][Winodws Server2008R2]
1.修改hosts文件
2.上传Netbackup 7.7.3软件解压并安装
3.输入License授权安装Master Server
4.等待安装完成
[Client][192.168.60.100][Redhat Linux 6.5]
1.修改HOSTNAME
vi /etc/sysconfig/network
NETWORKING=yes
HOSTNAME=rhel6
2.修改selinux设置
vi /etc/selinux/config
SELINUXTYPE=disabled
3.关闭防火墙
service iptables stop
iptables: Flushing firewall rules:                         [  OK  ]
iptables: Setting chains to policy ACCEPT: filter          [  OK  ]
iptables: Unloading modules:
4.修改hosts文件
vi /etc/hosts
192.168.60.100  rhel6
192.168.60.59  nbumaster
5.Linux NBU Client安装安装介质:
NetBackup_7.7.3_CLIENTS2.tar.gz 2.87 GB解压缩
tar xf NetBackup_7.7.3_CLIENTS2.tar.gz -C /opt进入解压完成后的目录:
cd NetBackup_7.7.3_CLIENTS2
./install
Do you wish to continue? [y,n] (y) y

Do you want to install the NetBackup client software for this client? [y,n] (y) y

Enter the name of the NetBackup master server : nbumaster

Would you like to use "rhel6" as the configured
name of the NetBackup client? [y,n] (y) y
[Client][192.168.60.100][Redhat Linux 6.5][数据库备份配置]1.连接登陆数据库,开启归档
[oracle@rhel6 ~]$ sqlplus / as sysdba

SQL*Plus: Release 11.2.0.4.0 Production on Thu Sep 14 10:32:24 2017

Copyright (c) 1982, 2013, Oracle.  All rights reserved.

Connected to:
Oracle Database 11g Enterprise Edition Release 11.2.0.4.0 - 64bit Production
With the Partitioning, OLAP, Data Mining and Real Application Testing options
SQL> shutdown immediate;              //关闭数据库;
Database closed.
Database dismounted.
ORACLE instance shut down.
SQL> startup mount;                 //启动数据库到mount状态;
ORACLE instance started.

Total System Global Area 1603411968 bytes
Fixed Size		    2253664 bytes
Variable Size		 1375734944 bytes
Database Buffers	  218103808 bytes
Redo Buffers		    7319552 bytes
Database mounted.
SQL> alter database archivelog;     //开启数据库归档;

Database altered.

SQL> archive log list;
Database log mode	       Archive Mode
Automatic archival	       Enabled
Archive destination	       USE_DB_RECOVERY_FILE_DEST
Oldest online log sequence     1
Next log sequence to archive   1
Current log sequence	       1
SQL> alter database open;        //打开数据库;

Database altered.
2.修改RMAN脚本
[oracle@rhel6 ~]$ su -
Password:
[oracle@rhel6 ~]# cp -rfp /usr/openv/netbackup/ext/db_ext/oracle/samples/rman/hot_database_backup.sh /opt/scripts
[oracle@rhel6 ~]# vi  /opt/scripts/hot_database_backup.sh
ORACLE_HOME=/oracle/app/oracle/product/11.2.0

ORACLE_SID=orcl
ORACLE_USER=oracle

ORACLE_TARGET_CONNECT_STR=sys/manager
3.建立Oracle Link
su - oracle
cd /usr/openv/netbackup/bin/
./oracle_link

All Oracle instances should be shutdown before running this script.

Please log into the Unix system as the Oracle owner for running this script

Do you want to continue? (y/n)
y

LIBOBK path: /usr/openv/netbackup/bin

ORACLE_HOME: /orcl/oracle

Oracle version: 11.2.0.4.0

Platform type: i686

Linking LIBOBK:

ln -s /usr/openv/netbackup/bin/libobk.so /orcl/oracle/lib/libobk.so

Done

Please check the trace file located in /tmp/make_trace.4459

to make sure the linking process was successful.
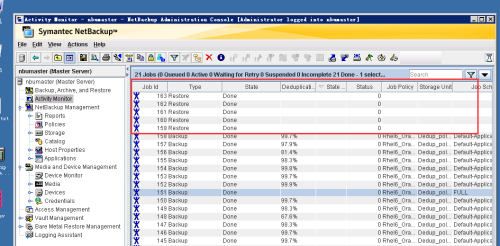
[Master/Media server][192.168.60.59][Windows 2008R2][数据库备份]1.登陆Netbackup客户端软件,新建Policy备份Oracle数据库
2.策略配置备份时间,FULL备份一周一次,两周一次删除数据
3.选择自定义RMAN脚本备份方式,添加客户端
4.选择相应的RMAN脚本进行备份
5.选择手动执行备份测试
6.至此Oracle数据库的备份完成
[Client][192.168.60.100][Redhat Linux 6.5][数据库恢复]在这模拟一下数据库故障问题,删除dbf数据文件、ctl控制文件、log日志文件
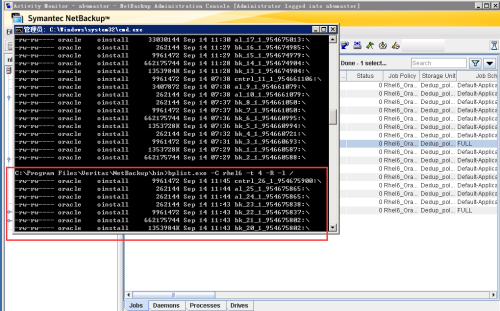
[oracle@rhel6 ~]#cd /oracle/app/oracle/oradata/orcl
[root@rhel6 orcl]# rm -rf *
[root@rhel6 orcl]# ll
总用量 0
1.首先登陆数据库,启动数据库到mount状态,在Client端或Server端查询备份数据库的备份文件
SQL> shutdown immediate;              //由于文件被删,关闭数据库报错;
ORA-00210: cannot open the specified control file
ORA-00202: control file: '/oracle/app/oracle/oradata/orcl/control01.ctl'
ORA-27041: unable to open file
Linux-x86_64 Error: 2: No such file or directory
Additional information: 3
SQL> shutdown abort;              //强制关闭数据库;
ORACLE instance shut down.
SQL> startup nomount;              //启动数据库到nomount状态;
ORACLE instance started.

Total System Global Area 1603411968 bytes
Fixed Size		    2253664 bytes
Variable Size		 1375734944 bytes
Database Buffers	  218103808 bytes
Redo Buffers		    7319552 bytes
这里在Server端查询数据库备份的文件(由于测试后面又多次进行了备份):
2.进入RMAN Target,首先恢复数据库控制文件
[oracle@rhel6 ~]$ rman nocatalog target /

Recovery Manager: Release 11.2.0.4.0 - Production on Thu Sep 14 12:23:20 2017

Copyright (c) 1982, 2011, Oracle and/or its affiliates.  All rights reserved.

connected to target database: ORCL (not mounted)
using target database control file instead of recovery catalog
RMAN> run {
2> allocate channel ch00 type sbt_tape;
3> restore controlfile from '/cntrl_26_1_954675900';
4> release channel ch00;
5> }
allocated channel: ch00
channel ch00: SID=771 device type=SBT_TAPE
channel ch00: Veritas NetBackup for Oracle - Release 7.7.3 (2016051915)

Starting restore at 2017-09-14 12:26:08

channel ch00: restoring control file
channel ch00: restore complete, elapsed time: 00:00:28
output file name=/oracle/app/oracle/oradata/orcl/control01.ctl
output file name=/oracle/app/oracle/fast_recovery_area/orcl/control02.ctl
Finished restore at 2017-09-14 12:26:36

released channel: ch003.控制文件恢复成功后,将数据库启动到mount状态,开始恢复数据文件RMAN> alter database mount;
database mounted
RMAN> run {
2> allocate channel ch00 type sbt_tape;
3> allocate channel ch01 type sbt_tape;
4> restore database;
5> release channel ch00;
6> release channel ch01;
7> }
allocated channel: ch00
channel ch00: SID=771 device type=SBT_TAPE
channel ch00: Veritas NetBackup for Oracle - Release 7.7.3 (2016051915)
allocated channel: ch01
channel ch01: SID=10 device type=SBT_TAPE
channel ch01: Veritas NetBackup for Oracle - Release 7.7.3 (2016051915)
Starting restore at 2017-09-14 12:29:42
Starting implicit crosscheck backup at 2017-09-14 12:29:42
Finished implicit crosscheck backup at 2017-09-14 12:29:43
Starting implicit crosscheck copy at 2017-09-14 12:29:43
Finished implicit crosscheck copy at 2017-09-14 12:29:43
searching for all files in the recovery area
cataloging files...
no files cataloged
channel ch00: starting datafile backup set restore
channel ch00: specifying datafile(s) to restore from backup set
channel ch00: restoring datafile 00001 to /oracle/app/oracle/oradata/orcl/system01.dbf
channel ch00: restoring datafile 00004 to /oracle/app/oracle/oradata/orcl/users01.dbf
channel ch00: reading from backup piece bk_21_1_954675802
channel ch01: starting datafile backup set restore
channel ch01: specifying datafile(s) to restore from backup set
channel ch01: restoring datafile 00002 to /oracle/app/oracle/oradata/orcl/sysaux01.dbf
channel ch01: restoring datafile 00003 to /oracle/app/oracle/oradata/orcl/undotbs01.dbf
channel ch01: reading from backup piece bk_20_1_954675802
channel ch00: piece handle=bk_21_1_954675802 tag=HOT_DB_BK_INC_LVL0
channel ch00: restored backup piece 1
channel ch00: restore complete, elapsed time: 00:01:05
channel ch01: piece handle=bk_20_1_954675802 tag=HOT_DB_BK_INC_LVL0
channel ch01: restored backup piece 1
channel ch01: restore complete, elapsed time: 00:01:05
Finished restore at 2017-09-14 12:30:55
released channel: ch00
released channel: ch014.恢复数据库RMAN> run {
2> allocate channel ch00 type sbt_tape;
3> allocate channel ch01 type sbt_tape;
4> recover database;
5> release channel ch00;
6> release channel ch01;
7> }
allocated channel: ch00
channel ch00: SID=771 device type=SBT_TAPE
channel ch00: Veritas NetBackup for Oracle - Release 7.7.3 (2016051915)
allocated channel: ch01
channel ch01: SID=10 device type=SBT_TAPE
channel ch01: Veritas NetBackup for Oracle - Release 7.7.3 (2016051915)
Starting recover at 2017-09-14 12:33:19
starting media recovery
channel ch00: starting archived log restore to default destination
channel ch00: restoring archived log
archived log thread=1 sequence=3
channel ch00: reading from backup piece al_24_1_954675865
channel ch01: starting archived log restore to default destination
channel ch01: restoring archived log
archived log thread=1 sequence=4
channel ch01: reading from backup piece al_25_1_954675865
channel ch00: piece handle=al_24_1_954675865 tag=TAG20170914T114424
channel ch00: restored backup piece 1
channel ch00: restore complete, elapsed time: 00:00:25
archived log file name=/oracle/app/oracle/fast_recovery_area/ORCL/archivelog/2017_09_14/o1_mf_1_3_dvn1o8l5_.arc thread=1 sequence=3
channel default: deleting archived log(s)
archived log file name=/oracle/app/oracle/fast_recovery_area/ORCL/archivelog/2017_09_14/o1_mf_1_3_dvn1o8l5_.arc RECID=9 STAMP=954678824
channel ch01: piece handle=al_25_1_954675865 tag=TAG20170914T114424
channel ch01: restored backup piece 1
channel ch01: restore complete, elapsed time: 00:00:25
archived log file name=/oracle/app/oracle/fast_recovery_area/ORCL/archivelog/2017_09_14/o1_mf_1_4_dvn1o8wd_.arc thread=1 sequence=4
channel default: deleting archived log(s)
archived log file name=/oracle/app/oracle/fast_recovery_area/ORCL/archivelog/2017_09_14/o1_mf_1_4_dvn1o8wd_.arc RECID=10 STAMP=954678824
unable to find archived log
archived log thread=1 sequence=5
released channel: ch00
released channel: ch01
RMAN-00571: ===========================================================
RMAN-00569: =============== ERROR MESSAGE STACK FOLLOWS ===============
RMAN-00571: ===========================================================
RMAN-03002: failure of recover command at 09/14/2017 12:33:53
RMAN-06054: media recovery requesting unknown archived log for thread 1 with sequence 5 and starting SCN of 19381645.从SCN记录从新记录新的日志文件RMAN> recover database until scn 1938164; Starting recover at 2017-09-14 12:35:08 allocated channel: ORA_DISK_1 channel ORA_DISK_1: SID=771 device type=DISK starting media recovery media recovery complete, elapsed time: 00:00:00 Finished recover at 2017-09-14 12:35:086.打开数据库,生成新的redolog以及undolog文件
RMAN> alter database open
2> ;

RMAN-00571: ===========================================================
RMAN-00569: =============== ERROR MESSAGE STACK FOLLOWS ===============
RMAN-00571: ===========================================================
RMAN-03002: failure of alter db command at 09/14/2017 12:37:54
ORA-01589: must use RESETLOGS or NORESETLOGS option for database open

RMAN> alter database open RESETLOGS;

database opened
至此,Oracle数据库的本机通过Netbackup备份恢复实验成功实现。需要注意的是在Netbackup备份数据库的时候,要在数据库端配置script,然后在master端发起备份;而数据库恢复只需在client端发起恢复即可。

相关文章推荐
- netbackup 7.5.0.7 之oracle数据库的备份和恢复
- Oracle数据库备份与恢复特性浅谈
- Oracle数据库的备份及恢复策略研究
- oracle数据库备份,删除,恢复
- windows环境下Oracle数据库冷备份和恢复
- Oracle数据库的备份与恢复
- Oracle数据库用户数据完整备份与恢复
- oracle数据库的备份与恢复
- Oracle数据库的备份与恢复
- Oracle数据库冷备份恢复的具体步骤
- Oracle数据库备份与恢复1\Oracle数据库备份与恢复(2)SQLLoader 之一
- Oracle数据库备份与恢复特性浅谈
- oracle数据库导出备份导入恢复
- Oracle数据库的备份与恢复
- Oracle数据库的备份与恢复
- Oracle数据库备份和恢复(导出,导入)
- Oracle数据库备份与恢复 - RMAN配置参数
- oracle数据库表备份和表恢复 怎样将Oracle一张表的多个字段更新到另一张表中去
- Oracle数据库备份与恢复总结
- Veritas灾难备份与恢复 推荐