Centos 7 上安装部署 JDK , Tomcat , Redis , ActiveMq,Mysql
2017-09-07 14:51
1081 查看
前言:
连接工具xshell
JDK 安装 步骤如下 :
Tomcat 安装 步骤如下 :
连接工具xshell
JDK 安装 步骤如下 :
/**下载安装包**/

wget  http://download.Oracle.com/otn-pub/java/jdk/7u79-b15/jdk-7u79-linux-x64.tar.gz
/**解压缩到指定文件夹**/

tar -xzvf  压缩包名称(.gz文件)  -c  指定目录(/agui/jdk/)
/**
配置系统环境
打开系统文件加入如下两句话 按 i 键可以进行编辑
**/
vi  /etc/profile
export JAVA_HOME=/agui/jdk/jdk1.8.0_144
export PATH=$PATH:$JAVA_HOME/bin

输入玩按 esc  退出编译模式,输入 :wq 命令回车。
键入命令 : source /etc/profile  保存文件 , 输入 java -version查看版本,无误后即配置完毕。
Tomcat 安装 步骤如下 :
wget http://mirrors.tuna.tsinghua.edu.cn/apache/tomcat/tomcat-8/v8.5.23/bin/apache-tomcat-8.5.23.tar.gz[/code]tar -zxvf 压缩包名称 -C /agui/tomcat/ 。 解压缩到 指定目录。cd tomcat/bin 目录,然后 ./startup.sh 命令启动tomcat, 然后 ps -ef | grep java查看是否有tomcat 进程。./shutdown.sh 关闭tomcat,有时候回报 连接被拒绝而无法关闭tomcat,此时需要kill -9 pid 来讲线程强制杀掉,从启即可。 ps -ef|grep java 来获取 tomcat pid/**外网访问需要关闭防火墙**/ systemctl stop firewalld.service #停止firewall systemctl disable firewalld.service #禁止firewall开机启动 firewall-cmd --state #查看默认防火墙状态(关闭后显示notrunning,开启后显示running)
ActiveMq 安装 步骤如下 :wget http://www.apache.org/dyn/closer.cgi?filename=/activemq/5.15.0/apache-activemq-5.15.0-bin.tar.gz&action=download[/code]tar -zxvf .... 解压缩。cd acitivemq/bin , 启动: ./activemq start . 关闭:./activemq stop
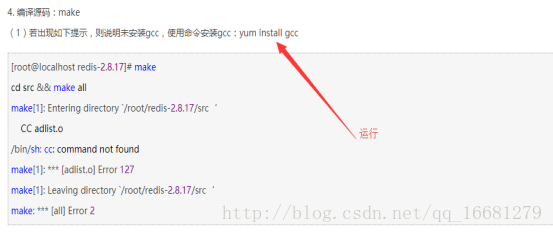
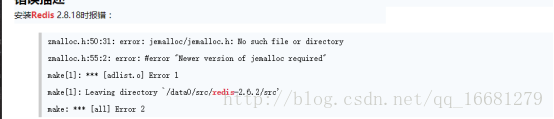
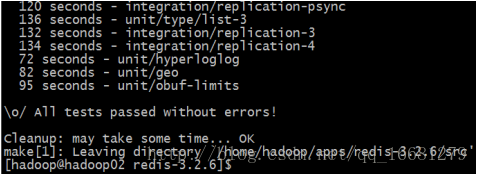
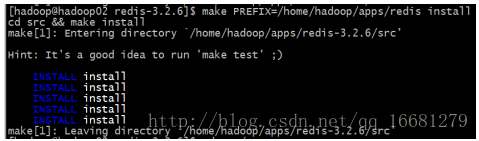
Redis 安装 步骤如下 :wget http://download.redis.io/releases/redis-2.8.3.tar.gz $ tar xzf redis-2.8.3.tar.gz $ cd redis-2.8.3 $ make注意:检查make 工具是否安装,通过 make -version 能够查看到版本,说明已安装,如果没有:用命令 sudo yum install -y make 来安装 make 工具进行后续步骤。 出现如下问题 :运行 yum install gcc 又出现如下问题:运行 make MALLOC=libc 又出现如下问题 :1.运行 wget http://downloads.sourceforge.net/tcl/tcl8.6.1-src.tar.gz 2.sudo tar xzvf tcl8.6.1-src.tar.gz -C /usr/local/ 3.cd /usr/local/tcl8.6.1/unix/ 4.sudo ./configure 5.sudo make 6.sudo make install 以上步骤 4 5 6 需等待一会才会完成,所有步骤完成之后 运行 make test :说明linux 针对redis 环境已经完成,运行 cd redis-2.8.3 到该目录下: 运行 make PREXIX=/agui/redis install出现上图结果表明redis 已经安装成功,此时我们运行 cp redis.conf /agui /redis/conf 命令将conf 复制到 /agui /redis/conf 目录。 接下来 执行如下命令修改redis.conf 文件内容操作如下: cd /agui/redis/conf Vi redis.conf 按 i 键 修改 daemonize 为 yes (支持后台启动), 修改 logfile "/agui/redis/logs/redis.log",按esc 后输入 :wq 回车保存并退出编译。 cd /agui/redis/bin ./redis-server ../conf/redis.conf ./redis-cli set agui agui OK get agui “agui” 安装成功。
Mysql 安装 步骤如下 :/** * 一、系统环境 * yum update升级以后的系统版本为 **/ [root@yl-web yl]# cat /etc/redhat-release CentOS Linux release 7.1.1503 (Core)/** * 二、mysql安装 * 一般网上给出的资料都是 **/ [root@yl-web yl]# yum install mysql [root@yl-web yl]# yum install mysql-server [root@yl-web yl]# yum install mysql-devel 安装mysql和mysql-devel都成功,但是安装mysql-server会失败。 查资料发现是CentOS 7 版本将MySQL数据库软件从默认的程序列表中移除,用mariadb代替了。 有两种解决办法: 方法一:试了不好用,已被鬼哥干掉。 方法二:官网下载安装mysql-server [root@yl-web yl]# wget http://dev.mysql.com/get/mysql-community-release-el7-5.noarch.rpm [root@yl-web yl]# rpm -ivh mysql-community-release-el7-5.noarch.rpm [root@yl-web yl]# yum install mysql-community-server 安装成功后重启mysql服务。 [root@yl-web yl]# service mysqld restart初次安装mysql,root账户没有密码。 [root@yl-web yl]# mysql -u root Welcome to the MySQL monitor. Commands end with ; or \g. Your MySQL connection id is 3 Server version: 5.6.26 MySQL Community Server (GPL) Copyright (c) 2000, 2015, Oracle and/or its affiliates. All rights reserved. Oracle is a registered trademark of Oracle Corporation and/or its affiliates. Other names may be trademarks of their respective owners. Type 'help;' or '\h' for help. Type '\c' to clear the current input statement. mysql> show databases;+--------------------+ | Database | +--------------------+ | information_schema | | mysql | | performance_schema | | test | +--------------------+ 4 rows in set (0.01 sec) mysql>设置密码 mysql> set password for 'root'@'localhost' =password('password'); Query OK, 0 rows affected (0.00 sec)配置mysql 1、编码 mysql配置文件为/etc/my.cnf 最后加上编码配置 [mysql] default-character-set =utf8 这里的字符编码必须和/usr/share/mysql/charsets/Index.xml中一致。 2、远程连接设置 把在所有数据库的所有表的所有权限赋值给位于所有IP地址的root用户。 mysql> grant all privileges on *.* to root@'%'identified by 'password'; 如果是新用户而不是root,则要先新建用户 mysql>create user 'username'@'%' identified by 'password'; 此时就可以进行远程连接了。基础运维
/******************************linux基础运维*******************************/ (1)文件系统,用户和用户组管理,bash脚本,vim编辑器,网络配置,软件管理,进程管理,Openssl,Openssh, DNS 。 权限系统: //程序后台启动命令 : [root@iz2ze5hhz shell]# nohup java -jar ../jenkins/jenkins.war >/dev/null 2>&1 & 编写shell : Nano agui.sh #!/bin/bash //告诉系统去执行这个shell a=”hello word” //定义一个变量 a 值为 hello word echo $a // 输出这个变量值 保存 ctrl + o . 输入 Y。 退出:ctrl + X . 运行shell : chmod +x agui.sh 让他有运行权利 或者 bash agui.sh , 俩种方法都行。


相关文章推荐
- Centos 安装mysql + tomcat +jdk 环境部署
- Linux服务器 CentOS 6.0 安装 jdk1.7 tomcat7 mysql5.6 【云服务器部署 x64】 推荐
- 【Centos学习】二、部署javaweb环境(jdk,tomcat,svn,Nginx,Redis,mysql)
- Centos6.0 64位jdk tomcat MySQL 5.6.11 CMake安装部署
- 在linux(CentOS 6.5)上安装jdk,tomcat,mysql,和redis
- linux服务器部署环境(阿里云 centos7.4 64位+ jdk+tomcat+mysql安装)
- <安彦>Linux上JDK、mysql、tomcat、redis等软件安装部署
- (四)Linux环境部署(Centos+Nginx+Tomcat+Mysql) - 安装Tomcat和JDK 以及 Nginx与Tomcat整合
- 阿里云CentOS7.3版本安装Java jdk/MySQL/Nginx/Tomcat/Redis个人记录
- red hat enterprise linux 5.4安装,mysql 安装、vsftp安装、apache安装、tomcat安装、JDK安装、SSH部署
- 基于CentOS 7 web服务环境搭建(包含JDK+Nginx+Tomcat+Mysql+Redis)
- 如何在Linux下部署web程序(搭建vsftp服务,搭建sshd 服务器,jdk安装步骤,Tomcat安装步骤,MySQL安装步骤)
- Linux yum命令以及centOs安装jdk、tomcat、mysql
- 如何在centOS6.7上安装jdk、mysql、tomcat,以及部署打包成war包的web项目
- 安装 JDK + Tomcat + MySQL for CentOS
- 从零搭建CentOS7 Java开发环境(JDK1.8,MySQL 5.7,Redis3.2,Tomcat8.5)
- jdk tomcat mysql eclipse安装(centos / windows)
- Linux\CentOS系统下的服务器搭建,下载编译环境,安装vsFtpd、nginx、MySQL、JDK、Tomcat、PHP
- 在CentOS7上安装JDK1.8,redis-3,tomcat-9,MySQL-5.7,zookeeper-3.4.8/memcached-1.4
- (五)Linux环境部署(Centos+Nginx+Tomcat+Mysql) - Mysql安装