微信小程序 页面跳转传参详解
2017-09-05 17:27
806 查看
微信小程序 页面跳转传参,做微信小程序必定会用的这样的功能,这里就记录下本人学习实现代码资料。
刚接触微信小程序,多里面的语法和属性还不怎么聊解,如有不多的地方希望各位大神多多指教。今天来说下微信小程序怎么跳转和传参,话不多说直接上代码。
实现的功能是给列表增加点击功能传参到下一页;
代码如下:
其中
<template is="buttonList" data="{{item}}"/>
为模版代码如下
这里只为下面的列表增加了点击方法
点击列表js代码
其中
wx.navigateTo({url:'/pages/xiangqing/xiangqing?id=上一页的参数'})
为跳转方法,id为需要传的参数 如果参数为动态参数代码如下:
其中p为上面为每一行设置的id值
在下一页取值代码如下:
然后在页面上显示代码如下:
<view>{{title}}</view>
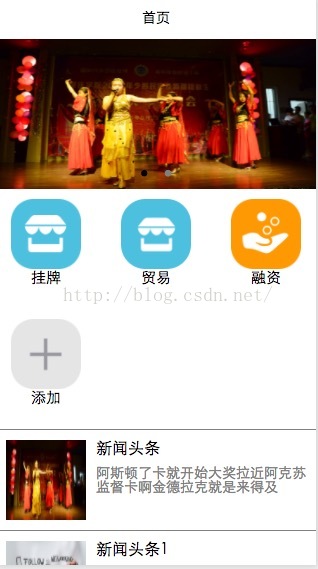
最终实现效果:

感谢阅读,希望能帮助到大家,谢谢大家对本站的支持!
刚接触微信小程序,多里面的语法和属性还不怎么聊解,如有不多的地方希望各位大神多多指教。今天来说下微信小程序怎么跳转和传参,话不多说直接上代码。
实现的功能是给列表增加点击功能传参到下一页;
代码如下:
<import src="../WXtemplate/headerTemplate.wxml"/>
<view>
<!--滚动图-->
<view>
<swiper indicator-dots="{{indicatorDots}}" autoplay="{{autoPlay}}" interval="{{intervalTime}}" duration="{{Time}}">
<block wx:for="{{imageURl}}">
<swiper-item>
<image src="{{item}}" class="imagePX"></image>
</swiper-item>
</block>
</swiper>
</view>
<!--功能按钮-->
<view class="section-bg">
<block wx:for="{{buttonNum}}">
<!--模版-->
<template is="buttonList" data="{{item}}"/>
<!--<view class="section-item">
<image class="section-img" src="{{item.image}}"></image>
<text class="section-text">{{item.text}}</text>
</view>-->
</block>
</view>
<!--资讯列表-->
<view>
<block wx:for="{{listNum}}">
<template is="newList" data="{{item,index}}"/>
</block>

</view>

</view>
其中
<template is="buttonList" data="{{item}}"/>
为模版代码如下
<template name="buttonList">
<view class="section-item">
<image class="section-img" src="{{item.image}}" bindtap="buttonClick"></image>
<text class="section-text">{{item.text}}</text>
</view>
</template>

<!--list-->
<template name="newList">
<view class="section-list" bindtap="listClick" id="{{index}}">
<view>
<image class="list-img" src="{{item.image}}"></image>
</view>

<view class="section-textt">
<view class="title"><text>{{item.title}}</text></view>
<view class="subTitle"><text>{{item.subTitle}}</text></view>
</view>
</view>

</template>
这里只为下面的列表增加了点击方法
点击列表js代码
listClick:function(event){
console.log(event);
var p = event.currentTarget.id

wx.navigateTo({url:'/pages/xiangqing/xiangqing?id=上一页的参数'})
}
其中
wx.navigateTo({url:'/pages/xiangqing/xiangqing?id=上一页的参数'})
为跳转方法,id为需要传的参数 如果参数为动态参数代码如下:
listClick:function(event){
console.log(event);
var p = event.currentTarget.id

wx.navigateTo({url:'/pages/xiangqing/xiangqing?id='+p})
}
其中p为上面为每一行设置的id值
在下一页取值代码如下:
data:{
// text:"这是一个页面"
title:''
},
onLoad:function(options){
// 页面初始化 options为页面跳转所带来的参数
this.setData({
title:options.id
})
然后在页面上显示代码如下:
<view>{{title}}</view>
最终实现效果:
感谢阅读,希望能帮助到大家,谢谢大家对本站的支持!

相关文章推荐
- 微信小程序页面跳转并传参
- 微信小程序详解——页面之间的跳转方式【路由】和参数传递
- 微信小程序链接传参,跳转新页面
- 微信小程序--跳转页面的两种方法详解
- 微信小程序 页面跳转事件绑定的实例详解
- 微信小程序详解——页面之间的跳转方式【路由】和参数传递
- 微信小程序 跳转页面的两种方法详解
- 微信小程序 页面跳转传递值几种方法详解
- 微信小程序 页面之间传参实例详解
- 微信小程序 详解页面跳转与返回并回传数据
- 微信小程序页面跳转传参
- 微信小程序 跳转页面的两种方法详解
- 微信小程序 页面跳转和数据传递实例详解
- 微信小程序详解——页面之间的跳转方式【路由】和参数传递
- 微信小程序之页面跳转、传参
- 微信小程序 页面跳转和数据传递实例详解
- 微信小程序 页面跳转及数据传递详解
- 微信小程序 跳转页面的两种方法详解
- 微信小程序(页面跳转详解)
- 微信小程序页面跳转传参填充数据的小案例