学习SpringMVC——整合Hibernate、Spring、SpringMVC
2017-09-03 15:17
435 查看
本次整合使用的是Hibernate4.2,Spring4.3。
(1) c3p0文件夹中,是使用c3p0数据库连接池所需的jar包,如下图所示:

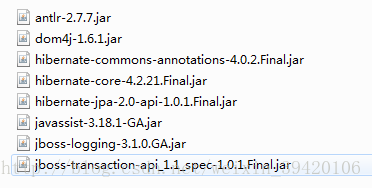
(2)hibernate-required文件夹中,是hibernate框架的核心jar包,如下图所示:
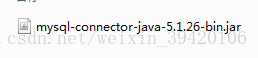
(3)mysql-connector-java-5.1.26文件夹中,是MySQL数据库的驱动jar包,如下图所示:
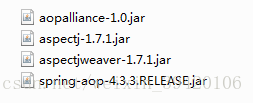
(4)spring-aop文件夹中,是Spring框架中负责aop的jar包,如下图所示:
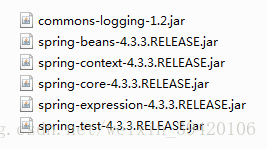
(5)spring-core文件夹中,是Spring框架的核心jar包,如下图所示:
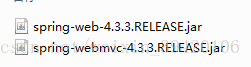
(6)springmvc文件夹中,是SpringMVC所需的jar包,如下图所示:
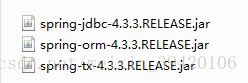
(7)spring-persistence文件夹中,是Spring框架中用来与orm框架集成所需的jar包,如下图所示:
(2)配置hibernate.cfg.xml文件。这个文件配置了数据库连接的属性(如数据库URL、用户名、密码等)、表与实体类的映射关系等。
注意:这里使用了注解来映射数据库表和实体类之间的关系。UserVo类的代码如下所示:
可以看到,使用注解映射实体类与数据库表的关系非常简单,只需要在实体类中添加相应的注解,并在hibernate.cfg.xml文件中配置
(3)测试hibernate。测试的思路非常简单,通过测试类像数据库中插入数据,并且查询数据库中的数据,如果能成功插入数据和查询数据,则表示hibernate配置成功。测试类的代码如下:
(1)需要导入的jar包有:spring-core、spring-persistence、spring-aop这三个文件夹中的jar包。
(2)配置Spring的配置文件applicationContext.xml,如下所示:
因为数据库连接的属性已经交由Spring管理,所以hibernate.cfg.xml文件中的相关配置就可以删除了。删除的部分如下图所示:

(3)测试整合效果。为了测试,建立了一个dao层的实现类UserDaoImpl,该类使用注解实现Spring的依赖注入。如下:
在测试类中使用junit4进行测试,如果能成功插入数据,则表示整合成功,测试类代码如下:
如有错漏之处,恳请留言指正。
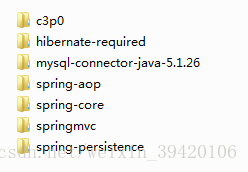
一、整理所需jar包
将jar包分类整理是一个好习惯,能够理清jar包各自的作用,以后遇见缺少jar包导致的错误,能够快速的定位。现将本次整合所需要的jar包整理如下图:(1) c3p0文件夹中,是使用c3p0数据库连接池所需的jar包,如下图所示:
(2)hibernate-required文件夹中,是hibernate框架的核心jar包,如下图所示:
(3)mysql-connector-java-5.1.26文件夹中,是MySQL数据库的驱动jar包,如下图所示:
(4)spring-aop文件夹中,是Spring框架中负责aop的jar包,如下图所示:
(5)spring-core文件夹中,是Spring框架的核心jar包,如下图所示:
(6)springmvc文件夹中,是SpringMVC所需的jar包,如下图所示:
(7)spring-persistence文件夹中,是Spring框架中用来与orm框架集成所需的jar包,如下图所示:
二、配置Hibernate
(1)导入jar包:需要导入的jar包为hibernate-required、c3p0、mysql-connector-java-5.1.26这三个文件夹中的jar包。(2)配置hibernate.cfg.xml文件。这个文件配置了数据库连接的属性(如数据库URL、用户名、密码等)、表与实体类的映射关系等。
<?xml version="1.0" encoding="UTF-8"?>
<!DOCTYPE hibernate-configuration PUBLIC
"-//Hibernate/Hibernate Configuration DTD 3.0//EN"
"http://hibernate.sourceforge.net/hibernate-configuration-3.0.dtd">
<hibernate-configuration>
<session-factory>
<property name="hibernate.connection.driver_class">com.mysql.jdbc.Driver</property>
<property name="hibernate.connection.password">Urie_308</property>
<property name="hibernate.connection.url">jdbc:mysql://localhost:3306/entry_exit_mgt</property>
<property name="hibernate.connection.username">root</property>

<property name="hibernate.dialect">org.hibernate.dialect.MySQLDialect</property>
<property name="hibernate.show_sql">true </property>
<property name="hibernate.format_sql">true</property>
<property name="hibernate.hbm2ddl.auto">update</property>
<property name="hibernate.cucurrent_session_context_class">thread</property>
<!-- 配置映射关系 -->
<mapping class="com.entry_exit_management.vo.UserVo"/>
</session-factory>
</hibernate-configuration>
注意:这里使用了注解来映射数据库表和实体类之间的关系。UserVo类的代码如下所示:
package com.entry_exit_management.vo;

import javax.persistence.Column;
import javax.persistence.Entity;
import javax.persistence.GeneratedValue;
import javax.persistence.GenerationType;
import javax.persistence.Id;
import javax.persistence.Table;

import org.springframework.context.annotation.Lazy;
import org.springframework.stereotype.Component;

@Entity
@Table(name="t_user")
@Lazy(value=true)
public class UserVo {
private int id;
private String accountid;
private String password;
private String fullname;
private String role;
@Id
@GeneratedValue(strategy=GenerationType.IDENTITY)
public int getId() {
return id;
}
public void setId(int id) {
this.id = id;
}
@Column(name="accountid",unique=true,nullable=false)
public String getAccountid() {
return accountid;
}
public void setAccountid(String accountid) {
this.accountid = accountid;
}
@Column(name="password")
public String getPassword() {
return password;
}
public void set
111e4
Password(String password) {
this.password = password;
}
@Column
public String getFullname() {
return fullname;
}
public void setFullname(String fullname) {
this.fullname = fullname;
}
@Column
public String getRole() {
return role;
}
public void setRole(String role) {
this.role = role;
}
}
可以看到,使用注解映射实体类与数据库表的关系非常简单,只需要在实体类中添加相应的注解,并在hibernate.cfg.xml文件中配置
<mapping class="实体类的完全限定名"/>即可。
(3)测试hibernate。测试的思路非常简单,通过测试类像数据库中插入数据,并且查询数据库中的数据,如果能成功插入数据和查询数据,则表示hibernate配置成功。测试类的代码如下:
package test;
import java.util.List;
import org.hibernate.Query;
import org.hibernate.Session;
import org.hibernate.SessionFactory;
import org.hibernate.cfg.Configuration;
import org.hibernate.service.ServiceRegistry;
import org.hibernate.service.ServiceRegistryBuilder;
import com.entry_exit_management.vo.UserVo;

public class TestHibernate {

public static void main(String[] args) {
// TODO Auto-generated method stub
//加载Hibernate的配置文件,这里使用了无参的configure方法,该方法默认加载名为hibernate.cfg.xml的文件;
//如果Hibernate的配置文件不叫这个名字,需要使用configure(String resource)方法
Configuration cfg = new Configuration().configure();

//Hibernate4.0之后的版本,需要使用下面的方法来获取sesionFactory
ServiceRegistry serviceRegistry = new ServiceRegistryBuilder().applySettings(cfg.getProperties()).buildServiceRegistry();
SessionFactory sessionFactory = cfg.buildSessionFactory(serviceRegistry);
Session session = null;
try{
session = sessionFactory.openSession();

UserVo user = new UserVo();
user.setAccountid("huangchao1");
user.setFullname("huangchao");
user.setPassword("hc054824");
user.setRole("Fme");
Transaction tx = session.beginTransaction();
session.save(user);
tx.commit();

String hql = "from UserVo where id < 4";
Query query = session.createQuery(hql);
List<UserVo> userList = query.list();
for(UserVo user:userList){
System.out.println(user.getAccountid());
}

}
catch(Exception e){
e.printStackTrace();
}
finally {
if(session!=null){
session.close();
}
}
}

}
三、整合Hibernate和Spring
整合Hibernate和Spring,就是要将与数据库的连接、SessionFactory对象的获取以及数据库的事务管理交给Spring。(1)需要导入的jar包有:spring-core、spring-persistence、spring-aop这三个文件夹中的jar包。
(2)配置Spring的配置文件applicationContext.xml,如下所示:
<?xml version="1.0" encoding="UTF-8"?>
<beans
xmlns="http://www.springframework.org/schema/beans"
xmlns:xsi="http://www.w3.org/2001/XMLSchema-instance"
xmlns:p="http://www.springframework.org/schema/p"
xmlns:context="http://www.springframework.org/schema/context"
xmlns:aop="http://www.springframework.org/schema/aop"
xmlns:tx="http://www.springframework.org/schema/tx"
xmlns:mvc="http://www.springframework.org/schema/mvc"
xsi:schemaLocation="http://www.springframework.org/schema/beans http://www.springframework.org/schema/beans/spring-beans-4.0.xsd http://www.springframework.org/schema/context http://www.springframework.org/schema/context/spring-context-4.0.xsd http://www.springframework.org/schema/aop http://www.springframework.org/schema/aop/spring-aop-4.0.xsd http://www.springframework.org/schema/tx http://www.springframework.org/schema/tx/spring-tx-4.0.xsd http://www.springframework.org/schema/mvc http://www.springframework.org/schema/mvc/spring-mvc-4.2.xsd ">

<!-- 读取properties文件 -->
<bean id="propertiesConfigurer" class="org.springframework.beans.factory.config.PropertyPlaceholderConfigurer">
<property name="location" value="classpath:configuration/db.properties"></property>
<!-- 也可以写成另一种形式,可以读取多个properties文件 -->
<!--
<property name="locations">
<list>
<value>classpath:db.properties</value>
</list>
</property>
-->

</bean>
<!-- 配置数据源,这里配置了连接数据库的各项参数 -->
<bean id="dataSource" class="${dataSource}">
<property name="driverClass" value="${driverClass}"></property>
<property name="jdbcUrl" value="${jdbcUrl}"></property>
<property name="user" value="${user}"></property>
<property name="password" value="${password}"></property>
</bean>
<!-- 配置sessionFactory,这里配置了数据库连接的其他设置,比如数据库方言、打印sql语句等等 -->
<bean id="sessionFactory" class="org.springframework.orm.hibernate4.LocalSessionFactoryBean">
<property name="dataSource" ref="dataSource"></property>
<property name="configLocation" value="classpath:configuration/hibernate.cfg.xml"></property>
</bean>

<!-- 配置事务管理 -->
<bean id="transactionManager" class="org.springframework.orm.hibernate4.HibernateTransactionManager">
<property name="sessionFactory" ref="sessionFactory" />
</bean>
<tx:advice id="advice" transaction-manager="transactionManager">
<tx:attributes>
<tx:method name="save*" propagation="REQUIRED" read-only="false"/>
<tx:method name="delete*" propagation="REQUIRED" read-only="false"/>
<tx:method name="update*" propagation="REQUIRED" read-only="false"/>
<tx:method name="get*" propagation="SUPPORTS" read-only="true"/>
<tx:method name="query*" propagation="SUPPORTS" read-only="true"/>
<tx:method name="login*" propagation="SUPPORTS" read-only="true"/>
</tx:attributes>
</tx:advice>
<aop:config>
<!-- 配置哪些包的类要切入事务 -->
<aop:pointcut id="pointcut" expression="execution(* com.entry_exit_management.dao.impl.*.*(..))" />
<aop:advisor advice-ref="advice" pointcut-ref="pointcut"/>
<!-- aop:pointcut要写在aop:advisor上面,否则会报错 -->
</aop:config>
<!-- 指定需要扫描的包 -->
<context:component-scan base-package="com.entry_exit_management.vo"></context:component-scan>
<context:component-scan base-package="com.entry_exit_management.dao.impl"></context:component-scan>

</beans>
因为数据库连接的属性已经交由Spring管理,所以hibernate.cfg.xml文件中的相关配置就可以删除了。删除的部分如下图所示:
(3)测试整合效果。为了测试,建立了一个dao层的实现类UserDaoImpl,该类使用注解实现Spring的依赖注入。如下:
package com.entry_exit_management.dao.impl;

import java.util.List;

import javax.annotation.Resource;

import org.hibernate.Session;
import org.hibernate.SessionFactory;
import org.springframework.stereotype.Repository;
import org.springframework.stereotype.Service;

import com.entry_exit_management.dao.UserDao;
import com.entry_exit_management.vo.UserVo;
@Service("userdao")
public class UserDaoImpl implements UserDao {
@Resource
private SessionFactory sessionFactory;

public void setSessionFactory(SessionFactory sessionFactory) {
this.sessionFactory = sessionFactory;
}

private Session getSession(){
return sessionFactory.getCurrentSession();
}

@Override
public void saveUser(UserVo user) {
// TODO Auto-generated method stub
getSession().save(user);

}

@Override
public void deleteUser(int id) {
// TODO Auto-generated method stub
UserVo user = new UserVo();
user.setId(id);
getSession().delete(user);
}

@Override
public void updateUser(UserVo user) {
// TODO Auto-generated method stub
getSession().update(user);
}

@Override
public UserVo get(int id) {
// TODO Auto-generated method stub
String hql = "from UserVo where id = :id";
UserVo user = (UserVo) getSession().createQuery(hql).setInteger("id", id).uniqueResult();
return user;
}

@Override
public List<UserVo> query() {
// TODO Auto-generated method stub
String hql = "from UserVo";
List<UserVo> userList = getSession().createQuery(hql).list();
return userList;
}

@Override
public UserVo login(String name,String password){
UserVo user = null;
String hql = "from UserVo where accountid = :name and password = :password";
try{
user = (UserVo) getSession().createQuery(hql)
.setString("name", name)
.setString("password", password)
.uniqueResult();
}
catch(Exception e){
e.printStackTrace();
user = null;
}
finally{
return user;
}

}

}
在测试类中使用junit4进行测试,如果能成功插入数据,则表示整合成功,测试类代码如下:
package test;

import java.util.Date;
import javax.annotation.Resource;
import org.junit.Test;
import org.junit.runner.RunWith;
import org.springframework.test.context.junit4.SpringJUnit4ClassRunner;
import org.springframework.test.context.ContextConfiguration;
import com.entry_exit_management.dao.UserDao;
import com.entry_exit_management.dao.impl.UserDaoImpl;
import com.entry_exit_management.vo.UserVo;

@RunWith(SpringJUnit4ClassRunner.class)
@ContextConfiguration(locations="classpath:configuration/applicationContext.xml")
public class TestSpring {
@Resource(name="userdao")
private UserDao userdao;

@Resource
private Date date;
public UserDao getUserdao() {
return userdao;
}

public void setUserdao(UserDaoImpl userdao) {
this.userdao = userdao;
}
@Test
public void testSpring(){
System.out.println(date);
UserVo user = new UserVo();
user.setAccountid("test");
user.setFullname("Test");
user.setPassword("DefaultPwd@001");
user.setRole("FME");
userdao.saveUser(user);
}

}
四、使用SpringMVC
SpringMVC其实是Spring框架中的一个模块,只需按照使用SpringMVC那样配置即可。具体可参考我之前的博客:配置SpringMVC和通过注解使用SpringMVC如有错漏之处,恳请留言指正。

相关文章推荐
- 学习整合hibernate springmvc spring的 心得(1)
- Spring 学习笔记(七) SpringMVC与Hibernate的整合
- 学习整合hibernate springmvc spring的 心得(3)
- 学习整合hibernate springmvc spring的 心得(2)
- SpringMVC学习系列(12) 完结篇 之 基于Hibernate+Spring+Spring MVC+Bootstrap的管理系统实现
- 【Java EE 学习 83 下】【SpringMVC】【使用注解替代已过时的API】【SpringMVC、Hibernate整合】
- SpringMVC学习笔记(四)——Mybatis整合Spring
- 【hibernate+Spring学习】S2SH整合笔记--中文乱码
- 总结篇-Spring-SpringMVC-Hibernate-jpa整合
- Spring+hibernate+springmvc 整合(六)
- Activiti5工作流框架学习之Struts2+Hibernate+Spring整合配置
- SSH整合学习笔记之spring与hibernate整合(二)--C3P0
- Spring学习之整合Hibernate
- 【SpringMVC学习04】Spring、MyBatis和SpringMVC的整合
- SSH(Spring+Struts+Hibernate)框架学习之ajax技术和struts的整合
- Spring学习7-Spring整合Hibernate
- springMVC学习笔记,SpringMV与web项目的整合(注解方式)
- SpringMVC整合Spring、Hibernate
- SSH整合学习笔记之spring与hibernate简单整合.doc
- SSH学习笔记之关于struts-spring-hibernate整合配置问