Maven安装及环境变量配置
2017-08-26 13:40
225 查看
1、关于Maven
Maven项目对象模型(POM),是可以通过一小段描述信息来管理项目的构建、报告和文档的软件项目管理工具。Maven也是一个用于Java web开发的容器,在这个容器中提供了很多Java web开发的所需的框架包和其他组件。
2、Maven下载
Maven可以从Apache网站上下载,下载地址:http://maven.apache.org/,进入后点击左侧的Download,然后在下面的下载表格中下载“apache-maven-*.*.*-bin.zip”。3、Maven安装
3.1、安装
将以上下载好的maven解压后移动到自定的路径中。3.2、环境变量配置
①右键桌面上的计算机,选择属性;②点击高级系统设置(在属性页的左上侧);
③弹出的窗口中点击右下侧的环境变量按钮;
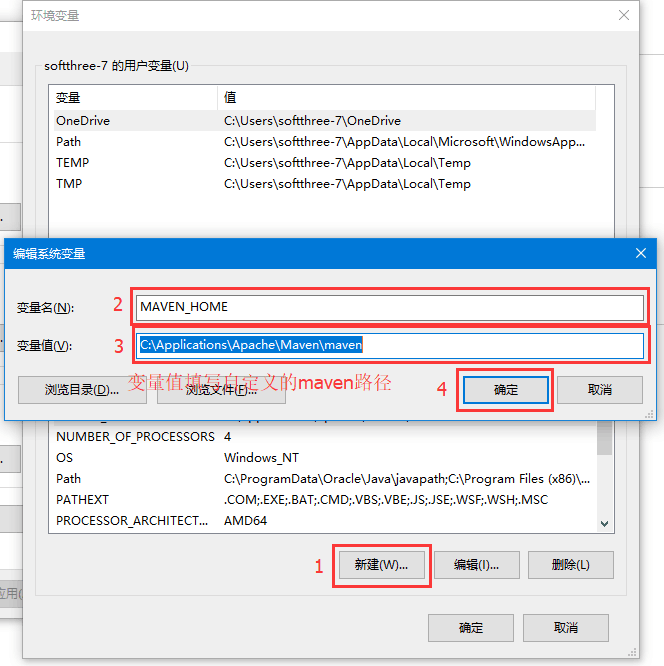
④在系统变量区点击新建按钮,填写变量名为MAVEN_HOME,变量值为自定义的Maven的目录的环境变量,如下图所示;
⑤在系统变量中找到Path环境变量,新增“;%MAVEN_HOME%\bin;”的配置;
3.3、验证安装是否成功
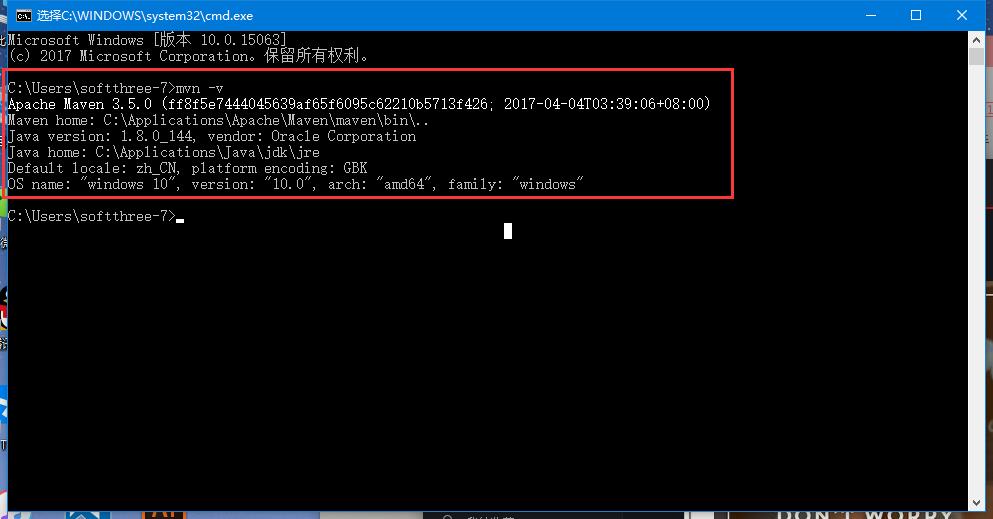
①按下Windows+R键运行,输入cmd,按下回车键;②在命令行窗口中输入“mvn -v”命令,若出现如下信息,则代表配置成功。
4、其他
除了以上配置之外,需要在内部修改的配置还有以下几点(都需要进入maven的conf目录中打开settings.xml):4.1、maven的本地仓库配置
在以下配置信息的下方配置:<!-- localRepository
| The path to the local repository maven will use to store artifacts.
|
| Default: ${user.home}/.m2/repository
<localRepository>/path/to/local/repo</localRepository>
-->需要在以上配置信息的下方添加如下代码的配置信息,其中两个尖括号<localRepository></localRepository>之间配置自定义的本地仓库的路径。
<localRepository>/../..</localRepository>
4.2、maven网络镜像优化配置
为什么要进行网络镜像优化配置呢?原因在于maven这个家伙是外国人开发的,但是并没有在中国设置服务器,在国内用大天朝的网络,如果用它自己默认配置的服务器的话下载jar包和镜像就要花费大半天的时间来下载jar包,时间就这么被浪费了,所以我们要解决网络问题。还好马云爸爸给力啊,阿里给提供了阿里自己的镜像库,可以从阿里的镜像库进行下载,时间节省了,得不偿失呢!
先找到如下配置:
<mirrors>
<!-- mirror
| Specifies a repository mirror site to use instead of a given repository. The repository that
| this mirror serves has an ID that matches the mirrorOf element of this mirror. IDs are used
| for inheritance and direct lookup purposes, and must be unique across the set of mirrors.
|
<mirror>
<id>mirrorId</id>
<mirrorOf>repositoryId</mirrorOf>
<name>Human Readable Name for this Mirror.</name>
<url>http://my.repository.com/repo/path</url>
</mirror>
-->
</mirrors>
在以上配置中添加如下配置:
<mirror>
<id>alimaven</id>
<name>aliyun maven</name>
<url>http://maven.aliyun.com/nexus/content/groups/public/</url>
<mirrorOf>central</mirrorOf>
</mirror>
以下是配置完成后的效果:
<mirrors>
<!-- mirror
| Specifies a repository mirror site to use instead of a given repository. The repository that
| this mirror serves has an ID that matches the mirrorOf element of this mirror. IDs are used
| for inheritance and direct lookup purposes, and must be unique across the set of mirrors.
|
<mirror>
<id>mirrorId</id>
<mirrorOf>repositoryId</mirrorOf>
<name>Human Readable Name for this Mirror.</name>
<url>http://my.repository.com/repo/path</url>
</mirror>
-->

<mirror>
<id>alimaven</id>
<name>aliyun maven</name>
<url>http://maven.aliyun.com/nexus/content/groups/public/</url>
<mirrorOf>central</mirrorOf>
</mirror>

</mirrors>
以上阿里镜像中心,亲测,速度快得飞起。
4.3、JDK适配配置
由于maven对JDK 8不是很友好,在配置maven项目的时候会产生警告或者错误,需要进行动态适配。解决方案:
找到如下配置:
<profiles>
<!-- profile
| Specifies a set of introductions to the build process, to be activated using one or more of the
| mechanisms described above. For inheritance purposes, and to activate profiles via <activatedProfiles/>
| or the command line, profiles have to have an ID that is unique.
|
| An encouraged best practice for profile identification is to use a consistent naming convention
| for profiles, such as 'env-dev', 'env-test', 'env-production', 'user-jdcasey', 'user-brett', etc.
| This will make it more intuitive to understand what the set of introduced profiles is attempting
| to accomplish, particularly when you only have a list of profile id's for debug.
|
| This profile example uses the JDK version to trigger activation, and provides a JDK-specific repo.
<profile>
<id>jdk-1.4</id>

<activation>
<jdk>1.4</jdk>
</activation>

<repositories>
<repository>
<id>jdk14</id>
<name>Repository for
b8aa
JDK 1.4 builds</name>
<url>http://www.myhost.com/maven/jdk14</url>
<layout>default</layout>
<snapshotPolicy>always</snapshotPolicy>
</repository>
</repositories>
</profile>
-->

<!--
| Here is another profile, activated by the system property 'target-env' with a value of 'dev',
| which provides a specific path to the Tomcat instance. To use this, your plugin configuration
| might hypothetically look like:
|
| ...
| <plugin>
|   <groupId>org.myco.myplugins</groupId>
|   <artifactId>myplugin</artifactId>
|
|   <configuration>
|     <tomcatLocation>${tomcatPath}</tomcatLocation>
|   </configuration>
| </plugin>
| ...
|
| NOTE: If you just wanted to inject this configuration whenever someone set 'target-env' to
|       anything, you could just leave off the <value/> inside the activation-property.
|
<profile>
<id>env-dev</id>

<activation>
<property>
<name>target-env</name>
<value>dev</value>
</property>
</activation>

<properties>
<tomcatPath>/path/to/tomcat/instance</tomcatPath>
</properties>
</profile>
-->
</profiles>
在其中添加如下配置:
<profile>
<id>jdk-1.8</id>
<activation>
<activeByDefault>true</activeByDefault>
<jdk>1.8</jdk>
</activation>
<properties>
<maven.compiler.source>1.8</maven.compiler.source>
<maven.compiler.target>1.8</maven.compiler.target>
<maven.compiler.compilerVersion>1.8</maven.compiler.compilerVersion>
</properties>
</profile>
以下是配置好之后的效果:
<profiles>
<!-- profile
| Specifies a set of introductions to the build process, to be activated using one or more of the
| mechanisms described above. For inheritance purposes, and to activate profiles via <activatedProfiles/>
| or the command line, profiles have to have an ID that is unique.
|
| An encouraged best practice for profile identification is to use a consistent naming convention
| for profiles, such as 'env-dev', 'env-test', 'env-production', 'user-jdcasey', 'user-brett', etc.
| This will make it more intuitive to understand what the set of introduced profiles is attempting
| to accomplish, particularly when you only have a list of profile id's for debug.
|
| This profile example uses the JDK version to trigger activation, and provides a JDK-specific repo.
<profile>
<id>jdk-1.4</id>

<activation>
<jdk>1.4</jdk>
</activation>

<repositories>
<repository>
<id>jdk14</id>
<name>Repository for JDK 1.4 builds</name>
<url>http://www.myhost.com/maven/jdk14</url>
<layout>default</layout>
<snapshotPolicy>always</snapshotPolicy>
</repository>
</repositories>
</profile>
-->

<!--
| Here is another profile, activated by the system property 'target-env' with a value of 'dev',
| which provides a specific path to the Tomcat instance. To use this, your plugin configuration
| might hypothetically look like:
|
| ...
| <plugin>
|   <groupId>org.myco.myplugins</groupId>
|   <artifactId>myplugin</artifactId>
|
|   <configuration>
|     <tomcatLocation>${tomcatPath}</tomcatLocation>
|   </configuration>
| </plugin>
| ...
|
| NOTE: If you just wanted to inject this configuration whenever someone set 'target-env' to
|       anything, you could just leave off the <value/> inside the activation-property.
|
<profile>
<id>env-dev</id>

<activation>
<property>
<name>target-env</name>
<value>dev</value>
</property>
</activation>

<properties>
<tomcatPath>/path/to/tomcat/instance</tomcatPath>
</properties>
</profile>
-->

<profile>
<id>jdk-1.8</id>
<activation>
<activeByDefault>true</activeByDefault>
<jdk>1.8</jdk>
</activation>
<properties>
<maven.compiler.source>1.8</maven.compiler.source>
<maven.compiler.target>1.8</maven.compiler.target>
<maven.compiler.compilerVersion>1.8</maven.compiler.compilerVersion>
</properties>
</profile>

</profiles>
5、关于macOS上的maven
在下载的时候下载”apache-maven-*.*.*-bin.tar.gz“的安装包,解压类似,环境变量无需配置,在内容配置的时候需要进行和第4点中相类似的配置。到此,maven的安装和环境变量的配置的方法介绍完了,希望采纳。

相关文章推荐
- Maven 安装与环境变量配置
- 5、电脑上安装maven及配置maven环境变量
- centos 为OPENJDK配置JAVA_HOME环境变量,安装MAVEN
- MyEclipse下Maven安装及环境变量配置
- Maven的安装和环境变量配置
- maven的安装与环境变量配置
- maven的安装与环境变量配置
- Java开发环境配置(4)--Maven安装 环境变量配置,本地仓库配置---插件安装
- Maven介绍以及Maven安装与环境变量配置
- Maven学习笔记(一)—— 下载、安装Maven并配置Maven的环境变量
- 安装maven 之后配置环境变量后 ,在命令行 中输入 mvn 遇到的C:\Users\Administrator>mvn The JAVA_HOME environment variabl.的错误
- Windows环境下maven 安装与环境变量配置
- MAC 下安装配置maven 环境变量-maven-3.5.0
- 解决Maven安装配置的java环境变量错误
- centos 为OPENJDK配置JAVA_HOME环境变量,安装MAVEN
- maven安装和环境变量配置
- maven 安装jar 包到本地仓库,以及maven环境变量 配置
- maven安装和环境变量配置
- 安装及配置Maven环境变量
- eclipse安装及配置Maven环境变量