【LEDE】树莓派上玩LEDE终极指南-94-在树莓派上搭建NextCloud私人云存储注意事项
2017-08-22 15:44
627 查看
引用:https://www.howtoforge.com/tutorial/how-to-install-nextcloud-with-nginx-and-php-fpm-on-centos-7/
注意:在LEDE上安装完毕之后访问web显示No inputfile specified。
解决:
// php.ini
cgi.force_redirect = 0
cgi.fix_pathinfo=1
doc_root=
另一个问题:竟然有的Linux发行版不带stat命令!这里我就不报名字了。通过php日志可以发现:command stat : stat not found !
遂安装stat即可解决。希望在编译php的时候添加以上依赖。我就是掉进了这个坑!
opkg install coreutils-stat

Step 2 - Configure PHP7-FPM
Step 3 - Install and Configure MariaDB
Step 4 - Generate a Self-signed SSL Certificate for Nextcloud
Step 5 - Download and Install Nextcloud
Step 6 - Configure Nextcloud Virtual Host in Nginx
Step 7 - Configure SELinux and FirewallD for Nextcloud
Step 8 - Nextcloud Installation Wizard
Reference
Nextcloud is a free (Open Source) Dropbox-like software, a fork of the ownCloud project. Nextcloud is written in PHP and JavaScript, it supports many database systems such as, MySQL/MariaDB, PostgreSQL, Oracle Database and SQLite. In order to keep your files synchronized between Desktop and your own server, Nextcloud provides applications for Windows, Linux and Mac desktops and a mobile app for android and iOS. Nextcloud is not just a dropbox clone, it provides additional features like Calendar, Contacts, Schedule tasks, and streaming media with Ampache.In this tutorial, I will show you how to install and configure the latest Nextcloud 10 release on a CentOS 7 server. I will run Nextcloud with a Nginx web server and PHP7-FPM and use MariaDB as the database system.Prerequisite
CentOS 7 64bit
Root privileges on the server
group = nginxIn line 22, make sure php-fpm is running under server port.listen = 127.0.0.1:9000Uncomment line 366-370 to activate the php-fpm system environment variables.env[HOSTNAME] = $HOSTNAME
env[PATH] = /usr/local/bin:/usr/bin:/bin
env[TMP] = /tmp
env[TMPDIR] = /tmp
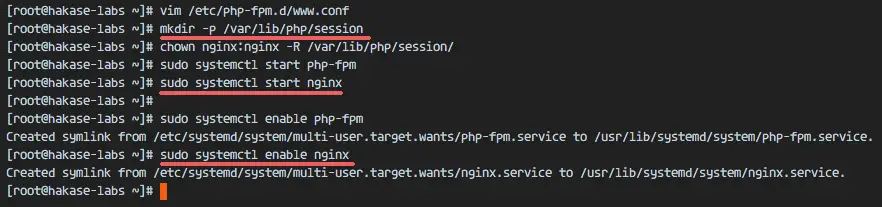
env[TEMP] = /tmpSave the file and exit the vim editor.Next, create a new directory for the session path in the '/var/lib/' directory, and change the owner to the 'nginx' user.mkdir -p /var/lib/php/session
chown nginx:nginx -R /var/lib/php/session/Now start php-fpm and Nginx, then enable the services to start at boot time.sudo systemctl start php-fpm
sudo systemctl start nginx
sudo systemctl enable php-fpm
sudo systemctl enable nginx
PHP7-FPM configuration is done.
systemctl enable mariadbNow configure the MariaDB root password.mysql_secure_installationType in your root password when requested.Set root password? [Y/n] Y
New password:
Re-enter new password:
Remove anonymous users? [Y/n] Y
Disallow root login remotely? [Y/n] Y
Remove test database and access to it? [Y/n] Y
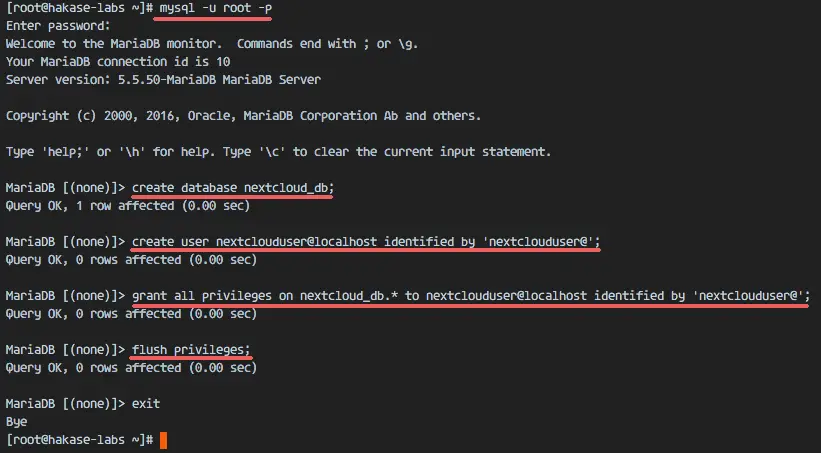
Reload privilege tables now? [Y/n] YThe MariaDB root password has been set, now we can login to the mysql shell to create a new database and a new user for Nextcloud. I will create a new database named 'nextcloud_db' and a user 'nextclouduser' with password 'nextclouduser@'. Choose a secure password for your installation!mysql -u root -p
Type PasswordType in the mysql query below to create a new database and a new user.create database nextcloud_db;
create user nextclouduser@localhost identified by 'nextclouduser@';
grant all privileges on nextcloud_db.* to nextclouduser@localhost identified by 'nextclouduser@';
flush privileges;
The nextcloud_db database with user 'nextclouduser' has been created.
chmod 600 /etc/nginx/cert/*
wget https://download.nextcloud.com/server/releases/nextcloud-10.0.2.zipExtract the nextcloud zip file and move it's content to the '/usr/share/nginx/html/' directory.unzip nextcloud-10.0.2.zip
mv nextcloud/ /usr/share/nginx/html/Next, go to the Nginx web root directory and create a new 'data' directory for Nextcloud.cd /usr/share/nginx/html/
mkdir -p nextcloud/data/Change the owner of the 'nextcloud' directory to the 'nginx' user and group.chown nginx:nginx -R nextcloud/
vim nextcloud.confPaste the Nextcloud virtual host configuration below.upstream php-handler {
server 127.0.0.1:9000;
#server unix:/var/run/php5-fpm.sock;
}
server {
listen 80;
server_name cloud.nextcloud.co;
# enforce https
return 301 https://$server_name$request_uri; }
server {
listen 443 ssl;
server_name cloud.nextcloud.co;
ssl_certificate /etc/nginx/cert/nextcloud.crt;
ssl_certificate_key /etc/nginx/cert/nextcloud.key;
# Add headers to serve security related headers
# Before enabling Strict-Transport-Security headers please read into this
# topic first.
add_header Strict-Transport-Security "max-age=15768000;
includeSubDomains; preload;";
add_header X-Content-Type-Options nosniff;
add_header X-Frame-Options "SAMEORIGIN";
add_header X-XSS-Protection "1; mode=block";
add_header X-Robots-Tag none;
add_header X-Download-Options noopen;
add_header X-Permitted-Cross-Domain-Policies none;
# Path to the root of your installation
root /usr/share/nginx/html/nextcloud/;
location = /robots.txt {
allow all;
log_not_found off;
access_log off;
}
# The following 2 rules are only needed for the user_webfinger app.
# Uncomment it if you're planning to use this app.
#rewrite ^/.well-known/host-meta /public.php?service=host-meta last;
#rewrite ^/.well-known/host-meta.json /public.php?service=host-meta-json
# last;
location = /.well-known/carddav {
return 301 $scheme://$host/remote.php/dav;
}
location = /.well-known/caldav {
return 301 $scheme://$host/remote.php/dav;
}
# set max upload size
client_max_body_size 512M;
fastcgi_buffers 64 4K;
# Disable gzip to avoid the removal of the ETag header
gzip off;
# Uncomment if your server is build with the ngx_pagespeed module
# This module is currently not supported.
#pagespeed off;
error_page 403 /core/templates/403.php;
error_page 404 /core/templates/404.php;
location / {
rewrite ^ /index.php$uri;
}
location ~ ^/(?:build|tests|config|lib|3rdparty|templates|data)/ {
deny all;
}
location ~ ^/(?:\.|autotest|occ|issue|indie|db_|console) {
deny all;
}
location ~ ^/(?:index|remote|public|cron|core/ajax/update|status|ocs/v[12]|updater/.+|ocs-provider/.+|core/templates/40[34])\.php(?:$|/) {
include fastcgi_params;
fastcgi_split_path_info ^(.+\.php)(/.*)$;
fastcgi_param SCRIPT_FILENAME $document_root$fastcgi_script_name;
fastcgi_param PATH_INFO $fastcgi_path_info;
fastcgi_param HTTPS on;
#Avoid sending the security headers twice
fastcgi_param modHeadersAvailable true;
fastcgi_param front_controller_active true;
fastcgi_pass php-handler;
fastcgi_intercept_errors on;
fastcgi_request_buffering off;
}
location ~ ^/(?:updater|ocs-provider)(?:$|/) {
try_files $uri/ =404;
index index.php;
}
# Adding the cache control header for js and css files
# Make sure it is BELOW the PHP block
location ~* \.(?:css|js)$ {
try_files $uri /index.php$uri$is_args$args;
add_header Cache-Control "public, max-age=7200";
# Add headers to serve security related headers (It is intended to
# have those duplicated to the ones above)
# Before enabling Strict-Transport-Security headers please read into
# this topic first.
add_header Strict-Transport-Security "max-age=15768000;
includeSubDomains; preload;";
add_header X-Content-Type-Options nosniff;
add_header X-Frame-Options "SAMEORIGIN";
add_header X-XSS-Protection "1; mode=block";
add_header X-Robots-Tag none;
add_header X-Download-Options noopen;
add_header X-Permitted-Cross-Domain-Policies none;
# Optional: Don't log access to assets
access_log off;
}
location ~* \.(?:svg|gif|png|html|ttf|woff|ico|jpg|jpeg)$ {
try_files $uri /index.php$uri$is_args$args;
# Optional: Don't log access to other assets
access_log off;
}
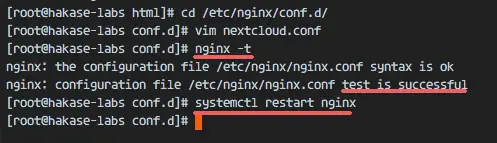
}Save the file and exit vim.Now test the Nginx configuration to ensure that there are no error,s- Then restart the service.nginx -t
systemctl restart nginx

注意:在LEDE上安装完毕之后访问web显示No inputfile specified。
解决:
// php.ini
cgi.force_redirect = 0
cgi.fix_pathinfo=1
doc_root=
另一个问题:竟然有的Linux发行版不带stat命令!这里我就不报名字了。通过php日志可以发现:command stat : stat not found !
遂安装stat即可解决。希望在编译php的时候添加以上依赖。我就是掉进了这个坑!
opkg install coreutils-stat
How to Install Nextcloud with Nginx and PHP7-FPM on CentOS 7
On this page
Step 1 - Install Nginx and PHP7-FPM on CentOS 7Step 2 - Configure PHP7-FPM
Step 3 - Install and Configure MariaDB
Step 4 - Generate a Self-signed SSL Certificate for Nextcloud
Step 5 - Download and Install Nextcloud
Step 6 - Configure Nextcloud Virtual Host in Nginx
Step 7 - Configure SELinux and FirewallD for Nextcloud
Step 8 - Nextcloud Installation Wizard
Reference
Nextcloud is a free (Open Source) Dropbox-like software, a fork of the ownCloud project. Nextcloud is written in PHP and JavaScript, it supports many database systems such as, MySQL/MariaDB, PostgreSQL, Oracle Database and SQLite. In order to keep your files synchronized between Desktop and your own server, Nextcloud provides applications for Windows, Linux and Mac desktops and a mobile app for android and iOS. Nextcloud is not just a dropbox clone, it provides additional features like Calendar, Contacts, Schedule tasks, and streaming media with Ampache.In this tutorial, I will show you how to install and configure the latest Nextcloud 10 release on a CentOS 7 server. I will run Nextcloud with a Nginx web server and PHP7-FPM and use MariaDB as the database system.Prerequisite
CentOS 7 64bit
Root privileges on the server
Step 1 - Install Nginx and PHP7-FPM on CentOS 7
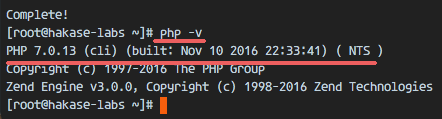
Before we start with the Nginx and php7-fpm installation, we have to add the EPEL package repository. Install it with this yum command.yum -y install epel-releaseNow install Nginx from the EPEL repository.yum -y install nginxThen we have to add another repository for php7-fpm. There are several repositories available on the net that provide PHP 7 packages, I will use webtatic here.Add the PHP7-FPM webtatic repository:rpm -Uvh https://mirror.webtatic.com/yum/el7/webtatic-release.rpmNext, install PHP7-FPM and some additional packages for the Nextcloud installation.yum -y install php70w-fpm php70w-cli php70w-gd php70w-mcrypt php70w-mysql php70w-pear php70w-xml php70w-mbstring php70w-pdo php70w-json php70w-pecl-apcu php70w-pecl-apcu-develFinally, check the PHP version from server terminal to verify that PHP installed correctly.php -v
Step 2 - Configure PHP7-FPM
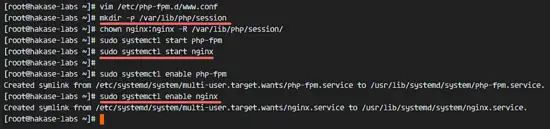
In this step, we will configure php-fpm to run with Nginx. Php7-fpm will run under user nginx and listen on port 9000.Edit the default php7-fpm configuration file with vim.vim /etc/php-fpm.d/www.confIn line 8 and 10, change user and group to 'nginx'.user = nginxgroup = nginxIn line 22, make sure php-fpm is running under server port.listen = 127.0.0.1:9000Uncomment line 366-370 to activate the php-fpm system environment variables.env[HOSTNAME] = $HOSTNAME
env[PATH] = /usr/local/bin:/usr/bin:/bin
env[TMP] = /tmp
env[TMPDIR] = /tmp
env[TEMP] = /tmpSave the file and exit the vim editor.Next, create a new directory for the session path in the '/var/lib/' directory, and change the owner to the 'nginx' user.mkdir -p /var/lib/php/session
chown nginx:nginx -R /var/lib/php/session/Now start php-fpm and Nginx, then enable the services to start at boot time.sudo systemctl start php-fpm
sudo systemctl start nginx
sudo systemctl enable php-fpm
sudo systemctl enable nginx
PHP7-FPM configuration is done.
Step 3 - Install and Configure MariaDB
I will use MariaDB for the Nextcloud database. Install the mariadb-server package from the CentOS repository with yum.yum -y install mariadb mariadb-serverStart the MariaDB service and add it to run at boot time.systemctl start mariadbsystemctl enable mariadbNow configure the MariaDB root password.mysql_secure_installationType in your root password when requested.Set root password? [Y/n] Y
New password:
Re-enter new password:
Remove anonymous users? [Y/n] Y
Disallow root login remotely? [Y/n] Y
Remove test database and access to it? [Y/n] Y
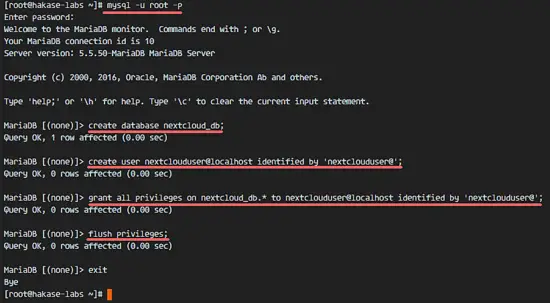
Reload privilege tables now? [Y/n] YThe MariaDB root password has been set, now we can login to the mysql shell to create a new database and a new user for Nextcloud. I will create a new database named 'nextcloud_db' and a user 'nextclouduser' with password 'nextclouduser@'. Choose a secure password for your installation!mysql -u root -p
Type PasswordType in the mysql query below to create a new database and a new user.create database nextcloud_db;
create user nextclouduser@localhost identified by 'nextclouduser@';
grant all privileges on nextcloud_db.* to nextclouduser@localhost identified by 'nextclouduser@';
flush privileges;
The nextcloud_db database with user 'nextclouduser' has been created.
Step 4 - Generate a Self-signed SSL Certificate for Nextcloud
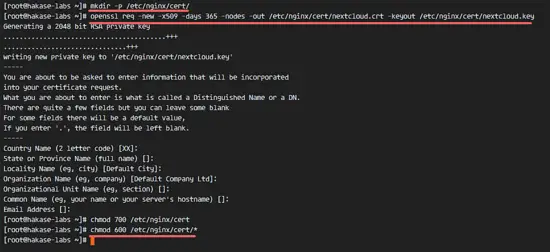
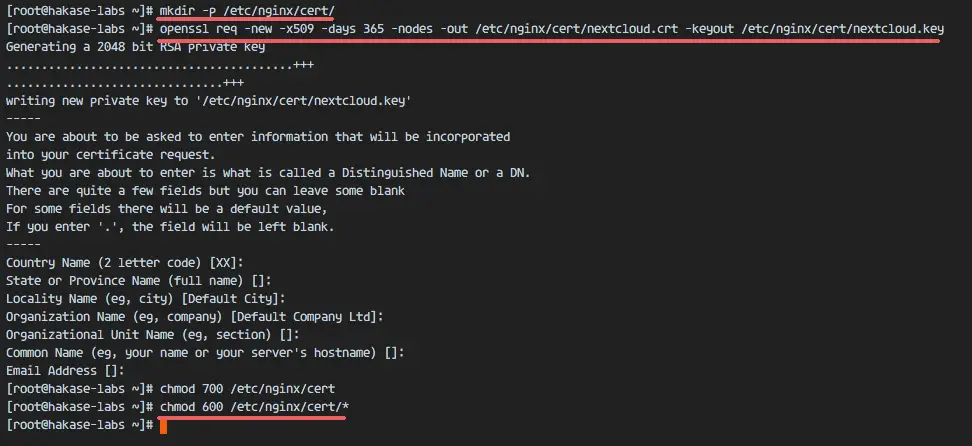
In this tutorial, I will run nextcloud with a https connection for the client. You can use free SSL such as let's encrypt or create self signed SSL certificate. I will create my own self-signed SSL certificate file with the OpenSSL command.Create a new directory for the SSL file.mkdir -p /etc/nginx/cert/And generate a new SSL certificate file with the the openssl command below.openssl req -new -x509 -days 365 -nodes -out /etc/nginx/cert/nextcloud.crt -keyout /etc/nginx/cert/nextcloud.keyFinally, change the permission of all certificate files to 600 with chmod.chmod 700 /etc/nginx/certchmod 600 /etc/nginx/cert/*
Step 5 - Download and Install Nextcloud
We will download Nextcloud with wget directly to the server, so we have to install wget first. Additionally, we need the unzip program. Install both applications with yum.yum -y install wget unzipGo to the /tmp directory and download latest stable Nextcloud 10 version from the Nextcloud web site with wget.cd /tmpwget https://download.nextcloud.com/server/releases/nextcloud-10.0.2.zipExtract the nextcloud zip file and move it's content to the '/usr/share/nginx/html/' directory.unzip nextcloud-10.0.2.zip
mv nextcloud/ /usr/share/nginx/html/Next, go to the Nginx web root directory and create a new 'data' directory for Nextcloud.cd /usr/share/nginx/html/
mkdir -p nextcloud/data/Change the owner of the 'nextcloud' directory to the 'nginx' user and group.chown nginx:nginx -R nextcloud/
Step 6 - Configure Nextcloud Virtual Host in Nginx
In step 5 we've downloaded the Nextcloud source code and configured it to run under the Nginx web server. But we still need to configure a virtual host for Nextcloud. Create a new virtual host configuration file 'nextcloud.conf' in the Nginx 'conf.d' directory.cd /etc/nginx/conf.d/vim nextcloud.confPaste the Nextcloud virtual host configuration below.upstream php-handler {
server 127.0.0.1:9000;
#server unix:/var/run/php5-fpm.sock;
}
server {
listen 80;
server_name cloud.nextcloud.co;
# enforce https
return 301 https://$server_name$request_uri; }
server {
listen 443 ssl;
server_name cloud.nextcloud.co;
ssl_certificate /etc/nginx/cert/nextcloud.crt;
ssl_certificate_key /etc/nginx/cert/nextcloud.key;
# Add headers to serve security related headers
# Before enabling Strict-Transport-Security headers please read into this
# topic first.
add_header Strict-Transport-Security "max-age=15768000;
includeSubDomains; preload;";
add_header X-Content-Type-Options nosniff;
add_header X-Frame-Options "SAMEORIGIN";
add_header X-XSS-Protection "1; mode=block";
add_header X-Robots-Tag none;
add_header X-Download-Options noopen;
add_header X-Permitted-Cross-Domain-Policies none;
# Path to the root of your installation
root /usr/share/nginx/html/nextcloud/;
location = /robots.txt {
allow all;
log_not_found off;
access_log off;
}
# The following 2 rules are only needed for the user_webfinger app.
# Uncomment it if you're planning to use this app.
#rewrite ^/.well-known/host-meta /public.php?service=host-meta last;
#rewrite ^/.well-known/host-meta.json /public.php?service=host-meta-json
# last;
location = /.well-known/carddav {
return 301 $scheme://$host/remote.php/dav;
}
location = /.well-known/caldav {
return 301 $scheme://$host/remote.php/dav;
}
# set max upload size
client_max_body_size 512M;
fastcgi_buffers 64 4K;
# Disable gzip to avoid the removal of the ETag header
gzip off;
# Uncomment if your server is build with the ngx_pagespeed module
# This module is currently not supported.
#pagespeed off;
error_page 403 /core/templates/403.php;
error_page 404 /core/templates/404.php;
location / {
rewrite ^ /index.php$uri;
}
location ~ ^/(?:build|tests|config|lib|3rdparty|templates|data)/ {
deny all;
}
location ~ ^/(?:\.|autotest|occ|issue|indie|db_|console) {
deny all;
}
location ~ ^/(?:index|remote|public|cron|core/ajax/update|status|ocs/v[12]|updater/.+|ocs-provider/.+|core/templates/40[34])\.php(?:$|/) {
include fastcgi_params;
fastcgi_split_path_info ^(.+\.php)(/.*)$;
fastcgi_param SCRIPT_FILENAME $document_root$fastcgi_script_name;
fastcgi_param PATH_INFO $fastcgi_path_info;
fastcgi_param HTTPS on;
#Avoid sending the security headers twice
fastcgi_param modHeadersAvailable true;
fastcgi_param front_controller_active true;
fastcgi_pass php-handler;
fastcgi_intercept_errors on;
fastcgi_request_buffering off;
}
location ~ ^/(?:updater|ocs-provider)(?:$|/) {
try_files $uri/ =404;
index index.php;
}
# Adding the cache control header for js and css files
# Make sure it is BELOW the PHP block
location ~* \.(?:css|js)$ {
try_files $uri /index.php$uri$is_args$args;
add_header Cache-Control "public, max-age=7200";
# Add headers to serve security related headers (It is intended to
# have those duplicated to the ones above)
# Before enabling Strict-Transport-Security headers please read into
# this topic first.
add_header Strict-Transport-Security "max-age=15768000;
includeSubDomains; preload;";
add_header X-Content-Type-Options nosniff;
add_header X-Frame-Options "SAMEORIGIN";
add_header X-XSS-Protection "1; mode=block";
add_header X-Robots-Tag none;
add_header X-Download-Options noopen;
add_header X-Permitted-Cross-Domain-Policies none;
# Optional: Don't log access to assets
access_log off;
}
location ~* \.(?:svg|gif|png|html|ttf|woff|ico|jpg|jpeg)$ {
try_files $uri /index.php$uri$is_args$args;
# Optional: Don't log access to other assets
access_log off;
}
}Save the file and exit vim.Now test the Nginx configuration to ensure that there are no error,s- Then restart the service.nginx -t
systemctl restart nginx

相关文章推荐
- 【LEDE】树莓派上玩LEDE终极指南-93-搭建MySQL Server
- 【LEDE】树莓派上玩LEDE终极指南-3-更改时区
- 【LEDE】树莓派上玩LEDE终极指南-91-no address range available for DHCP request via xxx解决办法
- 【LEDE】树莓派上玩LEDE终极指南-90-挂卡
- 【LEDE】树莓派上玩LEDE终极指南-1-LEDE的编译和安装
- 【LEDE】树莓派上玩LEDE终极指南-99-编译psutil,安装thefuck
- 【LEDE】树莓派上玩LEDE终极指南-98-Node.js和NPM在LEDE上存在的问题和解决方案
- 【LEDE】树莓派上玩LEDE终极指南-92-自己编译的LEDE为啥子不能用SSR和KoolProxy?
- 【LEDE】树莓派上玩LEDE终极指南-91-移植MariaDB到LEDE上
- 【LEDE】树莓派上玩LEDE终极指南-97-自动挂载sdX(U盘、移动硬盘等)
- 【LEDE】树莓派上玩LEDE终极指南-96-树莓派上LEDE挂卡只能半速的解决方法
- 【LEDE】树莓派上玩LEDE终极指南-95-Aria2不能下载https的解决方法
- 【LEDE】树莓派上玩LEDE终极指南-2-善用overlay挂载点
- 服务端开发指南与最佳实战 | 数据存储技术 | MySQL(04) 索引使用的注意事项
- Cocos2D-x搭建新环境注意事项
- 调试带返回参数的存储过程注意事项
- mha 搭建 及注意事项
- 搭建cordova环境重要注意事项
- oracle 存储过程的基本语法 及注意事项
- 使用CallableStatement调用存储过程注意事项