iOS逆向之二-一个简单的Tweak插件原理解析
2017-08-21 00:00
253 查看
iOS逆向之二-一个简单的Tweak插件
Tweak插件可以动态的注入到宿主程序中,修改宿主程序的运行流程Tweak插件是使用theos开发的,所以首先要安装theos程序,并且越狱手机中需要安装Cydia Substrate,这篇博客iOS逆向之一-工具的安装和使用有工具安装和使用的详细说明,如果没有安装首先需要安装对应的工具才能继续下面的步骤。
创建Tweak插件
工程创建
(1)、使用theos自带模块创建工程,/opt/theos 是我安装theos的目录➜ ios_re_proj /opt/theos/bin/nic.pl NIC 2.0 - New Instance Creator ------------------------------ [1.] iphone/activator_event [2.] iphone/application_modern [3.] iphone/cydget [4.] iphone/flipswitch_switch [5.] iphone/framework [6.] iphone/ios7_notification_center_widget [7.] iphone/library [8.] iphone/notification_center_widget [9.] iphone/preference_bundle_modern [10.] iphone/tool [11.] iphone/tweak [12.] iphone/xpc_service
(2)、选择11创建一个tweak项目
Choose a Template (required): 11
(3)、输入项目名称、项目包名,作者,需要注入的宿主程序包名和宿主进程名称
Project Name (required): FirstReProj        #项目名
Package Name [com.yourcompany.firstreproj]: com.zyt.firstreproj        #项目包名
Author/Maintainer Name [aron]: zyt        #作者
[iphone/tweak] MobileSubstrate Bundle filter [com.apple.springboard]: com.apple.springboard        #需要注入的宿主程序包名
[iphone/tweak] List of applications to terminate upon installation (space-separated, '-' for none) [SpringBoard]: SpringBoard        #宿主进程名称
Instantiating iphone/tweak in firstreproj/...
Done.
项目创建完毕,工程的目录如下:
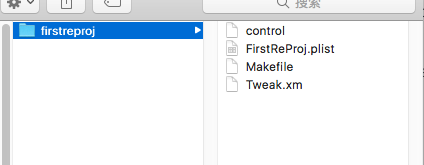
FirstReProj.plist    - 注入的宿主程序包名配置文件
Makefile    -make文件
Tweak.xm    -源码文件,xm格式文件支持c/oc/logo语法,x格式支持logo语法
control    -控制文件,保存项目的配置信息
添加代码
(1)、下面的代码实现的功能是注入SpringBoard进程,也就是IOS桌面管理程序,监听程序启动事件,在程序启动的时候添加一个弹框,以及监听HOME按钮和LOCK按钮的点击事件,打印LOG,修改之后的Tweak.xm文件如下所示:@interface SpringBoard
// 需要添加自定义方法的方法声明,否则编译不过
// 运行时会从%new添加的方法列表中查找方法
- (void)mm_handleMenuButtonDown;
- (void)mm_handleMenuLockButtonDown;
@end
%hook SpringBoard
// 使用 %new 添加自定义的方法
%new
- (void)mm_handleMenuButtonDown {
NSLog(@"mm_handleMenuButtonDown");
}
%new
- (void)mm_handleMenuLockButtonDown {
NSLog(@"mm_handleMenuLockButtonDown");
}
- (void)applicationDidFinishLaunching:(id)application
{
%orig;
UIAlertView *alert = [[UIAlertView alloc]
initWithTitle:@"Dream MAKE Dream!"
message:nil
delegate:self cancelButtonTitle:@"OK"
otherButtonTitles:nil];
[alert show];
}
- (void)menuButtonDown:(struct __GSEvent *)arg1 {
%orig;
[self mm_handleMenuBut
7fe0
tonDown];
}
- (void)_menuButtonDown:(struct __IOHIDEvent *)arg1 {
%orig;
[self mm_handleMenuButtonDown];
}
- (void)headsetButtonDown:(struct __GSEvent *)arg1 {
%orig;
NSLog(@"headsetButtonDown");
}
- (void)lockButtonDown:(struct __GSEvent *)arg1 {
%orig;
[self mm_handleMenuLockButtonDown];
}
%end(2)、修改Makefile
makefile相当于xcode总的plist文件,配置了编译信息和编译源文件,特别地,THEOS_DEVICE_IP = 192.168.1.112 配置安装设备的这个宏定义需要提到前面,才能生效,也可以通过添加环境变量的方式设置这个宏 export THEOS_DEVICE_IP=192.168.8.220
#编译debug或者release
DEBUG = 0

#越狱iPhone的ip地址
# 需要添加到环境变量中才能生效,命令: "export THEOS_DEVICE_IP=192.168.8.220"
THEOS_DEVICE_IP = 192.168.1.112

#指定支持的处理器架构
ARCHS = armv7 arm64

#指定需要的SDK版本iphone:Base SDK:Deployment Target
#最新的SDK,程序发布在iOS8.0以上
TARGET = iphone:latest:8.0

include /opt/theos/makefiles/common.mk

TWEAK_NAME = FirstReProj
FirstReProj_FILES = Tweak.xm

include $(THEOS_MAKE_PATH)/tweak.mk

#导入框架,多个框架时用空格隔开
#FirstReProj_FRAMEWORKS = UIKit
#FirstReProj_PRIVATE_FRAMEWORKS = AppSupport

#链接libsqlite3.0.dylib、libz.dylib和dylib1.o
#MyFirstReProject_LDFLAGS = -lz –lsqlite3.0 –dylib1.o

#make clean
clean::
rm -rf ./packages/*

#指定tweak安装之后,需要做的事情,这里是杀掉SpringBoard进程
after-install::
install.exec "killall -9 SpringBoard"
打包和安装
make 编译链接
➜  systemproxysettingtweak git:(master) ✗ make
> Making all for tweak SystemProxySettingTweak…
==> Preprocessing Tweak.xm…
==> Compiling Tweak.xm (armv7)…
==> Compiling WiFiProxyToggler.m (armv7)…
==> Linking tweak SystemProxySettingTweak (armv7)…
clang: warning: libstdc++ is deprecated; move to libc++ with a minimum deployment target of iOS 7 [-Wdeprecated]
ld: warning: -undefined dynamic_lookup is deprecated on iOS
==> Preprocessing Tweak.xm…
==> Compiling Tweak.xm (arm64)…
==> Compiling WiFiProxyToggler.m (arm64)…
==> Linking tweak SystemProxySettingTweak (arm64)…
clang: warning: libstdc++ is deprecated; move to libc++ with a minimum deployment target of iOS 7 [-Wdeprecated]
ld: warning: -undefined dynamic_lookup is deprecated on iOS
==> Merging tweak SystemProxySettingTweak…
==> Signing SystemProxySettingTweak…
生成deb包
➜  systemproxysettingtweak git:(master) ✗ make package
> Making all for tweak SystemProxySettingTweak…
make[2]: Nothing to be done for `internal-library-compile'.
> Making stage for tweak SystemProxySettingTweak…
dpkg-deb: building package 'com.zyt.systemproxysettingtweak' in './packages/com.zyt.systemproxysettingtweak_0.0.1-5+debug_iphoneos-arm.deb'.
在项目根目录下面新增了packages 文件夹,里面保存生成的包
➜  systemproxysettingtweak git:(master) ✗ tree
.
├── Makefile
├── SCNetworkHeader.h
├── SystemProxySettingTweak.plist
├── Tweak.xm
├── WiFiProxyToggler.h
├── WiFiProxyToggler.m
├── control
├── obj
│   └── debug
└── packages
└── com.zyt.systemproxysettingtweak_0.0.1-5+debug_iphoneos-arm.deb
安装
使用make install命令安装,**注意:需要在
make文件中指定设备的IP地址
THEOS_DEVICE_IP = 192.168.8.73**
➜  systemproxysettingtweak git:(master) ✗ make install
==> Installing…
root@192.168.8.73's password:
(Reading database ... 5000 files and directories currently installed.)
Preparing to unpack /tmp/_theos_install.deb ...
Unpacking com.zyt.systemproxysettingtweak (0.0.1-5+debug) over (0.0.1-4+debug) ...
Setting up com.zyt.systemproxysettingtweak (0.0.1-5+debug) ...
install.exec "killall -9 SystemProxySetting"
root@192.168.8.73's password:
一步编译安装
➜  systemproxysettingtweak git:(master) ✗ make package install
> Making all for tweak SystemProxySettingTweak…
make[2]: Nothing to be done for `internal-library-compile'.
> Making stage for tweak SystemProxySettingTweak…
dpkg-deb: building package 'com.zyt.systemproxysettingtweak' in './packages/com.zyt.systemproxysettingtweak_0.0.1-7+debug_iphoneos-arm.deb'.
==> Installing…
root@192.168.8.73's password:
(Reading database ... 5000 files and directories currently installed.)
Preparing to unpack /tmp/_theos_install.deb ...
Unpacking com.zyt.systemproxysettingtweak (0.0.1-7+debug) over (0.0.1-5+debug) ...
Setting up com.zyt.systemproxysettingtweak (0.0.1-7+debug) ...
install.exec "killall -9 SystemProxySetting"
root@192.168.8.73's password:
No matching processes were found
make: *** [after-install] Error 1
➜  systemproxysettingtweak git:(master) ✗
Tweak工作原理
(1) Cydia Substrate 越狱机器插件、软件运行的基础依赖包,提供动态注入的功能Sbustrate 主要由三部分组成:MobileHooker,MobileLoader,safe mode
(1.1) MobileHooker
用于替换系统的方法,这个过程称为Hooking
有两个有 Cydia Substrate 框架提供的方法
MSHookMessageEx 用于注入OC函数
函数原型 void MSHookMessageEx(Class _class, SEL message, IMP hook, IMP *old)
MSHookFunction 用于注入c/c++函数
Logos语法中的 %hook 就是对此函数的封装,代码更简洁、直观
(1.2) MobileLoader
将tweak插件注入到第三方应用程序中(动态注入:ptrace)
MobileLoader 查找 /Library/MobileSubstrate/DynamicLibraries 下 plist 文件指定的作用范围,把对应的dylib动态的注入到进程中
safe mode : 不加载第三方驱动,只加载系统自带的驱动
安装了第三方插件导致系统的在启动的时候导致桌面的崩溃,会启动 safe mode,不会重新加载桌面
*可以ssh到iPhone,使用dpkg命令删除Tweak插件包
dpkg -r com.zyt.reapp
DEB包解析
使用make package 会在项目目录下面生成package文件夹,里面包含了deb包,DEB包本质上就是一种特殊格式的压缩包,可以使用两种方法解压里面的内容
dpkg命令加压
解压出包中的文件到extract目录下
dpkg -X ../openssh-client_6.1p1_i386.deb extract/
解压出包的控制信息extract/DEBIAN/下:
dpkg -e ../openssh-client_6.1p1_i386.deb extract/DEBIAN/
可以直接使用ar/tar解压缩
➜  packages git:(master) ✗ ar -x com.zyt.firstreproj_0.0.1-2+debug_iphoneos-arm.deb
// 生成 data.tar.gz control.tar.gz 两个文件,使用tar解压缩
➜  packages git:(master) ✗ tar -zxf data.tar.gz
// 有可能是 data.tar.lzma格式的文件 ➜  packages git:(master) sudo tar -zxf data.tar.lzma
➜  packages git:(master) ✗ tar -zxf control.tar.gz
使用第二种方式解压后可以看到目录中的Library文件夹以及control文件
➜  packages git:(master) ll
total 40
drwxr-xr-x  3 root  staff   102B  8 18 18:37 Library
-rw-r--r--  1 root  staff   3.4K  8 18 18:37 com.zyt.firstreproj_0.0.1-1+debug_iphoneos-arm.deb
-rw-r--r--  1 root  staff   233B  8 18 18:37 control
-rw-r--r--  1 root  staff   313B  8 21 17:29 control.tar.gz
-rw-r--r--  1 root  staff   2.9K  8 21 17:29 data.tar.lzma
-rw-r--r--  1 root  staff     4B  8 21 17:29 debian-binary
➜  packages git:(master)
其中Library目录的结构如下:
➜  packages git:(master) tree
.
├── Library
│   └── MobileSubstrate
│       └── DynamicLibraries
│           ├── FirstReProj.dylib
│           └── FirstReProj.plist
Library的目录结构和安装到iPhone上对应文件目录结构是一致的,是一种映射关系,简单来说,安装deb包就是一个解压操作而已,把deb包中的内容解压到iPhone就完成了安装流程。
iPhone手机上看到对应文件夹下的文件:
iPhone:/Library/MobileSubstrate/DynamicLibraries root# ls | grep FirstRePro
FirstReProj.dylib*
FirstReProj.plist
总结
第一个逆向的项目到此结束了,路漫漫其道修远兮,吾将上下而求索。
相关文章推荐
- iOS逆向之二-一个简单的Tweak插件原理解析
- Skinned Mesh原理解析和一个最简单的实现示例
- Skinned Mesh 原理解析和一个最简单的实现示例
- Skinned Mesh原理解析和一个最简单的实现示例
- Skinned Mesh原理解析和一个最简单的实现示例
- Skinned Mesh 原理解析和一个最简单的实现示例 作者:n5 Email: happyfirecn##yahoo.com.cn Blog: http://blog.csdn.net/n5
- tomcat原理解析(一):一个简单的实现
- Skinned Mesh原理解析和一个最简单的实现示例
- Skinned Mesh 原理解析和一个最简单的实现示例
- Skinned Mesh原理解析和一个最简单的实现示例 .
- Skinned Mesh原理解析和一个最简单的实现示例
- Skinned Mesh 原理解析和一个最简单的实现示例
- Skinned Mesh原理解析和一个最简单的实现示例
- [置顶] Skinned Mesh原理解析和一个最简单的实现示例
- iOS 一个简单的获取网络json 解析成模型数组
- Skinned Mesh 原理解析和一个最简单的实现示例
- Skinned Mesh 原理解析和一个最简单的实现示例
- VC编译下对一个超简单的缓冲区溢出程序的原理解析以及c程序的汇编分析
- 利用解析原理写一个简单的计算器
- Skinned Mesh 原理解析和一个最简单的实现示例