Spring Boot 之 RESTfull API 项目搭建
2017-08-21 00:00
274 查看
Spring Boot 学习文档:
http://docs.spring.io/spring-boot/docs/
一、搭建一个 RESTfull API接口项目
1. spring-boot-starter-web的引入,其依赖包的学习
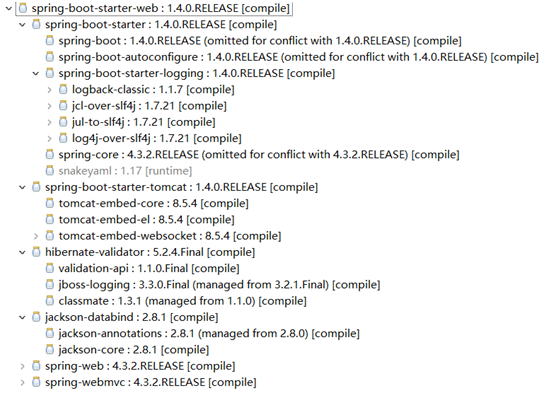
2. spring-boot-devtools的引入,其依赖包的学习

3. 代码的实现
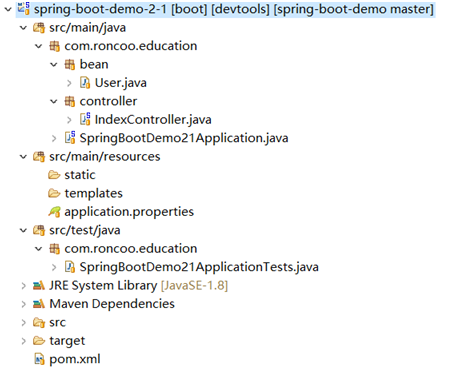
main:
bean:
Controller:
4. 运行项目
直接运行main方法或者使用maven命令: spring-boot:run
测试: http://localhost:8080/index
带参数:http://localhost:8080/index/get?name=wujing
带参数有中文:http://localhost:8080/index/get?name=gus
url测试:http://localhost:8080/index/get/1/gus
url测试:http://localhost:8080/index/get/1/gus
5.打包
命令: clean package
运行命令: java –jar demo-0.0.1-SNAPSHOT.jar
http://docs.spring.io/spring-boot/docs/
一、搭建一个 RESTfull API接口项目
1. spring-boot-starter-web的引入,其依赖包的学习
2. spring-boot-devtools的引入,其依赖包的学习
3. 代码的实现
main:
import org.springframework.boot.SpringApplication;
import org.springframework.boot.autoconfigure.SpringBootApplication;

@SpringBootApplication
public class SpringBootDemoApplication {

public static void main(String[] args) {
SpringApplication.run(SpringBootDemoApplication.class, args);
}
}
bean:
import java.util.Date;

/**
* 实体类
*
* @author  gus
*/
public class User {
private int id;
private String name;
private Date date;

public int getId() {
return id;
}

public void setId(int id) {
this.id = id;
}

public String getName() {
return name;
}

public void setName(String name) {
this.name = name;
}

public Date getDate() {
return date;
}

public void setDate(Date date) {
this.date = date;
}
}
Controller:
import java.util.Date;
import java.util.HashMap;

import org.springframework.web.bind.annotation.PathVariable;
import org.springframework.web.bind.annotation.RequestMapping;
import org.springframework.web.bind.annotation.RequestParam;
import org.springframework.web.bind.annotation.RestController;

import com.hlian.bean.User;

/**
* spring-boot-demo
*
* @author gus
*/
@RestController
@RequestMapping(value = "/index")
public class IndexController {

@RequestMapping
public String index() {
return "hello world";
}

// @RequestParam 简单类型的绑定,可以出来get和post
@RequestMapping(value = "/get")
public HashMap<String, Object> get(@RequestParam String name) {
HashMap<String, Object> map = new HashMap<String, Object>();
map.put("title", "hello world");
map.put("name", name);
return map;
}

// @PathVariable 获得请求url中的动态参数
@RequestMapping(value = "/get/{id}/{name}")
public User getUser(@PathVariable int id, @PathVariable String name) {
User user = new User();
user.setId(id);
user.setName(name);
user.setDate(new Date());
return user;
}

}
4. 运行项目
直接运行main方法或者使用maven命令: spring-boot:run
测试: http://localhost:8080/index
带参数:http://localhost:8080/index/get?name=wujing
带参数有中文:http://localhost:8080/index/get?name=gus
url测试:http://localhost:8080/index/get/1/gus
url测试:http://localhost:8080/index/get/1/gus
5.打包
命令: clean package
运行命令: java –jar demo-0.0.1-SNAPSHOT.jar

相关文章推荐
- 003,spring boot RESTfull API简单项目的快速搭建
- 【SpringBoot教程二】:RESTfull API简单项目的快速搭建
- spring-boot(2) - RESTfull API简单项目的快速搭建
- Spring Boot-RESTfull API简单项目的快速搭建
- [置顶] Spring Boot-RESTfull API简单项目的快速搭建
- 48. spring boot单元测试restfull API【从零开始学Spring Boot】
- SpringBoot RestFull API签名
- spring boot单元测试restfull API【从零开始学Spring Boot】
- 48. spring boot单元测试restfull API【从零开始学Spring Boot】
- 基于VS Code创建Spring Boot项目开发REST API(一)
- 重拾后端之Spring Boot(一):REST API的搭建可以这样简单
- 使用Spring Boot和Kotlin创建RESTfull API
- 48. spring boot单元测试restfull API【从零开始学Spring Boot】(
- 使用Spring Boot和Kotlin创建RESTfull API
- 【项目搭建】使用spring-boot进行REST风格的微服务开发入门
- spring-boot系列一 之restfull api与多环境配置
- Spring Boot -- RESTFul API 简单项目的快速搭建
- 48. spring boot单元测试restfull API【从零开始学Spring Boot】
- SpringBoot学习:IDEA中快速搭建springboot项目