搭建spring boot集成mybatis项目入门
2017-08-12 09:49
996 查看
已经很久没有写过博客了,正好这次趁着公司需要做一个新的项目的机会,我决定在新项目上使用spring boot来代替原来的spring框架。毕竟已经对那一大堆xml配置文件渐渐地产生了厌恶心理,正好spring boot的约定优于配置的理念可以在很大程度上解决我们的这个痛点。那下面我就来写写怎么使用spring
boot来简化一个java web项目的开发吧。 对于spring项目的开发个人比较喜欢使用Spring tool suite这个开发工具来开发,下面的示例我也都是使用STS来展示的。
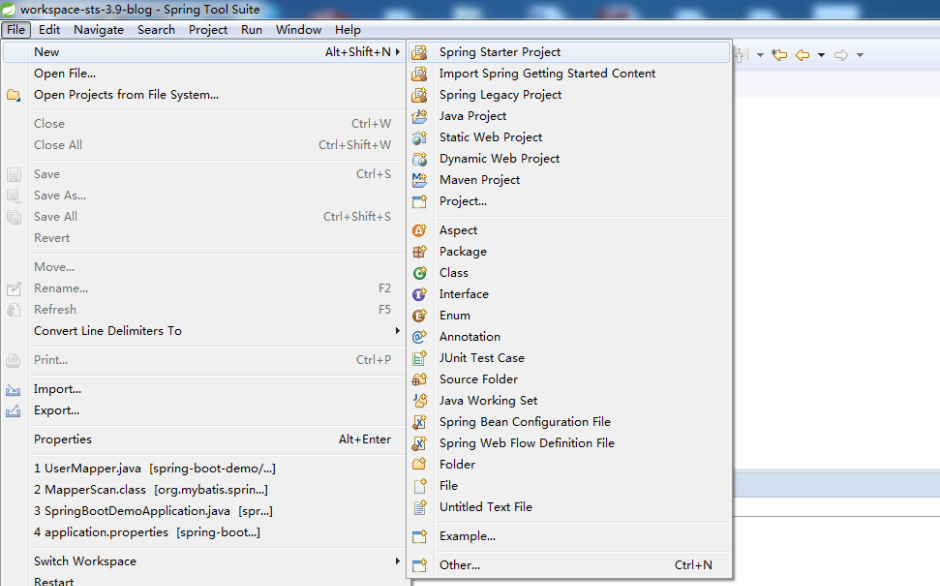
1.创建spring boot项目,点击File菜单,选择new,然后选择Spring Starter Project
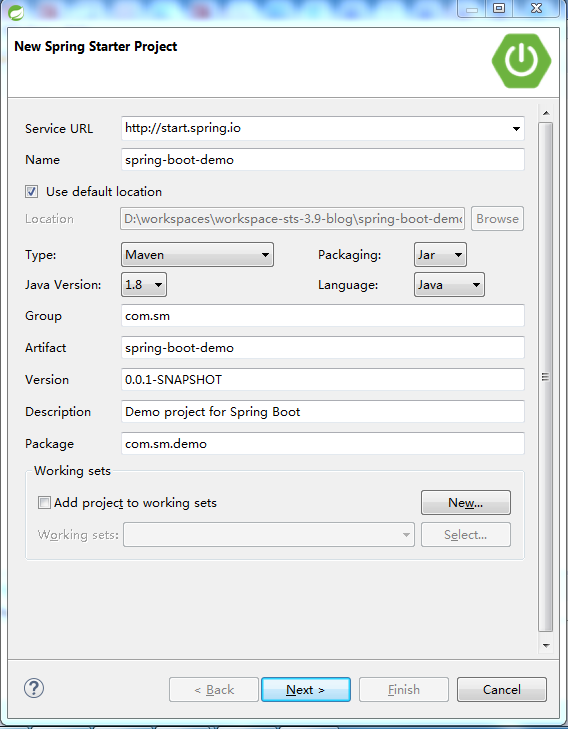
2.输入项目名,包名,描述等必要信息,packaging选择jar,java版本选择1.8,使用Maven构建,填写完整后点击next进入下一步
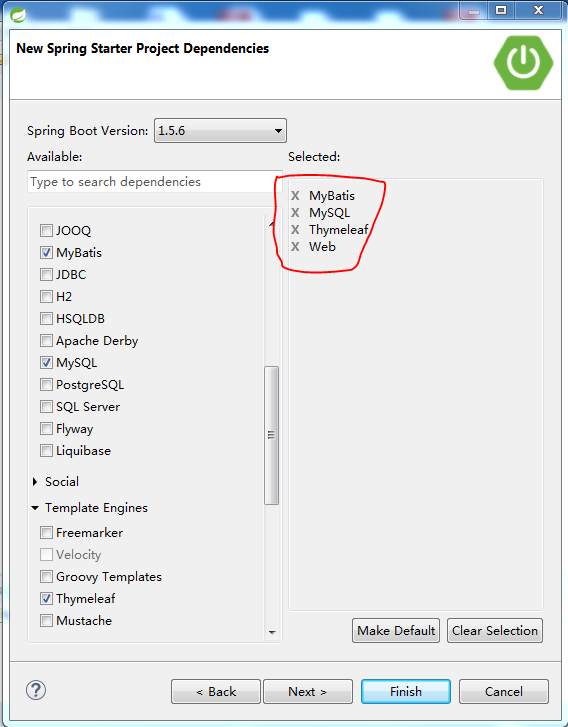
3.选择spring boot的版本及相关依赖模块,这里我选择的是1.5.6这个最新的稳定版,开发模块选择了Web模块,前端模板选择Thymeleaf,数据库则选择MySQL及MyBatis模块,选择完成后点击finsh完成一个基本的spring boot项目的创建
OK,创建完成后的项目基本结构如下:
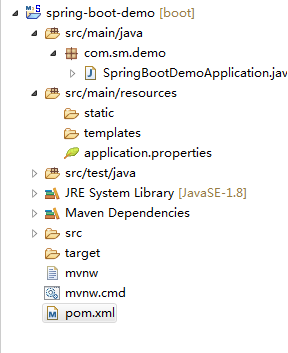
介绍一下,这里自动生成的SpringBootDemoApplication这个类为这个项目的启动类,spring boot项目在平时开发的时候就通过这个类的Main方法来启动。
对应maven的pom.xml文件内容如下:
到这里我们已经把spring-boot项目基础框架搭建好了,是不是很简单,接下来我们要做的就是集成mybatis来做数据库访问层,并编写相应spring mvc接口和使用spring-boot官方推荐的模板引擎Thymeleaf来编写页面完成一个用户登录的过程。
首先我们需要对数据库进行配置,只需要我们在src/main/resources目录下的application.properties文件中配置你所用到的数据库的相应配置就可以了,我的配置如下:
到这里我们就基本把Mybatis的配置都配置完成了,基本不需要多余的配置。
接下来我们需要在templates目录下编写页面(springboot默认使用templates目录存放页面,static目录存放静态资源,如js、css、img等),首选我们来写一个简单的登录页面login.html,代码如下:
下面我们需要来编写这个登录操作的后台方法,具体代码如下:
这里我摒弃了传统的mybatis使用xml来写sql语句的方式,而是采用了注解的方式来写sql,这样可以在一定程度上减少我们去管理xml配置文件的工作量。不过从代码的简洁的角度来看的话,对于一些比较复杂的sql语句我还是比较建议使用xml的形式来编写,spring boot的话可以在application.properties文件中配置mybatis.config-location这个属性来配置mybatis的xml文件路径,这里不做展开。
那么使用注解的方式来编写sql就比较简洁了,可以直接集成在接口代码中。对于使用的注解的话,也很简单,select类型sql就是用@Select注解,insert类型sql就使用@Insert注解,以此类推,对应的括号里面就是相应的sql语句,sql里面参数使用的占位符与使用xml编写一致。
此外,为了能够让spring能够扫描到我们编写的UserMapper这个dao接口,需要我们在Spring boot的启动类上配置一个@MapperScan注解来告诉spring应该扫描的Mapper路径。
SpringBootDemoApplication类代码:
index.html代码:
首先addViewControllers方法就是配置了简单的页面跳转,按照以前传统的方式,我们完成页面的跳转是直接写在controller方法里面的,比如:
其实单纯页面的跳转是毫无业务逻辑的处理的,只是进行了简单的页面转向,但是我们却需要写四行代码,显得有点冗余。那现在我们通过配置类写在addViewControllers方法里则只需要一行代码,简化了配置。
其次addInterceptors则是配置了一个登陆拦截器,addPathPatterns就是配置需要拦截的路径,excludePathPatterns则是配置不需要拦截的路径。
到这里就基本完成了一个spring boot demo项目的开发工作,接下来我们只需要在SpringBootDemoApplication类上右击run as选择java application或者Spring boot app就可以等待项目运行完成了。
待项目启动成功后在浏览器中输入127.0.0.1:8080就可以得到如下界面(界面丑了点,请忽略)

然后输入用户名和密码就可以登录到主页面了:

备注:spring boot默认使用8080作为默认端口号,项目根路径默认为/,若需要修改可以在application.properties文件中进行配置,例如:
boot来简化一个java web项目的开发吧。 对于spring项目的开发个人比较喜欢使用Spring tool suite这个开发工具来开发,下面的示例我也都是使用STS来展示的。
1.创建spring boot项目,点击File菜单,选择new,然后选择Spring Starter Project
2.输入项目名,包名,描述等必要信息,packaging选择jar,java版本选择1.8,使用Maven构建,填写完整后点击next进入下一步
3.选择spring boot的版本及相关依赖模块,这里我选择的是1.5.6这个最新的稳定版,开发模块选择了Web模块,前端模板选择Thymeleaf,数据库则选择MySQL及MyBatis模块,选择完成后点击finsh完成一个基本的spring boot项目的创建
OK,创建完成后的项目基本结构如下:
介绍一下,这里自动生成的SpringBootDemoApplication这个类为这个项目的启动类,spring boot项目在平时开发的时候就通过这个类的Main方法来启动。
对应maven的pom.xml文件内容如下:
<?xml version="1.0" encoding="UTF-8"?>
<project xmlns="http://maven.apache.org/POM/4.0.0" xmlns:xsi="http://www.w3.org/2001/XMLSchema-instance"
xsi:schemaLocation="http://maven.apache.org/POM/4.0.0 http://maven.apache.org/xsd/maven-4.0.0.xsd"> <modelVersion>4.0.0</modelVersion>

<groupId>com.sm</groupId>
<artifactId>spring-boot-demo</artifactId>
<version>0.0.1-SNAPSHOT</version>
<packaging>jar</packaging>

<name>spring-boot-demo</name>
<description>Demo project for Spring Boot</description>

<parent>
<groupId>org.springframework.boot</groupId>
<artifactId>spring-boot-starter-parent</artifactId>
<version>1.5.6.RELEASE</version>
<relativePath/> <!-- lookup parent from repository -->
</parent>

<properties>
<project.build.sourceEncoding>UTF-8</project.build.sourceEncoding>
<project.reporting.outputEncoding>UTF-8</project.reporting.outputEncoding>
<java.version>1.8</java.version>
</properties>

<dependencies>
<dependency>
<groupId>org.mybatis.spring.boot</groupId>
<artifactId>mybatis-spring-boot-starter</artifactId>
<version>1.3.0</version>
</dependency>
<dependency>
<groupId>org.springframework.boot</groupId>
<artifactId>spring-boot-starter-thymeleaf</artifactId>
</dependency>
<dependency>
<groupId>org.springframework.boot</groupId>
<artifactId>spring-boot-starter-web</artifactId>
</dependency>

<dependency>
<groupId>mysql</groupId>
<artifactId>mysql-connector-java</artifactId>
<scope>runtime</scope>
</dependency>
<dependency>
<groupId>org.springframework.boot</groupId>
<artifactId>spring-boot-starter-test</artifactId>
<scope>test</scope>
</dependency>
</dependencies>

<build>
<plugins>
<plugin>
<groupId>org.springframework.boot</groupId>
<artifactId>spring-boot-maven-plugin</artifactId>
</plugin>
</plugins>
</build>

</project>
到这里我们已经把spring-boot项目基础框架搭建好了,是不是很简单,接下来我们要做的就是集成mybatis来做数据库访问层,并编写相应spring mvc接口和使用spring-boot官方推荐的模板引擎Thymeleaf来编写页面完成一个用户登录的过程。
首先我们需要对数据库进行配置,只需要我们在src/main/resources目录下的application.properties文件中配置你所用到的数据库的相应配置就可以了,我的配置如下:
#数据源配置
spring.datasource.driver-class-name=com.mysql.jdbc.Driver
spring.datasource.url=jdbc:mysql://localhost:3306/test?useUnicode=true&characterEncoding=utf-8&useSSL=true
spring.datasource.username=root
spring.datasource.password=123456

#mybatis数据库字段开启驼峰转换
mybatis.configuration.map-underscore-to-camel-case=true
到这里我们就基本把Mybatis的配置都配置完成了,基本不需要多余的配置。
接下来我们需要在templates目录下编写页面(springboot默认使用templates目录存放页面,static目录存放静态资源,如js、css、img等),首选我们来写一个简单的登录页面login.html,代码如下:
<!DOCTYPE html>
<html xmlns:th="http://www.thymeleaf.org">
<head>
<meta charset="UTF-8"/>
<title>登录页</title>
<script th:src="@{js/jquery-3.2.1.js}"></script>
</head>
<body>
<span th:text="${errorMessage}"></span>
<form th:action="@{/doLogin}" method="post">
<div><label> 账号 : <input type="text" name="username"/> </label></div>
<div><label> 密码: <input type="password" name="password"/> </label></div>
<div><input type="submit" value="登陆"/></div>
</form>
</body>
</html> 注:这里面使用了一些thymeleaf模板的语法,其实这里的语法和jsp、freemarker以及velocity等模板的语法都大同小异,这里不做展开。下面我们需要来编写这个登录操作的后台方法,具体代码如下:
@Controller
public class LoginController {

@Autowired
private UserMapper userMapper;

@RequestMapping("/doLogin")
public String login(HttpSession session, String username, String password, Model model) {
if (StringUtils.isEmpty(username) || StringUtils.isEmpty(password)) {
model.addAttribute("errorMessage", "请输入用户名和密码");
return "login";
}
UserEntity user = userMapper.queryUser(username, MD5Util.stringMD5(password));
if (user == null) {
model.addAttribute("errorMessage", "用户名或者密码错误");
return "login";
}
session.setAttribute("user", user);
model.addAttribute("user", user);
return "index";
}
} 我在这里引用到了UserMapper这个dao接口,代码如下:public interface UserMapper {
@Select("select * from user where username = #{username} and password = #{password}")
UserEntity queryUser(@Param("username")String username, @Param("password")String password);
}这里我摒弃了传统的mybatis使用xml来写sql语句的方式,而是采用了注解的方式来写sql,这样可以在一定程度上减少我们去管理xml配置文件的工作量。不过从代码的简洁的角度来看的话,对于一些比较复杂的sql语句我还是比较建议使用xml的形式来编写,spring boot的话可以在application.properties文件中配置mybatis.config-location这个属性来配置mybatis的xml文件路径,这里不做展开。
那么使用注解的方式来编写sql就比较简洁了,可以直接集成在接口代码中。对于使用的注解的话,也很简单,select类型sql就是用@Select注解,insert类型sql就使用@Insert注解,以此类推,对应的括号里面就是相应的sql语句,sql里面参数使用的占位符与使用xml编写一致。
此外,为了能够让spring能够扫描到我们编写的UserMapper这个dao接口,需要我们在Spring boot的启动类上配置一个@MapperScan注解来告诉spring应该扫描的Mapper路径。
SpringBootDemoApplication类代码:
@MapperScan("com.sm.demo.dao")
@SpringBootApplication
public class SpringBootDemoApplication {

public static void main(String[] args) {
SpringApplication.run(SpringBootDemoApplication.class, args);
}
}
index.html代码:
<!DOCTYPE html>
<html xmlns:th="http://www.thymeleaf.org">
<head>
<meta charset="UTF-8"/>
<title>主页</title>
<script th:src="@{js/jquery-3.2.1.js}"></script>
</head>
<body>
<span th:text="${user.realname}"></span><span>,你好,欢迎进入首页</span>
</body>
</html>
接下来我写了一个配置类WebMvcConfig,这个类继承了WebMvcConfiguerAdapter,用于对spring mvc进行配置。@Configuration
public class WebMvcConfig extends WebMvcConfigurerAdapter {
//路由直接返回页面配置
@Override
public void addViewControllers(ViewControllerRegistry registry) {
registry.addViewController("/").setViewName("login");
registry.addViewController("/login").setViewName("login");
registry.addViewController("/index").setViewName("index");
}
//拦截器配置
@Override
public void addInterceptors(InterceptorRegistry registry) {
registry.addInterceptor(new AuthInterceptor())
.addPathPatterns("/**").excludePathPatterns("/login", "/doLogin");
super.addInterceptors(registry);
}
} 其中@Configuration注解用于表明当前这个类是一个配置类。可以看到我重写了addViewControllers和addInterceptors两个方法。首先addViewControllers方法就是配置了简单的页面跳转,按照以前传统的方式,我们完成页面的跳转是直接写在controller方法里面的,比如:
@RequestMapping("/login")
public String toLogin() {
return "login";
}
其实单纯页面的跳转是毫无业务逻辑的处理的,只是进行了简单的页面转向,但是我们却需要写四行代码,显得有点冗余。那现在我们通过配置类写在addViewControllers方法里则只需要一行代码,简化了配置。
其次addInterceptors则是配置了一个登陆拦截器,addPathPatterns就是配置需要拦截的路径,excludePathPatterns则是配置不需要拦截的路径。
到这里就基本完成了一个spring boot demo项目的开发工作,接下来我们只需要在SpringBootDemoApplication类上右击run as选择java application或者Spring boot app就可以等待项目运行完成了。
待项目启动成功后在浏览器中输入127.0.0.1:8080就可以得到如下界面(界面丑了点,请忽略)
然后输入用户名和密码就可以登录到主页面了:
备注:spring boot默认使用8080作为默认端口号,项目根路径默认为/,若需要修改可以在application.properties文件中进行配置,例如:
#配置端口
server.port=8081
#配置项目路径
server.context-path=/demo
至此,我们就完成了一个拥有基础功能的spring boot简单项目。

相关文章推荐
- 使用SpringBoot搭建小型项目,集成mybatis,redis,swagger2,并部署在外部容器中。
- Spring+SpringMvc+Mybatis框架集成搭建教程五(项目源码发布到GitHub)
- 微服务开发的入门级框架Spring Boot详解:集成Mybatis
- Spring Boot / Spring MVC 入门实践 (一) :环境搭建与第一个项目
- springboot入门(二)初步集成mybatis
- 架构实战项目心得(七):使用SpringBoot+Dubbo+Mybatisplus+Oracle搭建后台项目框架(二)
- MyBatis 在Spring boot项目中快速集成mybatis和mysql
- SpringBoot 入门教程:集成mybatis,redis
- Spring Boot入门——集成Mybatis
- 搭建SpringBoot-MyBatis-MyBatisGenerator项目
- SpringBoot入门-17(springboot集成mybatis注解形式增删查改properties配置)
- SpringBoot入门-19(springboot集成mybatis注解形式增删查改properties配置,利用《script》实现动态SQL)
- eclipse搭建简单springboot-mybatis项目实现页面简单跳转
- Spring Boot / Spring MVC 入门实践 (一) :环境搭建与第一个项目
- Springboot整合dubbo构建maven多模块项目(四) - 集成mybatis
- IDEA搭建SpringBoot+Maven+Mybatis+MySQL-Web项目流程
- 架构实战项目心得(七):使用SpringBoot+Dubbo+Mybatisplus+Oracle搭建后台项目框架(一)
- springboot入门,简单能跑的项目快速搭建
- SpringBoot+Maven项目实战(4):集成Mybatis